> ## Documentation Index
> Fetch the complete documentation index at: https://apidoc.cometapi.com/llms.txt
> Use this file to discover all available pages before exploring further.

# ربط BuildShip بـ CometAPI

> استخدم هذا الدليل لربط BuildShip بـ CometAPI عبر تعيين base URL وAPI key وخيارات model أو provider.

BuildShip هو أداة إنشاء خلفية مرئية منخفضة البرمجة. استخدم عقدة المجتمع **CometAPI Text Generator** لإضافة توليد نصوص مدعوم بالذكاء الاصطناعي إلى أي سير عمل.

## المتطلبات المسبقة

* حساب CometAPI مع مفتاح API نشط — [احصل على مفتاحك من هنا](https://www.cometapi.com/console/token)
* حساب BuildShip — [سجّل الدخول من هنا](https://app.buildship.com)

<Steps>
  <Step title="احصل على مفتاح API الخاص بـ CometAPI">
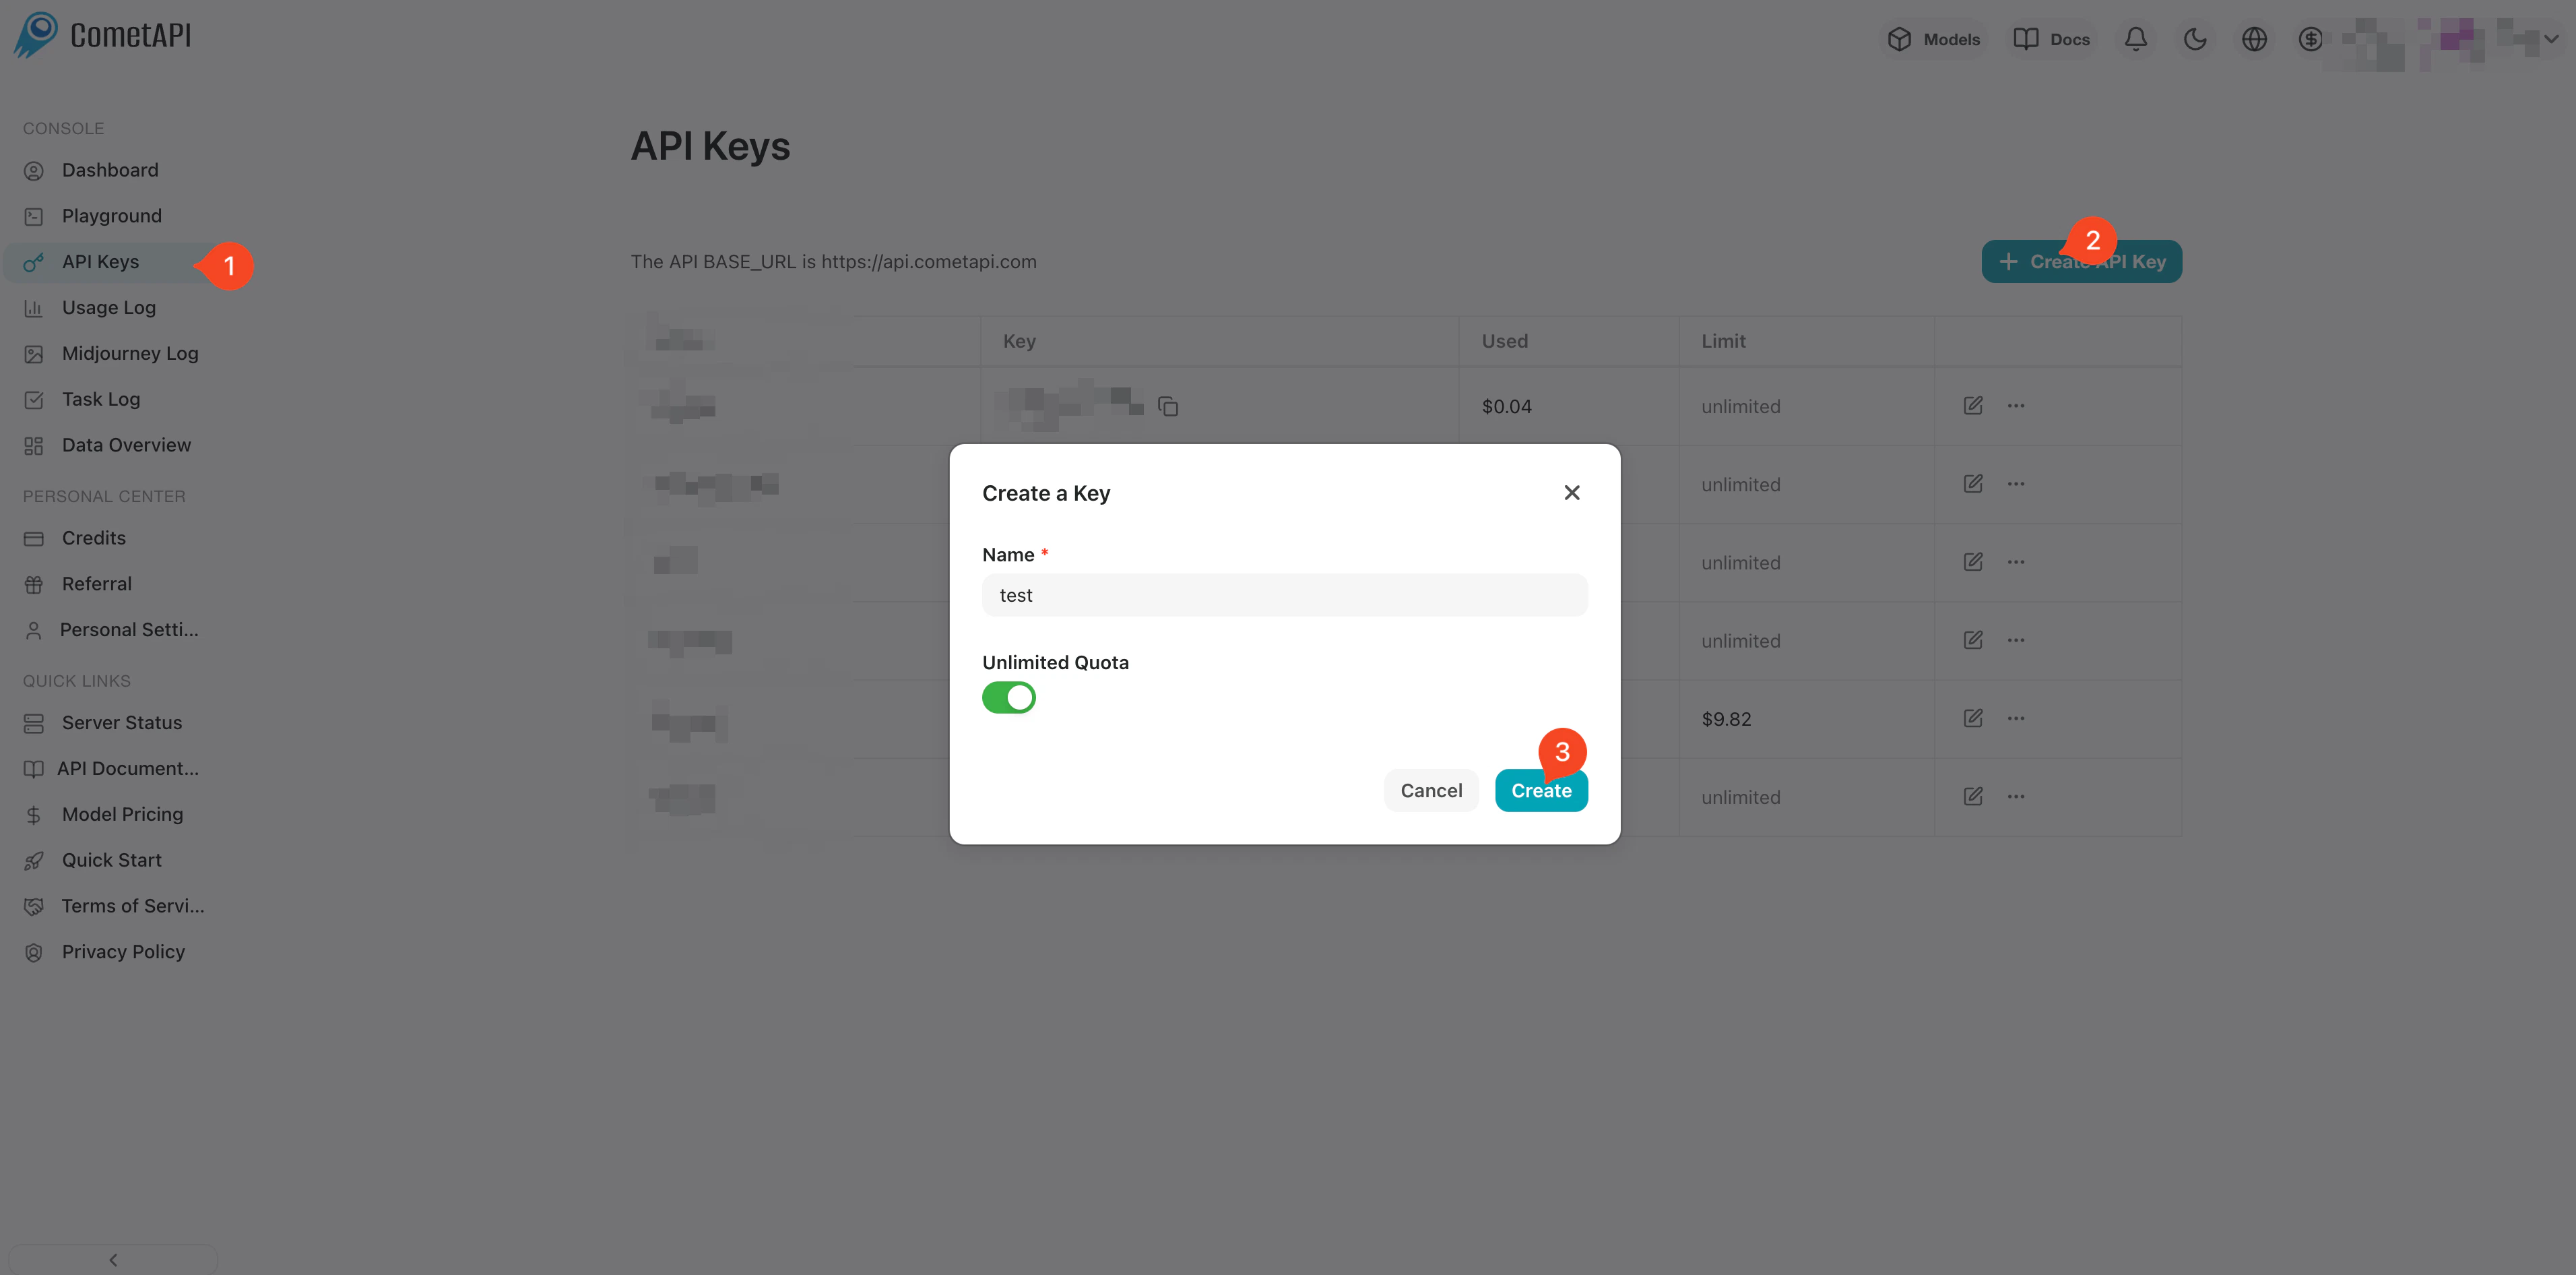
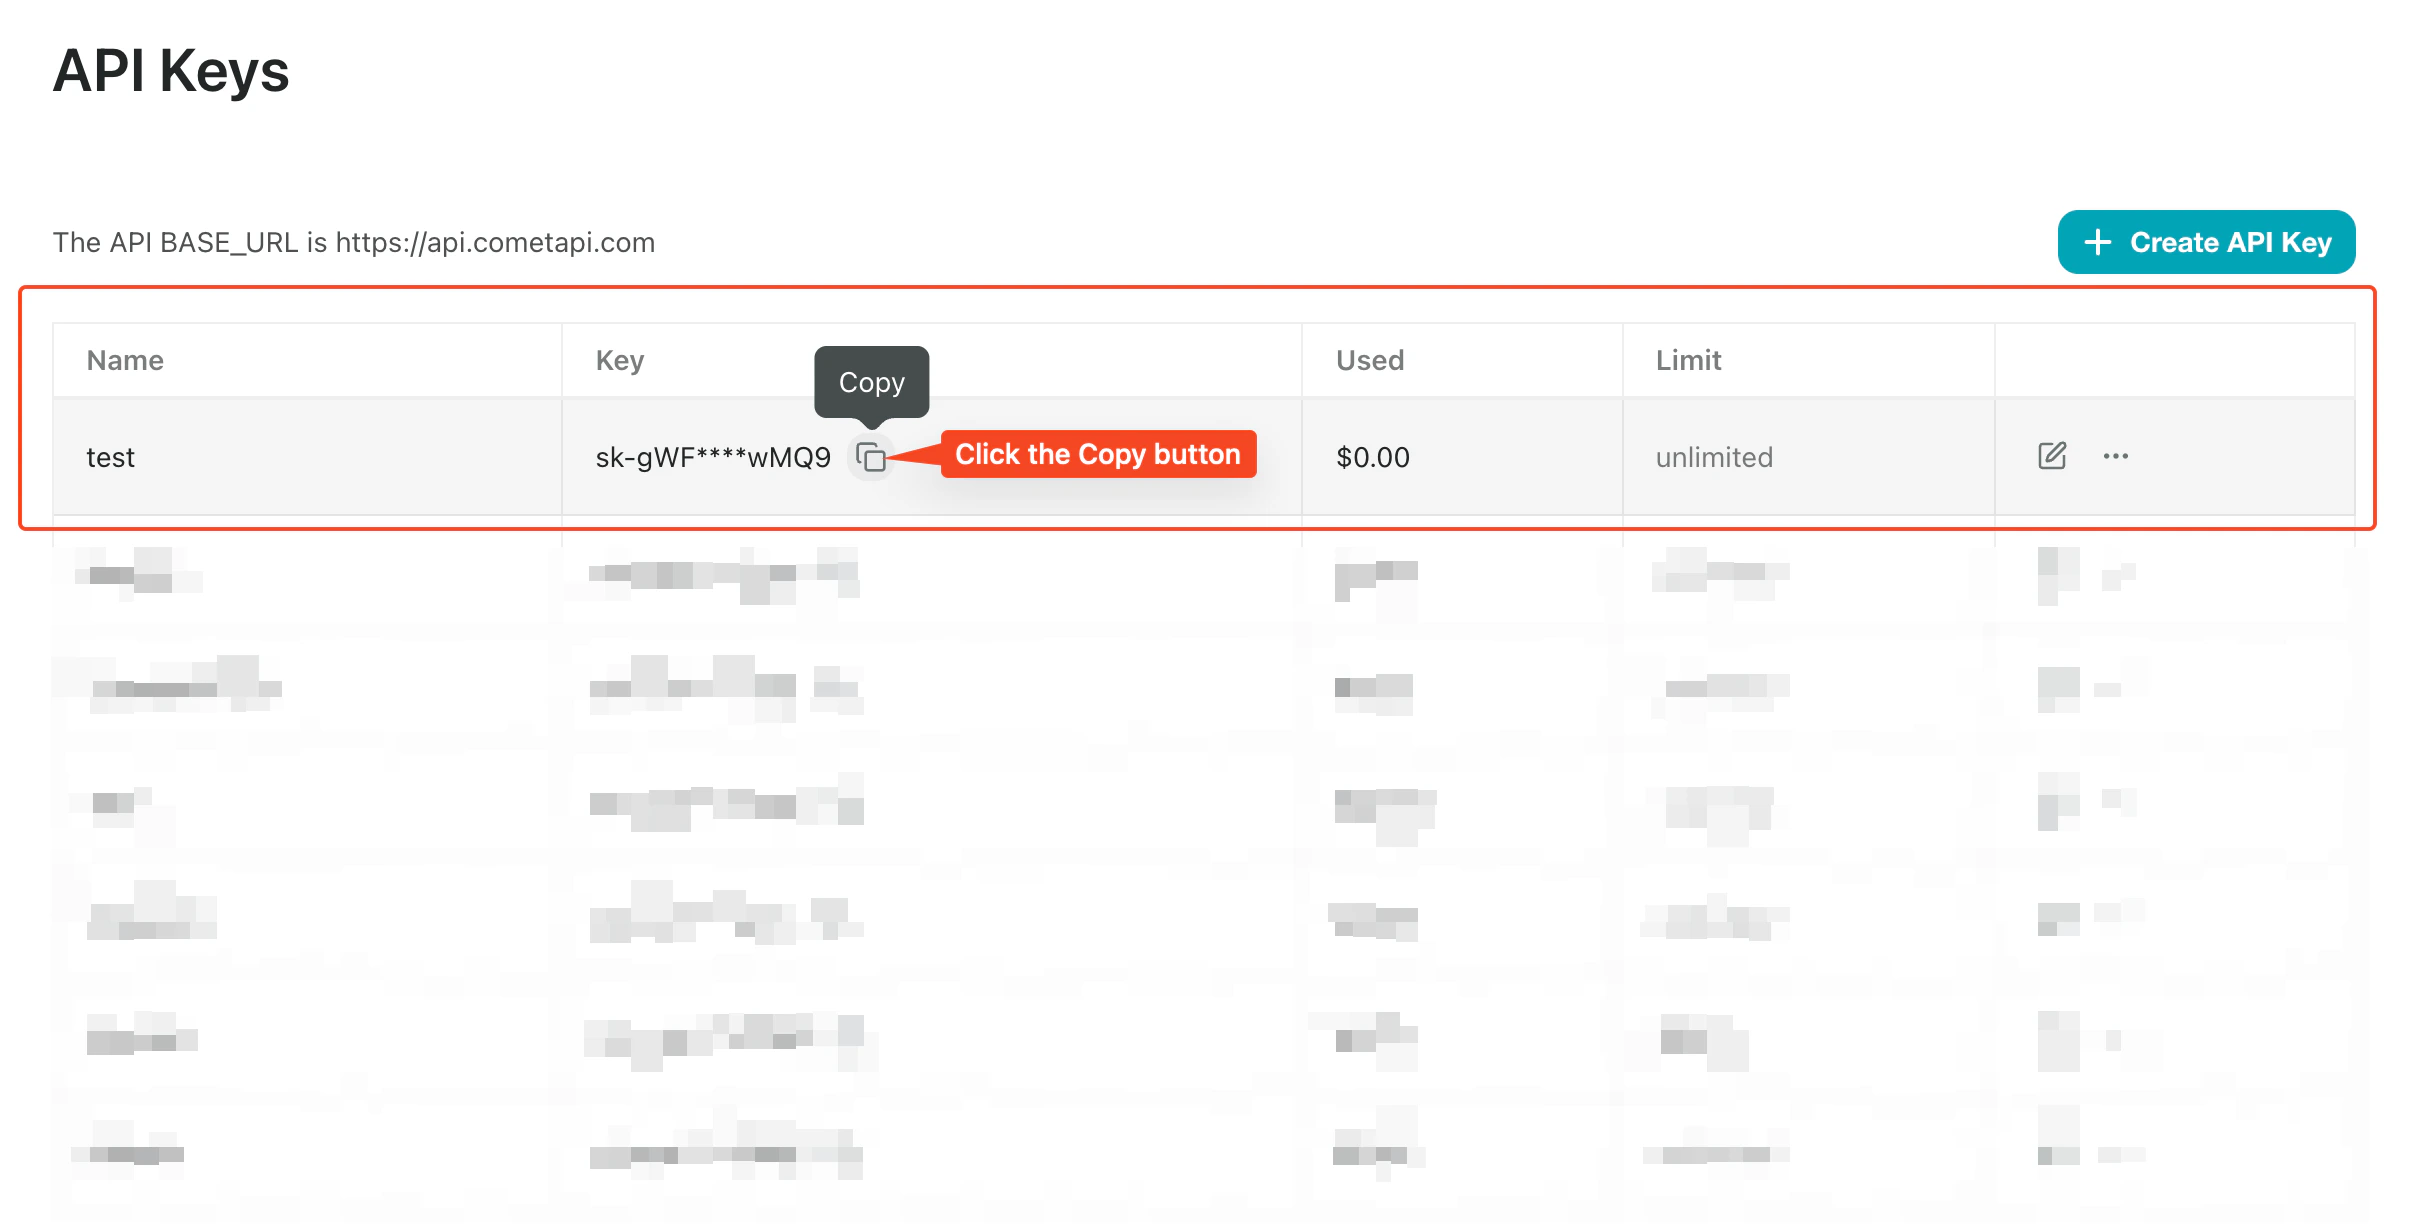
    سجّل الدخول إلى [لوحة تحكم CometAPI](https://www.cometapi.com/console/token). انقر على **Add API Key** وانسخ مفتاح API الخاص بـ CometAPI.
    <Frame>
      <img src="https://mintcdn.com/cometapi/SZhlxZhCnMLn__BW/images/overview/810968_364191.png?fit=max&auto=format&n=SZhlxZhCnMLn__BW&q=85&s=aef81a83f29f8eb16655ed4060425f50" alt="لوحة تحكم CometAPI تعرض زر Add API Key" width="3824" height="1892" data-path="images/overview/810968_364191.png" />
    </Frame>

    <Frame>
      <img src="https://mintcdn.com/cometapi/HhtmQffktazbxUvS/images/overview/810968_364193.png?fit=max&auto=format&n=HhtmQffktazbxUvS&q=85&s=d893f659267150d0faf45f99eb5dffc1" alt="تفاصيل مفتاح API في CometAPI مع base URL" width="2434" height="1232" data-path="images/overview/810968_364193.png" />
    </Frame>
  </Step>

  <Step title="أنشئ workflow باستخدام REST API trigger">
    1. في لوحة تحكم BuildShip، انقر على **Create a new workflow → From Scratch**.
    2. على لوحة العمل، انقر على **Add Trigger** واختر **REST API**. سيؤدي ذلك إلى إنشاء endpoint قابل للاستدعاء لهذا الـ workflow.
  </Step>

  <Step title="أضف عقدة CometAPI Text Generator">
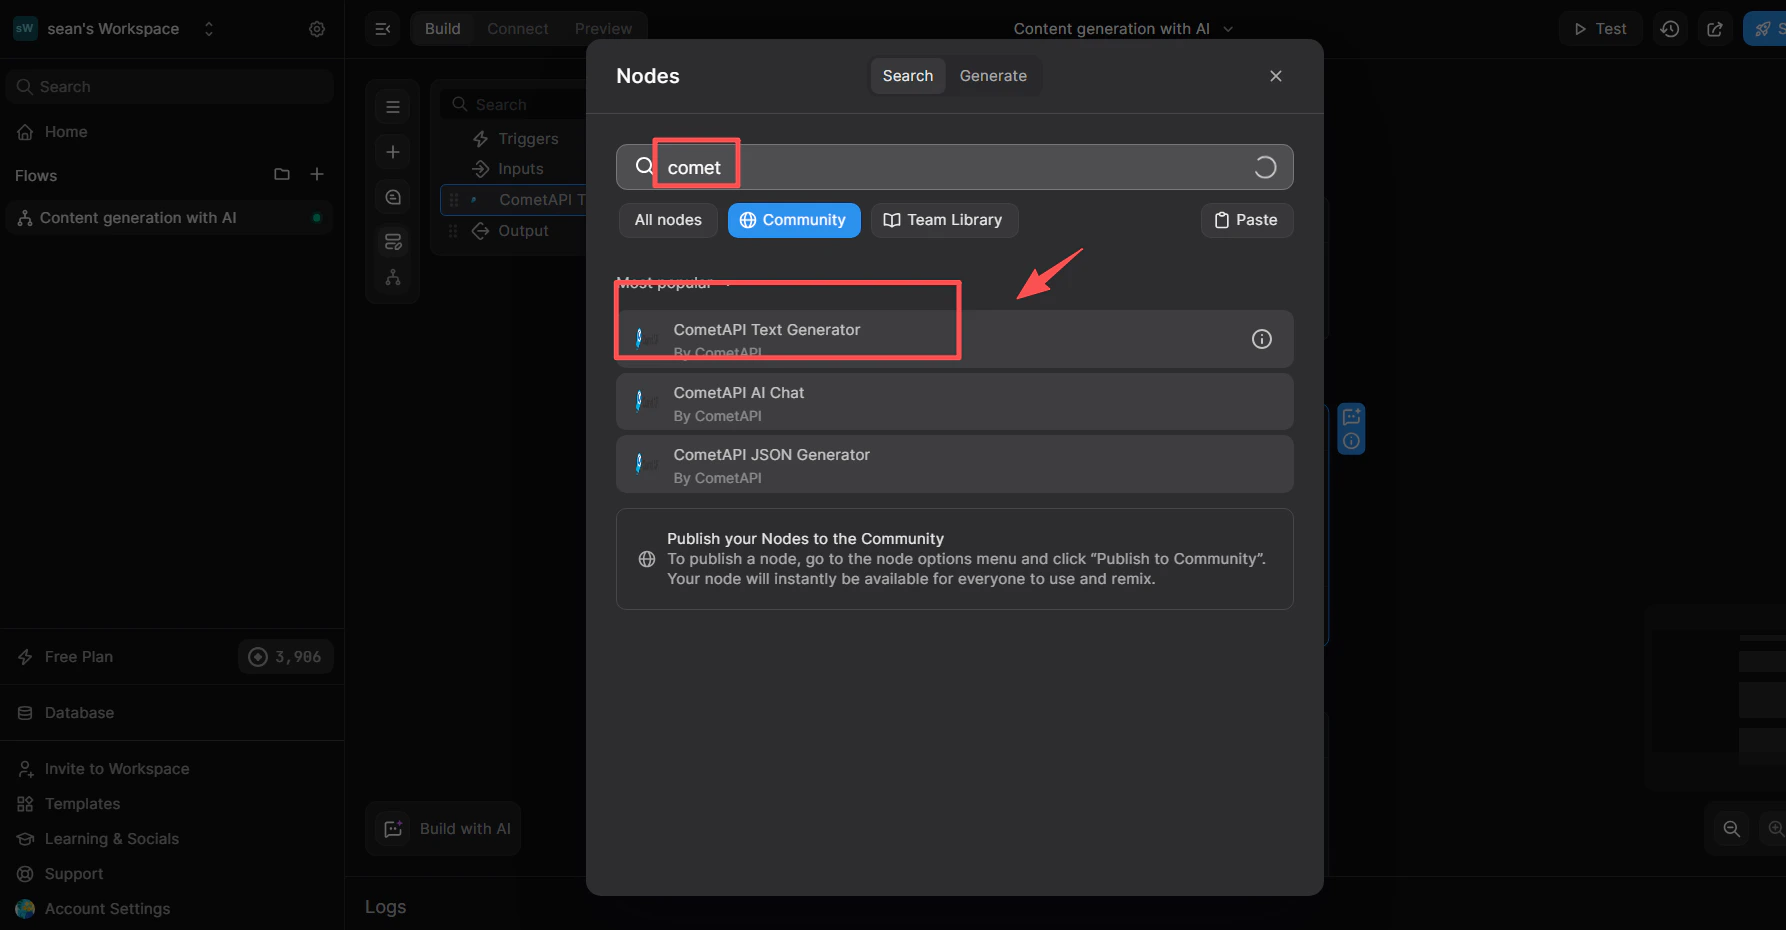
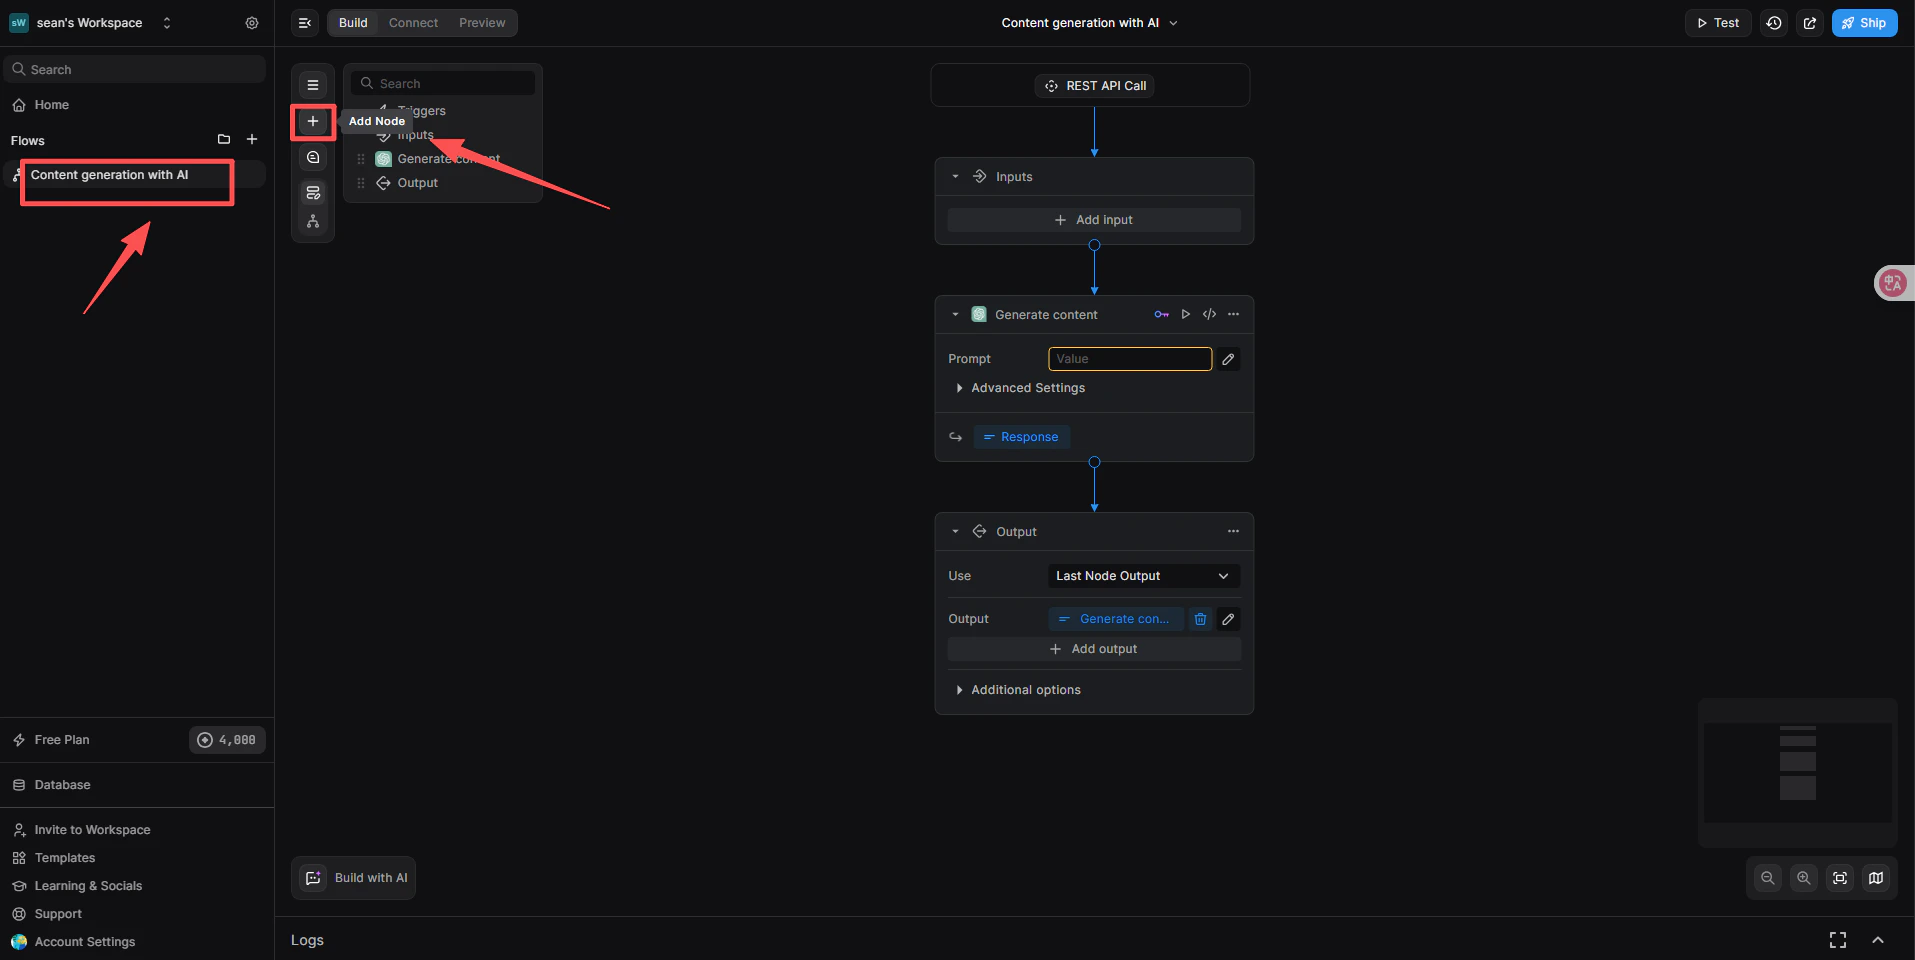
    1. أسفل REST API trigger، انقر على **+ Add a new step**.
    2. في مربع البحث داخل مكتبة العقد، اكتب `cometapi`.
    3. من قائمة **Community**، اختر **CometAPI Text Generator**.
    <Frame>
      <img src="https://mintcdn.com/cometapi/SZhlxZhCnMLn__BW/images/integrations/810968_360694.png?fit=max&auto=format&n=SZhlxZhCnMLn__BW&q=85&s=4ac17cb84e36a7f026f618e2b5229bf2" alt="مكتبة عقد BuildShip تعرض CometAPI Text Generator في نتائج البحث" width="1915" height="960" data-path="images/integrations/810968_360694.png" />
    </Frame>

    <Frame>
      <img src="https://mintcdn.com/cometapi/SZhlxZhCnMLn__BW/images/integrations/810968_360712.png?fit=max&auto=format&n=SZhlxZhCnMLn__BW&q=85&s=5da7aa2a5bef0d8a9ce45eceace876d1" alt="تمت إضافة عقدة CometAPI Text Generator إلى لوحة العمل" width="1786" height="930" data-path="images/integrations/810968_360712.png" />
    </Frame>
  </Step>

  <Step title="اربط تكامل CometAPI">
    تحدد هذه الخطوة نظام إدارة المفاتيح الذي ستستخدمه العقدة.

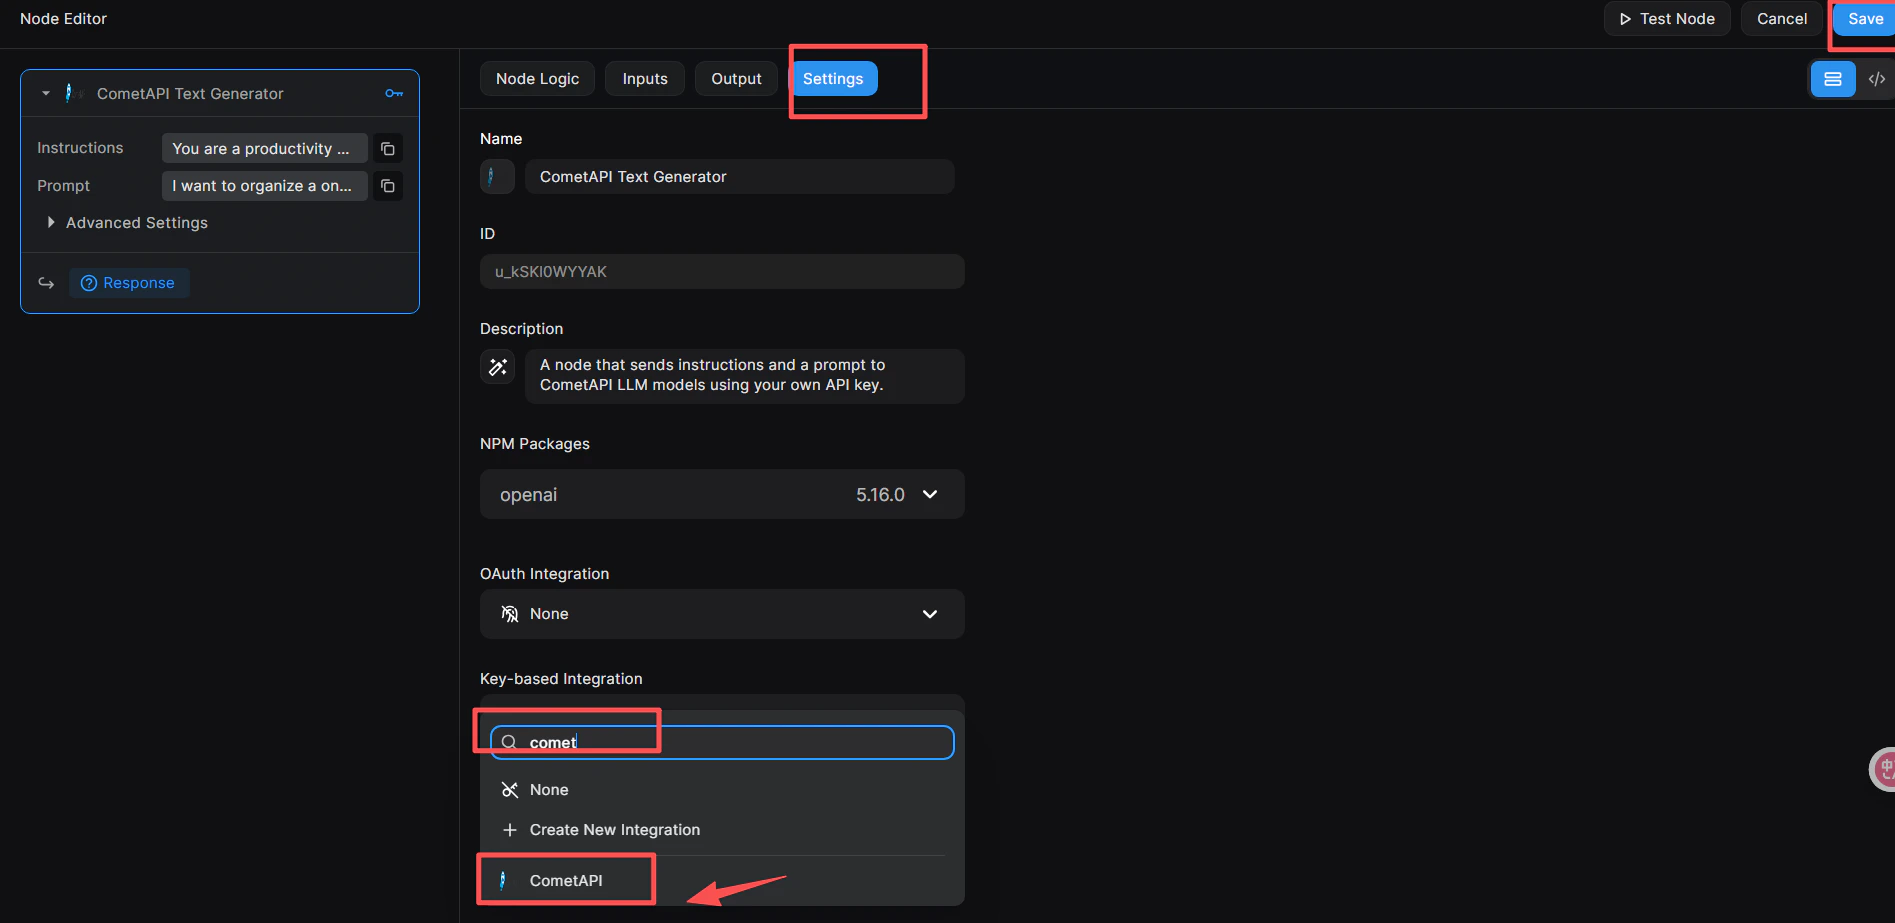
    1. انقر على العقدة لفتح **Node Editor** على اليمين.
    2. انتقل إلى تبويب **Settings**.
    3. في **Key-based Integration**، افتح القائمة المنسدلة واختر **CometAPI**.
    4. انقر على زر **Save** الأزرق في الزاوية العلوية اليمنى.
    <Frame>
      <img src="https://mintcdn.com/cometapi/SZhlxZhCnMLn__BW/images/integrations/810968_360713.png?fit=max&auto=format&n=SZhlxZhCnMLn__BW&q=85&s=ceea3b9fec0cf8a1ab81f70547b0a499" alt="تبويب Settings في Node Editor مع تعيين Key-based Integration إلى CometAPI" width="1895" height="923" data-path="images/integrations/810968_360713.png" />
    </Frame>
  </Step>

  <Step title="أضف مفتاح API الخاص بك إلى العقدة">
    1. في Node Editor، انتقل إلى تبويب **Inputs** (أو انقر مباشرة على العقدة).
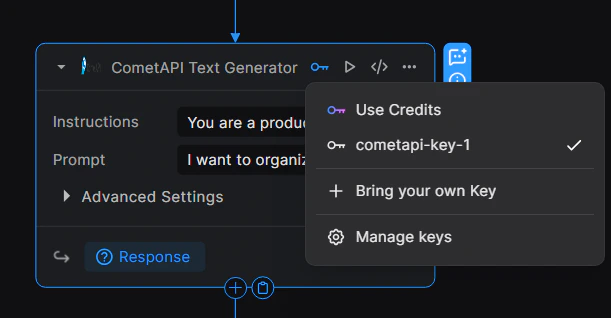
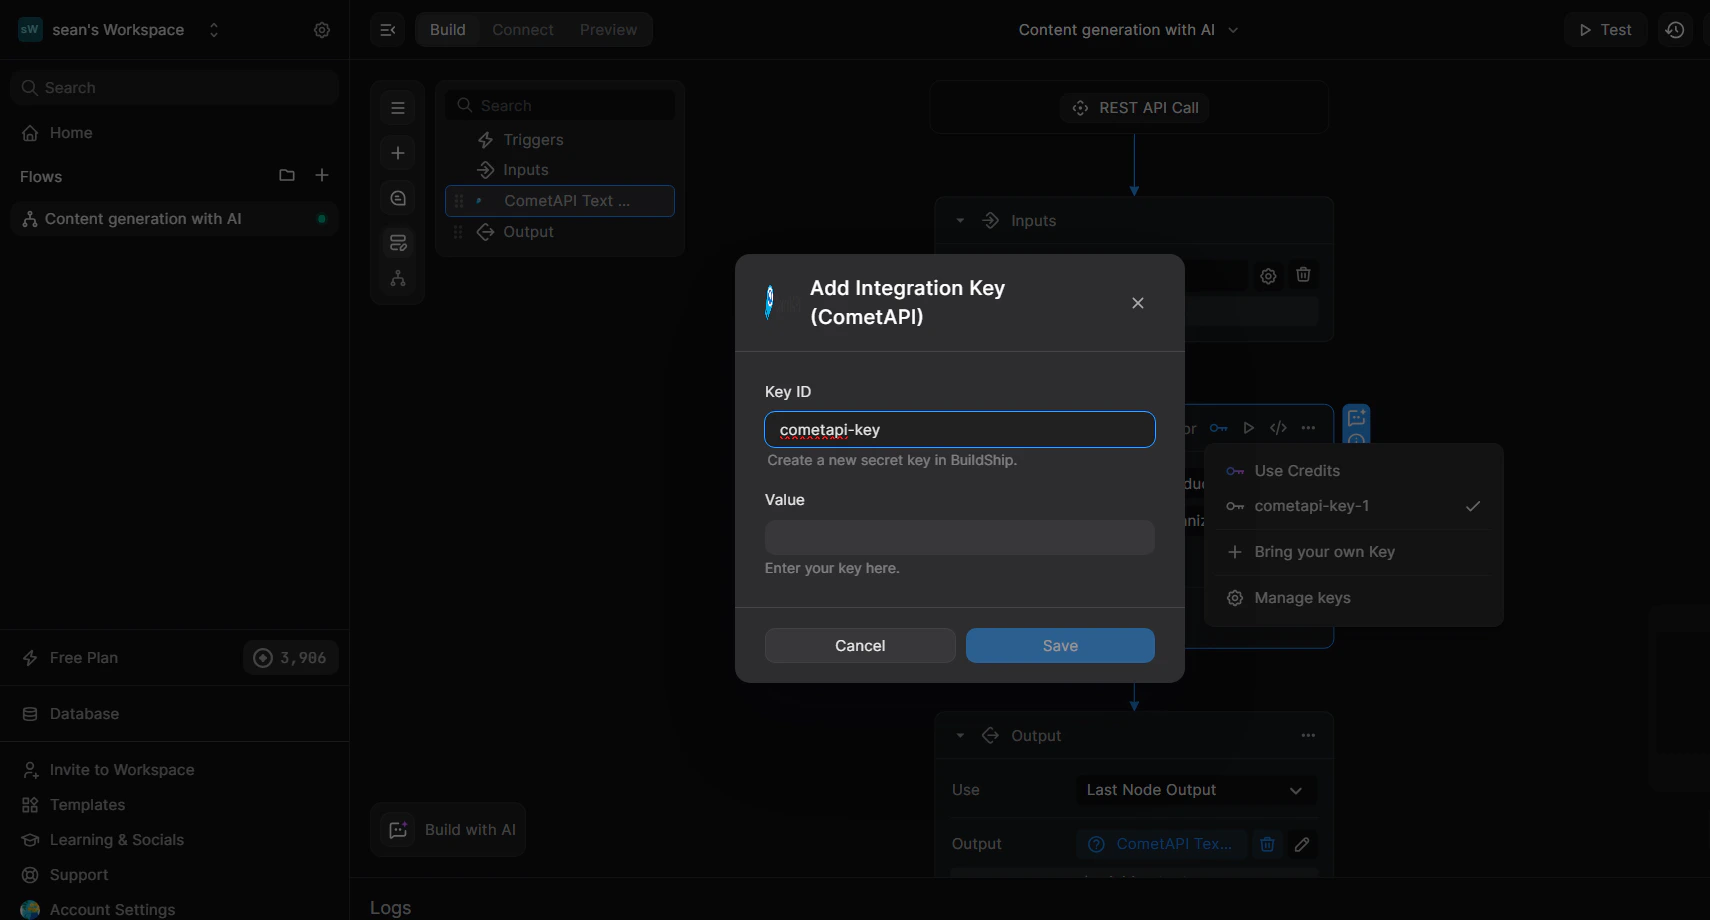
    2. انقر على أيقونة المفتاح 🔑 في الزاوية العلوية اليمنى من العقدة لفتح القائمة المنسدلة الخاصة بالمفاتيح.
    3. اختر **+ Bring your own Key**.
    4. أدخل **Key ID** (مثل `cometapi-key-1`) والصق مفتاح API الخاص بـ CometAPI في **Value**.
    5. انقر على **Save**.
    <Frame>
      <img src="https://mintcdn.com/cometapi/SZhlxZhCnMLn__BW/images/integrations/810968_360715.png?fit=max&auto=format&n=SZhlxZhCnMLn__BW&q=85&s=25c09a874e2a0ceadf2a83e1192323ca" alt="مربع حوار إدارة المفاتيح مع تعبئة حقلي Key ID وValue" width="1710" height="920" data-path="images/integrations/810968_360715.png" />
    </Frame>

    <Frame>
      <img src="https://mintcdn.com/cometapi/SZhlxZhCnMLn__BW/images/integrations/810968_360714.png?fit=max&auto=format&n=SZhlxZhCnMLn__BW&q=85&s=7a946cdb3d110605b3a9f1d7d91e022b" alt="العقدة تعرض ربط المفتاح بنجاح" width="611" height="318" data-path="images/integrations/810968_360714.png" />
    </Frame>
  </Step>

  <Step title="اضبط معلمات الإدخال">
    في تبويب **Inputs** الخاص بالعقدة:

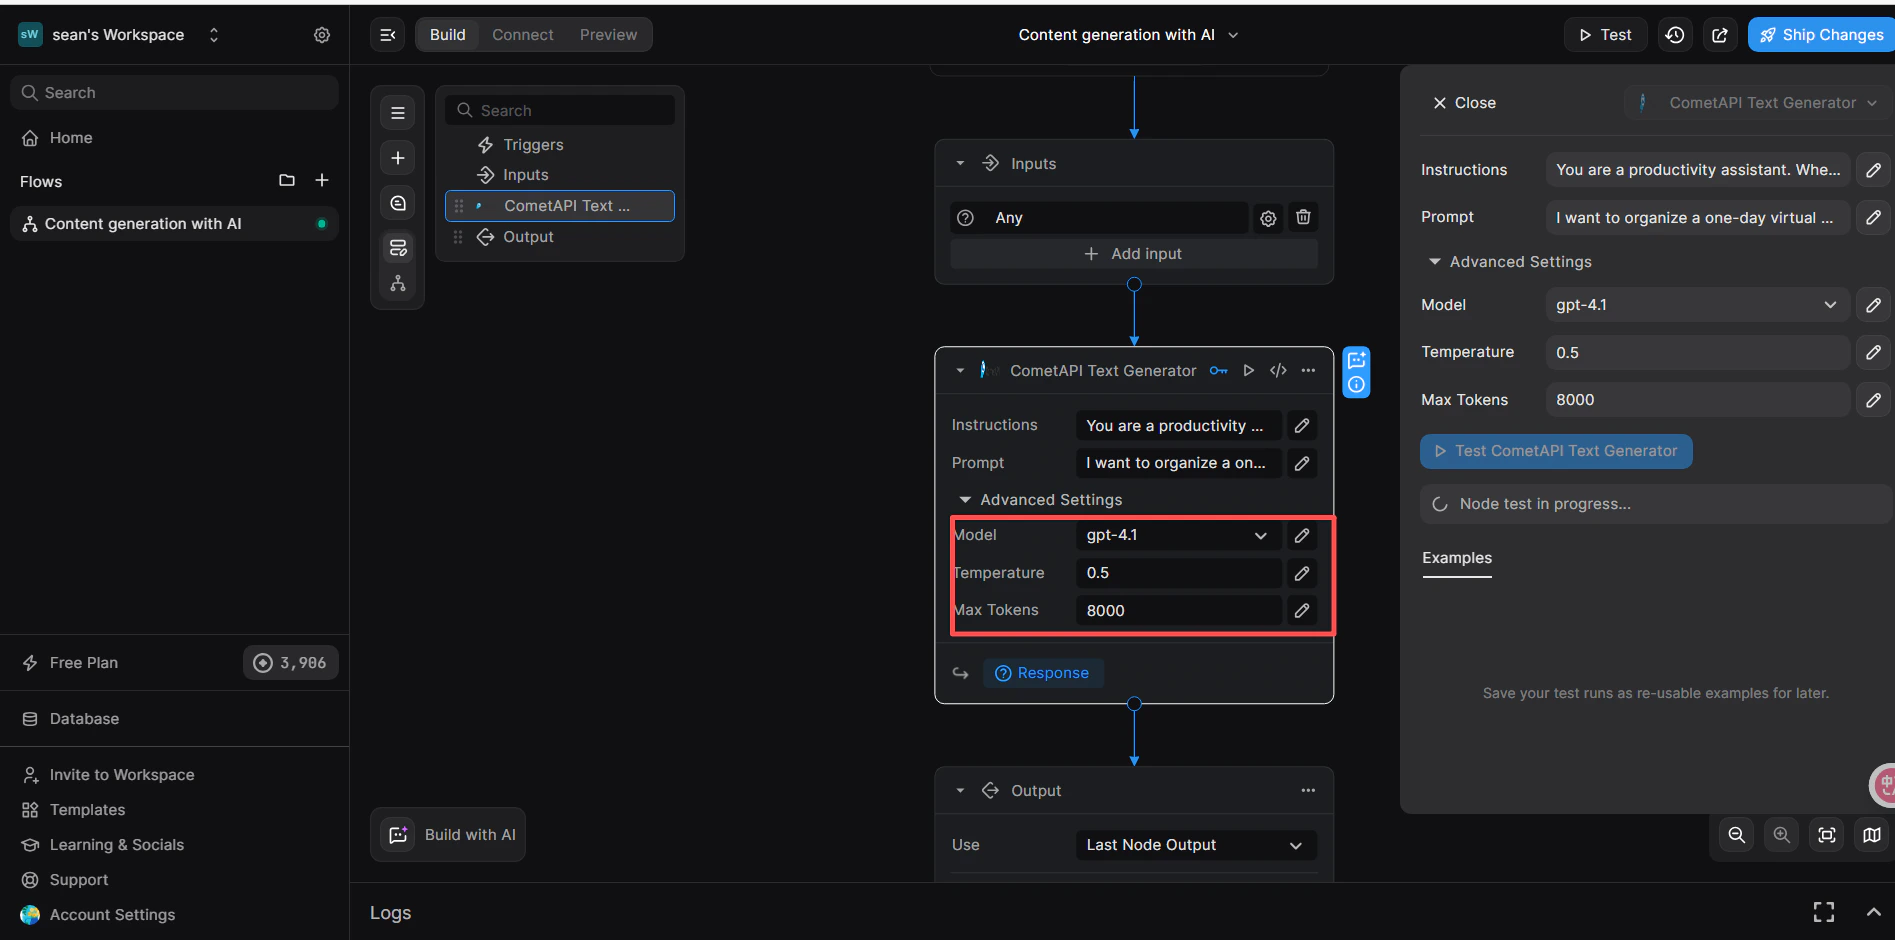
    * **Instructions** (اختياري): عيّن system role، مثل `You are a productivity assistant.`
    * **Prompt**: انقر على أيقونة **`</>`**، ثم اختر **Trigger → Body → prompt** لربط body الخاص بالطلب الوارد.
    * **Advanced → Model**: أدخل model ID الحالي الذي تريد استخدامه.
    <Frame>
      <img src="https://mintcdn.com/cometapi/SZhlxZhCnMLn__BW/images/integrations/810968_360716.png?fit=max&auto=format&n=SZhlxZhCnMLn__BW&q=85&s=71431b9496c396bbe5fa8d529ca57b27" alt="عقدة CometAPI مع ضبط Instructions وPrompt وModel" width="1895" height="940" data-path="images/integrations/810968_360716.png" />
    </Frame>
  </Step>

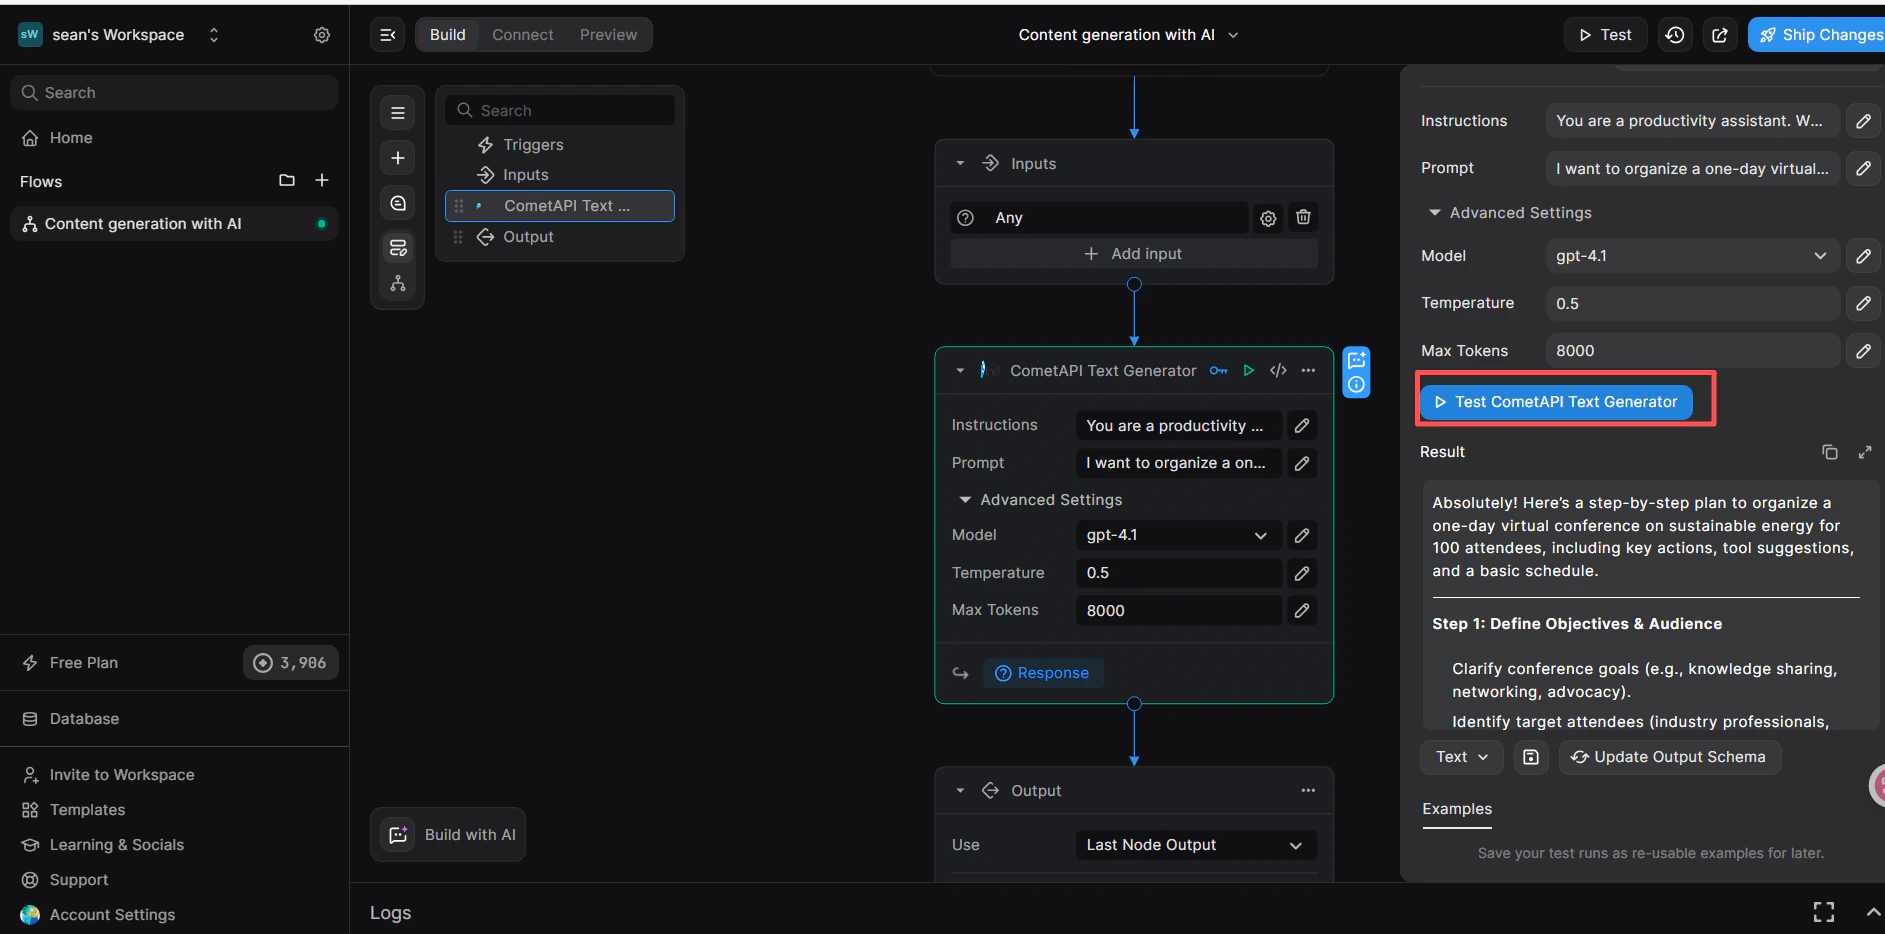
  <Step title="أضف عقدة Return Response واختبر">
    1. أسفل عقدة CometAPI، انقر على **+ Add a new step** واختر **Return Response**.
    2. في حقل **Body**، انقر على **`</>`** واختر المتغير `response` من عقدة CometAPI Text Generator.
    3. انقر على **Test** في الزاوية العلوية اليمنى، واختر تنسيق الإدخال **JSON**، ثم أرسل:

    ```json theme={null}
    {
      "prompt": "hi"
    }
    ```

    4. يؤكد ظهور استجابة ناجحة في لوحة **Result** أن الـ workflow يعمل.
    <Frame>
      <img src="https://mintcdn.com/cometapi/SZhlxZhCnMLn__BW/images/integrations/810968_360717.png?fit=max&auto=format&n=SZhlxZhCnMLn__BW&q=85&s=561ea8bcdfd96a014dab4476840ee377" alt="لوحة الاختبار في BuildShip تعرض استجابة ناجحة من CometAPI" width="1885" height="934" data-path="images/integrations/810968_360717.png" />
    </Frame>

    إذا فشل الاستدعاء، فتحقق من مفتاح API الخاص بك ومن أن **Key-based Integration** مضبوط على **CometAPI**، أو تواصل مع [دعم CometAPI](https://www.cometapi.com).
  </Step>
</Steps>

<Tip>
  خطوة **Key-based Integration** (ربط العقدة بـ CometAPI) أساسية — تخطيها سيسبب أخطاء في المصادقة حتى إذا كان مفتاح API الخاص بك صحيحًا.
</Tip>

<script type="application/ld+json">
  {`
    {
    "@context": "https://schema.org",
    "@graph": [
      {
        "@type": "HowTo",
        "@id": "https://apidoc.cometapi.com/integrations/buildship#howto",
        "name": "ربط BuildShip بـ CometAPI",
        "description": "استخدم هذا الدليل لربط BuildShip بـ CometAPI من خلال تعيين base URL ومفتاح API وخيارات model أو provider.",
        "step": [
          {
            "@type": "HowToStep",
            "@id": "https://apidoc.cometapi.com/integrations/buildship#step-1",
            "position": 1,
            "name": "احصل على مفتاح API الخاص بـ CometAPI",
            "text": "أنشئ حساب CometAPI الخاص بك أو افتحه، ثم انسخ مفتاح API نشطًا من لوحة التحكم."
          },
          {
            "@type": "HowToStep",
            "@id": "https://apidoc.cometapi.com/integrations/buildship#step-2",
            "position": 2,
            "name": "أنشئ workflow باستخدام REST API trigger",
            "text": "أكمل خطوة إنشاء workflow باستخدام REST API trigger في دليل ربط BuildShip بـ CometAPI."
          },
          {
            "@type": "HowToStep",
            "@id": "https://apidoc.cometapi.com/integrations/buildship#step-3",
            "position": 3,
            "name": "أضف عقدة CometAPI Text Generator",
            "text": "أكمل خطوة إضافة عقدة CometAPI Text Generator في دليل ربط BuildShip بـ CometAPI."
          },
          {
            "@type": "HowToStep",
            "@id": "https://apidoc.cometapi.com/integrations/buildship#step-4",
            "position": 4,
            "name": "اربط تكامل CometAPI",
            "text": "أكمل خطوة ربط تكامل CometAPI في دليل ربط BuildShip بـ CometAPI."
          },
          {
            "@type": "HowToStep",
            "@id": "https://apidoc.cometapi.com/integrations/buildship#step-5",
            "position": 5,
            "name": "أضف مفتاح API الخاص بك إلى العقدة",
            "text": "أكمل خطوة إضافة مفتاح API الخاص بك إلى العقدة في دليل ربط BuildShip بـ CometAPI."
          },
          {
            "@type": "HowToStep",
            "@id": "https://apidoc.cometapi.com/integrations/buildship#step-6",
            "position": 6,
            "name": "اضبط معلمات الإدخال",
            "text": "أكمل خطوة ضبط معلمات الإدخال في دليل ربط BuildShip بـ CometAPI."
          },
          {
            "@type": "HowToStep",
            "@id": "https://apidoc.cometapi.com/integrations/buildship#step-7",
            "position": 7,
            "name": "أضف عقدة Return Response واختبر",
            "text": "أكمل خطوة إضافة عقدة Return Response والاختبار في دليل ربط BuildShip بـ CometAPI."
          }
        ]
      },
      {
        "@type": "BreadcrumbList",
        "itemListElement": [
          {
            "@type": "ListItem",
            "position": 1,
            "name": "مستندات CometAPI",
            "item": "https://apidoc.cometapi.com/"
          },
          {
            "@type": "ListItem",
            "position": 2,
            "name": "التكاملات",
            "item": "https://apidoc.cometapi.com/integrations"
          },
          {
            "@type": "ListItem",
            "position": 3,
            "name": "ربط BuildShip بـ CometAPI",
            "item": "https://apidoc.cometapi.com/integrations/buildship"
          }
        ]
      }
    ]
    }
    `}
</script>