> ## Documentation Index
> Fetch the complete documentation index at: https://apidoc.cometapi.com/llms.txt
> Use this file to discover all available pages before exploring further.

# Continue mit CometAPI verwenden

> Verwende diese Anleitung, um Continue mit CometAPI zu konfigurieren, indem du die base URL, den API-Schlüssel sowie model- oder provider-Optionen festlegst.

[Continue](https://continue.dev) ist eine Open-Source-VS-Code-Erweiterung für KI-gestützte Programmierunterstützung. Sie verfügt über einen nativen CometAPI-provider — keine manuelle URL-Konfiguration erforderlich.

## Voraussetzungen

* [Continue](https://marketplace.visualstudio.com/items?itemName=Continue.continue) in VS Code installiert
* Ein [CometAPI](https://www.cometapi.com)-Konto mit einem aktiven API-Schlüssel

## Einrichtung

<Steps>
  <Step title="Continue in VS Code installieren">
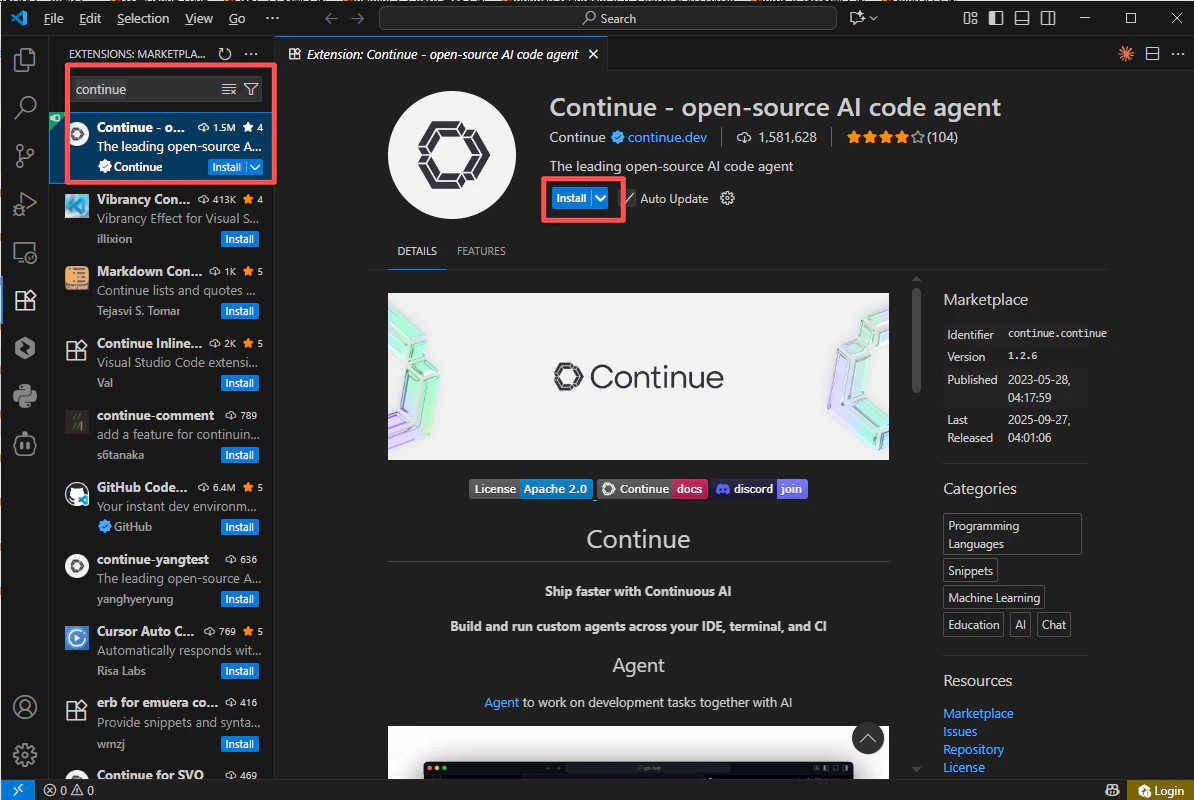
    Suche im VS Code-Erweiterungsbereich nach **Continue** und installiere es.
    <Frame>
      <img src="https://mintcdn.com/cometapi/SZhlxZhCnMLn__BW/images/integrations/810968_362621.png?fit=max&auto=format&n=SZhlxZhCnMLn__BW&q=85&s=6e94ab329f18d8e02387dc6fe8c798e3" alt="VS Code-Erweiterungsbereich mit der Continue-Erweiterung" width="1194" height="800" data-path="images/integrations/810968_362621.png" />
    </Frame>
  </Step>

  <Step title="Deinen CometAPI API-Schlüssel abrufen">
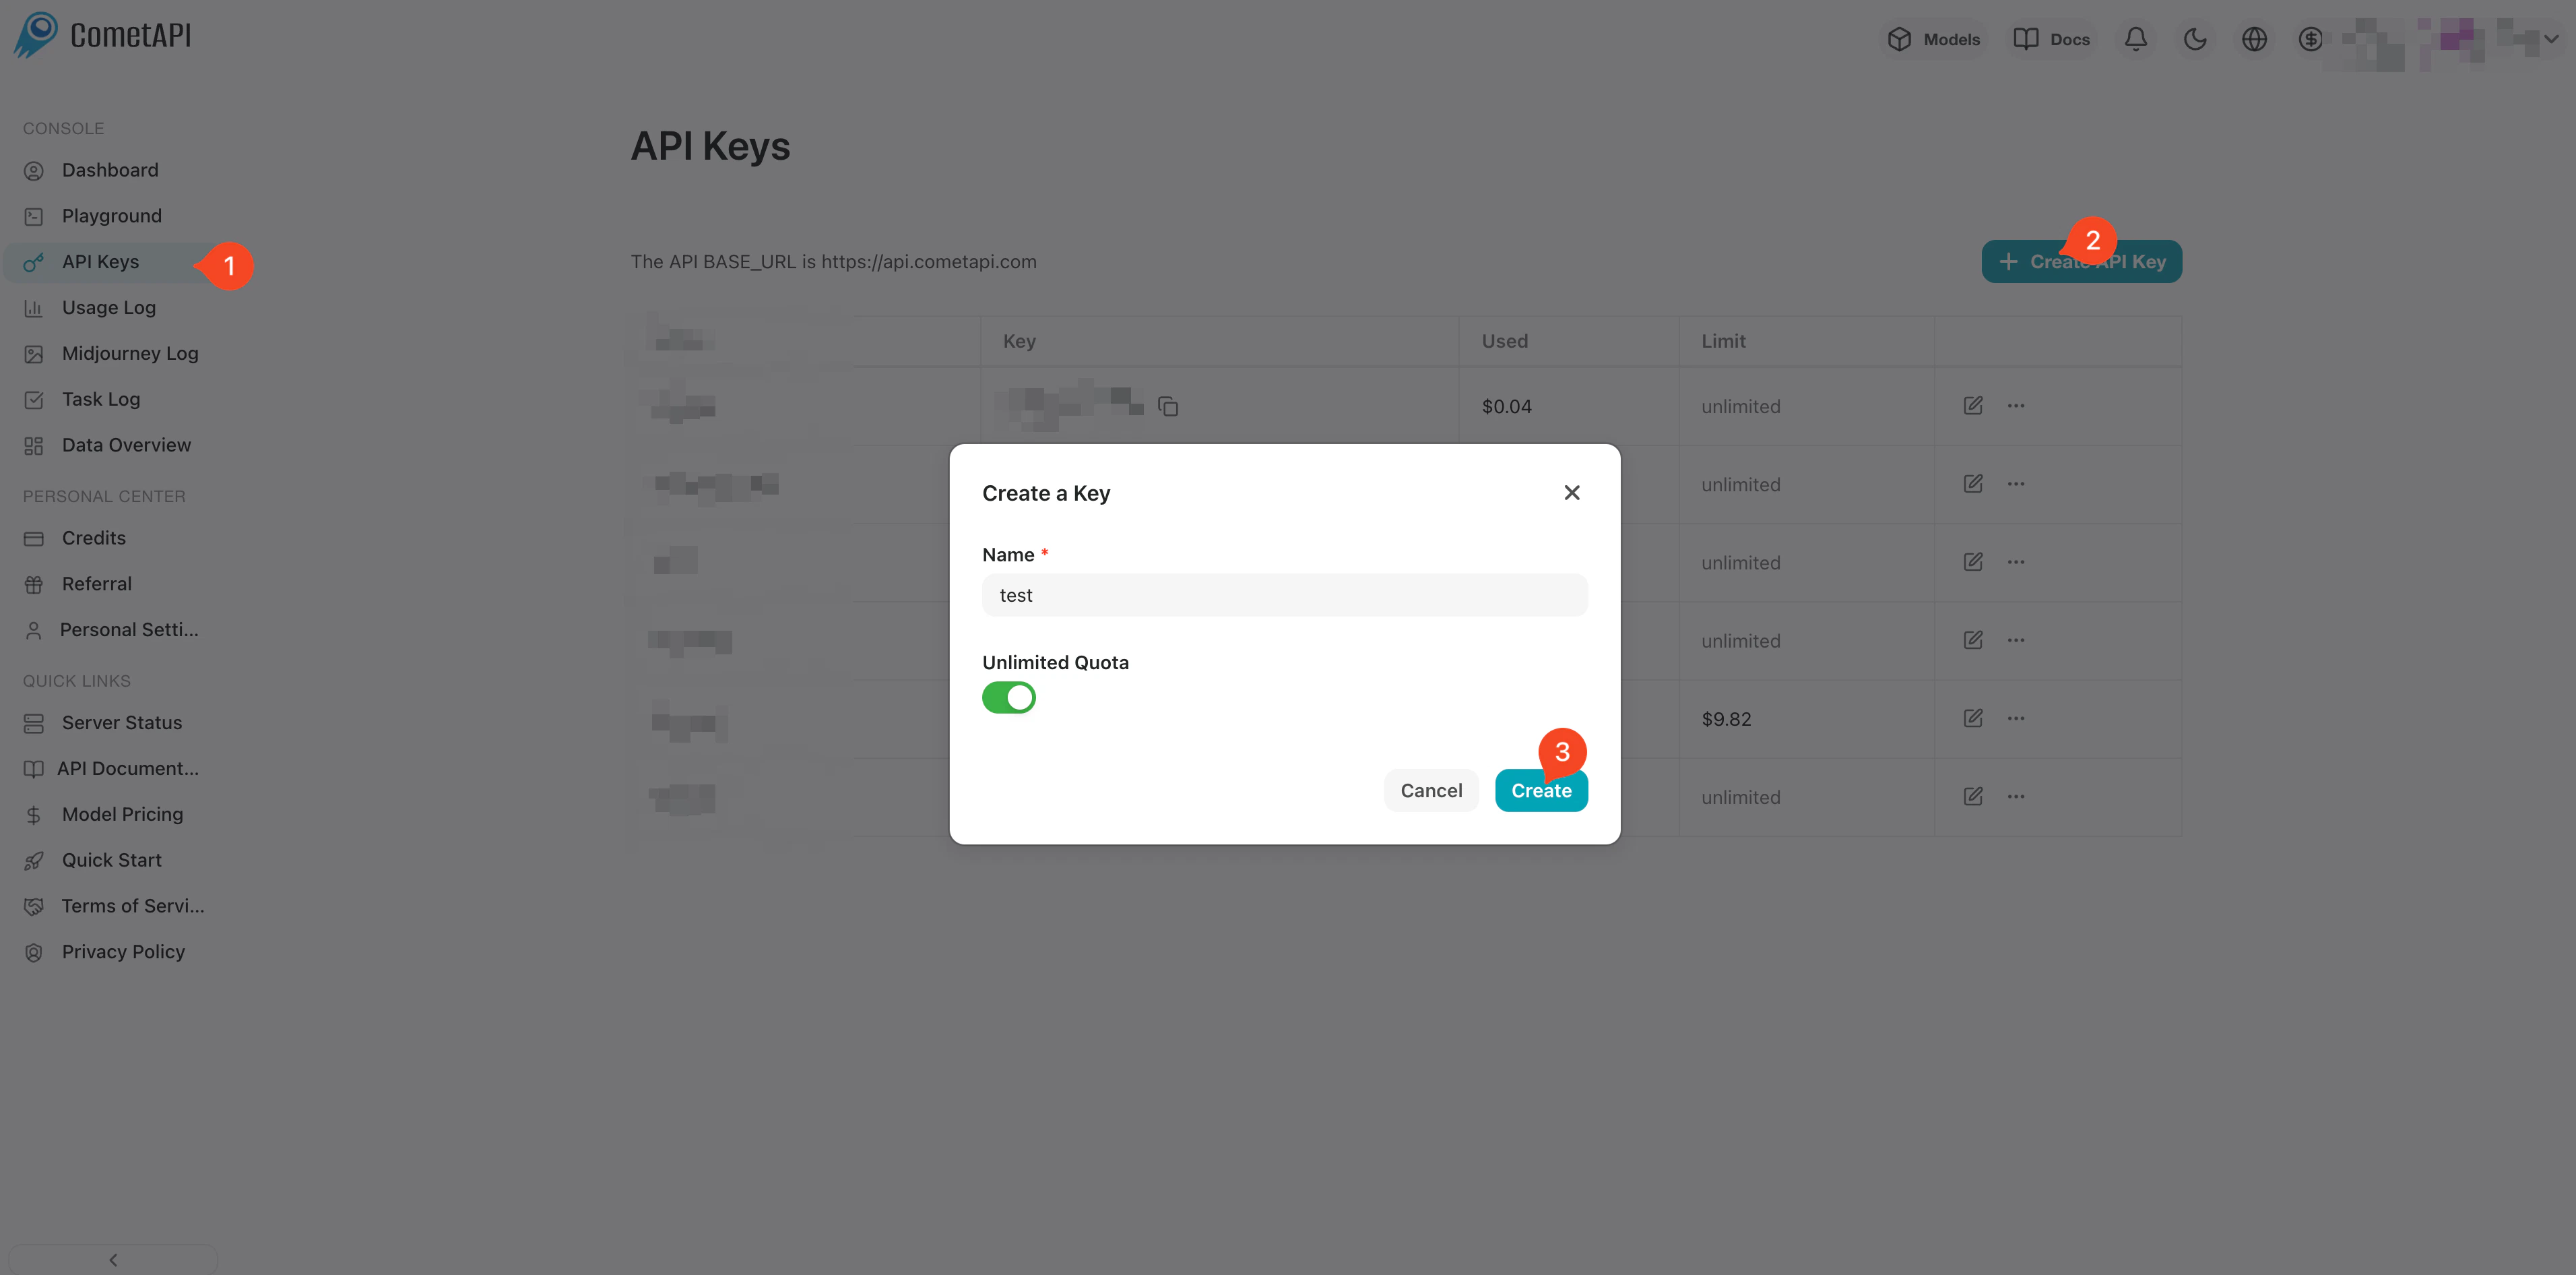
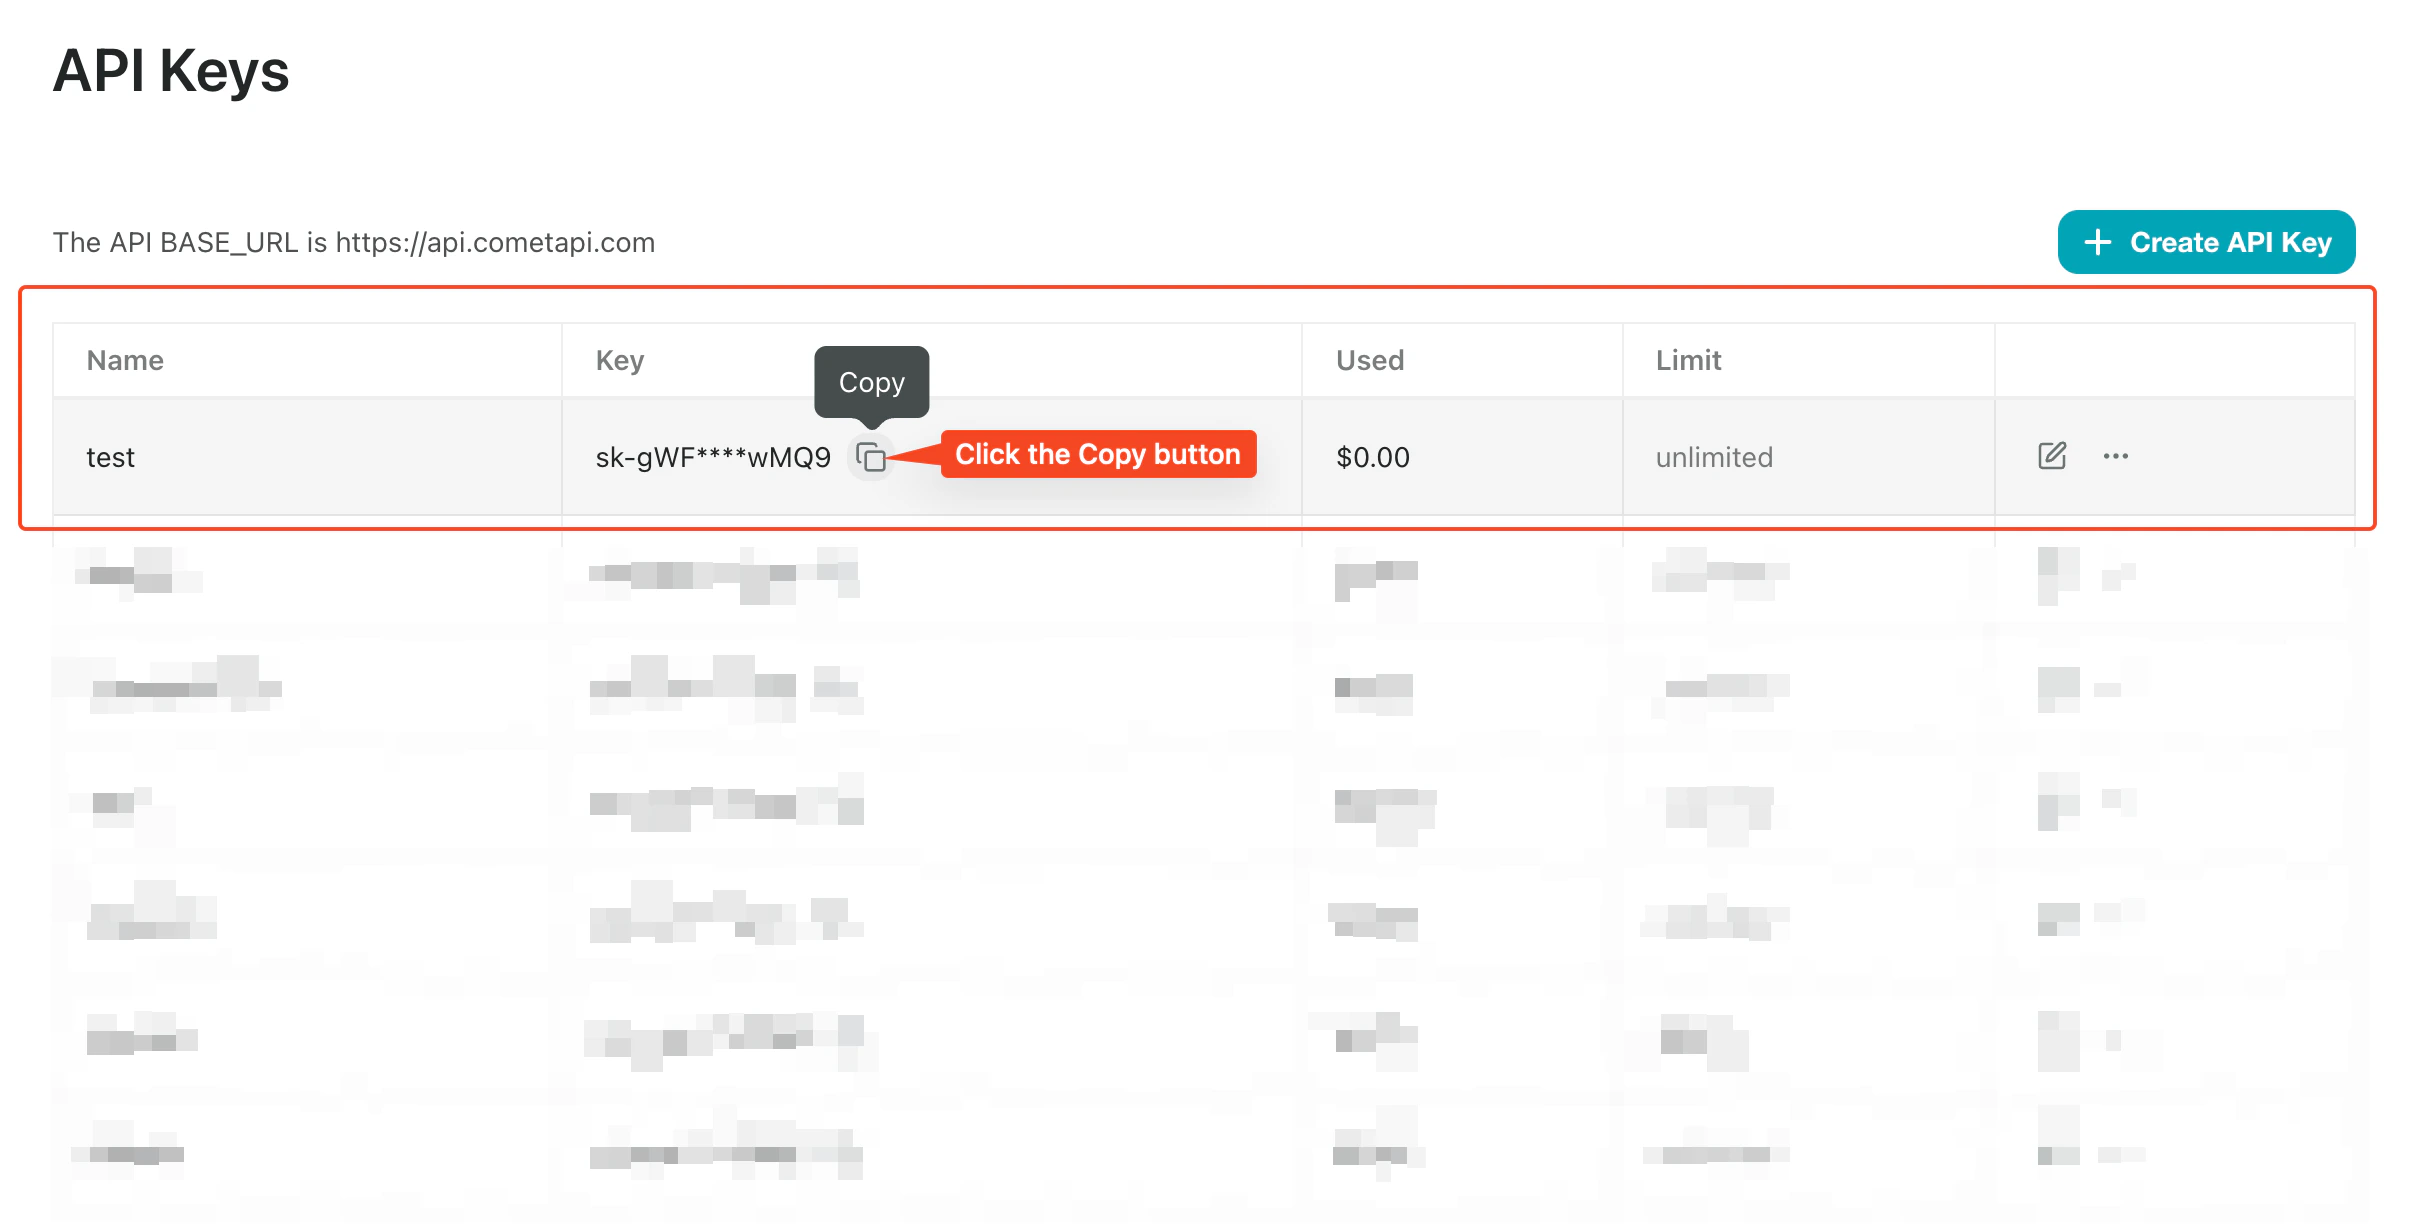
    Melde dich im [CometAPI-Dashboard](https://www.cometapi.com/console) an. Klicke auf **Add API Key** und kopiere deinen Schlüssel.
    <Frame>
      <img src="https://mintcdn.com/cometapi/SZhlxZhCnMLn__BW/images/overview/810968_364191.png?fit=max&auto=format&n=SZhlxZhCnMLn__BW&q=85&s=aef81a83f29f8eb16655ed4060425f50" alt="CometAPI-Dashboard — Add API Key" width="3824" height="1892" data-path="images/overview/810968_364191.png" />
    </Frame>

    <Frame>
      <img src="https://mintcdn.com/cometapi/HhtmQffktazbxUvS/images/overview/810968_364193.png?fit=max&auto=format&n=HhtmQffktazbxUvS&q=85&s=d893f659267150d0faf45f99eb5dffc1" alt="CometAPI API-Schlüssel und Base-URL" width="2434" height="1232" data-path="images/overview/810968_364193.png" />
    </Frame>
  </Step>

  <Step title="CometAPI als Provider hinzufügen">
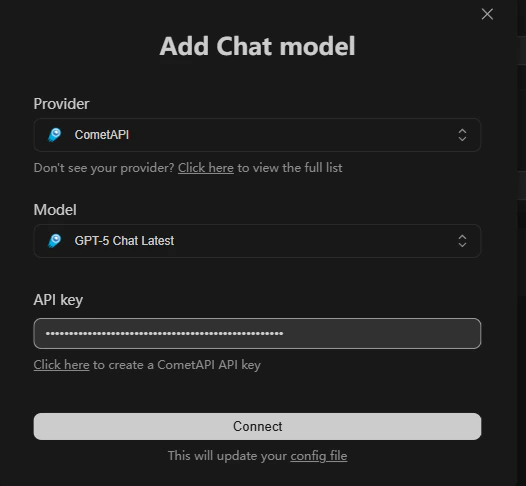
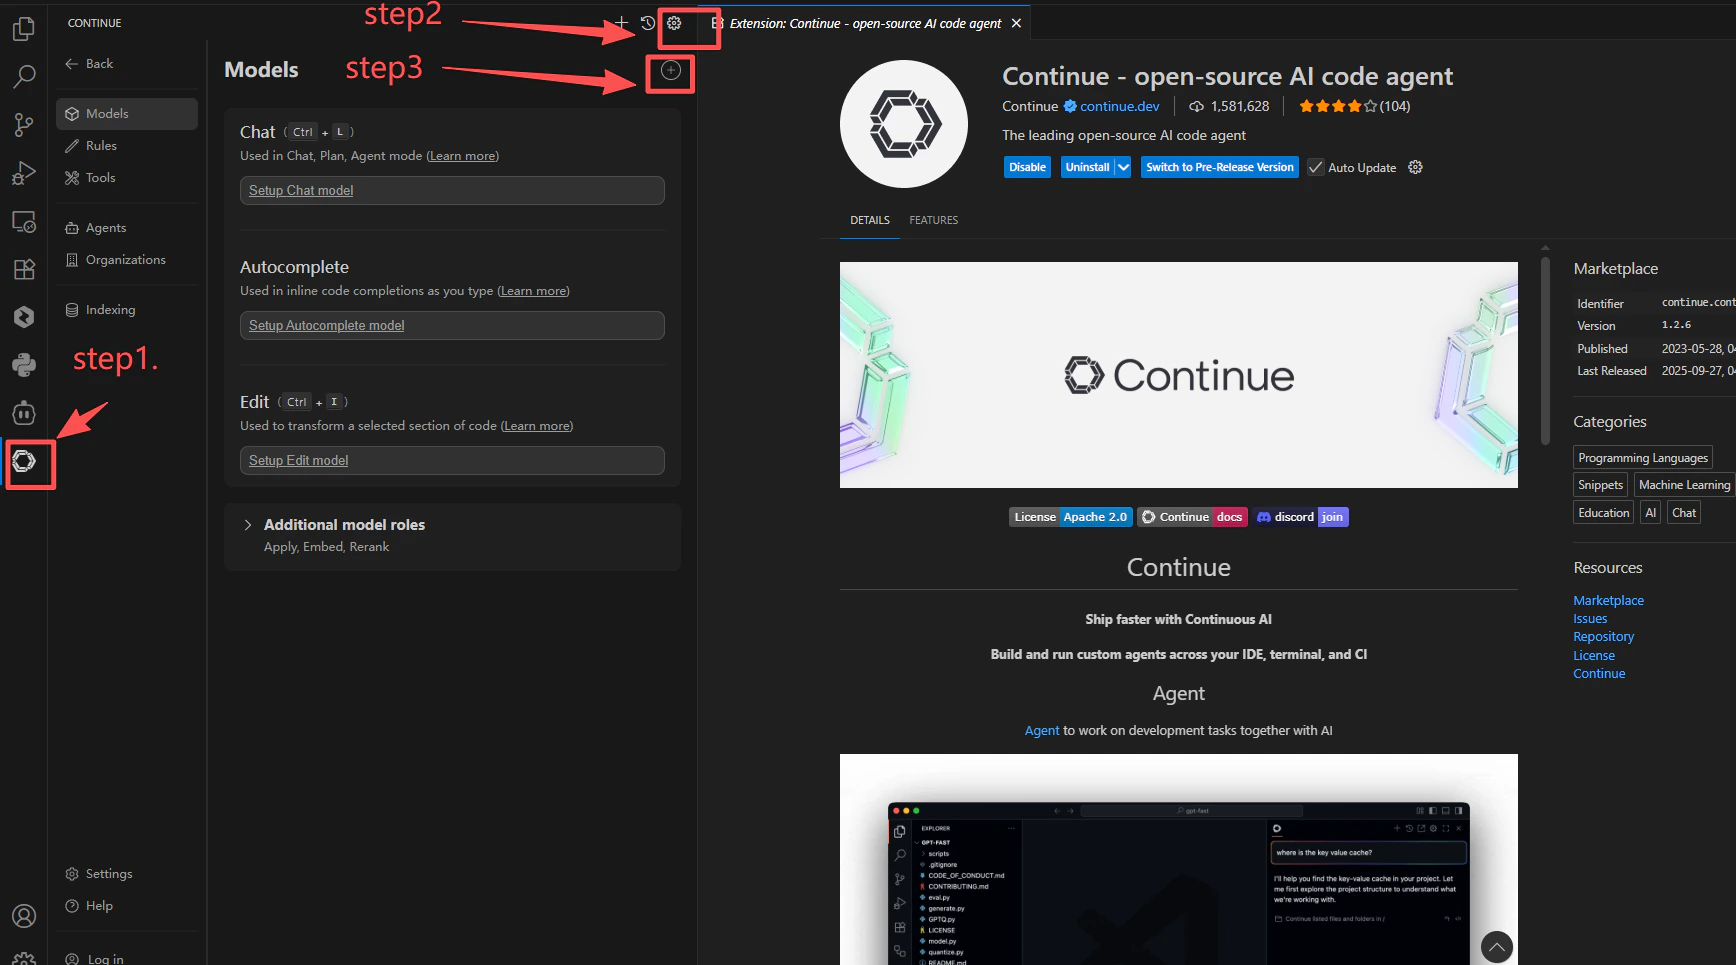
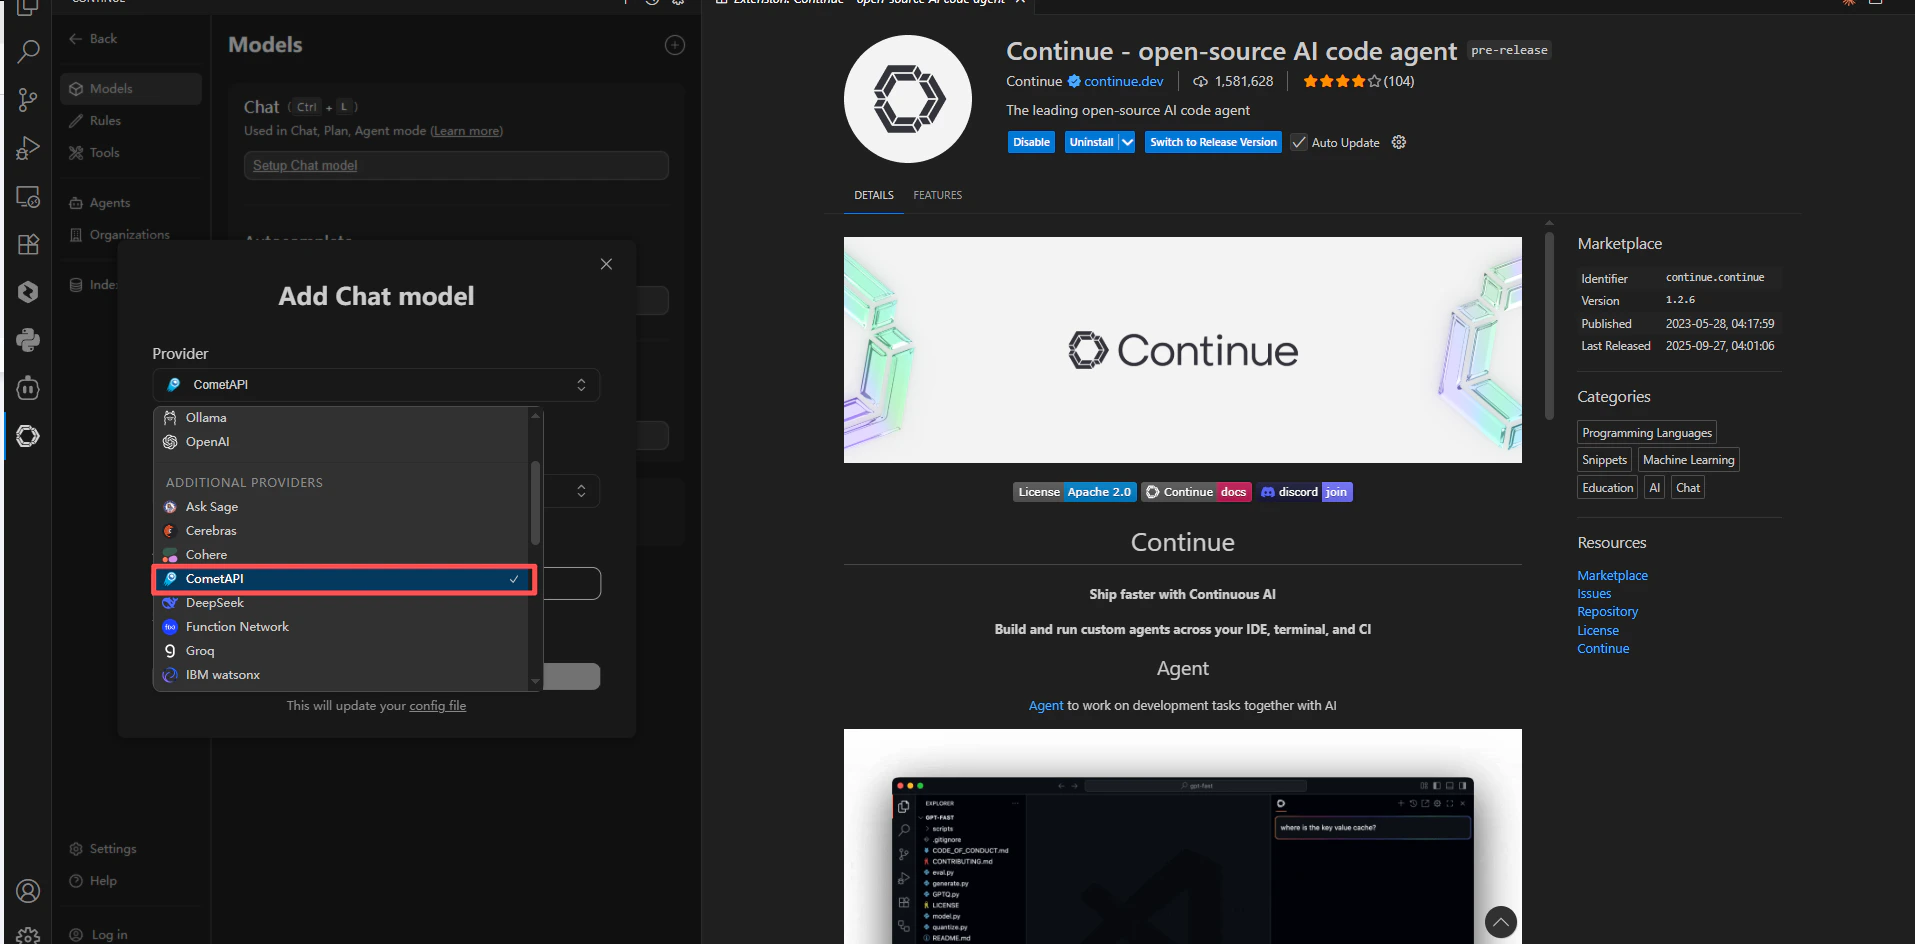
    Öffne Continue **Settings** → **Models** → **+**. Suche in der Provider-Liste nach `cometapi` und wähle es aus. Füge deinen API-Schlüssel ein und wähle die Modelle aus, die du verwenden möchtest.
    <Frame>
      <img src="https://mintcdn.com/cometapi/SZhlxZhCnMLn__BW/images/integrations/810968_362622.png?fit=max&auto=format&n=SZhlxZhCnMLn__BW&q=85&s=7d9ad8d97240036f8eabad68ac872f7e" alt="Continue-Einstellungen — Provider-Suche mit ausgewähltem cometapi" width="1736" height="965" data-path="images/integrations/810968_362622.png" />
    </Frame>

    <Frame>
      <img src="https://mintcdn.com/cometapi/SZhlxZhCnMLn__BW/images/integrations/810968_362623.png?fit=max&auto=format&n=SZhlxZhCnMLn__BW&q=85&s=53d3b5b690328196cbc0c7aeeb39ad9b" alt="CometAPI-Provider-Konfiguration in Continue" width="1915" height="944" data-path="images/integrations/810968_362623.png" />
    </Frame>

    <Frame>
      <img src="https://mintcdn.com/cometapi/SZhlxZhCnMLn__BW/images/integrations/810968_362624.png?fit=max&auto=format&n=SZhlxZhCnMLn__BW&q=85&s=e9fee9dd542d42a4415f0a41827124e5" alt="Modellauswahl in Continue mit CometAPI-Provider" width="526" height="486" data-path="images/integrations/810968_362624.png" />
    </Frame>
  </Step>

  <Step title="Die Verbindung testen">
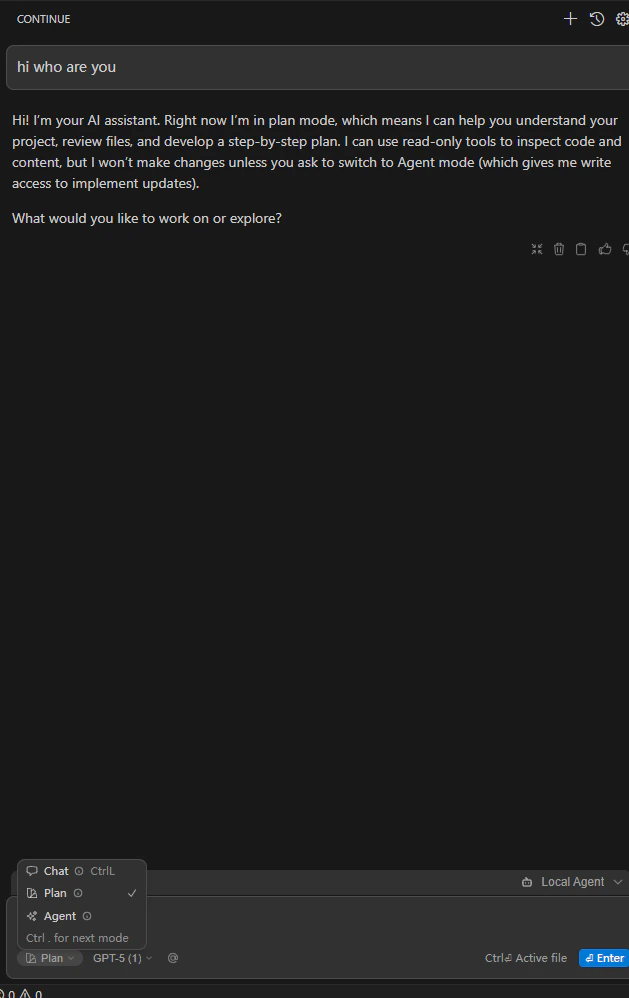
    Öffne eine Datei und sende über Continue einen Test-Prompt. Eine erfolgreiche Antwort bestätigt, dass die Integration funktioniert.
    <Frame>
      <img src="https://mintcdn.com/cometapi/SZhlxZhCnMLn__BW/images/integrations/810968_362626.png?fit=max&auto=format&n=SZhlxZhCnMLn__BW&q=85&s=765ce3c34f80b122bab7b763d970bd4f" alt="Continue-Chat mit einer erfolgreichen Antwort von CometAPI" width="629" height="998" data-path="images/integrations/810968_362626.png" />
    </Frame>
  </Step>
</Steps>

<Note>
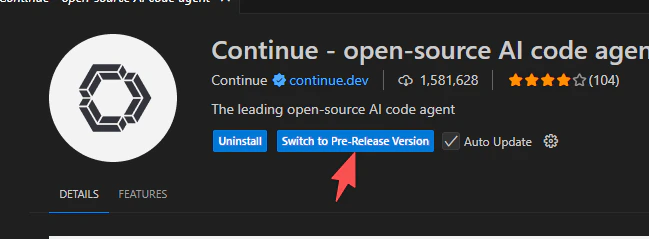
  Wenn CometAPI nicht in der Provider-Liste erscheint, wechsle Continue zur **Preview**-Version und öffne die Erweiterung erneut.
  <Frame>
    <img src="https://mintcdn.com/cometapi/SZhlxZhCnMLn__BW/images/integrations/810968_362627.png?fit=max&auto=format&n=SZhlxZhCnMLn__BW&q=85&s=54d4157b18c9134ec966daf66ec36e45" alt="Continue-Erweiterungsbereich mit Umschalter für die Preview-Version" width="649" height="239" data-path="images/integrations/810968_362627.png" />
  </Frame>
</Note>

<script type="application/ld+json">
  {`
    {
    "@context": "https://schema.org",
    "@graph": [
      {
        "@type": "HowTo",
        "@id": "https://apidoc.cometapi.com/integrations/continue#howto",
        "name": "Continue mit CometAPI verwenden",
        "description": "Verwende diese Anleitung, um Continue mit CometAPI zu konfigurieren, indem du die Base-URL, den API-Schlüssel sowie model- oder Provider-Optionen festlegst.",
        "step": [
          {
            "@type": "HowToStep",
            "@id": "https://apidoc.cometapi.com/integrations/continue#step-1",
            "position": 1,
            "name": "Continue in VS Code installieren",
            "text": "Führe den Schritt Continue in VS Code installieren in der Anleitung Continue mit CometAPI verwenden aus."
          },
          {
            "@type": "HowToStep",
            "@id": "https://apidoc.cometapi.com/integrations/continue#step-2",
            "position": 2,
            "name": "Deinen CometAPI API-Schlüssel abrufen",
            "text": "Erstelle oder öffne dein CometAPI-Konto und kopiere dann einen aktiven API-Schlüssel aus dem Dashboard."
          },
          {
            "@type": "HowToStep",
            "@id": "https://apidoc.cometapi.com/integrations/continue#step-3",
            "position": 3,
            "name": "CometAPI als Provider hinzufügen",
            "text": "Führe den Schritt CometAPI als Provider hinzufügen in der Anleitung Continue mit CometAPI verwenden aus."
          },
          {
            "@type": "HowToStep",
            "@id": "https://apidoc.cometapi.com/integrations/continue#step-4",
            "position": 4,
            "name": "Die Verbindung testen",
            "text": "Wähle eine aktuelle model ID auf der CometAPI Models-Seite aus und sende dann eine Testanfrage aus der Integration."
          }
        ]
      },
      {
        "@type": "BreadcrumbList",
        "itemListElement": [
          {
            "@type": "ListItem",
            "position": 1,
            "name": "CometAPI-Dokumentation",
            "item": "https://apidoc.cometapi.com/"
          },
          {
            "@type": "ListItem",
            "position": 2,
            "name": "Integrationen",
            "item": "https://apidoc.cometapi.com/integrations"
          },
          {
            "@type": "ListItem",
            "position": 3,
            "name": "Continue mit CometAPI verwenden",
            "item": "https://apidoc.cometapi.com/integrations/continue"
          }
        ]
      }
    ]
    }
    `}
</script>