> ## Documentation Index
> Fetch the complete documentation index at: https://apidoc.cometapi.com/llms.txt
> Use this file to discover all available pages before exploring further.

# n8n mit CometAPI verbinden

> Verwende diese Anleitung, um n8n mit CometAPI zu verbinden, indem du die base URL, den API key sowie model- oder provider-Optionen festlegst.

[n8n](https://n8n.io/) ist ein Tool zur Workflow-Automatisierung. Verbinde es mit CometAPI, indem du OpenAI-kompatible Zugangsdaten konfigurierst — alle CometAPI-Modelle funktionieren sofort.

## Voraussetzungen

* Ein [n8n](https://n8n.io/)-Konto (Cloud oder selbst gehostet)
* Ein [CometAPI](https://www.cometapi.com)-Konto mit einem aktiven API key

<Note>
  Für lokales/selbst gehostetes n8n mit dem CometAPI-Community-Node siehe die Anleitung [n8n Local Deployment](/de/integrations/n8n-local-deployment).
</Note>

## Einrichtung

<Steps>
  <Step title="Holen Sie sich Ihren CometAPI-API-Schlüssel">
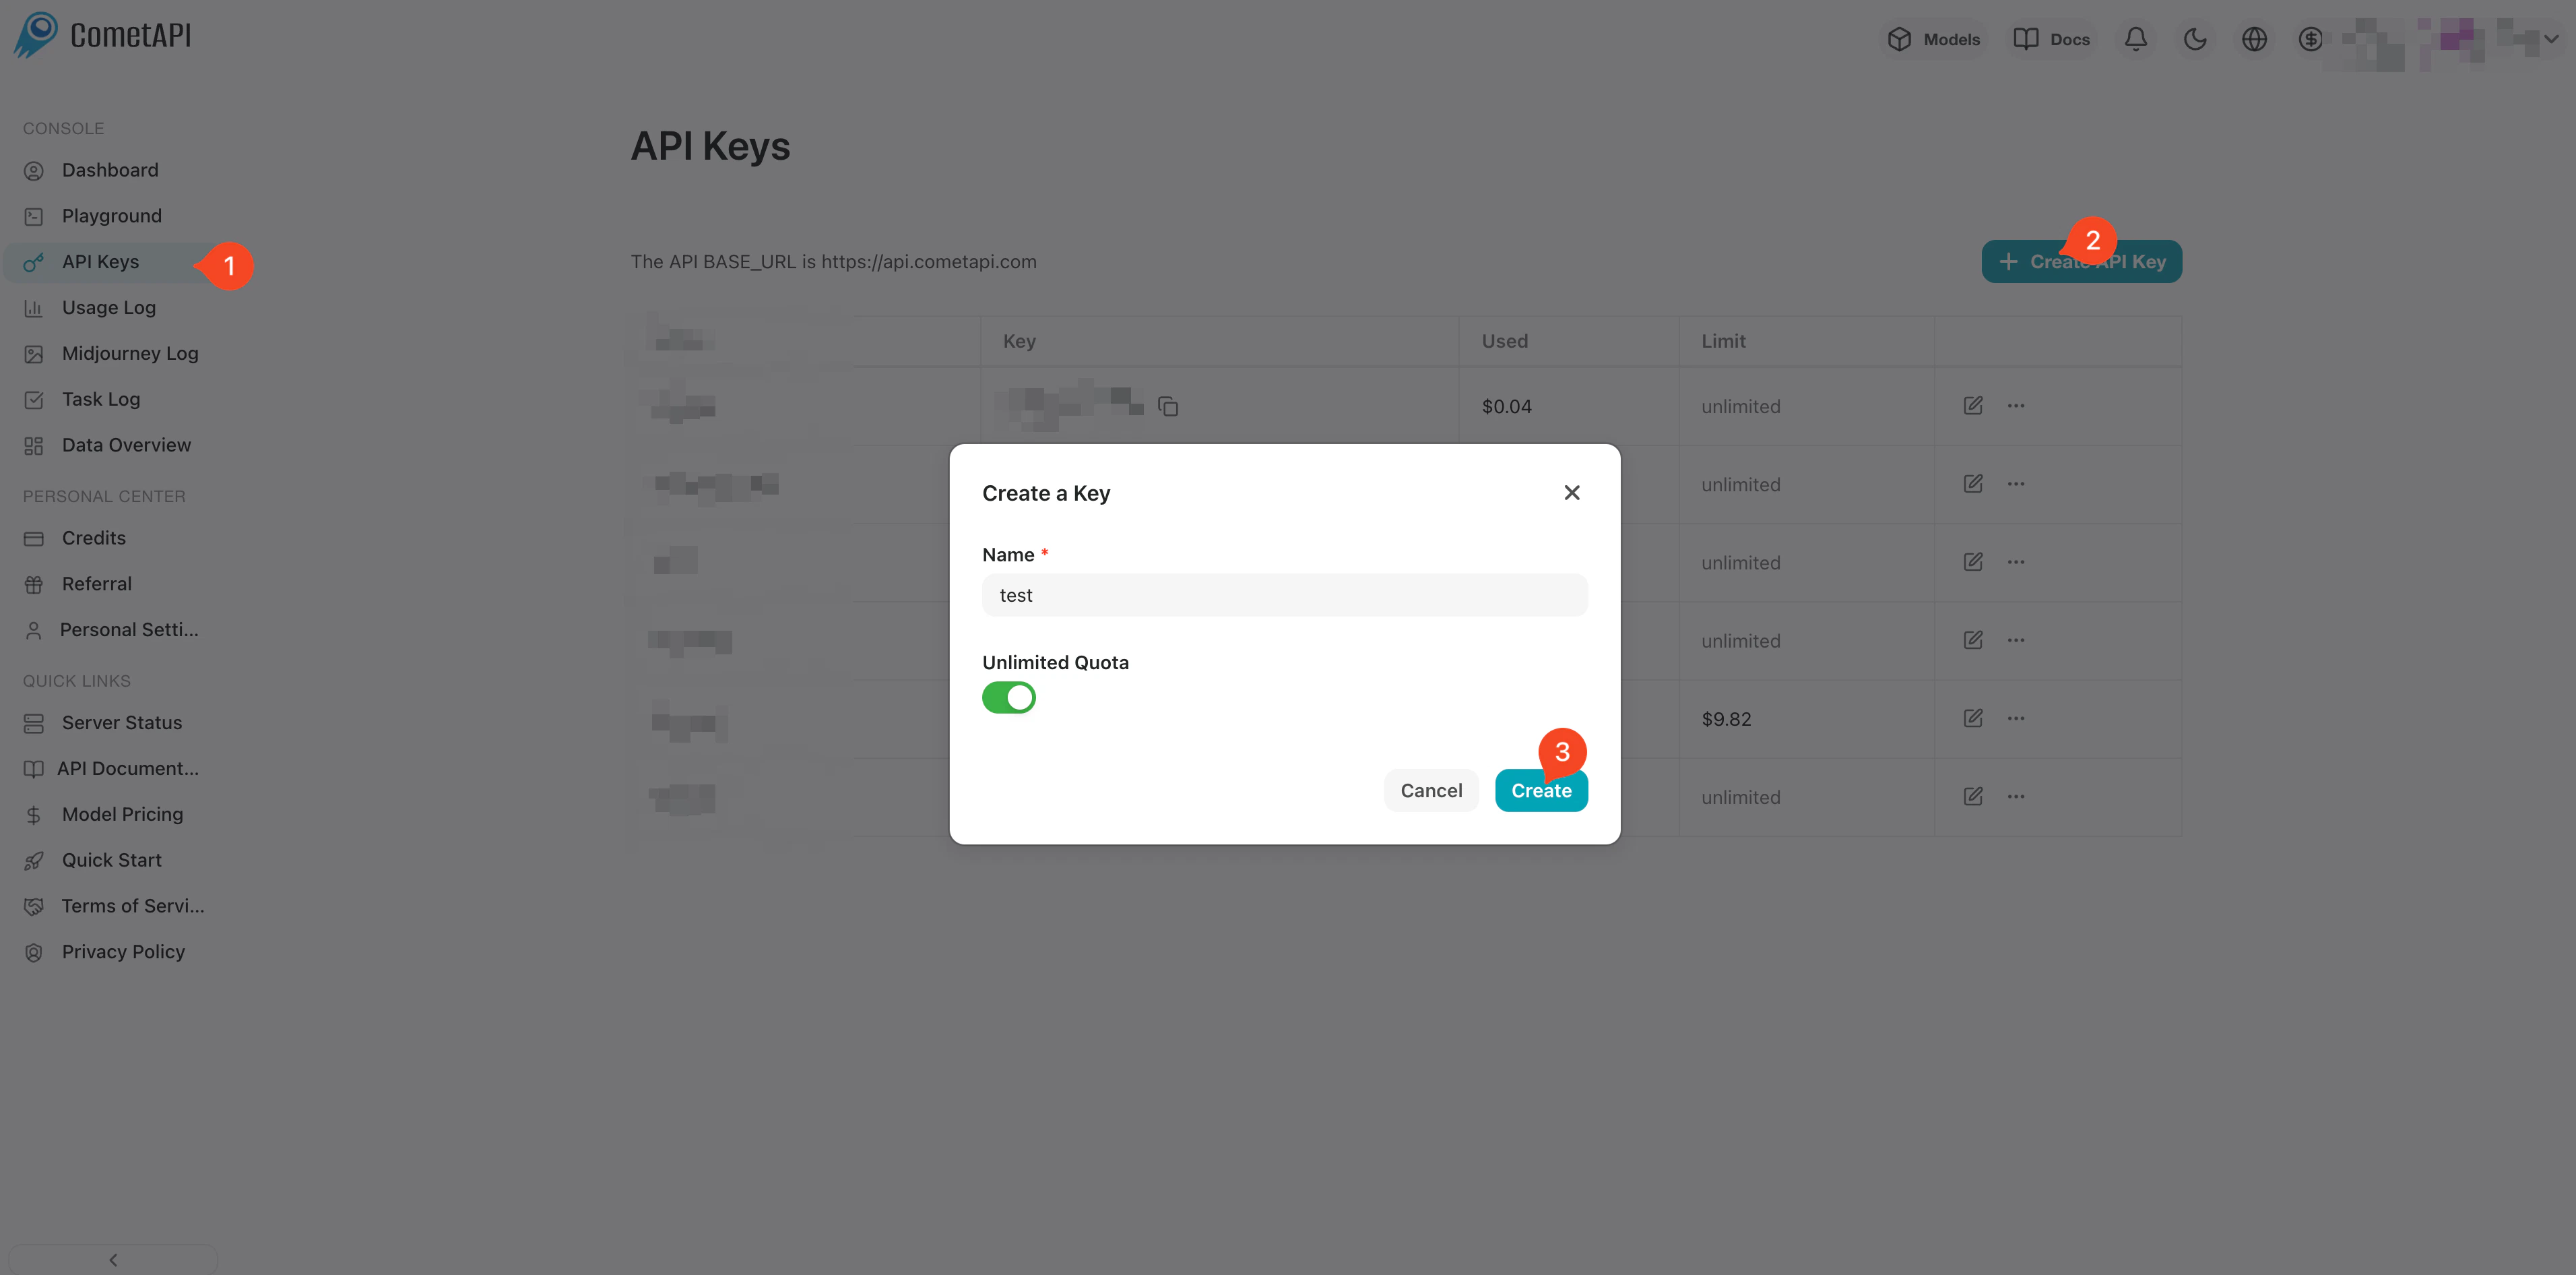
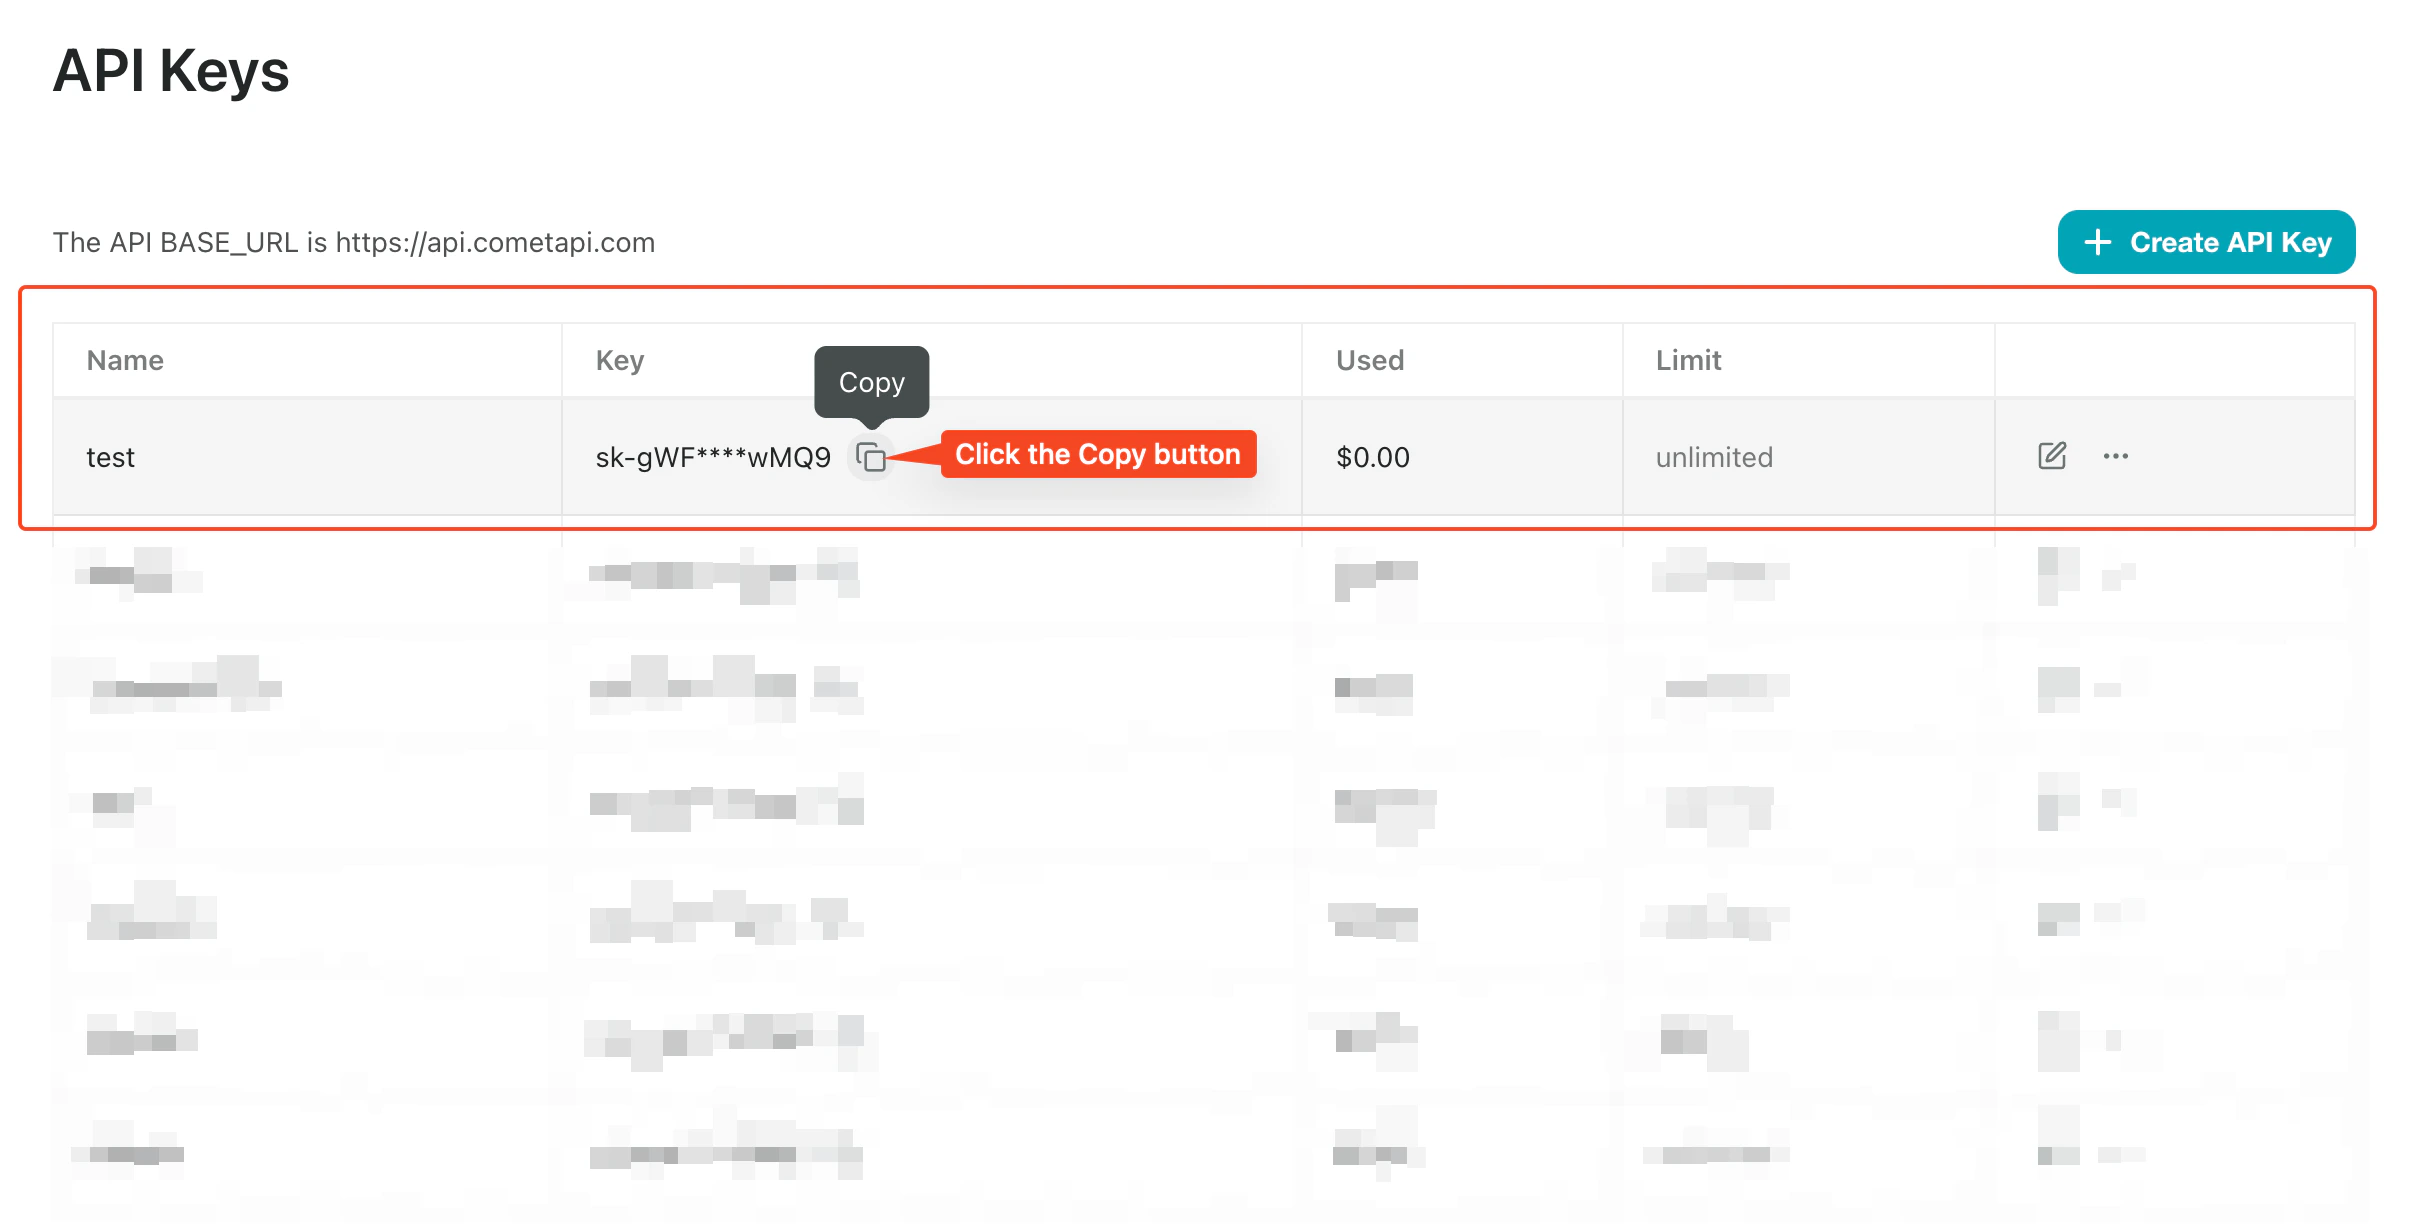
    Melden Sie sich im [CometAPI-Dashboard](https://www.cometapi.com/console) an. Klicken Sie auf **Add API Key** und kopieren Sie Ihren Schlüssel sowie die Basis-URL (`https://api.cometapi.com`).
    <Frame>
      <img src="https://mintcdn.com/cometapi/SZhlxZhCnMLn__BW/images/overview/810968_364191.png?fit=max&auto=format&n=SZhlxZhCnMLn__BW&q=85&s=aef81a83f29f8eb16655ed4060425f50" alt="CometAPI-Dashboard — Add API Key" width="3824" height="1892" data-path="images/overview/810968_364191.png" />
    </Frame>

    <Frame>
      <img src="https://mintcdn.com/cometapi/HhtmQffktazbxUvS/images/overview/810968_364193.png?fit=max&auto=format&n=HhtmQffktazbxUvS&q=85&s=d893f659267150d0faf45f99eb5dffc1" alt="CometAPI-API-Schlüssel und Basis-URL" width="2434" height="1232" data-path="images/overview/810968_364193.png" />
    </Frame>
  </Step>

  <Step title="Erstellen Sie eine OpenAI-Anmeldedaten">
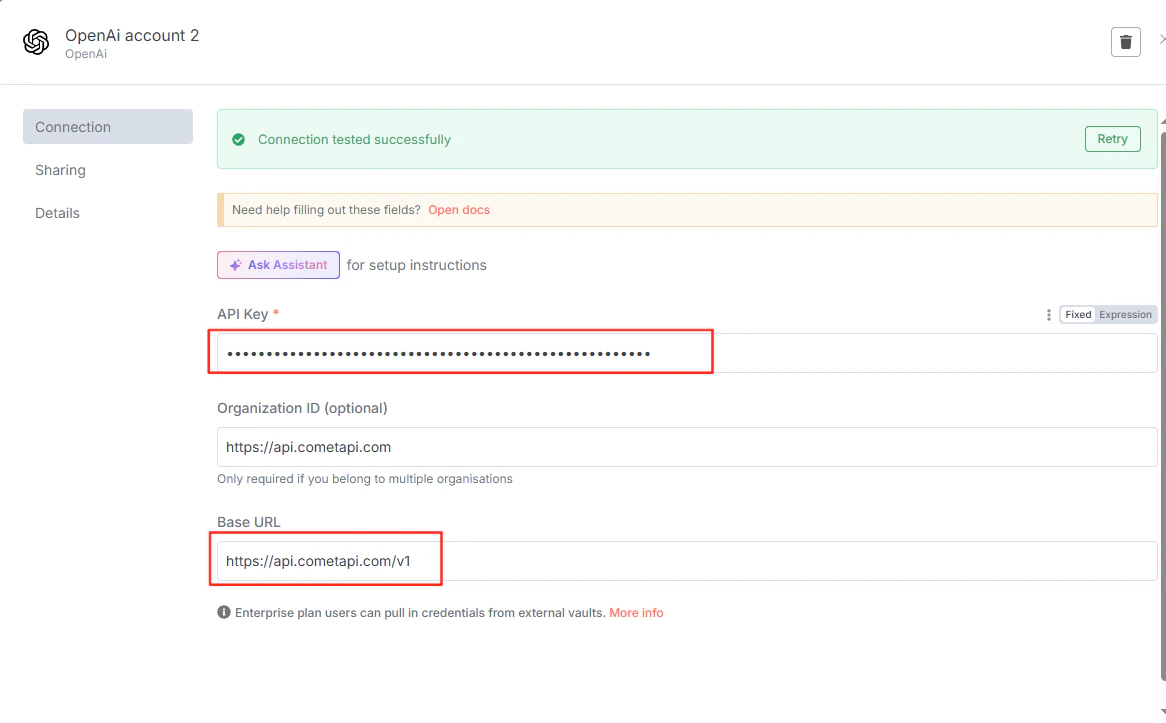
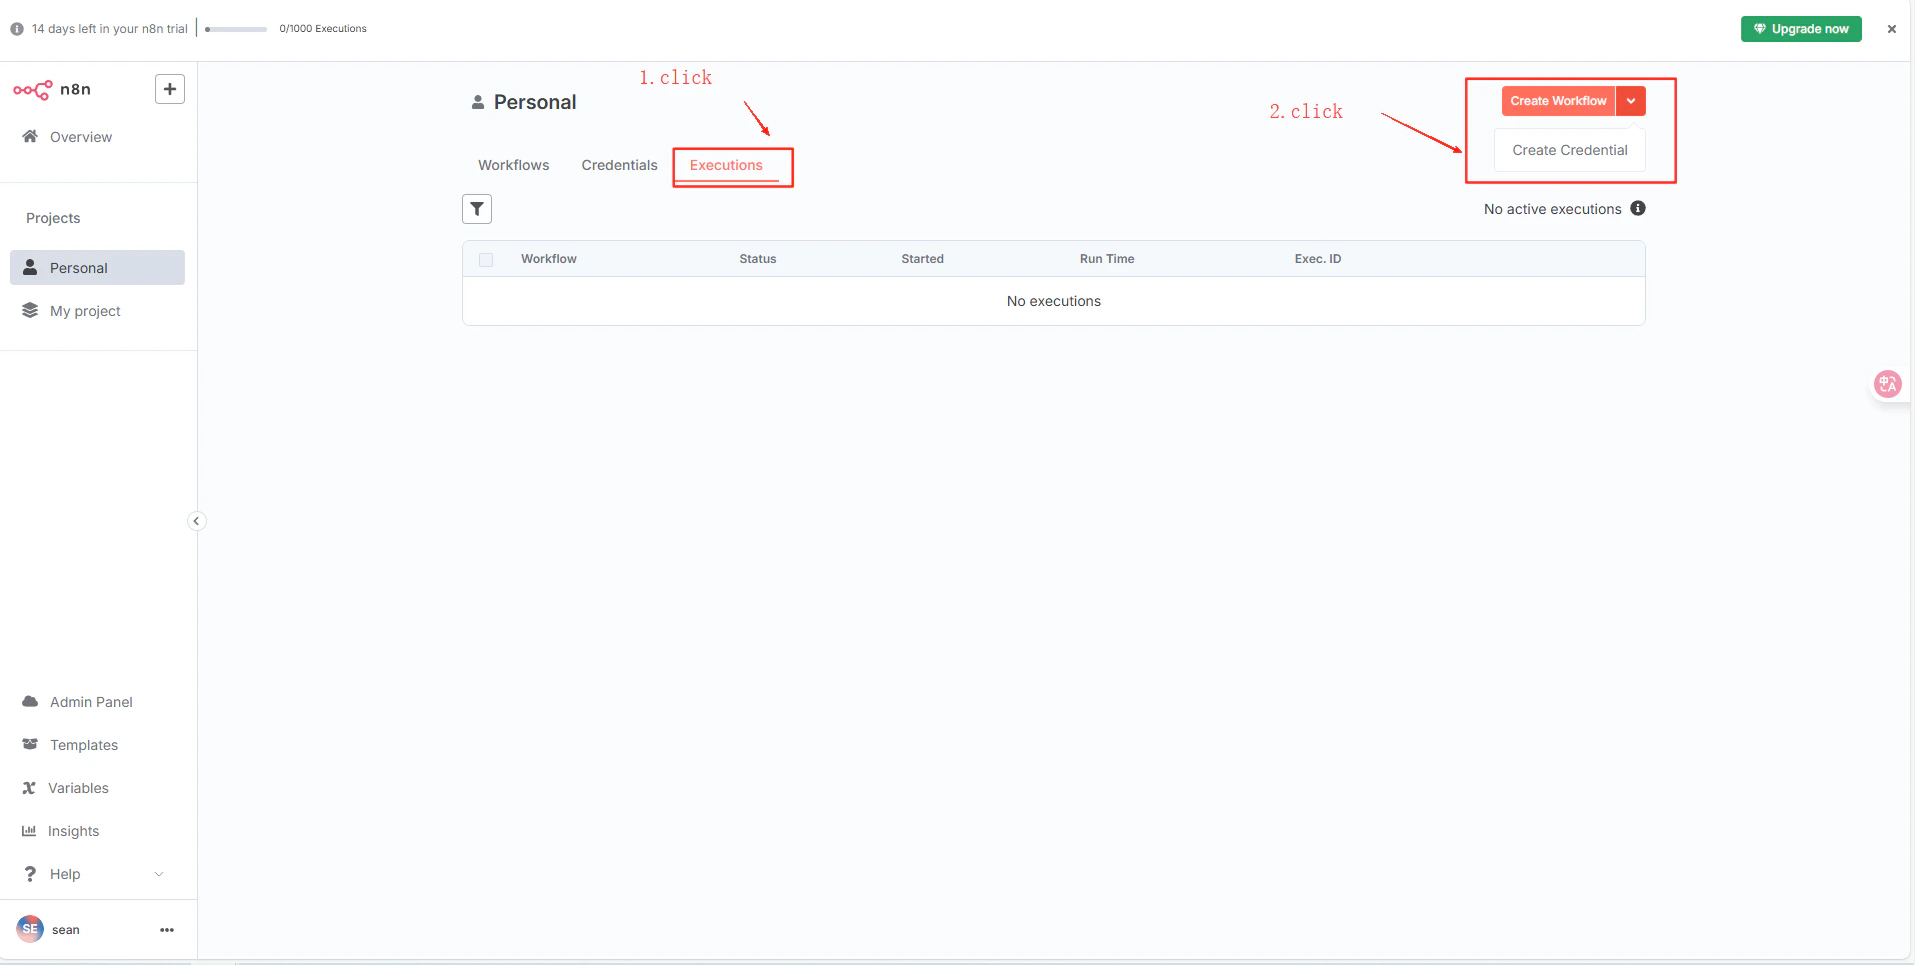
    Navigieren Sie in n8n zu Ihrem Projekt → **Credentials** → **Create Credential** → **OpenAI API**. Fügen Sie Ihren CometAPI-Schlüssel in **API Key** ein, geben Sie `https://api.cometapi.com/v1` in das Feld **Base URL** ein und klicken Sie auf **Save**.
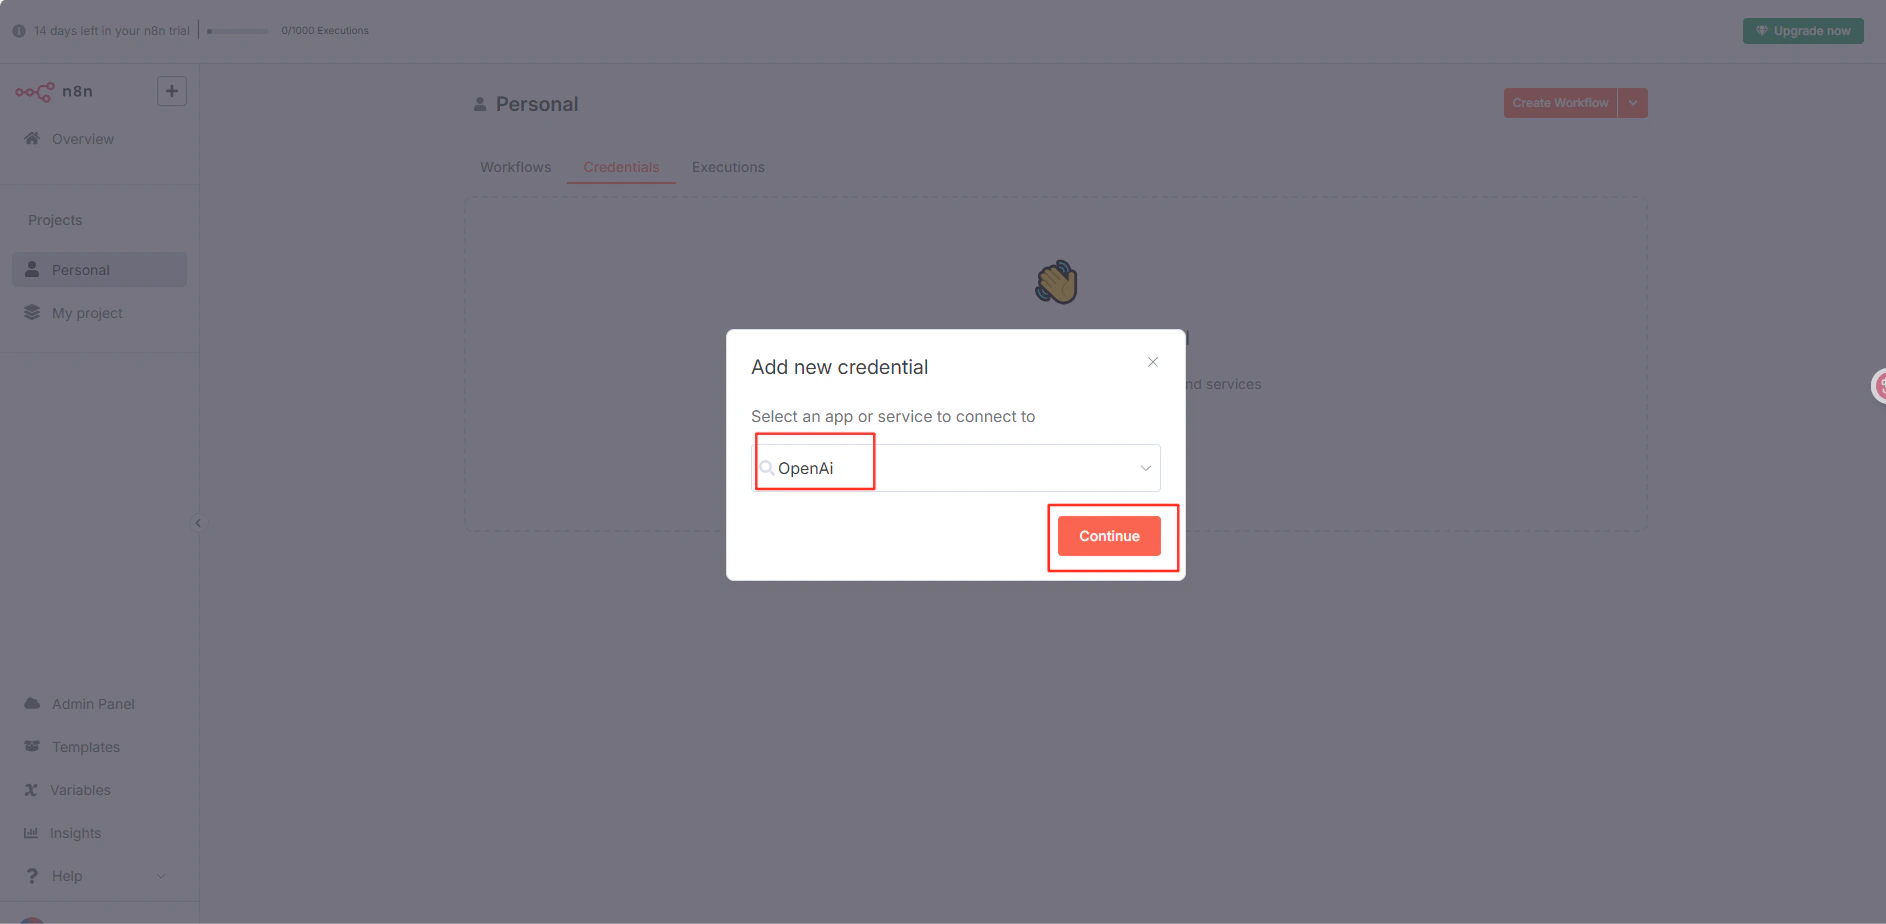
    <Frame>
      <img src="https://mintcdn.com/cometapi/mA1ovj6s0e3RM42l/images/integrations/810968_354031.png?fit=max&auto=format&n=mA1ovj6s0e3RM42l&q=85&s=915bfac17a897d2df0a6868a71fd1618" alt="n8n-Dialog „Create Credential“ mit ausgewählter OpenAI API" width="1915" height="965" data-path="images/integrations/810968_354031.png" />
    </Frame>

    <Frame>
      <img src="https://mintcdn.com/cometapi/mA1ovj6s0e3RM42l/images/integrations/810968_354032.png?fit=max&auto=format&n=mA1ovj6s0e3RM42l&q=85&s=c94c58a1f8826554f7b703d376c3ce53" alt="n8n-Formular für OpenAI-Anmeldedaten mit eingetragenem CometAPI-Schlüssel und Basis-URL" width="1886" height="924" data-path="images/integrations/810968_354032.png" />
    </Frame>

    <Frame>
      <img src="https://mintcdn.com/cometapi/mA1ovj6s0e3RM42l/images/integrations/810968_354037.png?fit=max&auto=format&n=mA1ovj6s0e3RM42l&q=85&s=e46a7e333b897ec09a791a26bb8db13f" alt="n8n-Anmeldedaten erfolgreich gespeichert" width="1166" height="723" data-path="images/integrations/810968_354037.png" />
    </Frame>
  </Step>

  <Step title="Testen Sie die Verbindung">
    Erstellen Sie einen Workflow mit einem OpenAI-Knoten unter Verwendung der gespeicherten Anmeldedaten und führen Sie ihn aus. Eine erfolgreiche Antwort bestätigt, dass die Einrichtung funktioniert.
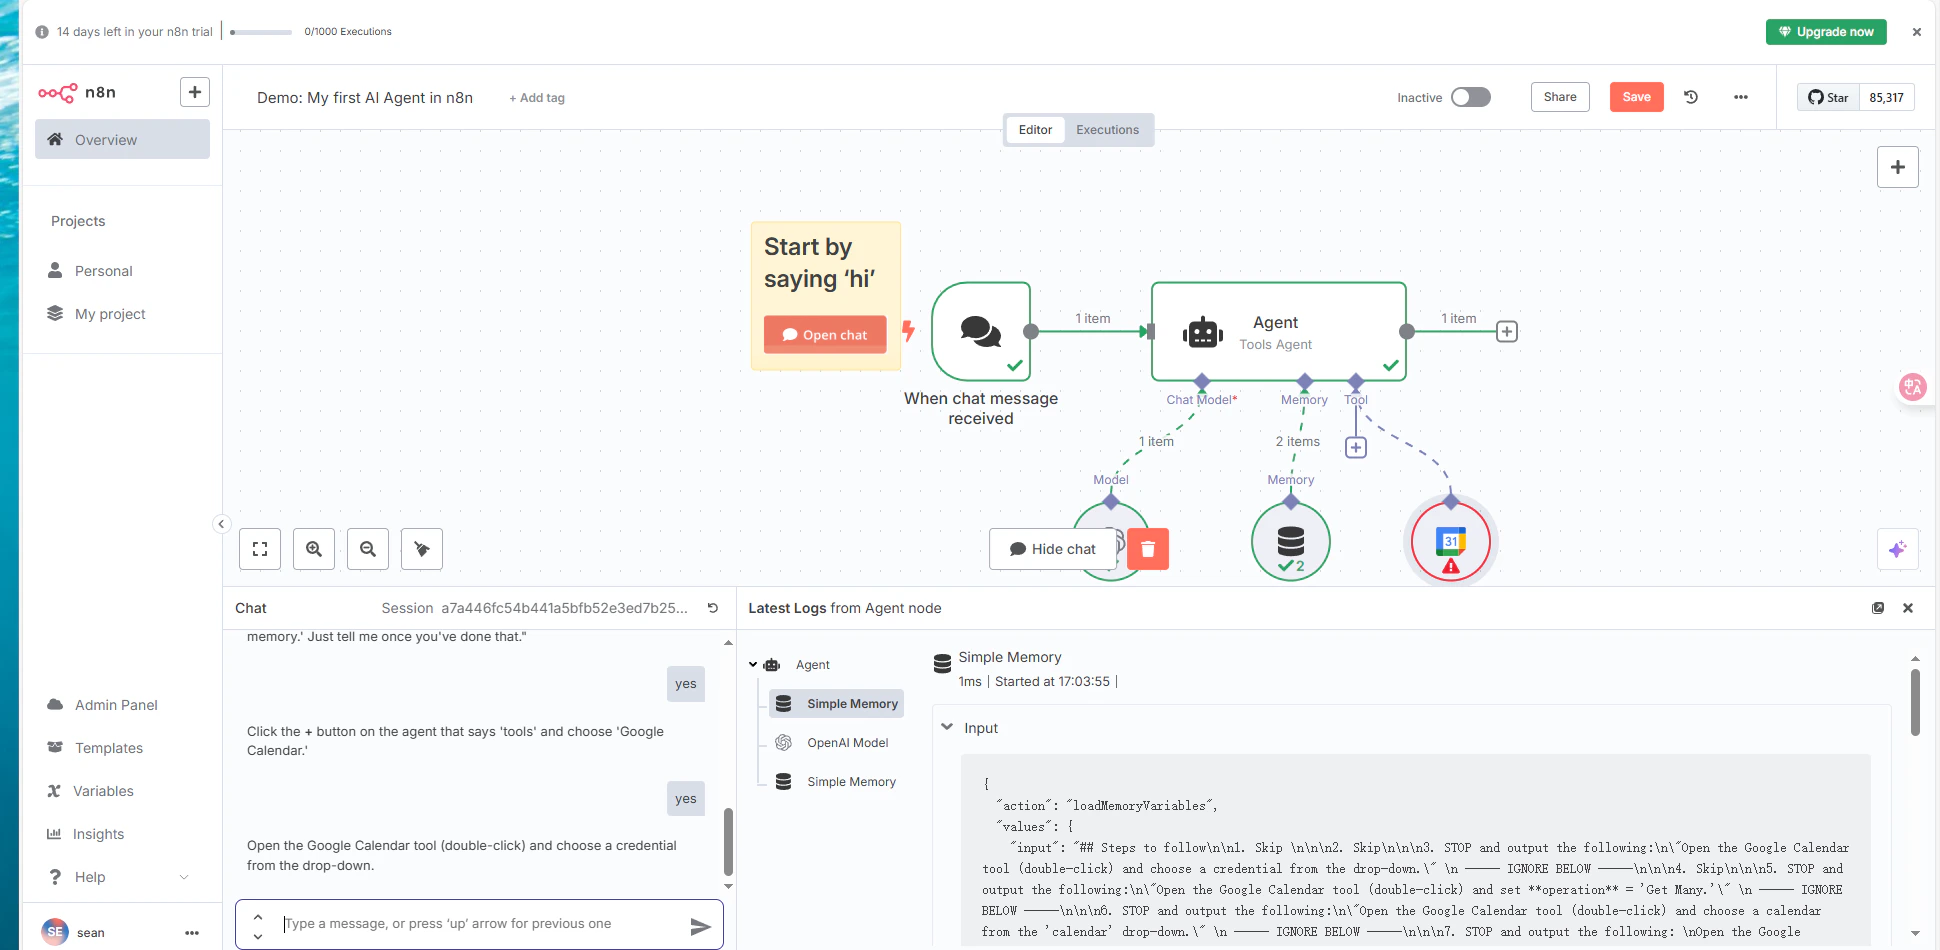
    <Frame>
      <img src="https://mintcdn.com/cometapi/mA1ovj6s0e3RM42l/images/integrations/810968_354039.png?fit=max&auto=format&n=mA1ovj6s0e3RM42l&q=85&s=4707697d418bff1dec20eb42dd5a2c60" alt="n8n-Workflow mit einer erfolgreichen Antwort von CometAPI" width="1940" height="950" data-path="images/integrations/810968_354039.png" />
    </Frame>
  </Step>
</Steps>

<script type="application/ld+json">
  {`
    {
    "@context": "https://schema.org",
    "@graph": [
      {
        "@type": "HowTo",
        "@id": "https://apidoc.cometapi.com/integrations/n8n#howto",
        "name": "n8n mit CometAPI verbinden",
        "description": "Verwenden Sie diese Anleitung, um n8n mit CometAPI zu verbinden, indem Sie die Basis-URL, den API-Schlüssel sowie die model- oder Provider-Optionen festlegen.",
        "step": [
          {
            "@type": "HowToStep",
            "@id": "https://apidoc.cometapi.com/integrations/n8n#step-1",
            "position": 1,
            "name": "Holen Sie sich Ihren CometAPI-API-Schlüssel",
            "text": "Erstellen Sie Ihr CometAPI-Konto oder öffnen Sie es, und kopieren Sie dann einen aktiven API-Schlüssel aus dem Dashboard."
          },
          {
            "@type": "HowToStep",
            "@id": "https://apidoc.cometapi.com/integrations/n8n#step-2",
            "position": 2,
            "name": "Erstellen Sie OpenAI-Anmeldedaten",
            "text": "Führen Sie den Schritt „Erstellen Sie OpenAI-Anmeldedaten“ in der Anleitung „n8n mit CometAPI verbinden“ aus."
          },
          {
            "@type": "HowToStep",
            "@id": "https://apidoc.cometapi.com/integrations/n8n#step-3",
            "position": 3,
            "name": "Testen Sie die Verbindung",
            "text": "Wählen Sie eine aktuelle model ID auf der Seite „CometAPI Models“ aus und senden Sie dann eine Testanfrage aus der Integration."
          }
        ]
      },
      {
        "@type": "BreadcrumbList",
        "itemListElement": [
          {
            "@type": "ListItem",
            "position": 1,
            "name": "CometAPI-Dokumentation",
            "item": "https://apidoc.cometapi.com/"
          },
          {
            "@type": "ListItem",
            "position": 2,
            "name": "Integrationen",
            "item": "https://apidoc.cometapi.com/integrations"
          },
          {
            "@type": "ListItem",
            "position": 3,
            "name": "n8n mit CometAPI verbinden",
            "item": "https://apidoc.cometapi.com/integrations/n8n"
          }
        ]
      }
    ]
    }
    `}
</script>