> ## Documentation Index
> Fetch the complete documentation index at: https://apidoc.cometapi.com/llms.txt
> Use this file to discover all available pages before exploring further.

# Utiliser Coze avec CometAPI

> Utilisez ce guide pour configurer Coze avec CometAPI en définissant l’URL de base, la clé API, ainsi que les options de modèle ou de fournisseur.

Coze est un créateur d’agents IA et de workflows. Vous pouvez connecter CometAPI à Coze de deux façons : via le **plugin CometAPI** natif (la plus simple) ou via un **nœud HTTP Request** générique pour une flexibilité maximale.

## Prérequis

* Un compte CometAPI avec une clé API active — [obtenez la vôtre ici](https://www.cometapi.com/console/token)
* Un compte Coze — [inscrivez-vous ici](https://www.coze.com)

<Steps>
  <Step title="Obtenez votre clé API CometAPI">
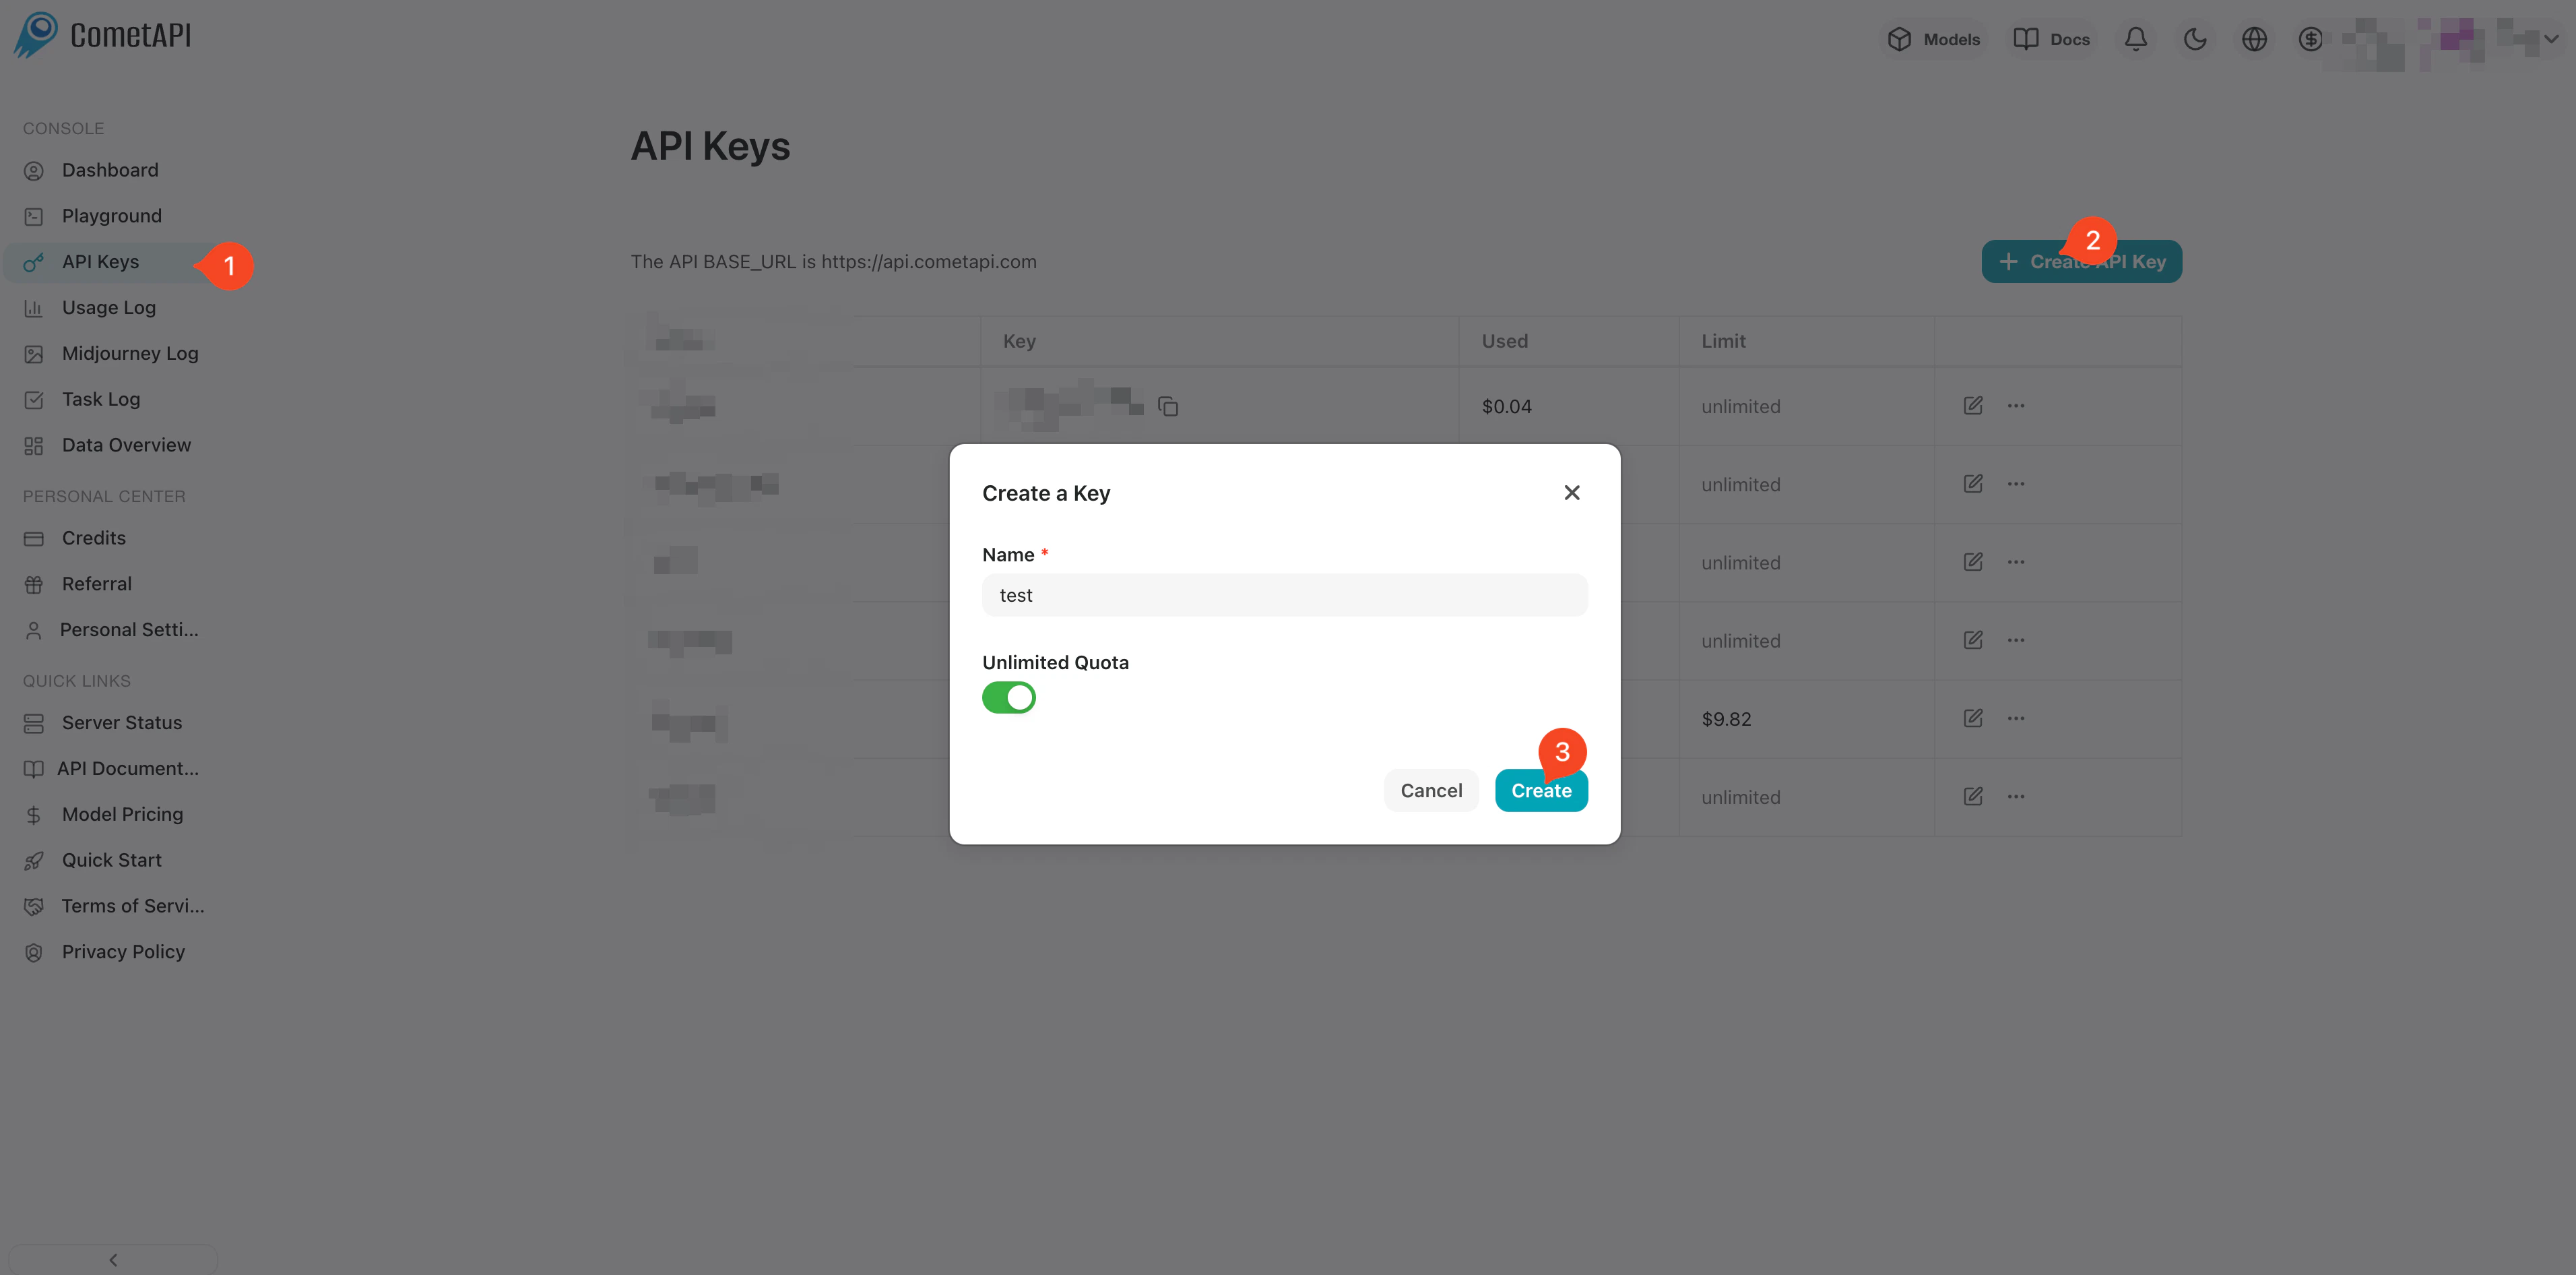
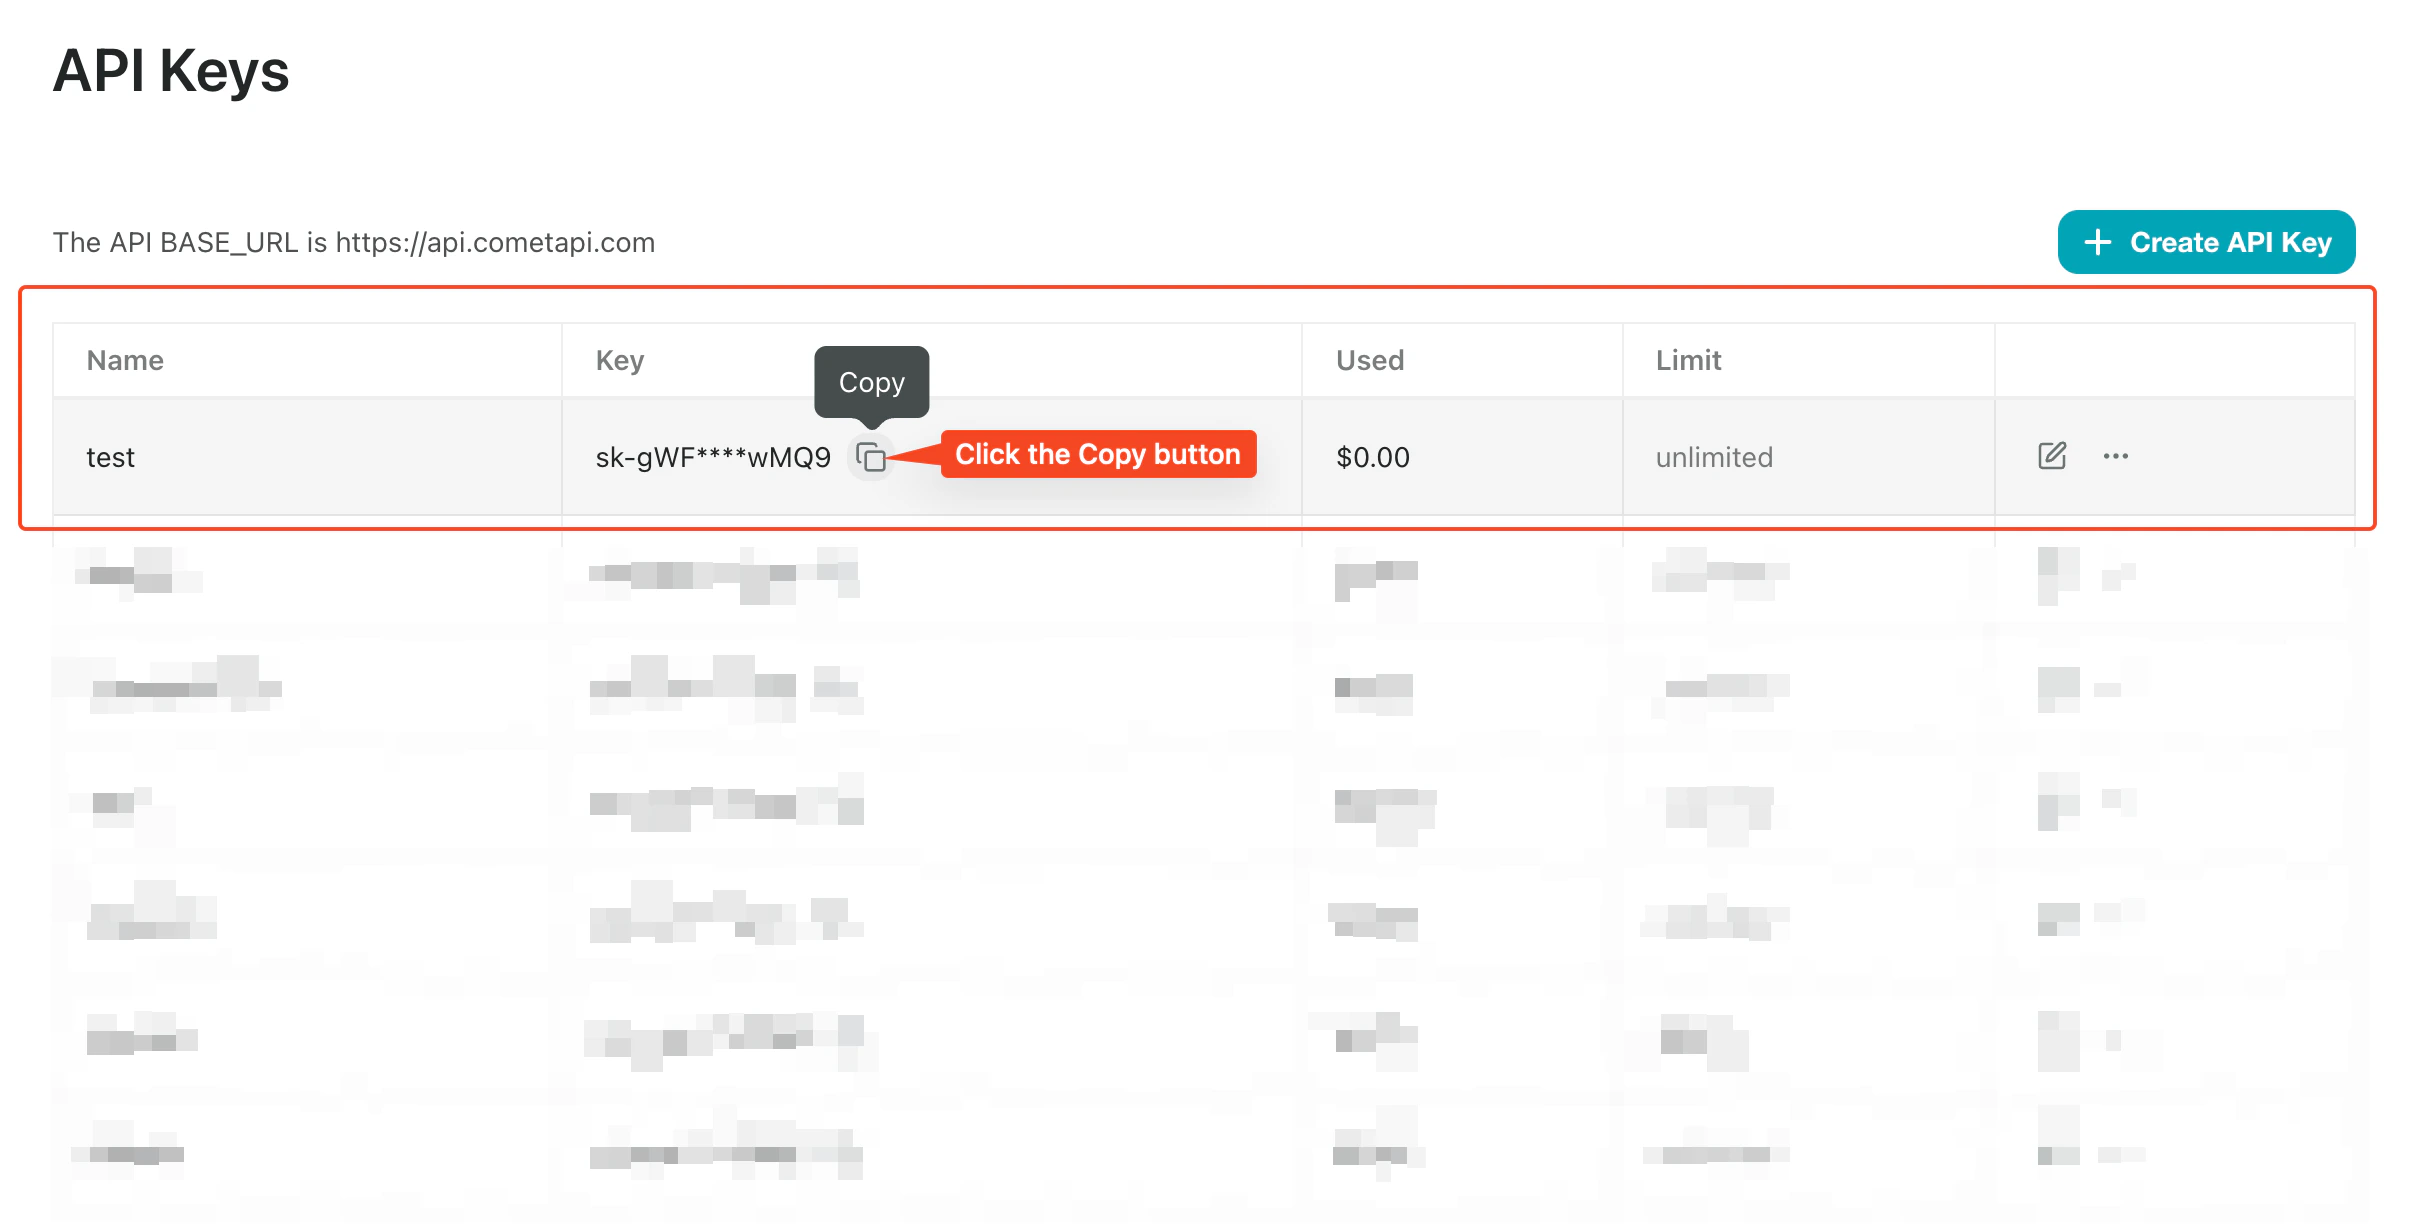
    Connectez-vous à la [console CometAPI](https://www.cometapi.com/console/token). Cliquez sur **Add API Key** et copiez votre clé API CometAPI.
    <Frame>
      <img src="https://mintcdn.com/cometapi/SZhlxZhCnMLn__BW/images/overview/810968_364191.png?fit=max&auto=format&n=SZhlxZhCnMLn__BW&q=85&s=aef81a83f29f8eb16655ed4060425f50" alt="Tableau de bord CometAPI affichant le bouton Add API Key" width="3824" height="1892" data-path="images/overview/810968_364191.png" />
    </Frame>

    <Frame>
      <img src="https://mintcdn.com/cometapi/HhtmQffktazbxUvS/images/overview/810968_364193.png?fit=max&auto=format&n=HhtmQffktazbxUvS&q=85&s=d893f659267150d0faf45f99eb5dffc1" alt="Détails de la clé API CometAPI avec l'URL de base" width="2434" height="1232" data-path="images/overview/810968_364193.png" />
    </Frame>
  </Step>

  <Step title="Ajouter CometAPI à un workflow Coze">
    <Tabs>
      <Tab title="Méthode 1 : plugin CometAPI (recommandé)">
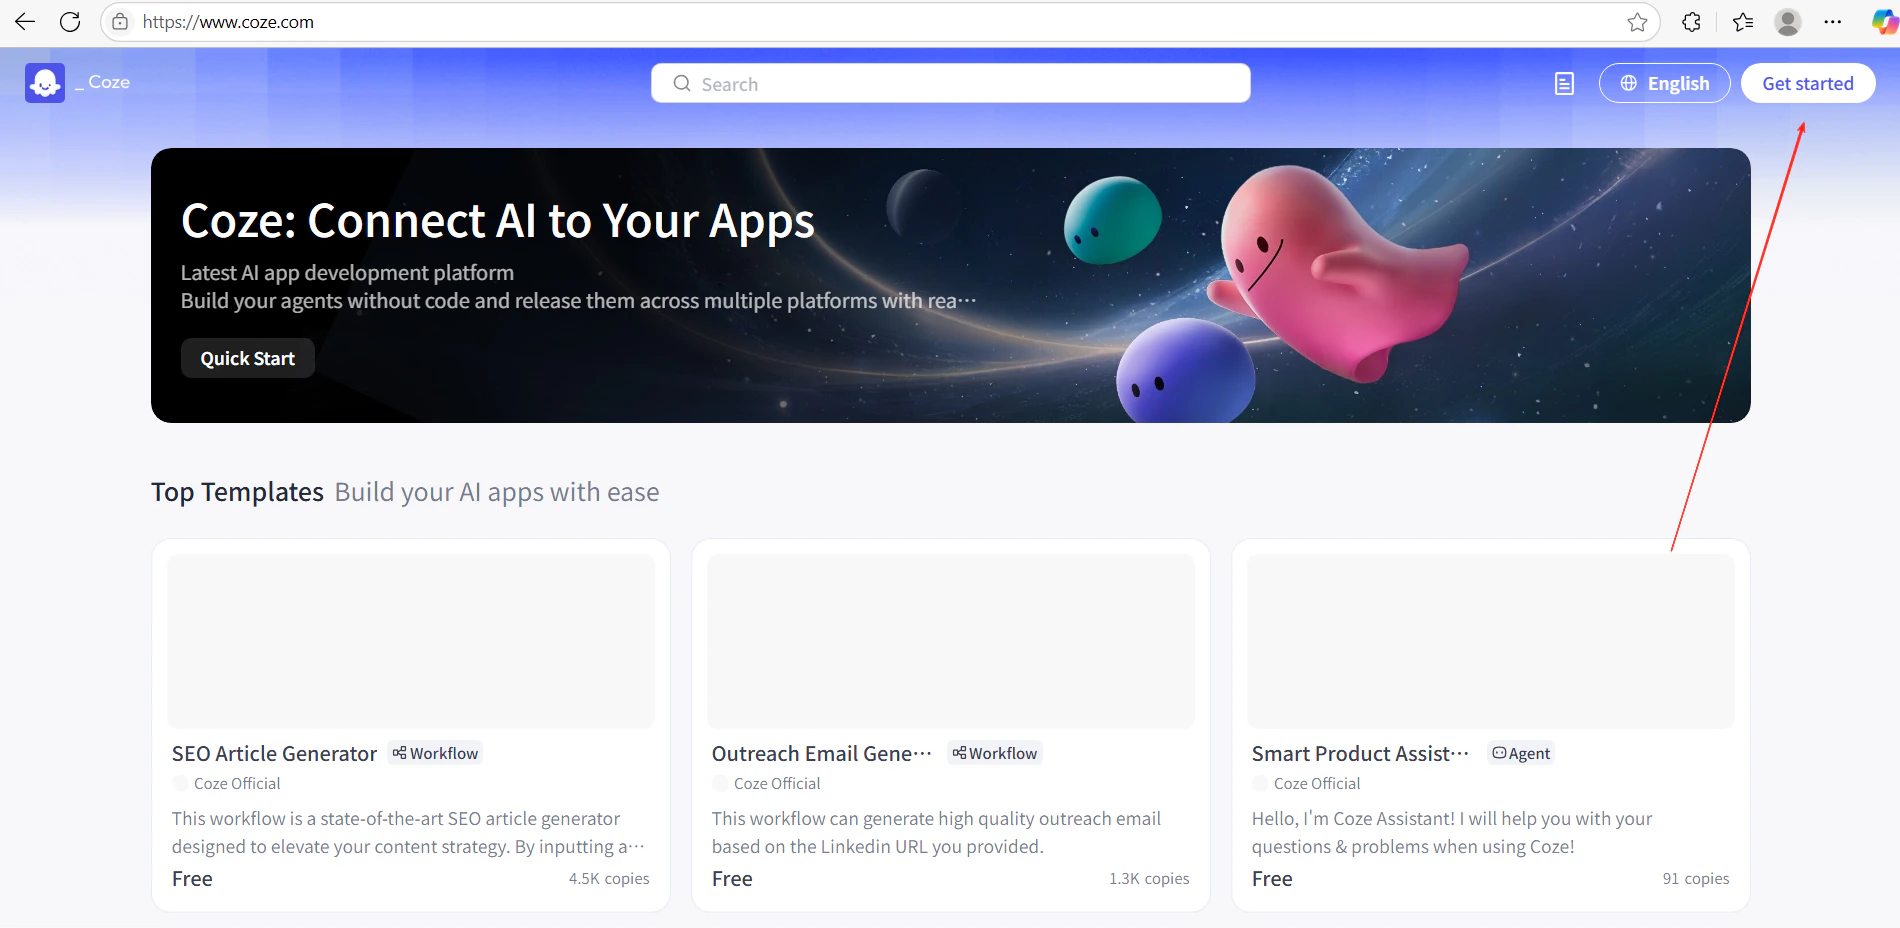
        1. Dans Coze, cliquez sur **Get Started** et créez un nouveau workflow.
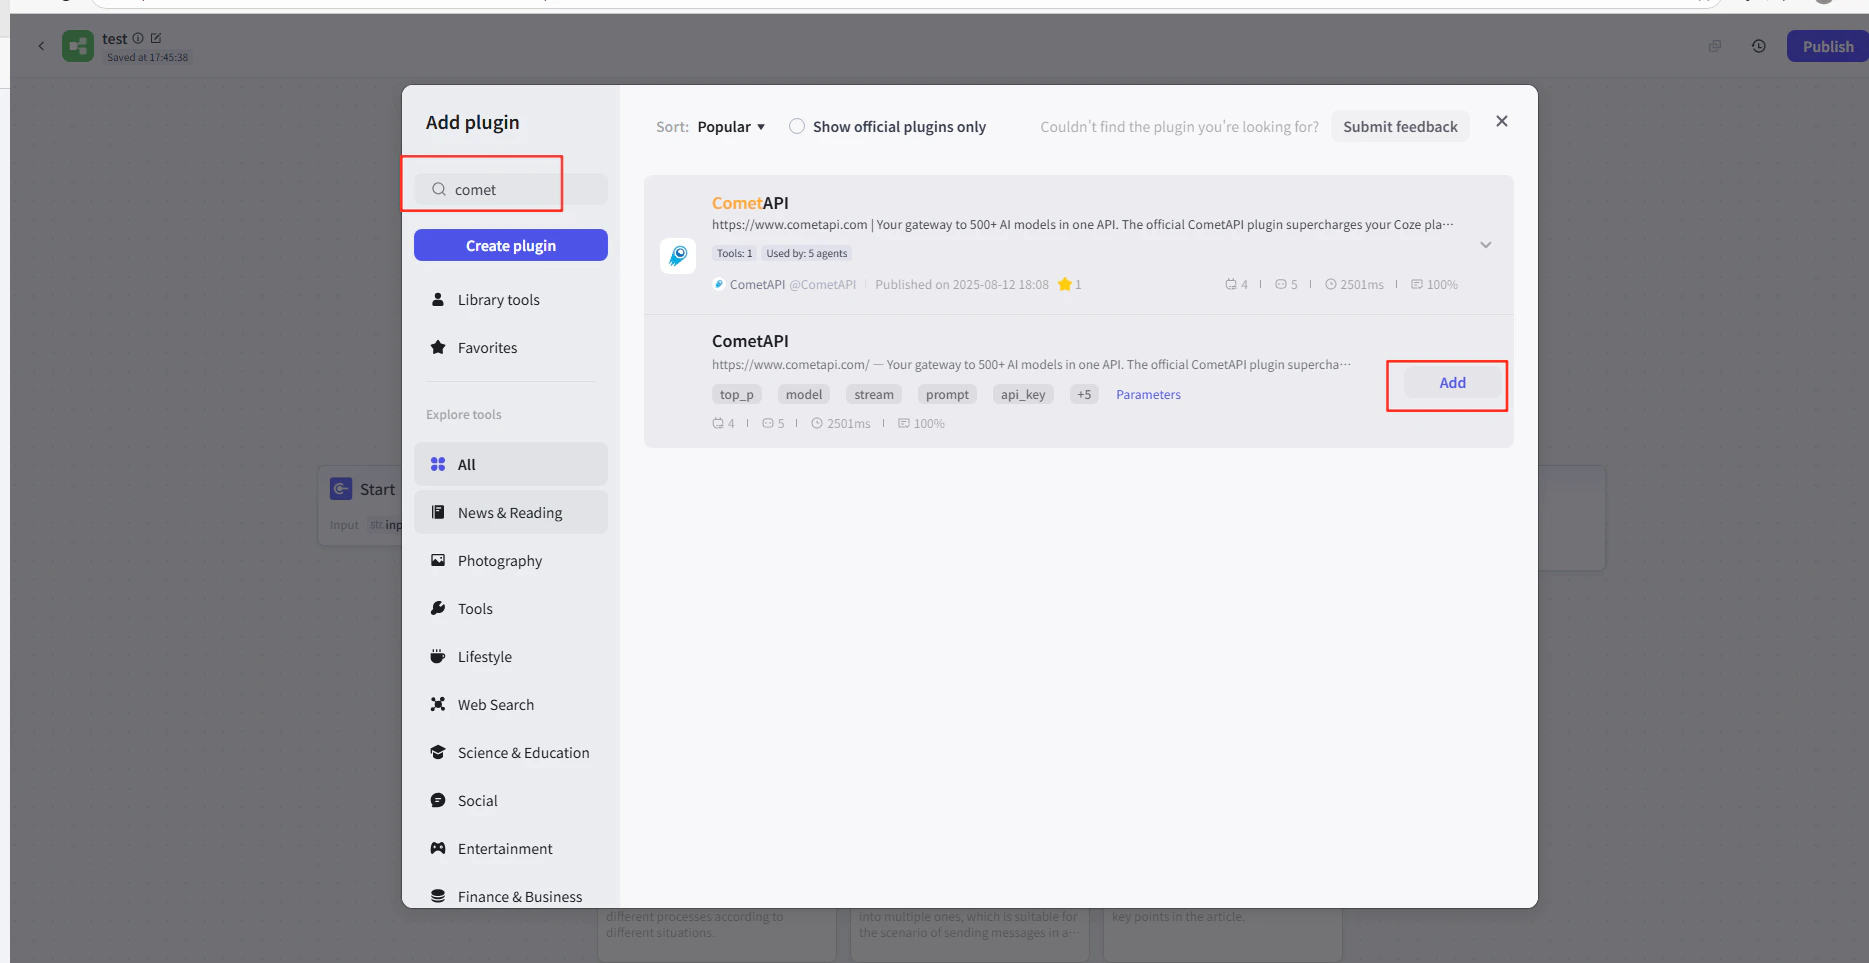
        2. Dans l'éditeur de workflow, cliquez sur **Add Node → Plugins** et recherchez **CometAPI**.
        3. Ajoutez le nœud de plugin CometAPI à votre workflow.
        <Frame>
          <img src="https://mintcdn.com/cometapi/E4FFvyMYmaOZoldp/images/integrations/810968_355124.png?fit=max&auto=format&n=E4FFvyMYmaOZoldp&q=85&s=31a8c613d735f88246baa86ae399fa11" alt="Éditeur de workflow Coze affichant la recherche de plugin" width="1900" height="928" data-path="images/integrations/810968_355124.png" />
        </Frame>

        <Frame>
          <img src="https://mintcdn.com/cometapi/E4FFvyMYmaOZoldp/images/integrations/810968_355125.png?fit=max&auto=format&n=E4FFvyMYmaOZoldp&q=85&s=75f2336cc40c9f21d757ced6ee227fd7" alt="Plugin CometAPI apparaissant dans les résultats de recherche" width="1904" height="940" data-path="images/integrations/810968_355125.png" />
        </Frame>

        <Frame>
          <img src="https://mintcdn.com/cometapi/E4FFvyMYmaOZoldp/images/integrations/810968_355126.png?fit=max&auto=format&n=E4FFvyMYmaOZoldp&q=85&s=1058980811bfc31c51715a76e048cc02" alt="Nœud de plugin CometAPI ajouté au canvas" width="1938" height="908" data-path="images/integrations/810968_355126.png" />
        </Frame>

        <Frame>
          <img src="https://mintcdn.com/cometapi/E4FFvyMYmaOZoldp/images/integrations/810968_360283.png?fit=max&auto=format&n=E4FFvyMYmaOZoldp&q=85&s=f89b117699a4d46802c62436ae92bd84" alt="Panneau de configuration du nœud de plugin" width="1869" height="963" data-path="images/integrations/810968_360283.png" />
        </Frame>

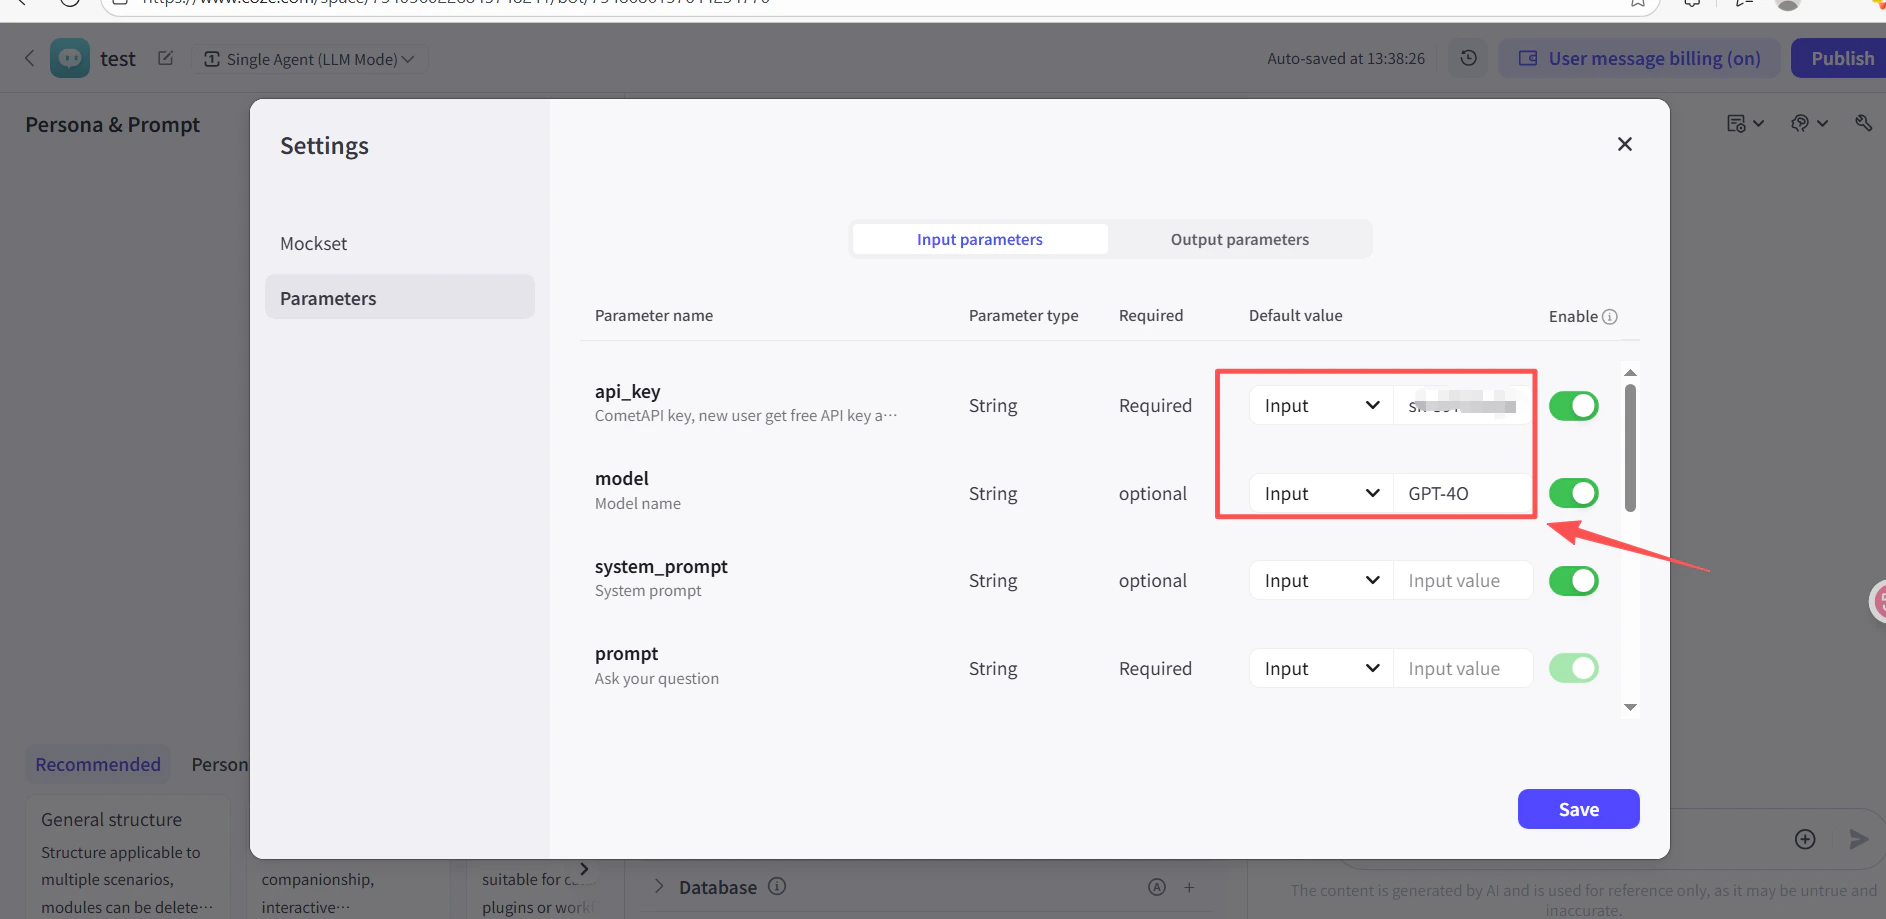
        4. Dans le champ **API Key** du nœud de plugin, collez votre clé API CometAPI.
        5. Cliquez sur **Test** pour vérifier la connexion, puis sur **Publish**.
        <Frame>
          <img src="https://mintcdn.com/cometapi/SZhlxZhCnMLn__BW/images/integrations/810968_361332.png?fit=max&auto=format&n=SZhlxZhCnMLn__BW&q=85&s=0f41c0cfaf3cdcebd45d740ce96fd178" alt="Nœud de plugin avec la clé API renseignée" width="1886" height="919" data-path="images/integrations/810968_361332.png" />
        </Frame>

        <Frame>
          <img src="https://mintcdn.com/cometapi/SZhlxZhCnMLn__BW/images/integrations/810968_361333.png?fit=max&auto=format&n=SZhlxZhCnMLn__BW&q=85&s=17b349b2c651c6e5193bfde6b63e0c17" alt="Résultat de test réussi pour le plugin CometAPI" width="1884" height="903" data-path="images/integrations/810968_361333.png" />
        </Frame>
      </Tab>

      <Tab title="Méthode 2 : nœud HTTP Request">
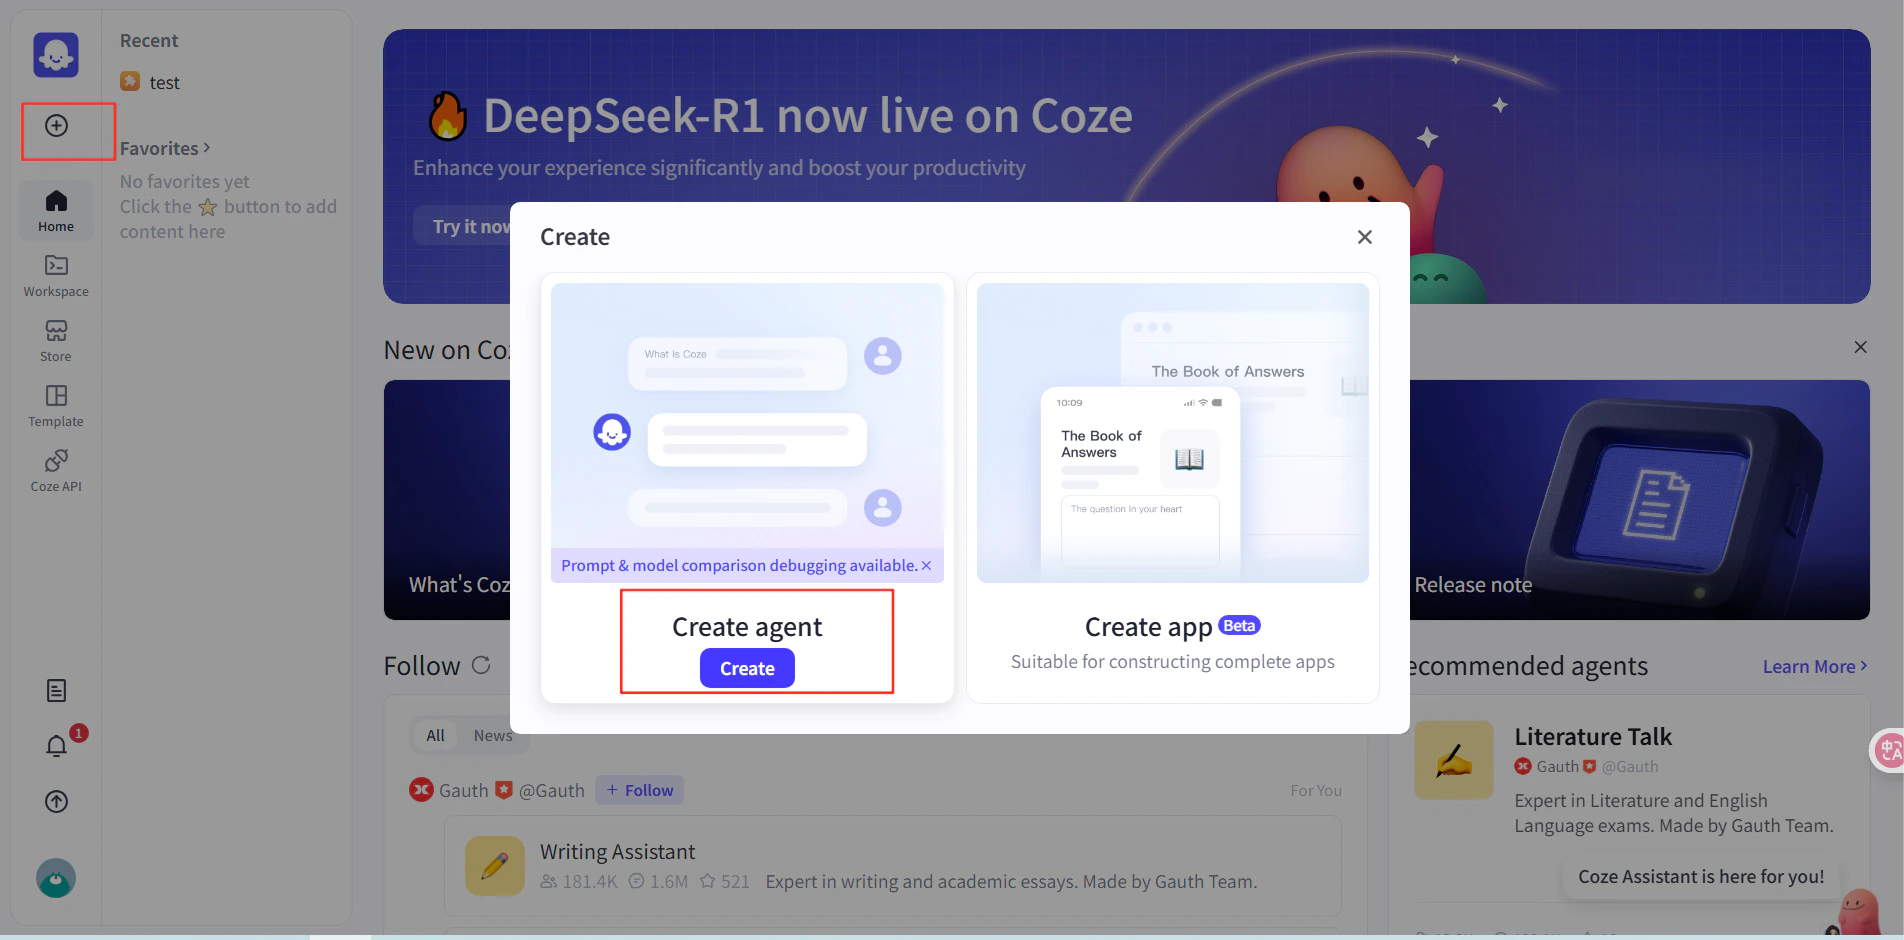
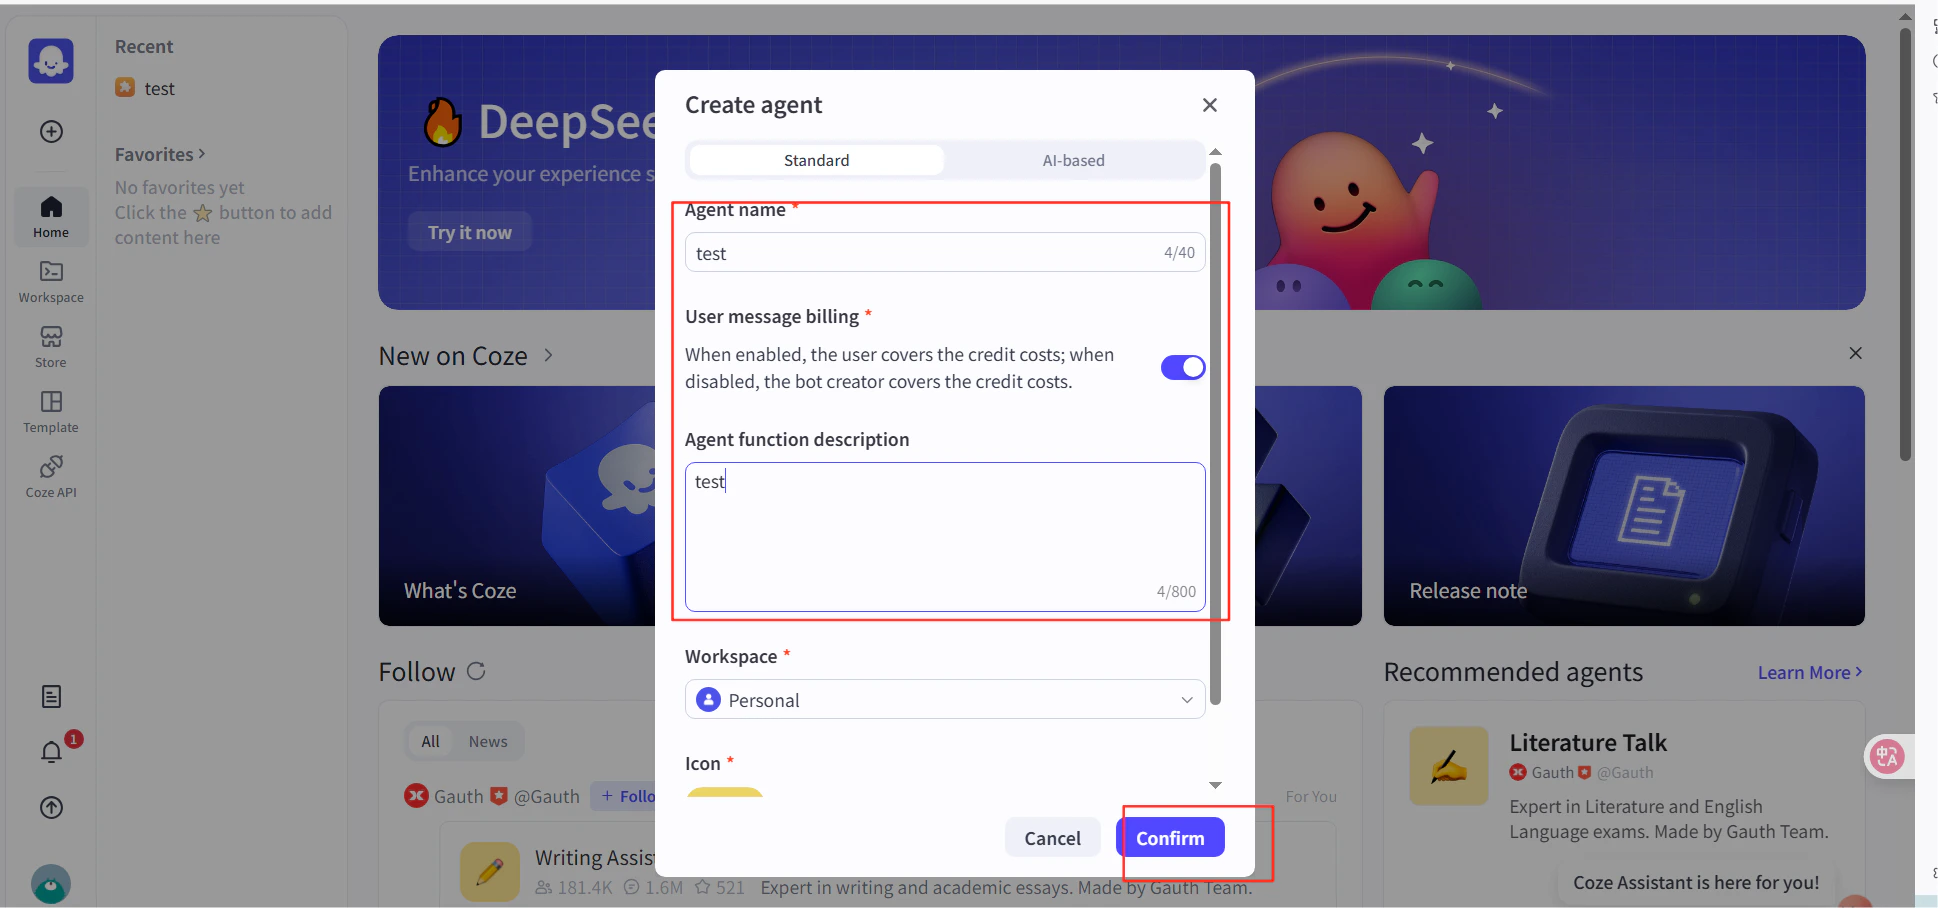
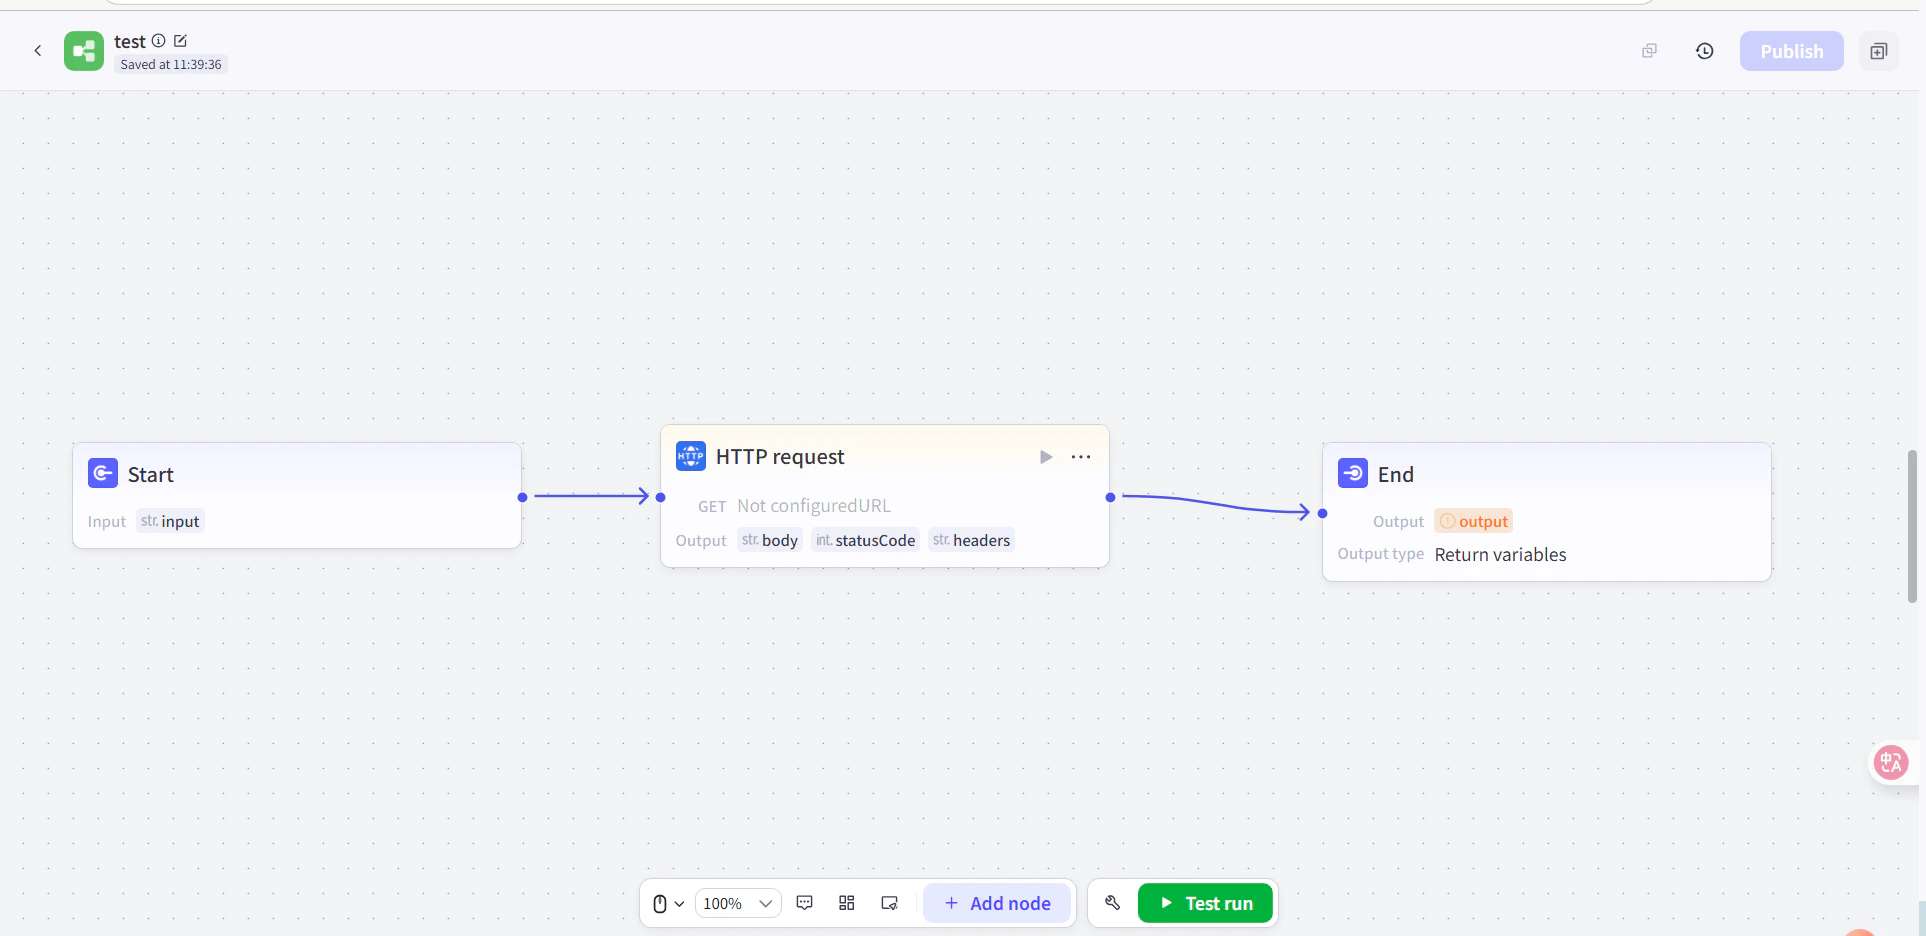
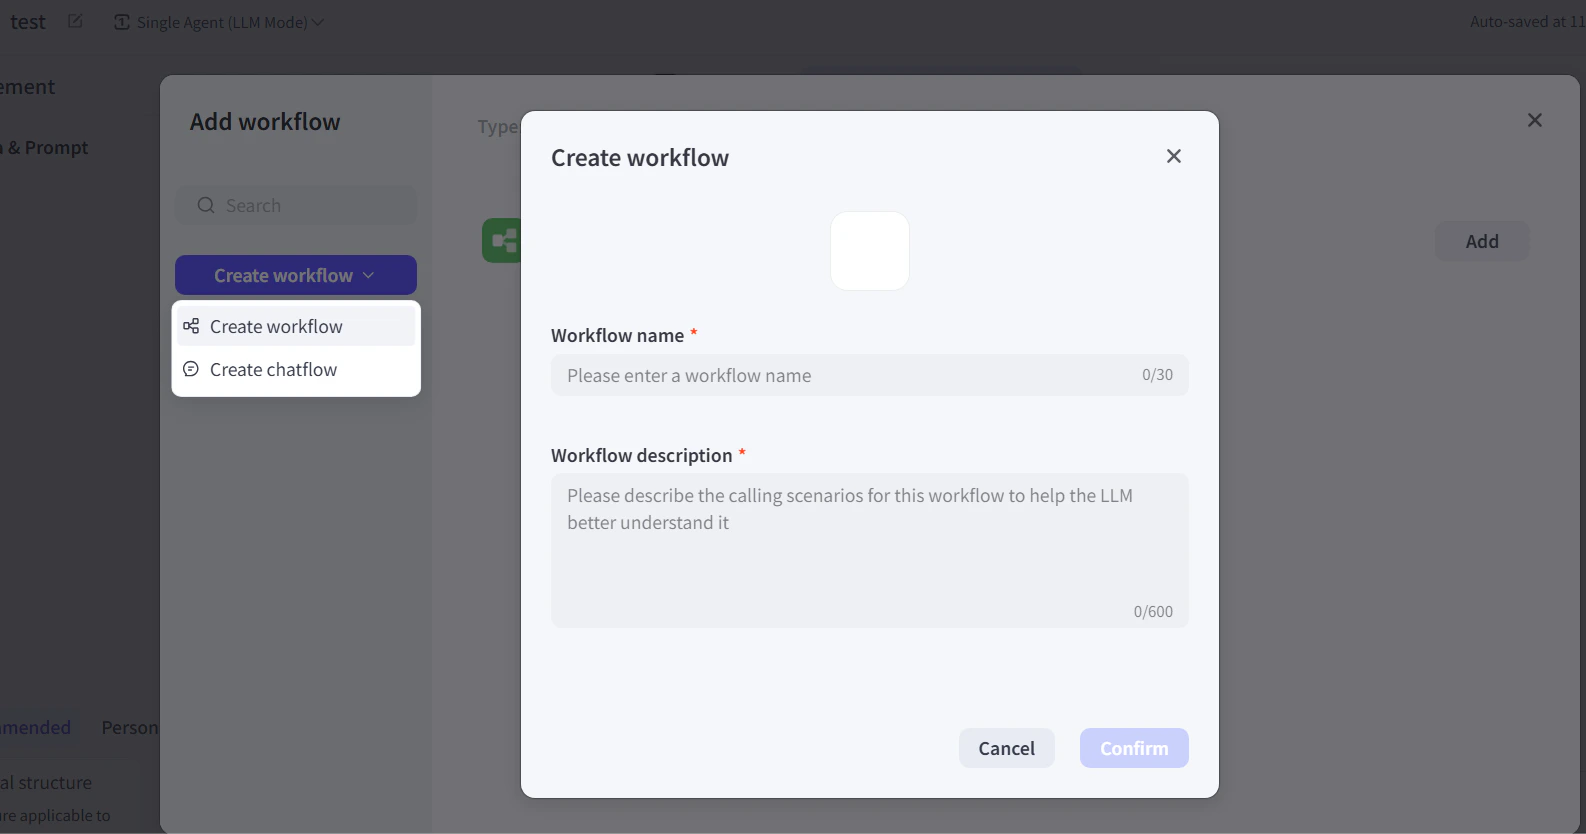
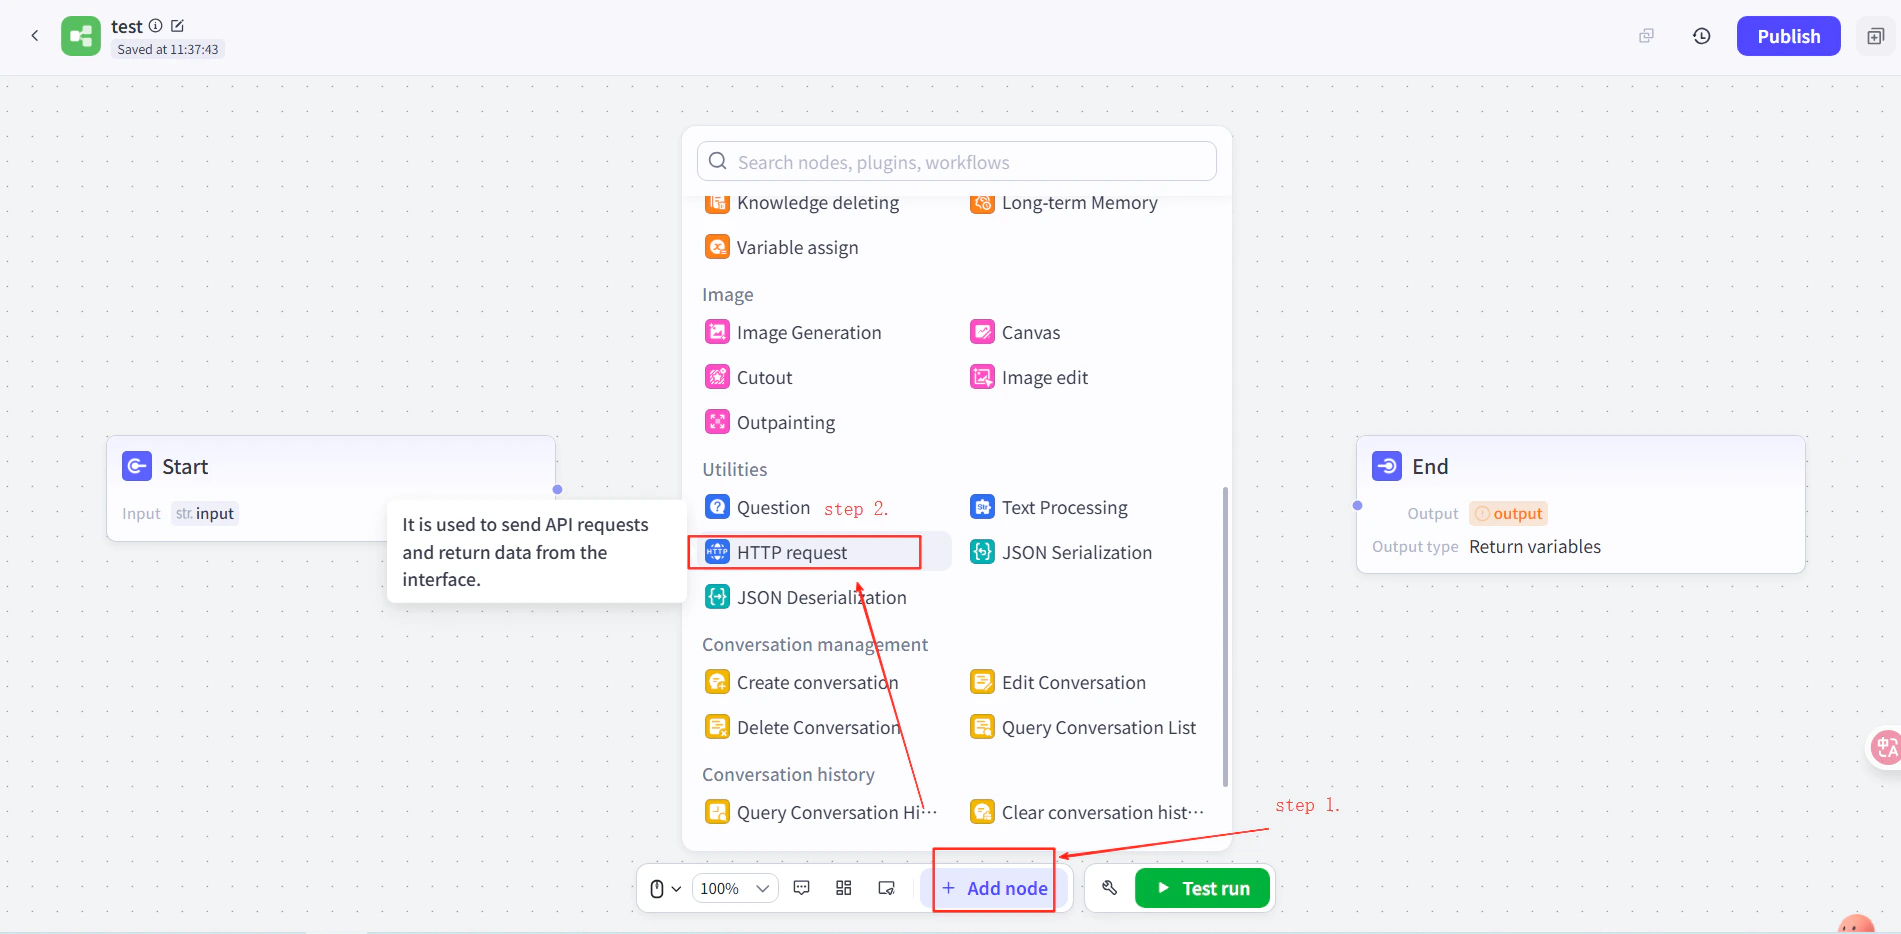
        1. Créez un agent dans Coze, puis, dans le workflow de l'agent, ajoutez un nœud **HTTP Request** entre les nœuds Start et End.
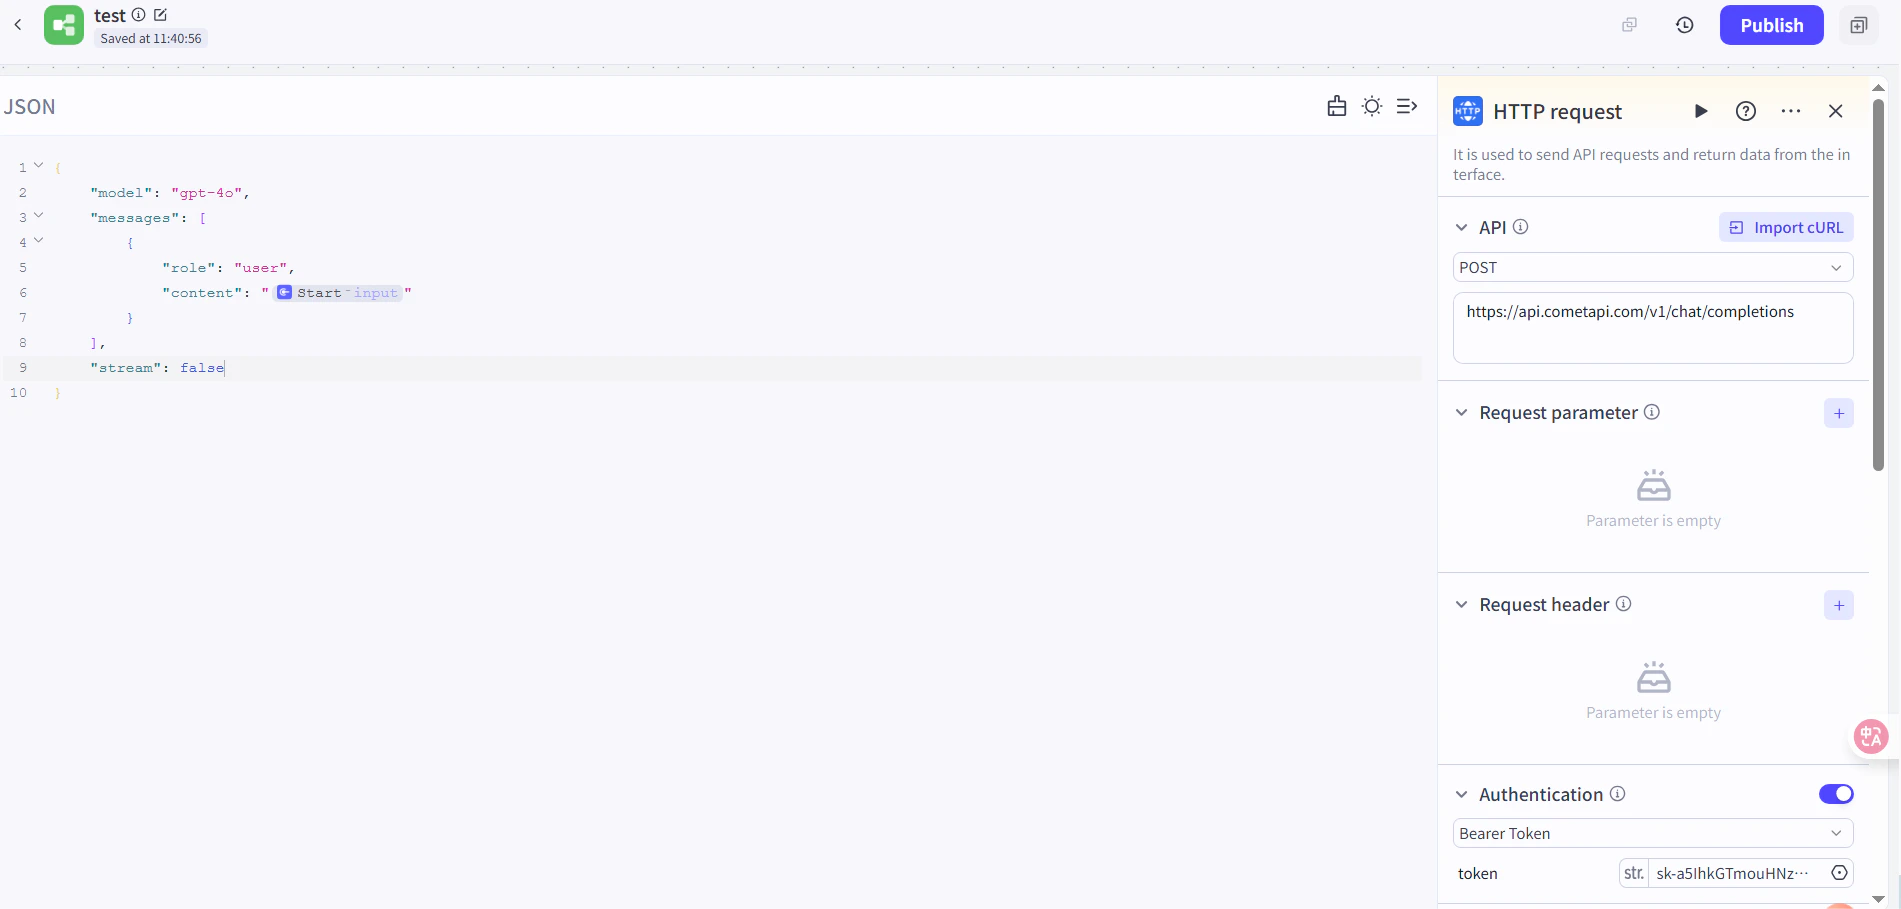
        2. Définissez les éléments suivants :
           * **Method** : `POST`
           * **URL** : `https://api.cometapi.com/v1/chat/completions`
           * **Authentication Token** : collez votre clé API CometAPI, puis cliquez sur **Confirm**
        3. Définissez le corps de la requête :

        ```json theme={null}
        {
          "model": "your-model-id",
          "messages": [
            {
              "role": "user",
              "content": "{{block_output_100001.input}}"
            }
          ],
          "stream": false
        }
        ```

        4. Dans le nœud End, définissez la sortie sur le corps de réponse de la requête HTTP. Remplacez `your-model-id` par un model ID actuel depuis la [page des modèles CometAPI](/fr/overview/models).
        <Frame>
          <img src="https://mintcdn.com/cometapi/E4FFvyMYmaOZoldp/images/integrations/810968_355128.png?fit=max&auto=format&n=E4FFvyMYmaOZoldp&q=85&s=862c588b2f301bd66b89366c5344fbdc" alt="Nœud HTTP Request avec l'URL et le jeton d'authentification configurés" width="1586" height="834" data-path="images/integrations/810968_355128.png" />
        </Frame>

        <Frame>
          <img src="https://mintcdn.com/cometapi/E4FFvyMYmaOZoldp/images/integrations/810968_355129.png?fit=max&auto=format&n=E4FFvyMYmaOZoldp&q=85&s=a438417210684dddf988307c448edb57" alt="Corps JSON de la requête configuré dans le nœud HTTP" width="1901" height="934" data-path="images/integrations/810968_355129.png" />
        </Frame>

        <Frame>
          <img src="https://mintcdn.com/cometapi/E4FFvyMYmaOZoldp/images/integrations/810968_355130.png?fit=max&auto=format&n=E4FFvyMYmaOZoldp&q=85&s=18254fe80669e295bd7b8ac2e48c3d45" alt="Nœud End avec le corps de réponse HTTP sélectionné comme sortie" width="1926" height="936" data-path="images/integrations/810968_355130.png" />
        </Frame>

        <Frame>
          <img src="https://mintcdn.com/cometapi/E4FFvyMYmaOZoldp/images/integrations/810968_355131.png?fit=max&auto=format&n=E4FFvyMYmaOZoldp&q=85&s=5fde76e14e42d41311076f7eb1d0fd77" alt="Workflow Coze avec tous les nœuds connectés" width="1901" height="909" data-path="images/integrations/810968_355131.png" />
        </Frame>
      </Tab>
    </Tabs>
  </Step>

  <Step title="Tester et publier">
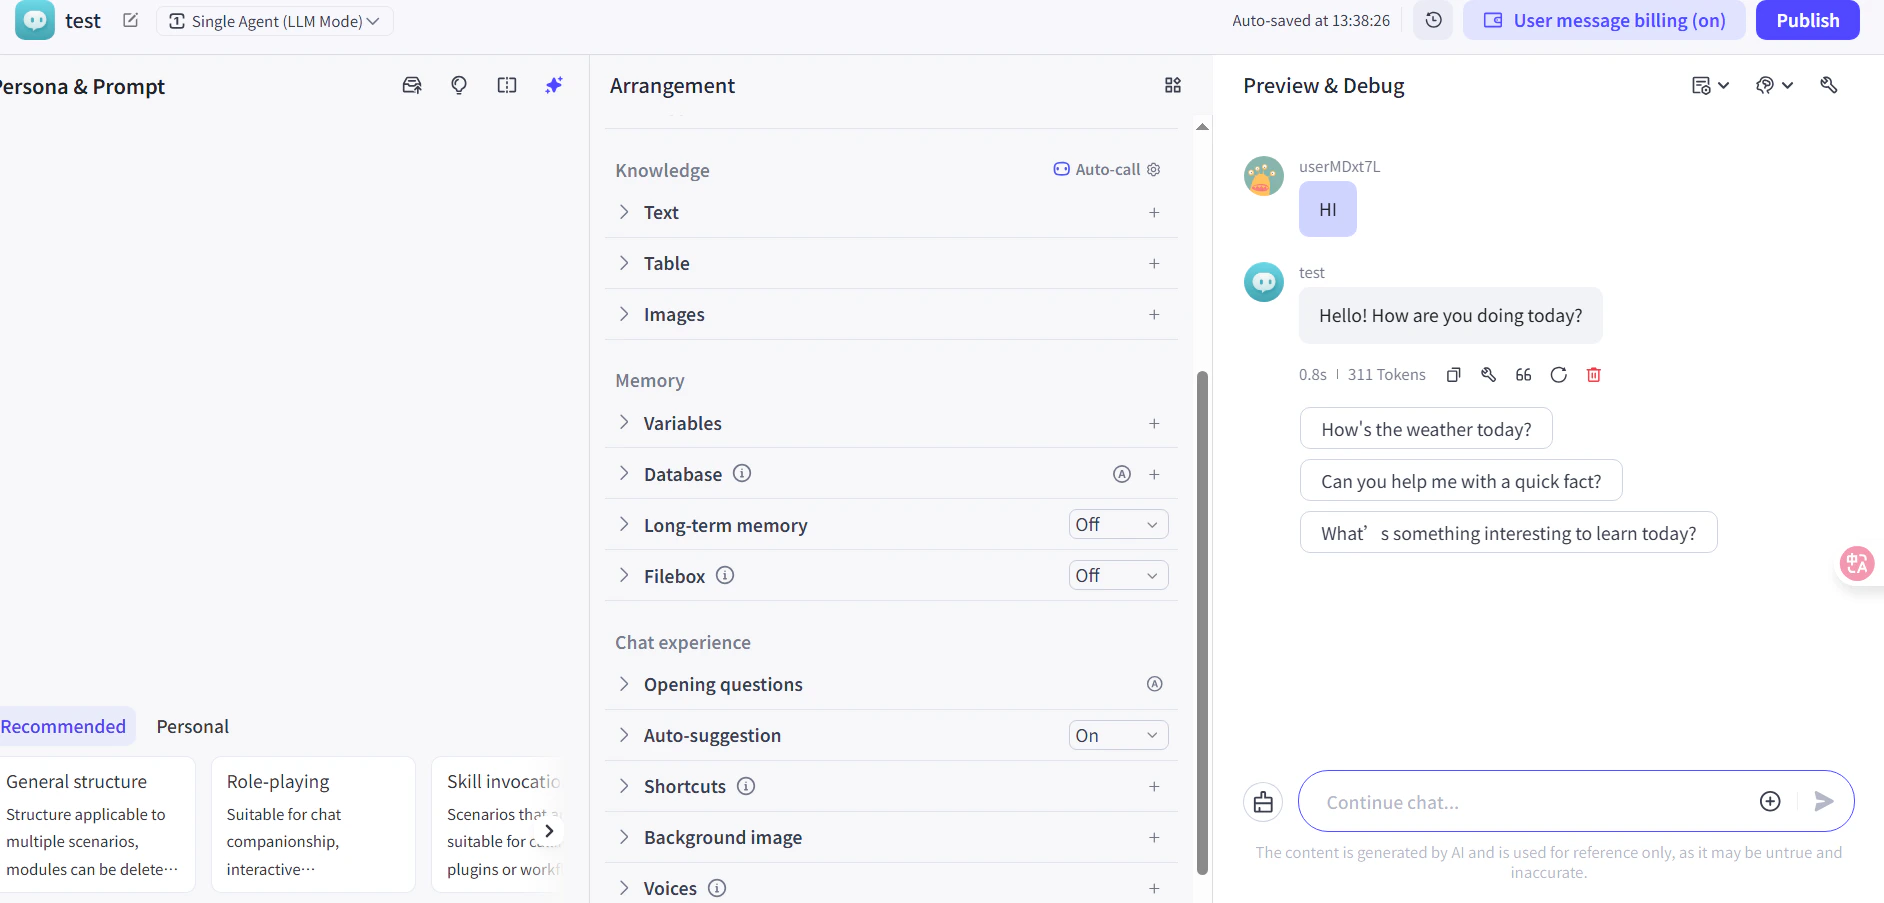
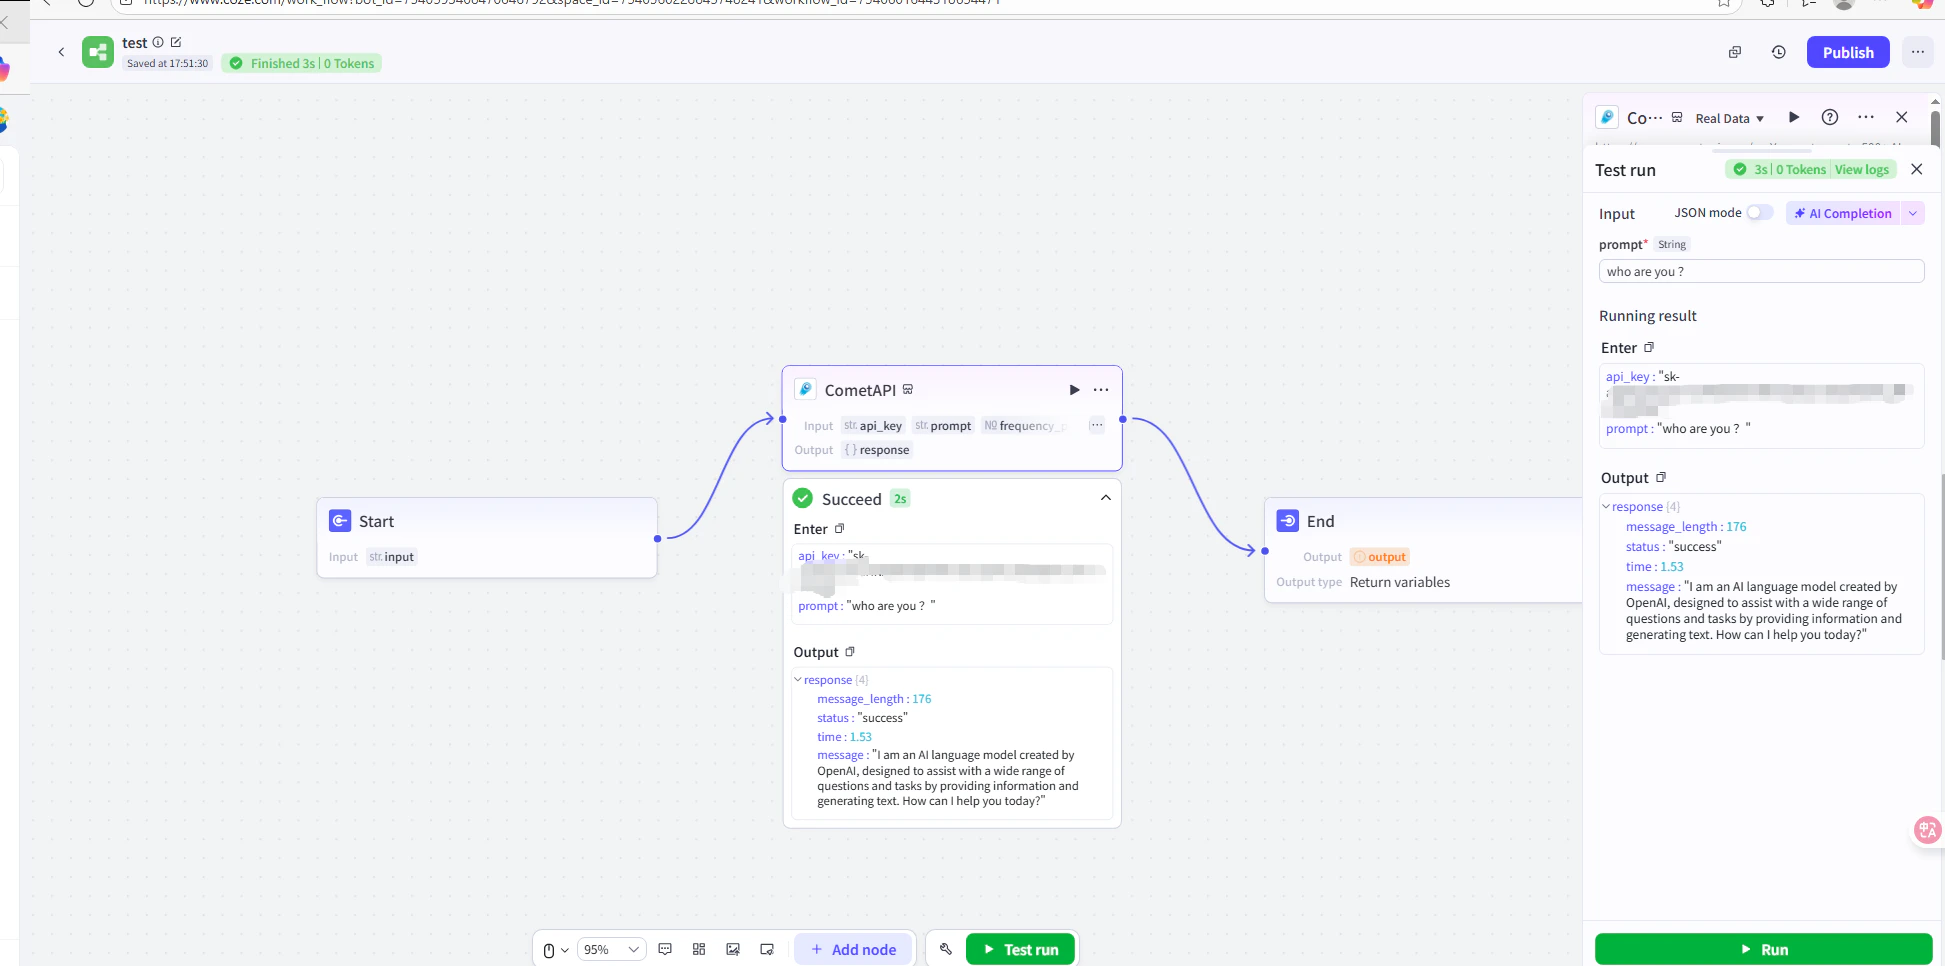
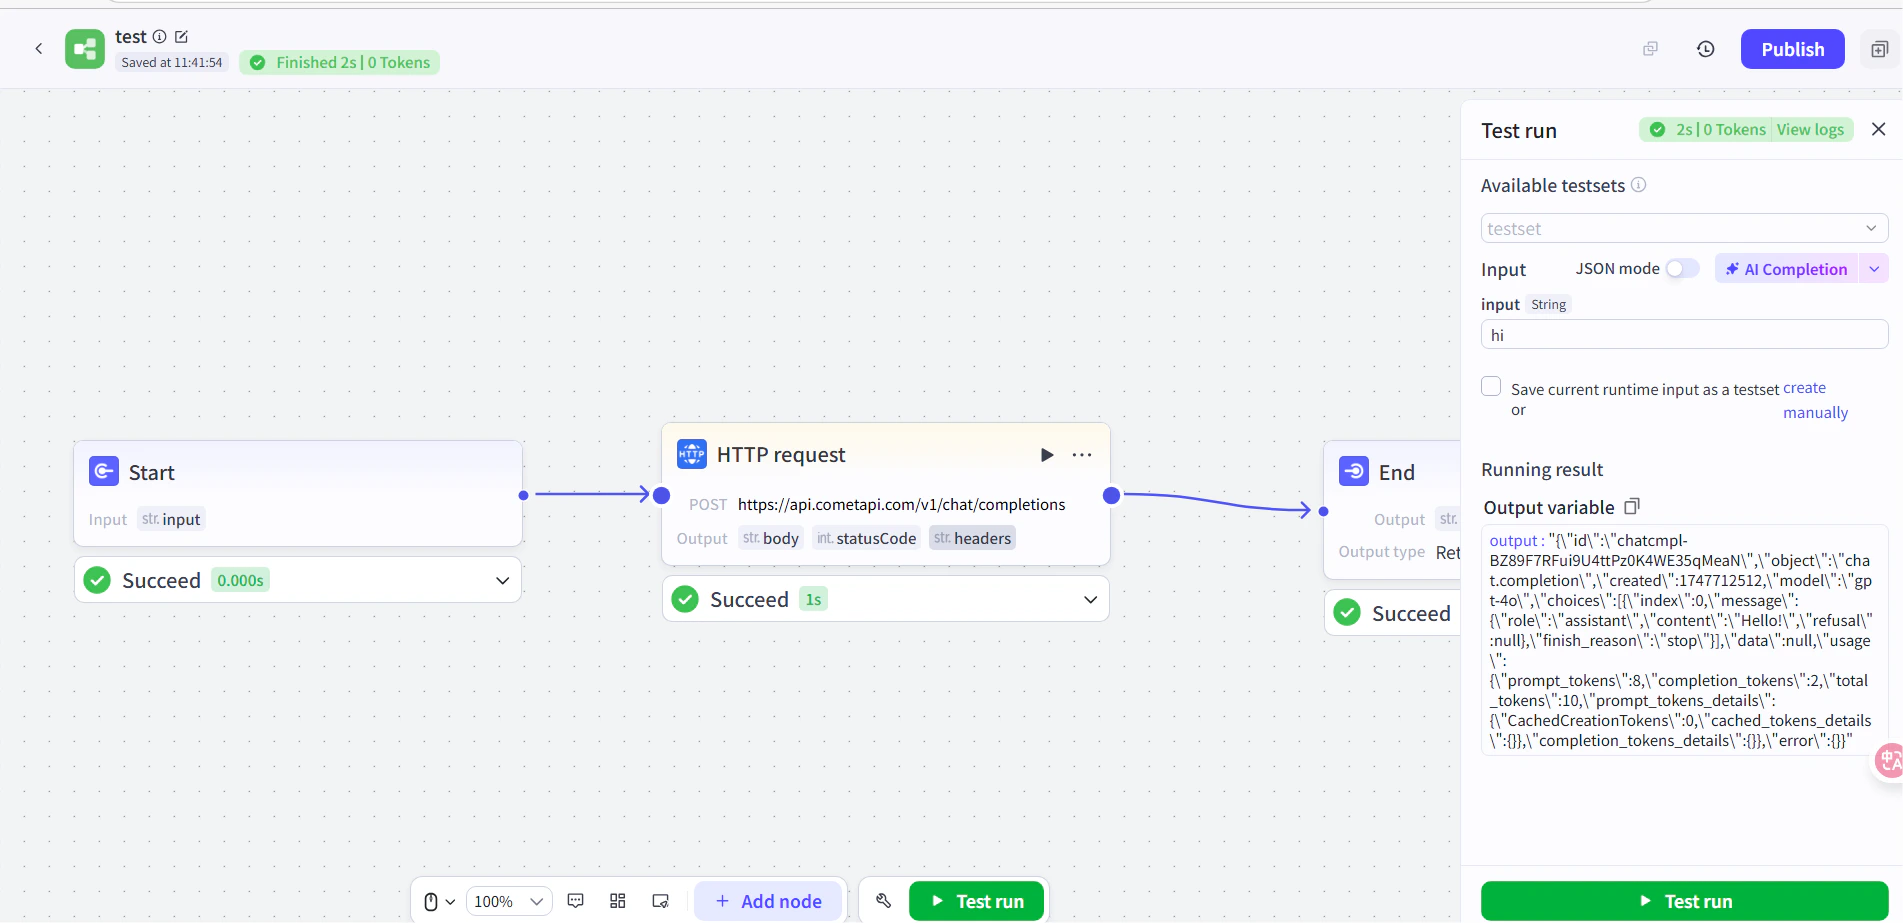
    Exécutez un message de test dans le workflow (par exemple, demandez l'heure actuelle). Une réponse IA réussie confirme que l'intégration fonctionne. Publiez le workflow pour le mettre en ligne.
    <Frame>
      <img src="https://mintcdn.com/cometapi/E4FFvyMYmaOZoldp/images/integrations/810968_360285.png?fit=max&auto=format&n=E4FFvyMYmaOZoldp&q=85&s=5f362ef3274c53c47a8f3793d4fa6966" alt="Workflow Coze affichant une réponse de test réussie" width="1945" height="966" data-path="images/integrations/810968_360285.png" />
    </Frame>

    <Frame>
      <img src="https://mintcdn.com/cometapi/E4FFvyMYmaOZoldp/images/integrations/810968_355132.png?fit=max&auto=format&n=E4FFvyMYmaOZoldp&q=85&s=8b7fe683331ec5cb31222062c6f3aa80" alt="Agent Coze publié répondant correctement" width="1903" height="923" data-path="images/integrations/810968_355132.png" />
    </Frame>

    Si l'appel échoue, vérifiez votre clé API et l'URL de l'endpoint, ou contactez le [support CometAPI](https://www.cometapi.com).
  </Step>
</Steps>

<Tip>
  La méthode du plugin est recommandée pour la plupart des utilisateurs — elle gère automatiquement l'authentification et l'analyse de la réponse. Utilisez le nœud HTTP Request lorsque vous avez besoin d'un contrôle total sur les en-têtes de requête ou que vous souhaitez appeler un endpoint non chat.
</Tip>

<script type="application/ld+json">
  {`
    {
    "@context": "https://schema.org",
    "@graph": [
      {
        "@type": "HowTo",
        "@id": "https://apidoc.cometapi.com/integrations/coze#howto",
        "name": "Utiliser Coze avec CometAPI",
        "description": "Utilisez ce guide pour configurer Coze avec CometAPI en définissant l'URL de base, la clé API et les options de modèle ou de fournisseur.",
        "step": [
          {
            "@type": "HowToStep",
            "@id": "https://apidoc.cometapi.com/integrations/coze#step-1",
            "position": 1,
            "name": "Obtenez votre clé API CometAPI",
            "text": "Créez ou ouvrez votre compte CometAPI, puis copiez une clé API active depuis le tableau de bord."
          },
          {
            "@type": "HowToStep",
            "@id": "https://apidoc.cometapi.com/integrations/coze#step-2",
            "position": 2,
            "name": "Ajouter CometAPI à un workflow Coze",
            "text": "Effectuez l'étape Ajouter CometAPI à un workflow Coze dans le guide Utiliser Coze avec CometAPI."
          },
          {
            "@type": "HowToStep",
            "@id": "https://apidoc.cometapi.com/integrations/coze#step-3",
            "position": 3,
            "name": "Tester et publier",
            "text": "Effectuez l'étape Tester et publier dans le guide Utiliser Coze avec CometAPI."
          }
        ]
      },
      {
        "@type": "BreadcrumbList",
        "itemListElement": [
          {
            "@type": "ListItem",
            "position": 1,
            "name": "Documentation CometAPI",
            "item": "https://apidoc.cometapi.com/"
          },
          {
            "@type": "ListItem",
            "position": 2,
            "name": "Intégrations",
            "item": "https://apidoc.cometapi.com/integrations"
          },
          {
            "@type": "ListItem",
            "position": 3,
            "name": "Utiliser Coze avec CometAPI",
            "item": "https://apidoc.cometapi.com/integrations/coze"
          }
        ]
      }
    ]
    }
    `}
</script>