> ## Documentation Index
> Fetch the complete documentation index at: https://apidoc.cometapi.com/llms.txt
> Use this file to discover all available pages before exploring further.
# Connect Flowise to CometAPI
> Use this guide to connect Flowise to CometAPI by setting the base URL, API key, and model or provider options.
FlowiseAI is a low-code platform for building LLM applications visually. Use the native **ChatCometAPI** node to connect CometAPI to chatflows, Q\&A systems, and RAG workflows that call text chat models.
This guide covers text chat and RAG workflows. It does not cover image generation workflows.
## Prerequisites
* A CometAPI account with an active API key - [get yours here](https://www.cometapi.com/console/token)
* A FlowiseAI account or self-hosted Flowise instance - [sign in to Flowise Cloud](https://cloud.flowiseai.com/chatflows)
* A current text model ID from the [CometAPI Models page](/overview/models)
* For RAG, a document source plus a Flowise-supported embeddings provider and vector store
## Configure ChatCometAPI
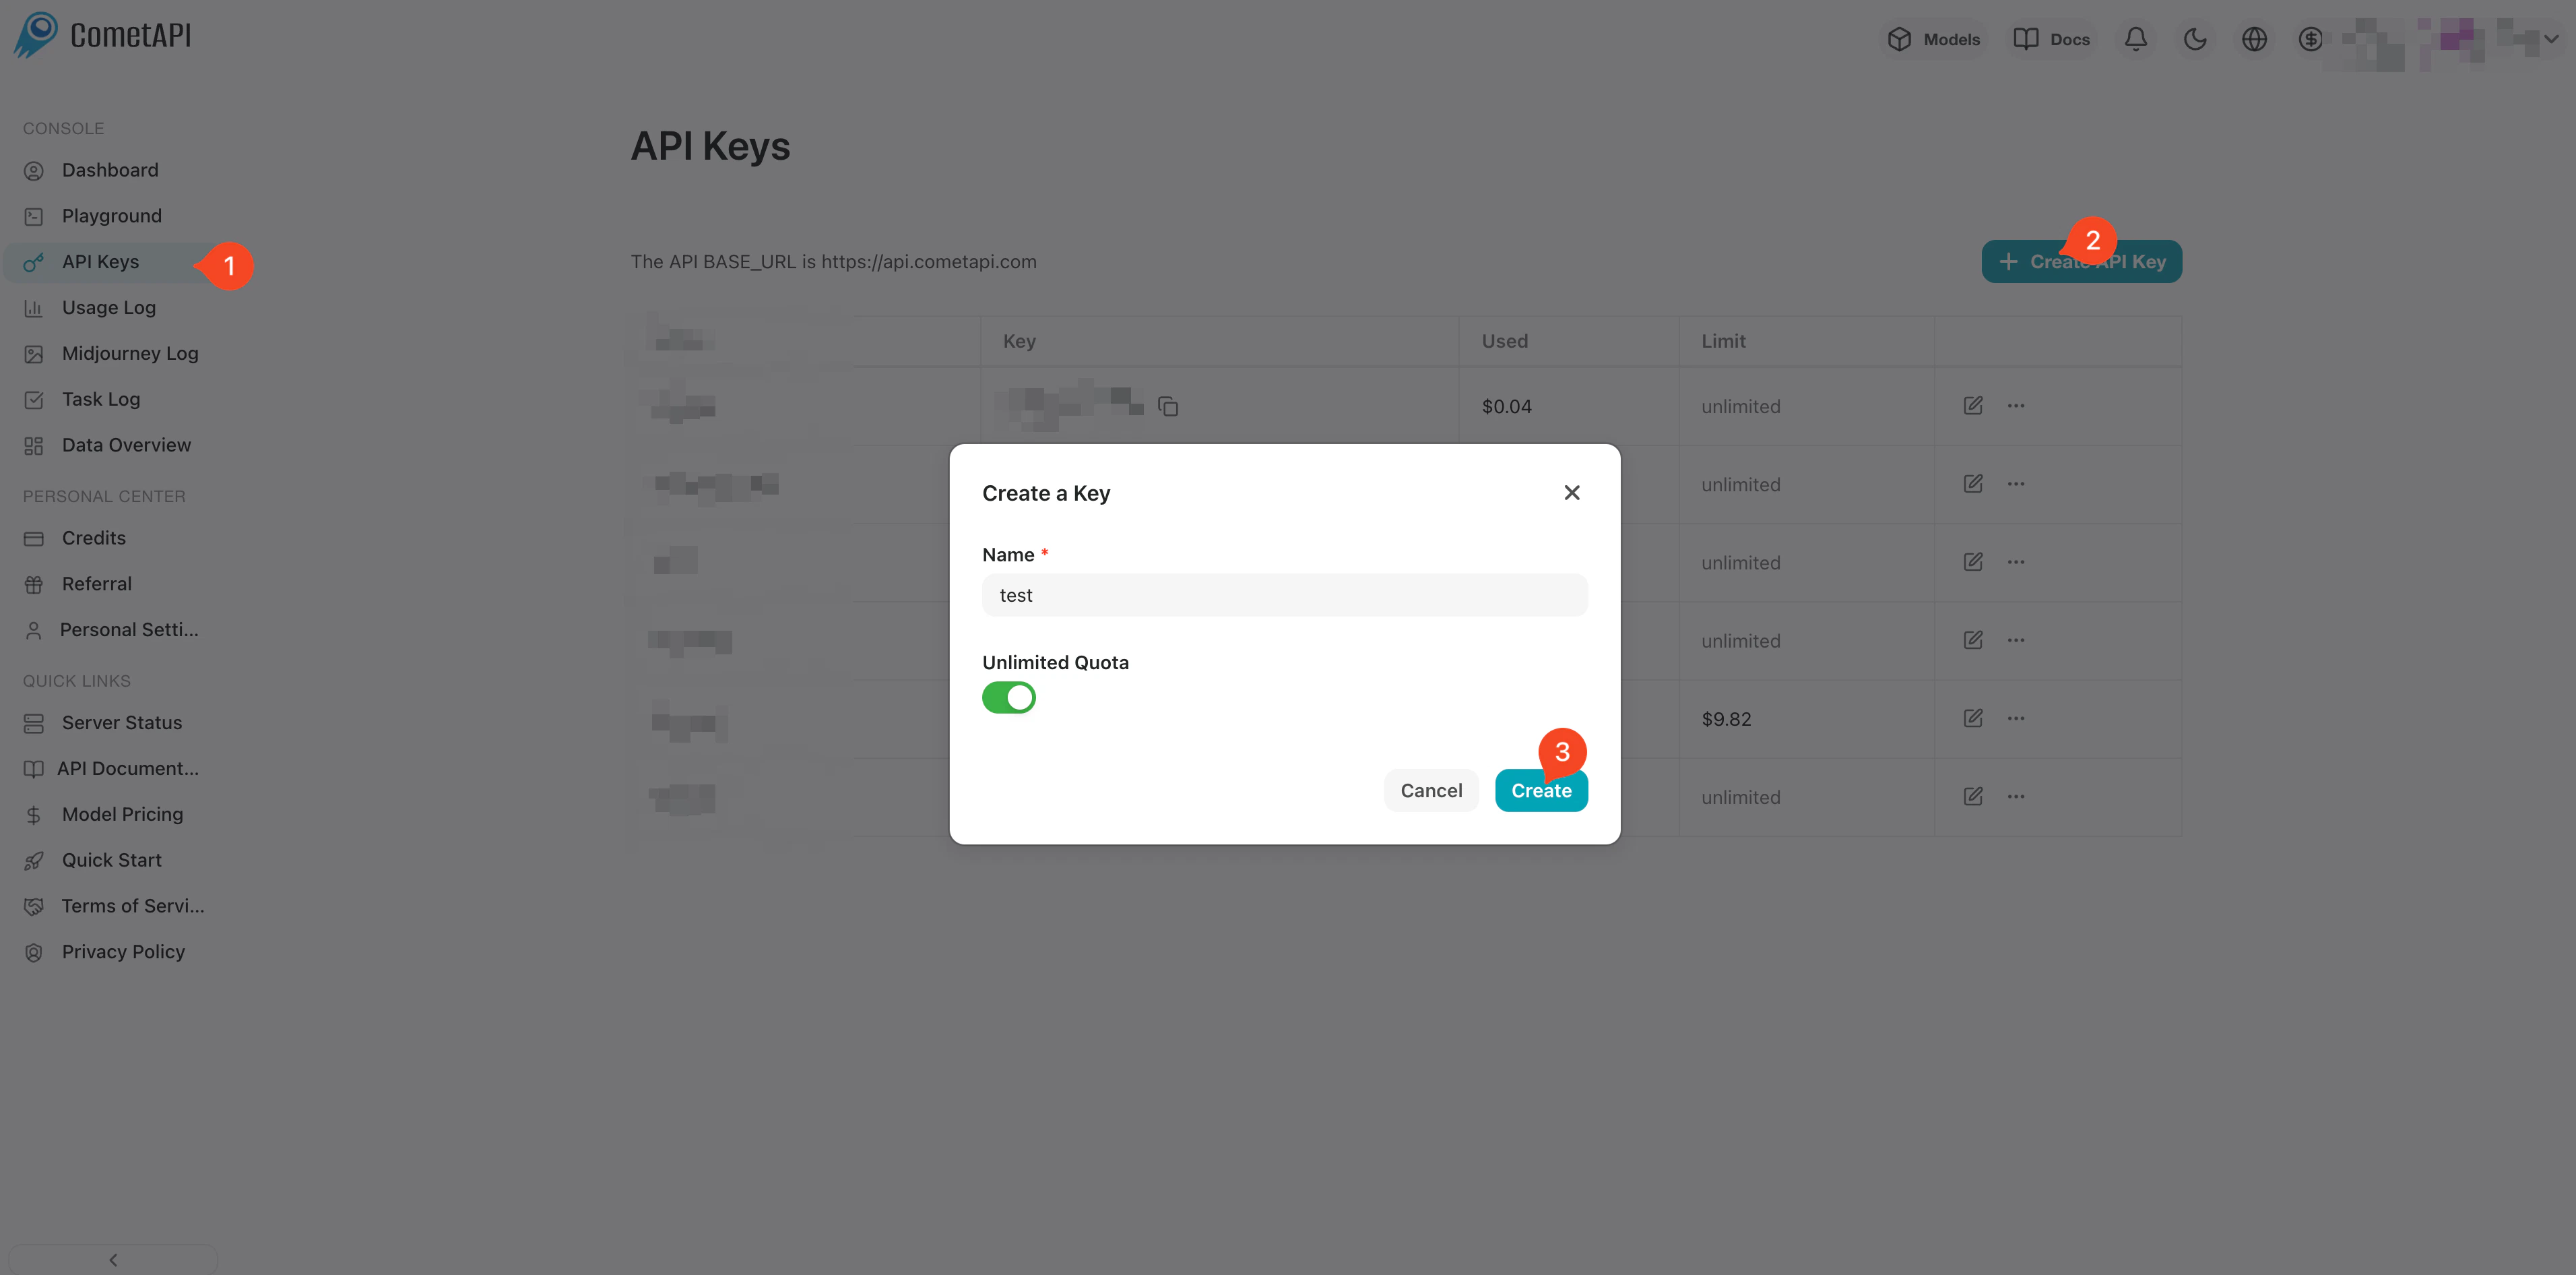
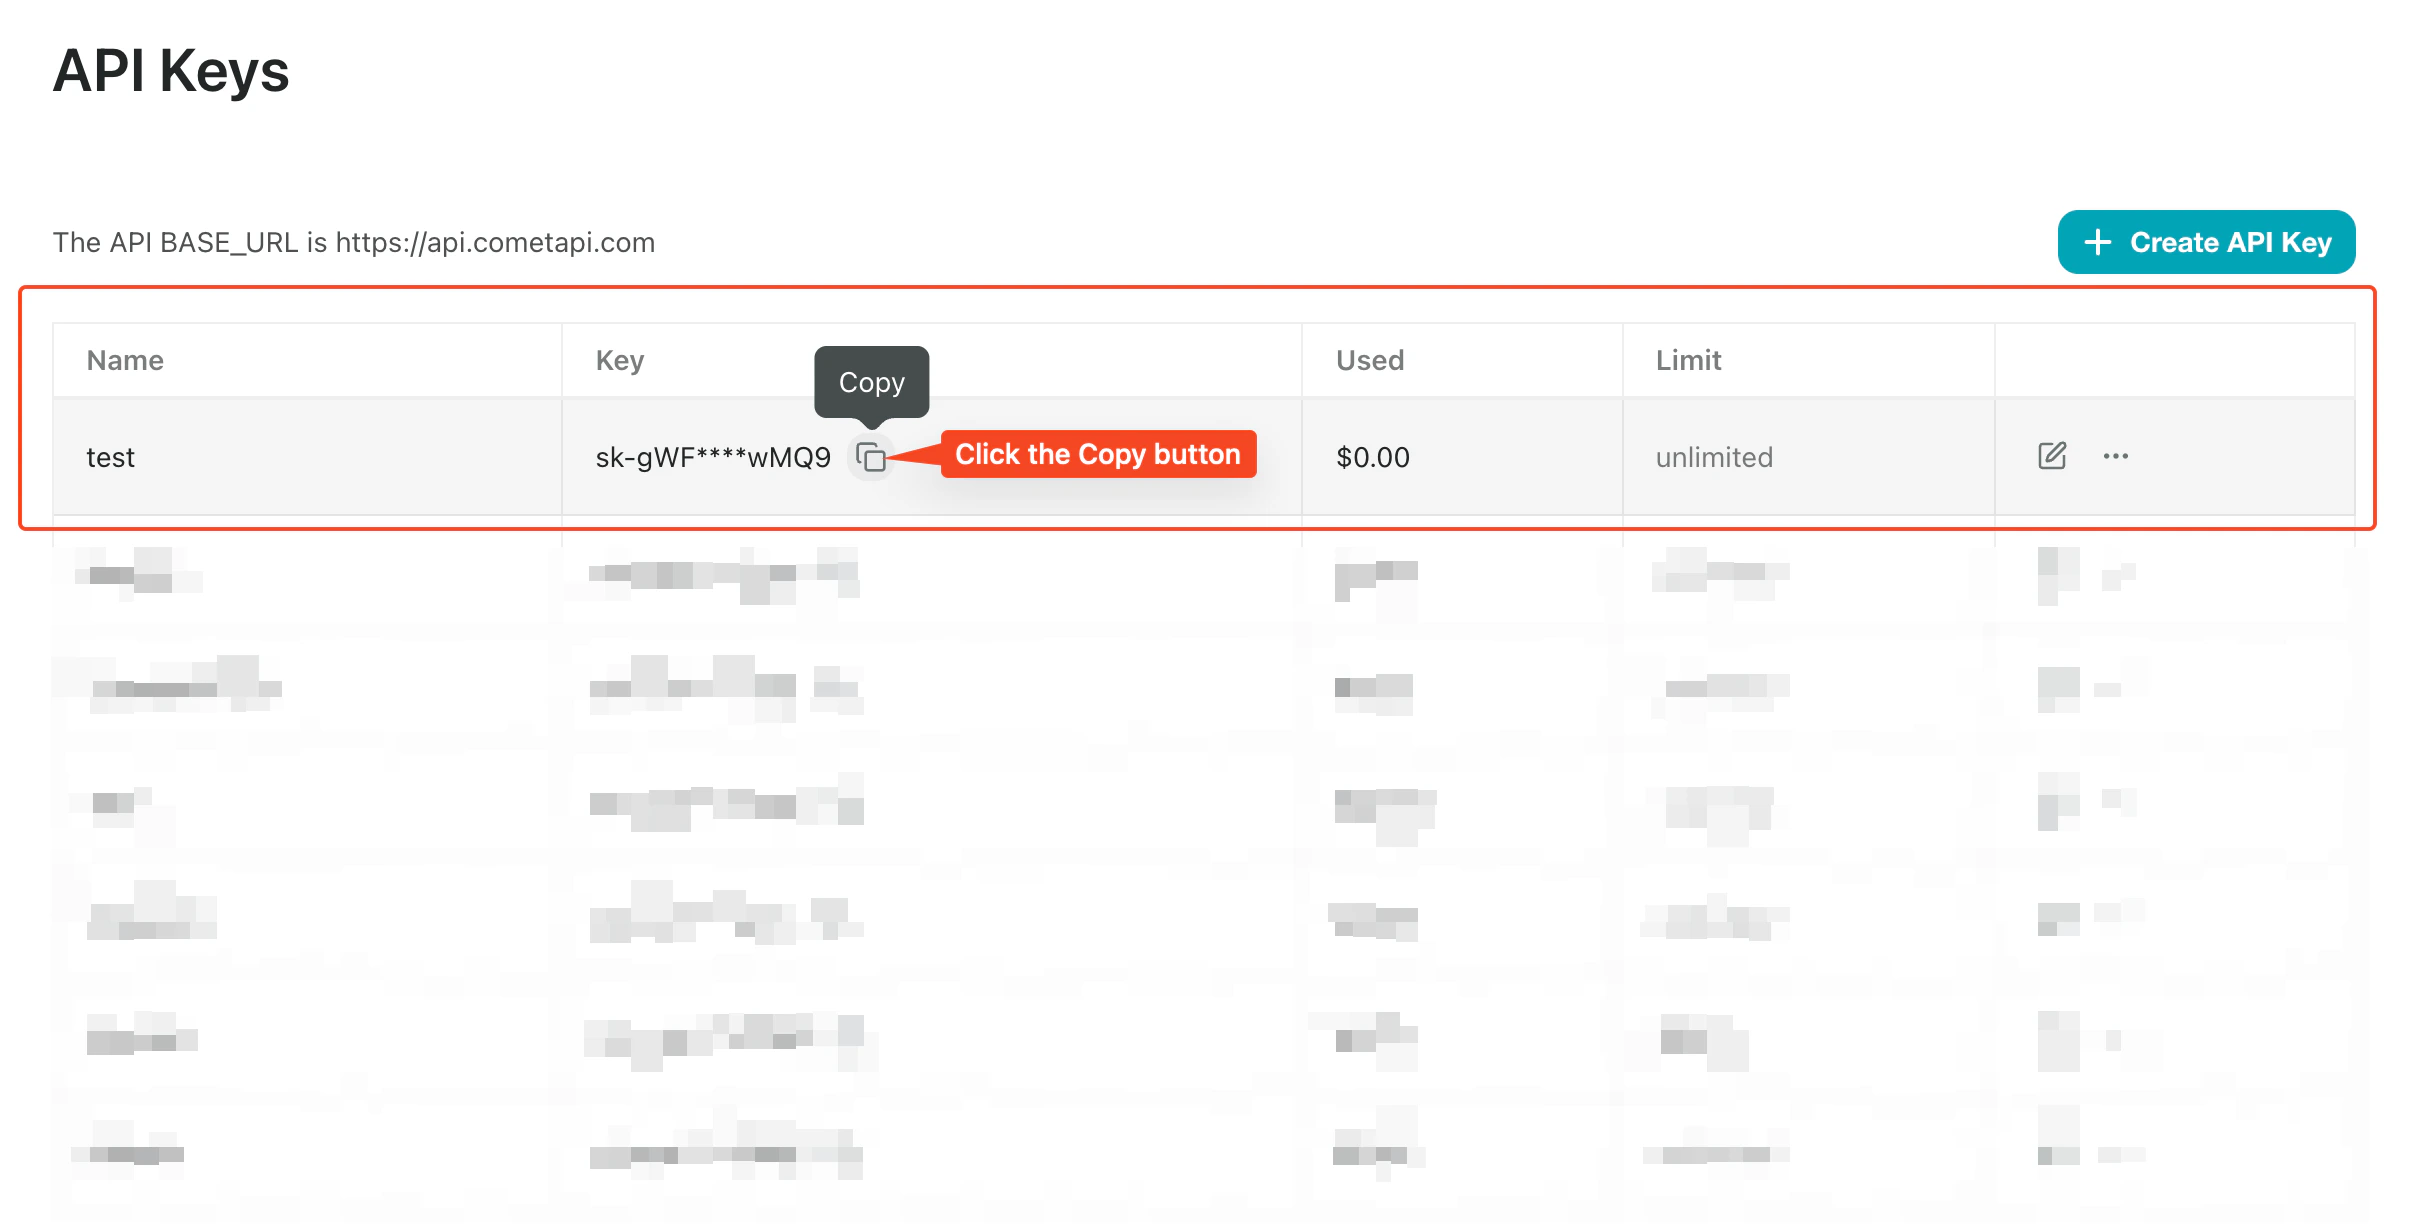
Log in to the [CometAPI console](https://www.cometapi.com/console/token). Click **Add API Key** and copy your CometAPI API key.
 1. In your FlowiseAI chatflow canvas, click **Add New**.
 2. Search for **cometapi** and select the **ChatCometAPI** node.
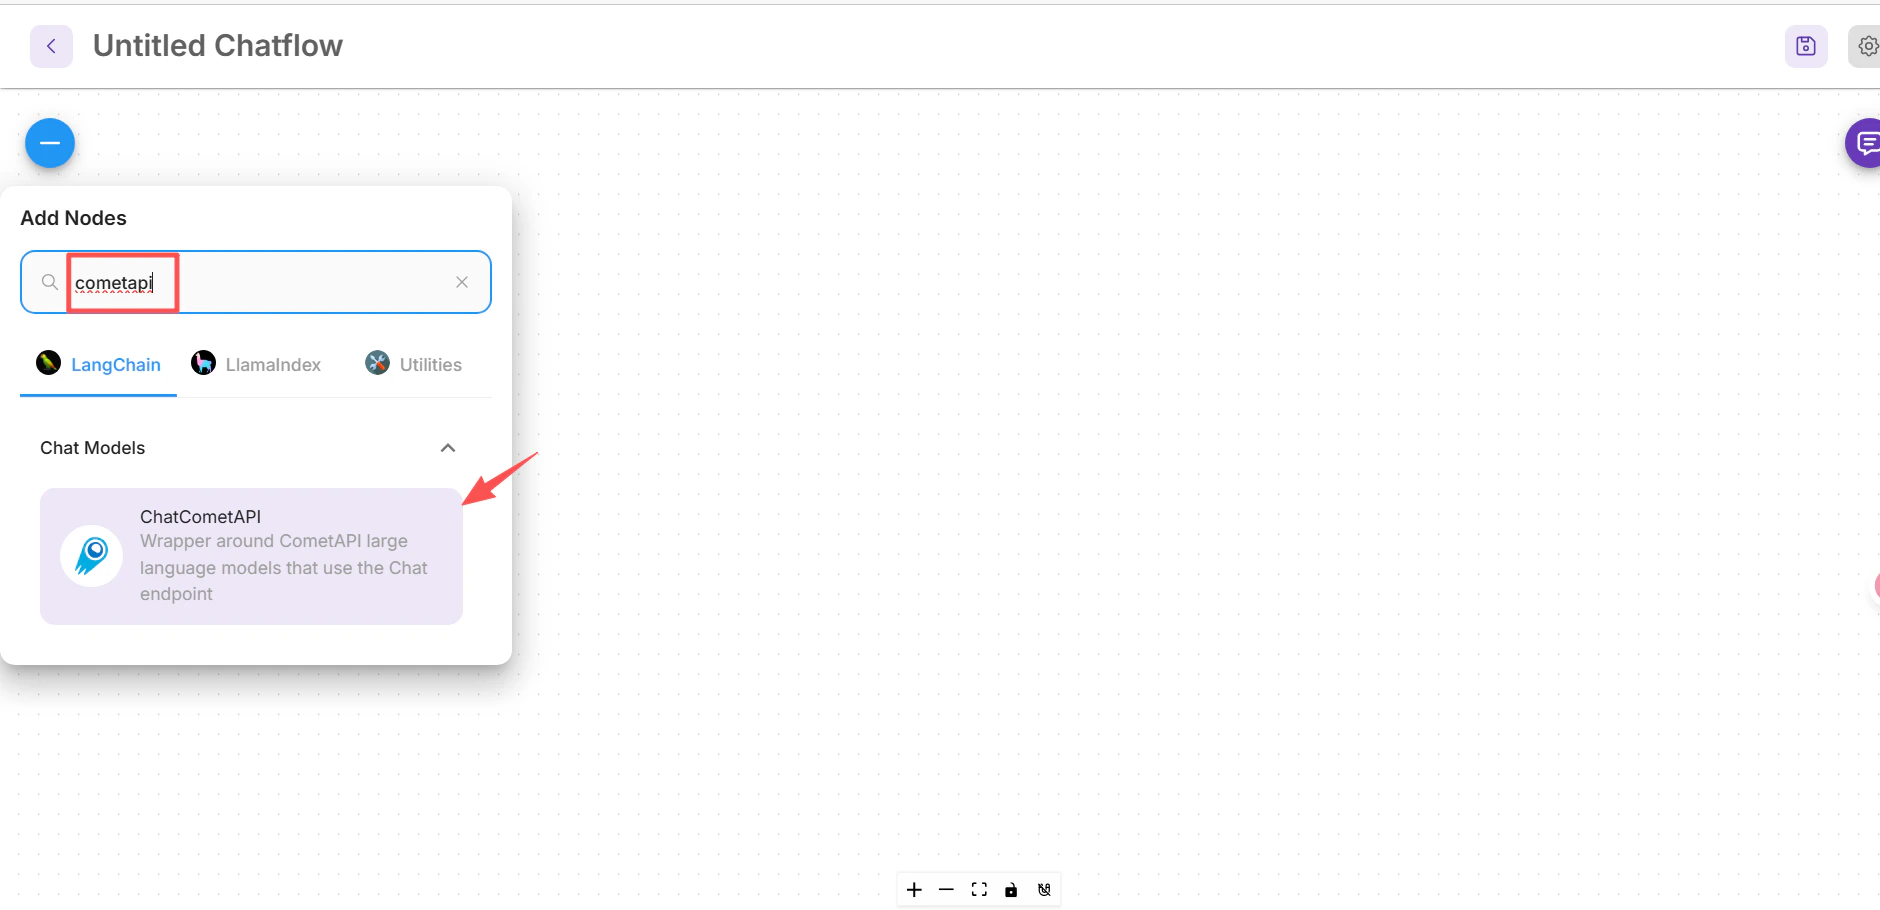 3. Drag it onto the canvas.
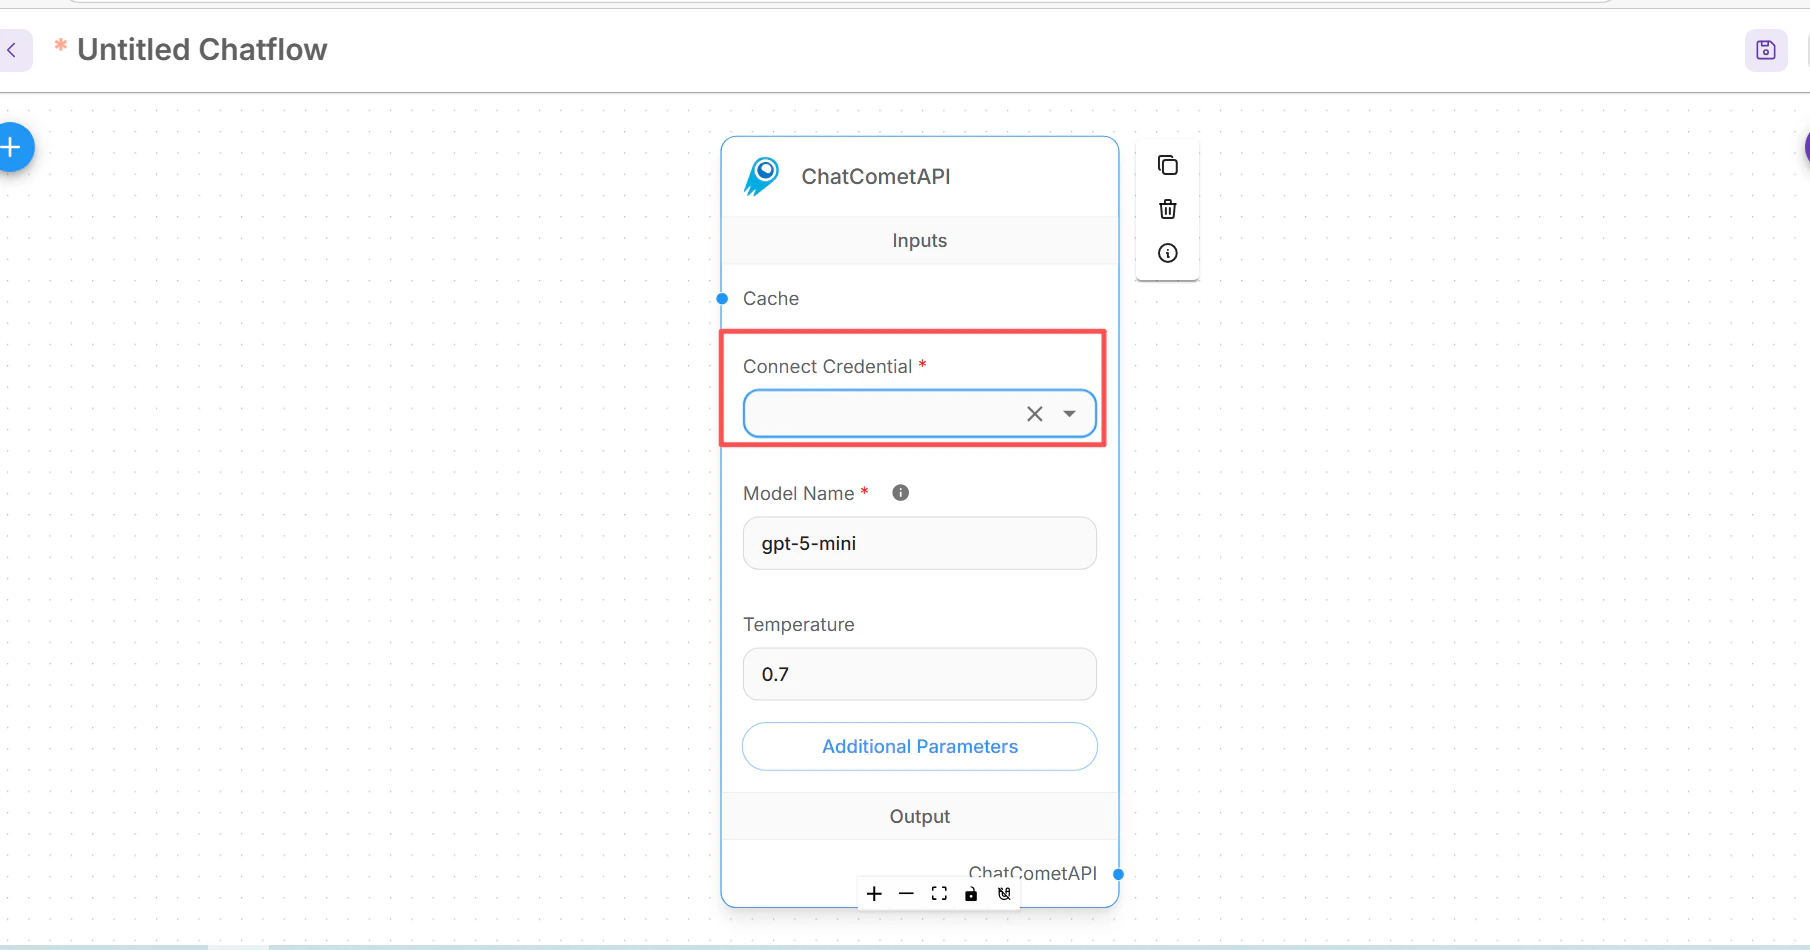 In the ChatCometAPI node, open **Connect Credential**, select **Create New**, paste your CometAPI API key, and save the credential.
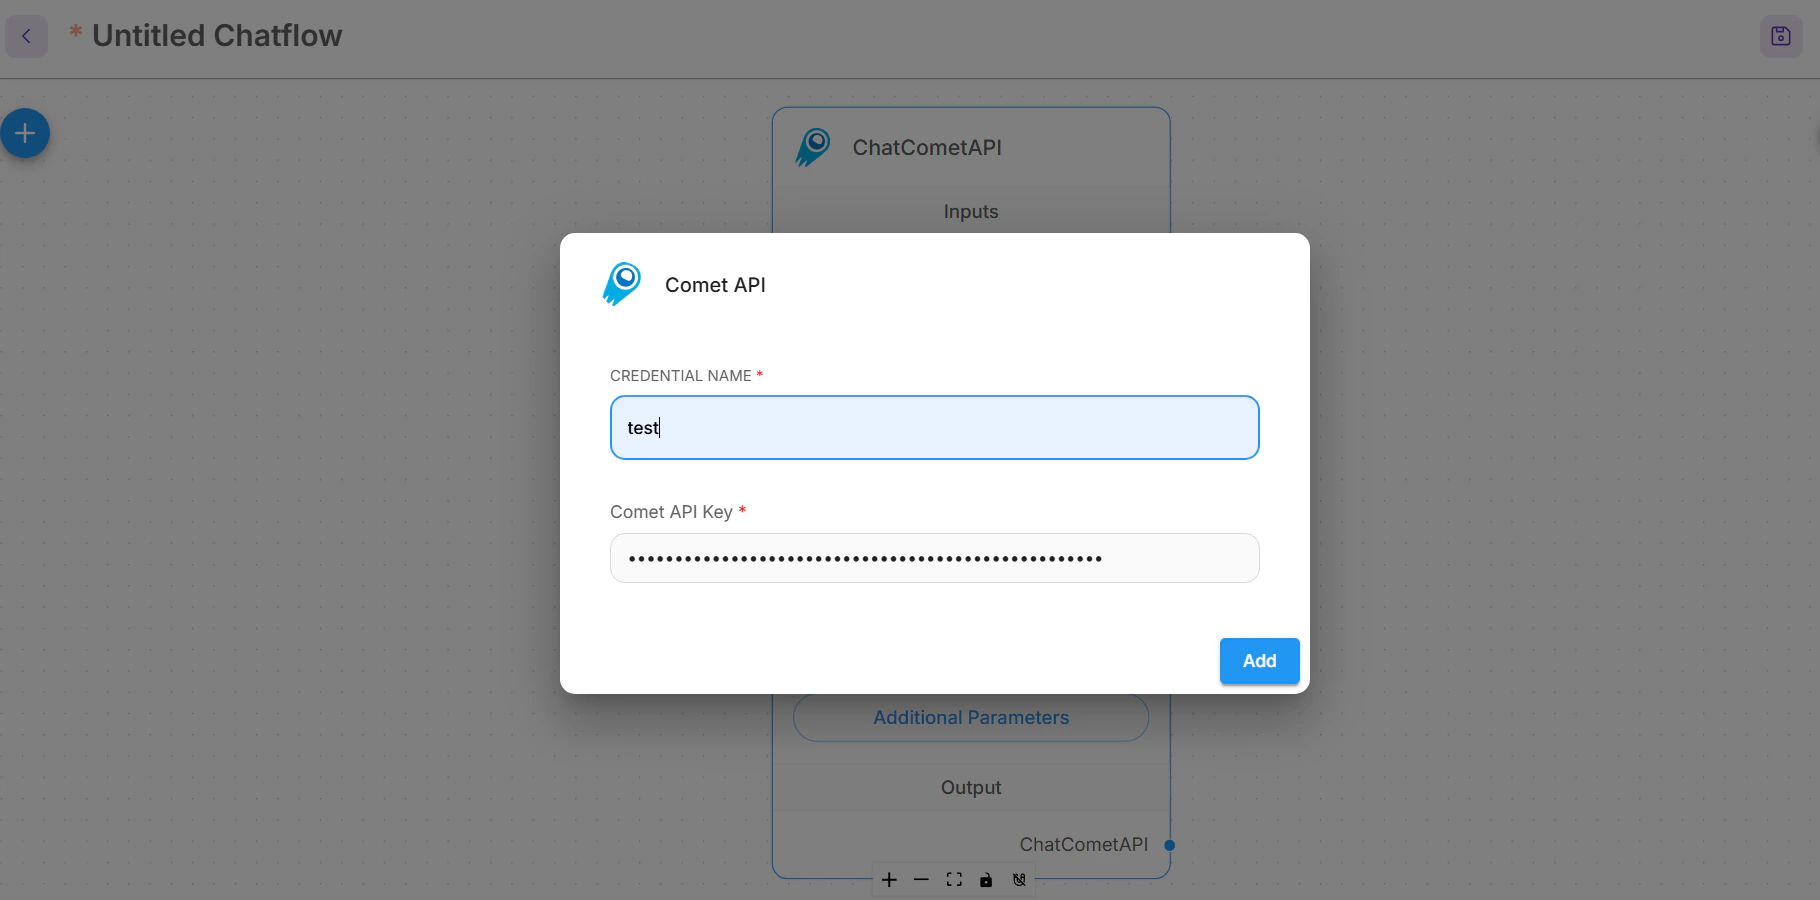 Expand **Additional Parameters** on the ChatCometAPI node.
If your Flowise build shows a **Base Path** field, set it to:
```text theme={null}
https://api.cometapi.com/v1/
```
If it exposes **Base Options** instead, add a `basePath` entry:
```json theme={null}
{
"basePath": "https://api.cometapi.com/v1/"
}
```
Set **Model Name** to the exact text model ID you want to call, for example `your-model-id`, and adjust **Temperature** only if your workflow needs more or less variation.
## Create a basic chatflow
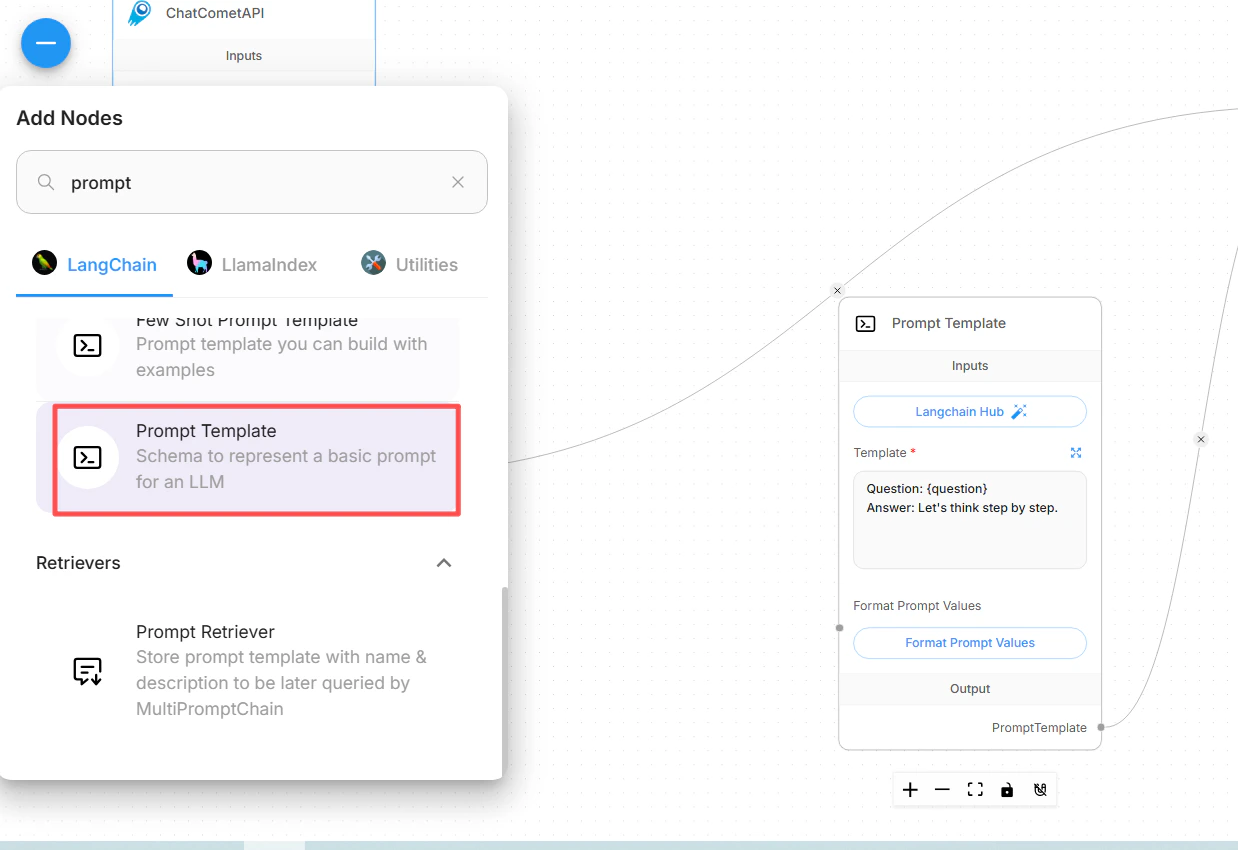
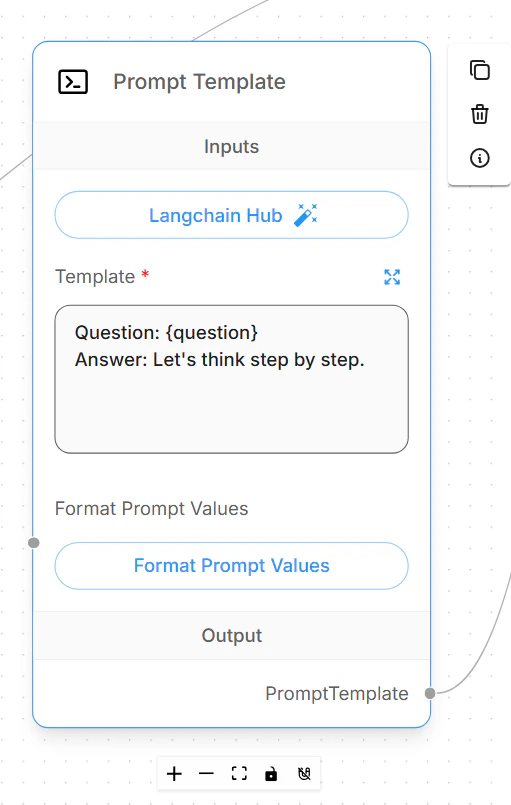
Add a **Prompt Template** node and define the prompt your chatflow will send to the model.
```text theme={null}
Question: {question}
Answer clearly and concisely.
```
Expand **Additional Parameters** on the ChatCometAPI node.
If your Flowise build shows a **Base Path** field, set it to:
```text theme={null}
https://api.cometapi.com/v1/
```
If it exposes **Base Options** instead, add a `basePath` entry:
```json theme={null}
{
"basePath": "https://api.cometapi.com/v1/"
}
```
Set **Model Name** to the exact text model ID you want to call, for example `your-model-id`, and adjust **Temperature** only if your workflow needs more or less variation.
## Create a basic chatflow
Add a **Prompt Template** node and define the prompt your chatflow will send to the model.
```text theme={null}
Question: {question}
Answer clearly and concisely.
```
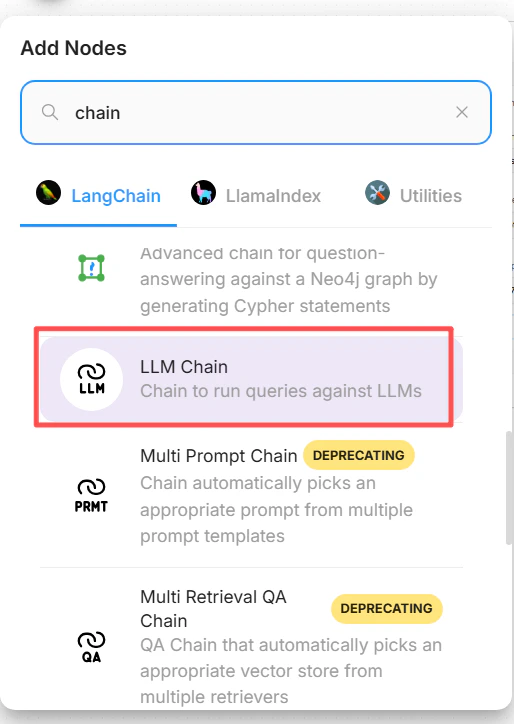
 Add an **LLM Chain** node. Connect the **ChatCometAPI** node to the chain's **Language Model** input, then connect the **Prompt Template** node to the chain's **Prompt** input.
 Save the chatflow, open the chat preview, and send a short test question. A healthy setup returns a normal text answer from the selected CometAPI model.
 ## Switch model IDs
To switch models, keep the same CometAPI credential and base path, then change only the ChatCometAPI model ID field.
Use exact model IDs from the [CometAPI Models page](/overview/models). Avoid copying display names, provider names, or extra spaces.
| Use case | Model ID value |
| ------------------------- | ------------------------- |
| General chat model family | `your-chat-model-id` |
| Reasoning model family | `your-reasoning-model-id` |
| Coding model family | `your-coding-model-id` |
After changing the model ID, save the chatflow and run a short test prompt. If you maintain multiple production flows, duplicate the chatflow first and give each copy a name that reflects the model family.
## Configure retrieval-augmented generation
Flowise RAG has two parts: first prepare and upsert documents in **Document Stores**, then connect the prepared retriever to a chatflow. ChatCometAPI is the chat model that writes the final answer; the Document Store still needs a Flowise-supported embeddings provider and vector store.
In Flowise, open **Document Stores** and create a new store. Add a document loader, such as **File Loader**, **PDF Loader**, **Web Scraper**, or another loader that matches your source. Add a text splitter when the document is long enough to need chunking, then click **Process** to preview the generated chunks.
Click **Upsert** or **Upsert All Chunks**. Select:
* **Embeddings**: a Flowise embeddings node compatible with your data and vector store.
* **Vector Store**: the vector database where Flowise should store document embeddings.
* **Record Manager**: optional. Use it when you want repeat upserts to avoid duplicate records.
Keep the embedding model dimension aligned with the vector store index dimension. After upsert finishes, use the Document Store's retrieval query test to confirm that relevant chunks are returned before building the chatflow.
In a chatflow, add a **Document Store (Vector)** or **Document Store Retriever** node and select the processed Document Store. Set **Top K** to the number of chunks you want Flowise to retrieve for each question.
Add **Conversational Retrieval QA Chain** and connect:
* **Language Model** input from **ChatCometAPI**.
* **Vector Store Retriever** input from the Document Store retriever.
* **Memory** only if your chatflow needs conversation history.
Enable **Return Source Documents** when you want the answer to include citations or retrieved source chunks. Save the flow and ask a question whose answer exists only in the uploaded document.
## Troubleshooting
Confirm that your Flowise version includes the **ChatCometAPI** chat model integration. In older or customized Flowise deployments, update Flowise or check whether the integration has been disabled by the administrator.
Set the CometAPI base path to `https://api.cometapi.com/v1/`. In some Flowise builds this is a **Base Path** field. In others, add `basePath` inside **Base Options**.
Do not use `https://api.cometapi.com` for the ChatCometAPI chatflow, because the chat node calls OpenAI-compatible `/chat/completions` routes under `/v1`.
Recopy the key from the [CometAPI console](https://www.cometapi.com/console/token), create a fresh Flowise credential, and make sure the chatflow uses that credential. If the same key works in direct API calls but fails in Flowise, check that Flowise is not still using an older credential attached to the node.
Replace the model ID value in the ChatCometAPI node with an exact current text model ID from the [CometAPI Models page](/overview/models). The value should not include quotes, a provider prefix, a display label, or trailing spaces.
ChatCometAPI is a chat model node for text workflows. Use it for chat, chains, agents, and RAG answer generation. Do not use this Flowise setup for image generation nodes or image-only workflows.
First test the Document Store retrieval query before testing the full chatflow. If retrieval is weak, tune the text splitter, chunk size, chunk overlap, metadata filters, and **Top K**. If citations are missing, enable **Return Source Documents** on **Conversational Retrieval QA Chain**.
Check that the embedding provider, vector store, and vector dimensions match. Flowise Cloud vector stores often require their own reachable service URL and credentials; a local-only vector store URL such as `localhost` will not be reachable from Flowise Cloud. Record Manager is optional, but if you enable it, configure its database connection separately.
Lower retrieval **Top K**, reduce prompt size, use smaller chunks, or choose a faster model ID for the ChatCometAPI node. For rate limits, wait and retry with lower concurrency, then check account usage and limits in the CometAPI console.
## Switch model IDs
To switch models, keep the same CometAPI credential and base path, then change only the ChatCometAPI model ID field.
Use exact model IDs from the [CometAPI Models page](/overview/models). Avoid copying display names, provider names, or extra spaces.
| Use case | Model ID value |
| ------------------------- | ------------------------- |
| General chat model family | `your-chat-model-id` |
| Reasoning model family | `your-reasoning-model-id` |
| Coding model family | `your-coding-model-id` |
After changing the model ID, save the chatflow and run a short test prompt. If you maintain multiple production flows, duplicate the chatflow first and give each copy a name that reflects the model family.
## Configure retrieval-augmented generation
Flowise RAG has two parts: first prepare and upsert documents in **Document Stores**, then connect the prepared retriever to a chatflow. ChatCometAPI is the chat model that writes the final answer; the Document Store still needs a Flowise-supported embeddings provider and vector store.
In Flowise, open **Document Stores** and create a new store. Add a document loader, such as **File Loader**, **PDF Loader**, **Web Scraper**, or another loader that matches your source. Add a text splitter when the document is long enough to need chunking, then click **Process** to preview the generated chunks.
Click **Upsert** or **Upsert All Chunks**. Select:
* **Embeddings**: a Flowise embeddings node compatible with your data and vector store.
* **Vector Store**: the vector database where Flowise should store document embeddings.
* **Record Manager**: optional. Use it when you want repeat upserts to avoid duplicate records.
Keep the embedding model dimension aligned with the vector store index dimension. After upsert finishes, use the Document Store's retrieval query test to confirm that relevant chunks are returned before building the chatflow.
In a chatflow, add a **Document Store (Vector)** or **Document Store Retriever** node and select the processed Document Store. Set **Top K** to the number of chunks you want Flowise to retrieve for each question.
Add **Conversational Retrieval QA Chain** and connect:
* **Language Model** input from **ChatCometAPI**.
* **Vector Store Retriever** input from the Document Store retriever.
* **Memory** only if your chatflow needs conversation history.
Enable **Return Source Documents** when you want the answer to include citations or retrieved source chunks. Save the flow and ask a question whose answer exists only in the uploaded document.
## Troubleshooting
Confirm that your Flowise version includes the **ChatCometAPI** chat model integration. In older or customized Flowise deployments, update Flowise or check whether the integration has been disabled by the administrator.
Set the CometAPI base path to `https://api.cometapi.com/v1/`. In some Flowise builds this is a **Base Path** field. In others, add `basePath` inside **Base Options**.
Do not use `https://api.cometapi.com` for the ChatCometAPI chatflow, because the chat node calls OpenAI-compatible `/chat/completions` routes under `/v1`.
Recopy the key from the [CometAPI console](https://www.cometapi.com/console/token), create a fresh Flowise credential, and make sure the chatflow uses that credential. If the same key works in direct API calls but fails in Flowise, check that Flowise is not still using an older credential attached to the node.
Replace the model ID value in the ChatCometAPI node with an exact current text model ID from the [CometAPI Models page](/overview/models). The value should not include quotes, a provider prefix, a display label, or trailing spaces.
ChatCometAPI is a chat model node for text workflows. Use it for chat, chains, agents, and RAG answer generation. Do not use this Flowise setup for image generation nodes or image-only workflows.
First test the Document Store retrieval query before testing the full chatflow. If retrieval is weak, tune the text splitter, chunk size, chunk overlap, metadata filters, and **Top K**. If citations are missing, enable **Return Source Documents** on **Conversational Retrieval QA Chain**.
Check that the embedding provider, vector store, and vector dimensions match. Flowise Cloud vector stores often require their own reachable service URL and credentials; a local-only vector store URL such as `localhost` will not be reachable from Flowise Cloud. Record Manager is optional, but if you enable it, configure its database connection separately.
Lower retrieval **Top K**, reduce prompt size, use smaller chunks, or choose a faster model ID for the ChatCometAPI node. For rate limits, wait and retry with lower concurrency, then check account usage and limits in the CometAPI console.