> ## Documentation Index
> Fetch the complete documentation index at: https://apidoc.cometapi.com/llms.txt
> Use this file to discover all available pages before exploring further.
# Use OpenClaw with CometAPI
> Use this guide to configure OpenClaw with CometAPI by setting the base URL, API key, and model or provider options.
Use [CometAPI](https://www.cometapi.com) as the model provider for [OpenClaw](https://openclaw.ai) — 500+ models in one API.
## Prerequisites
* Node.js ≥ 22 — recommended via [nvm](https://github.com/nvm-sh/nvm)
* A CometAPI account with an active API key — [get yours here](https://www.cometapi.com/console/token)
## Installation
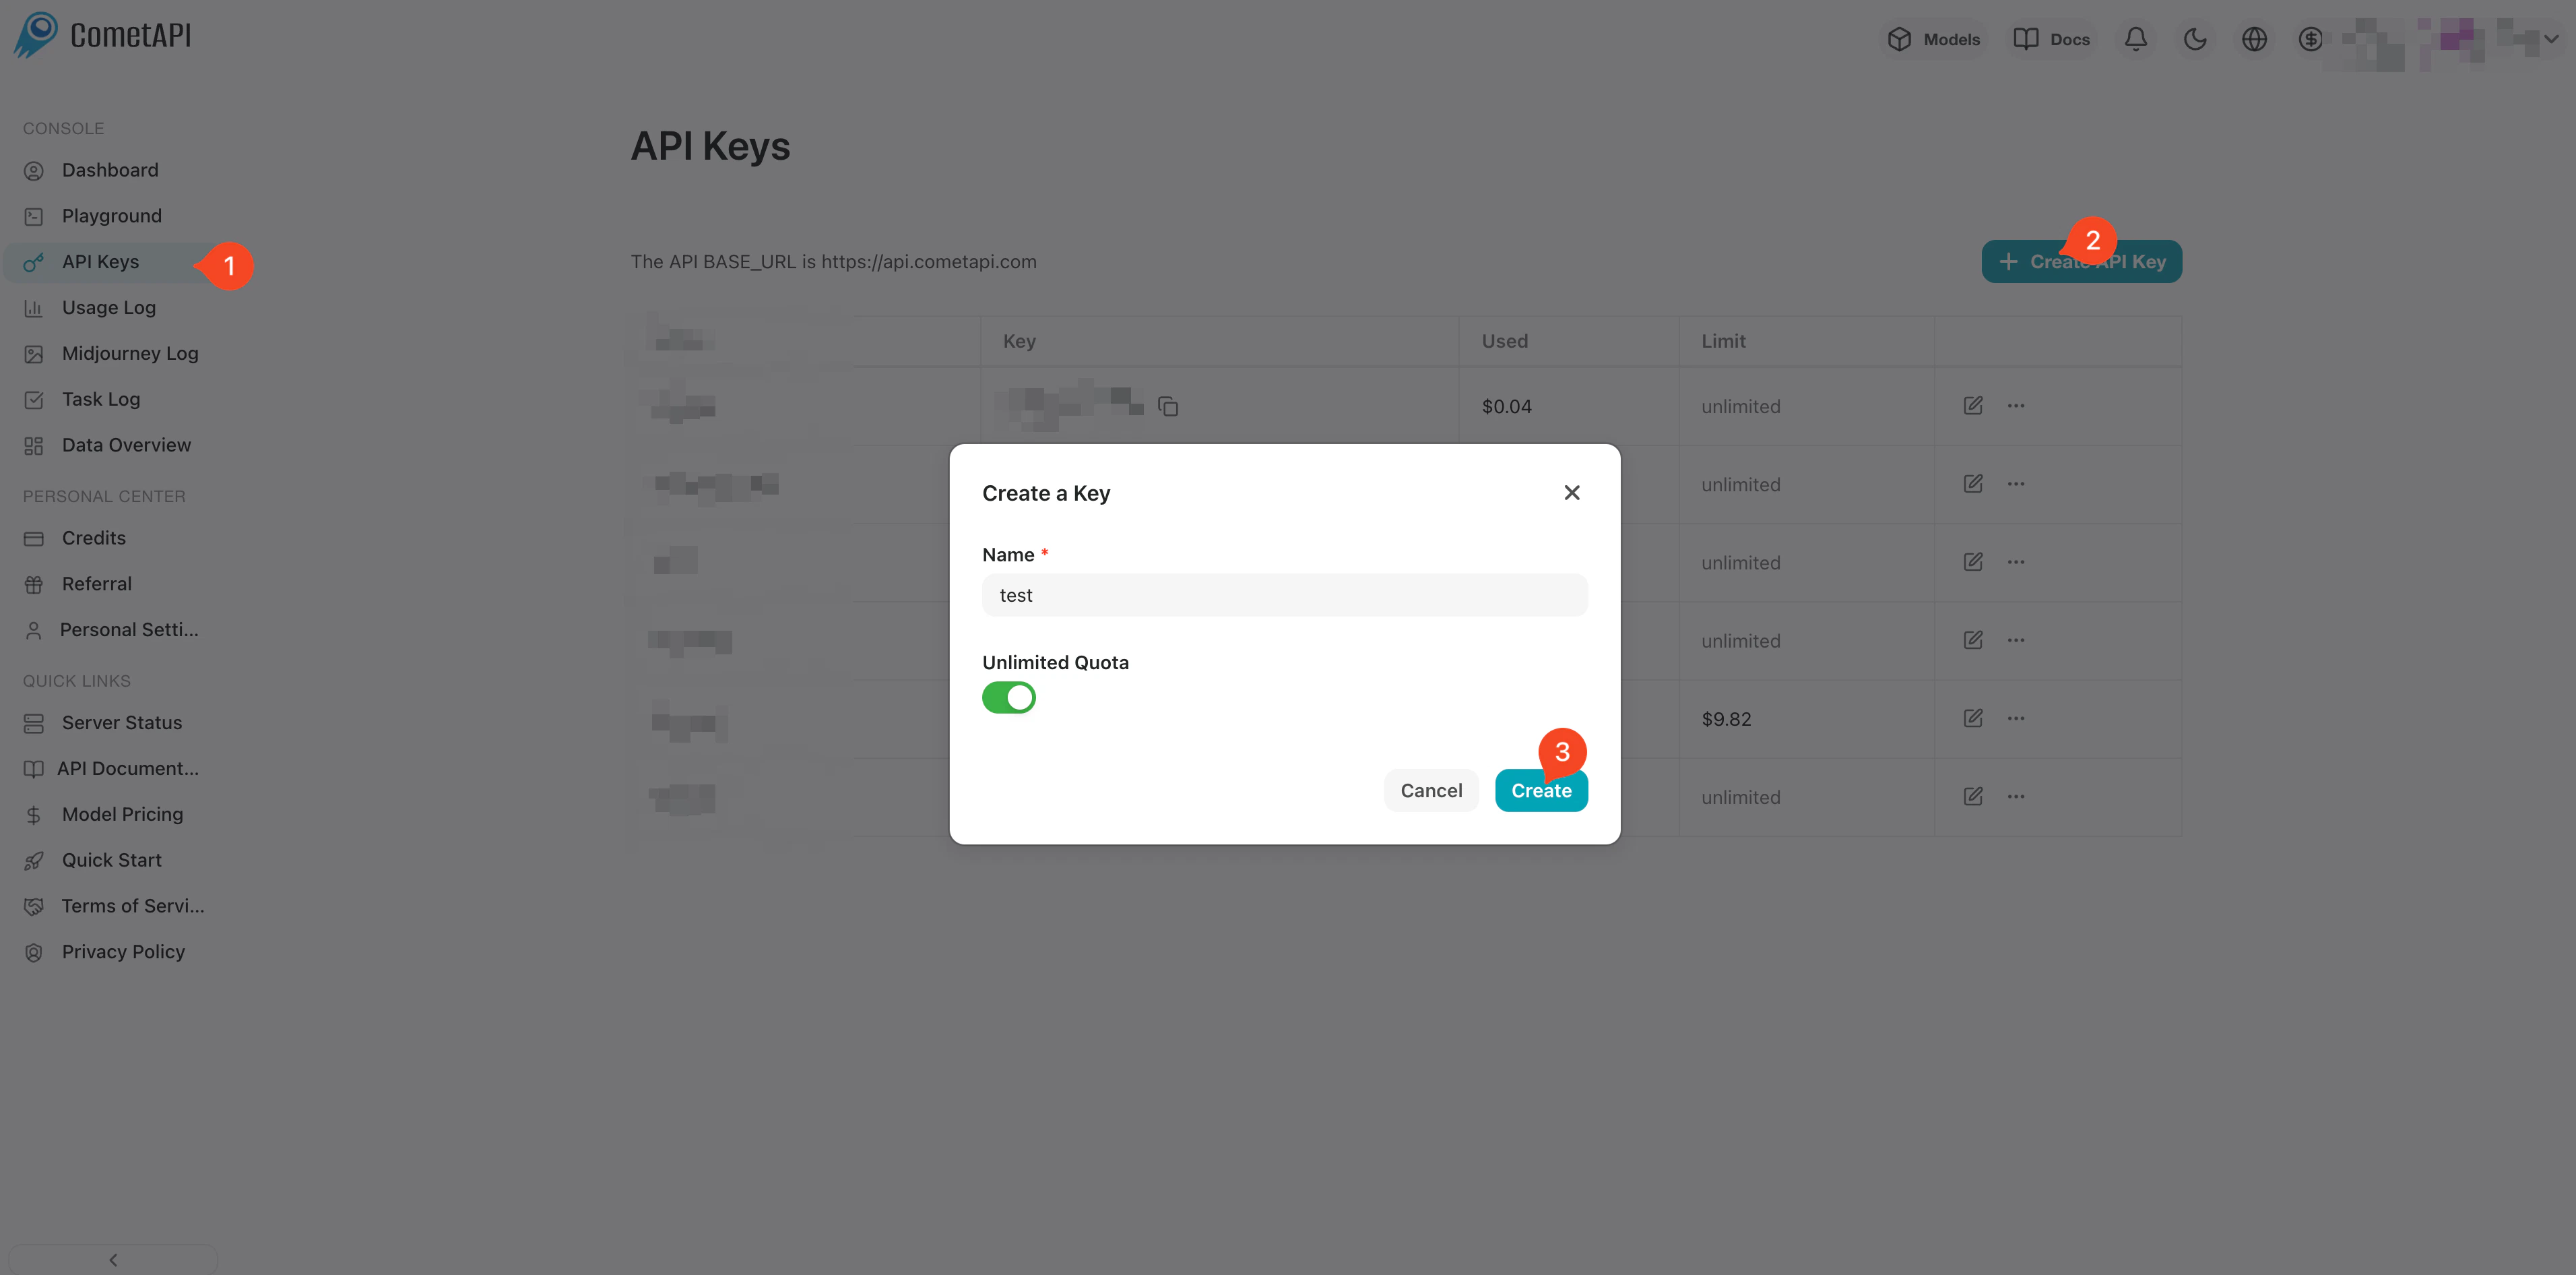
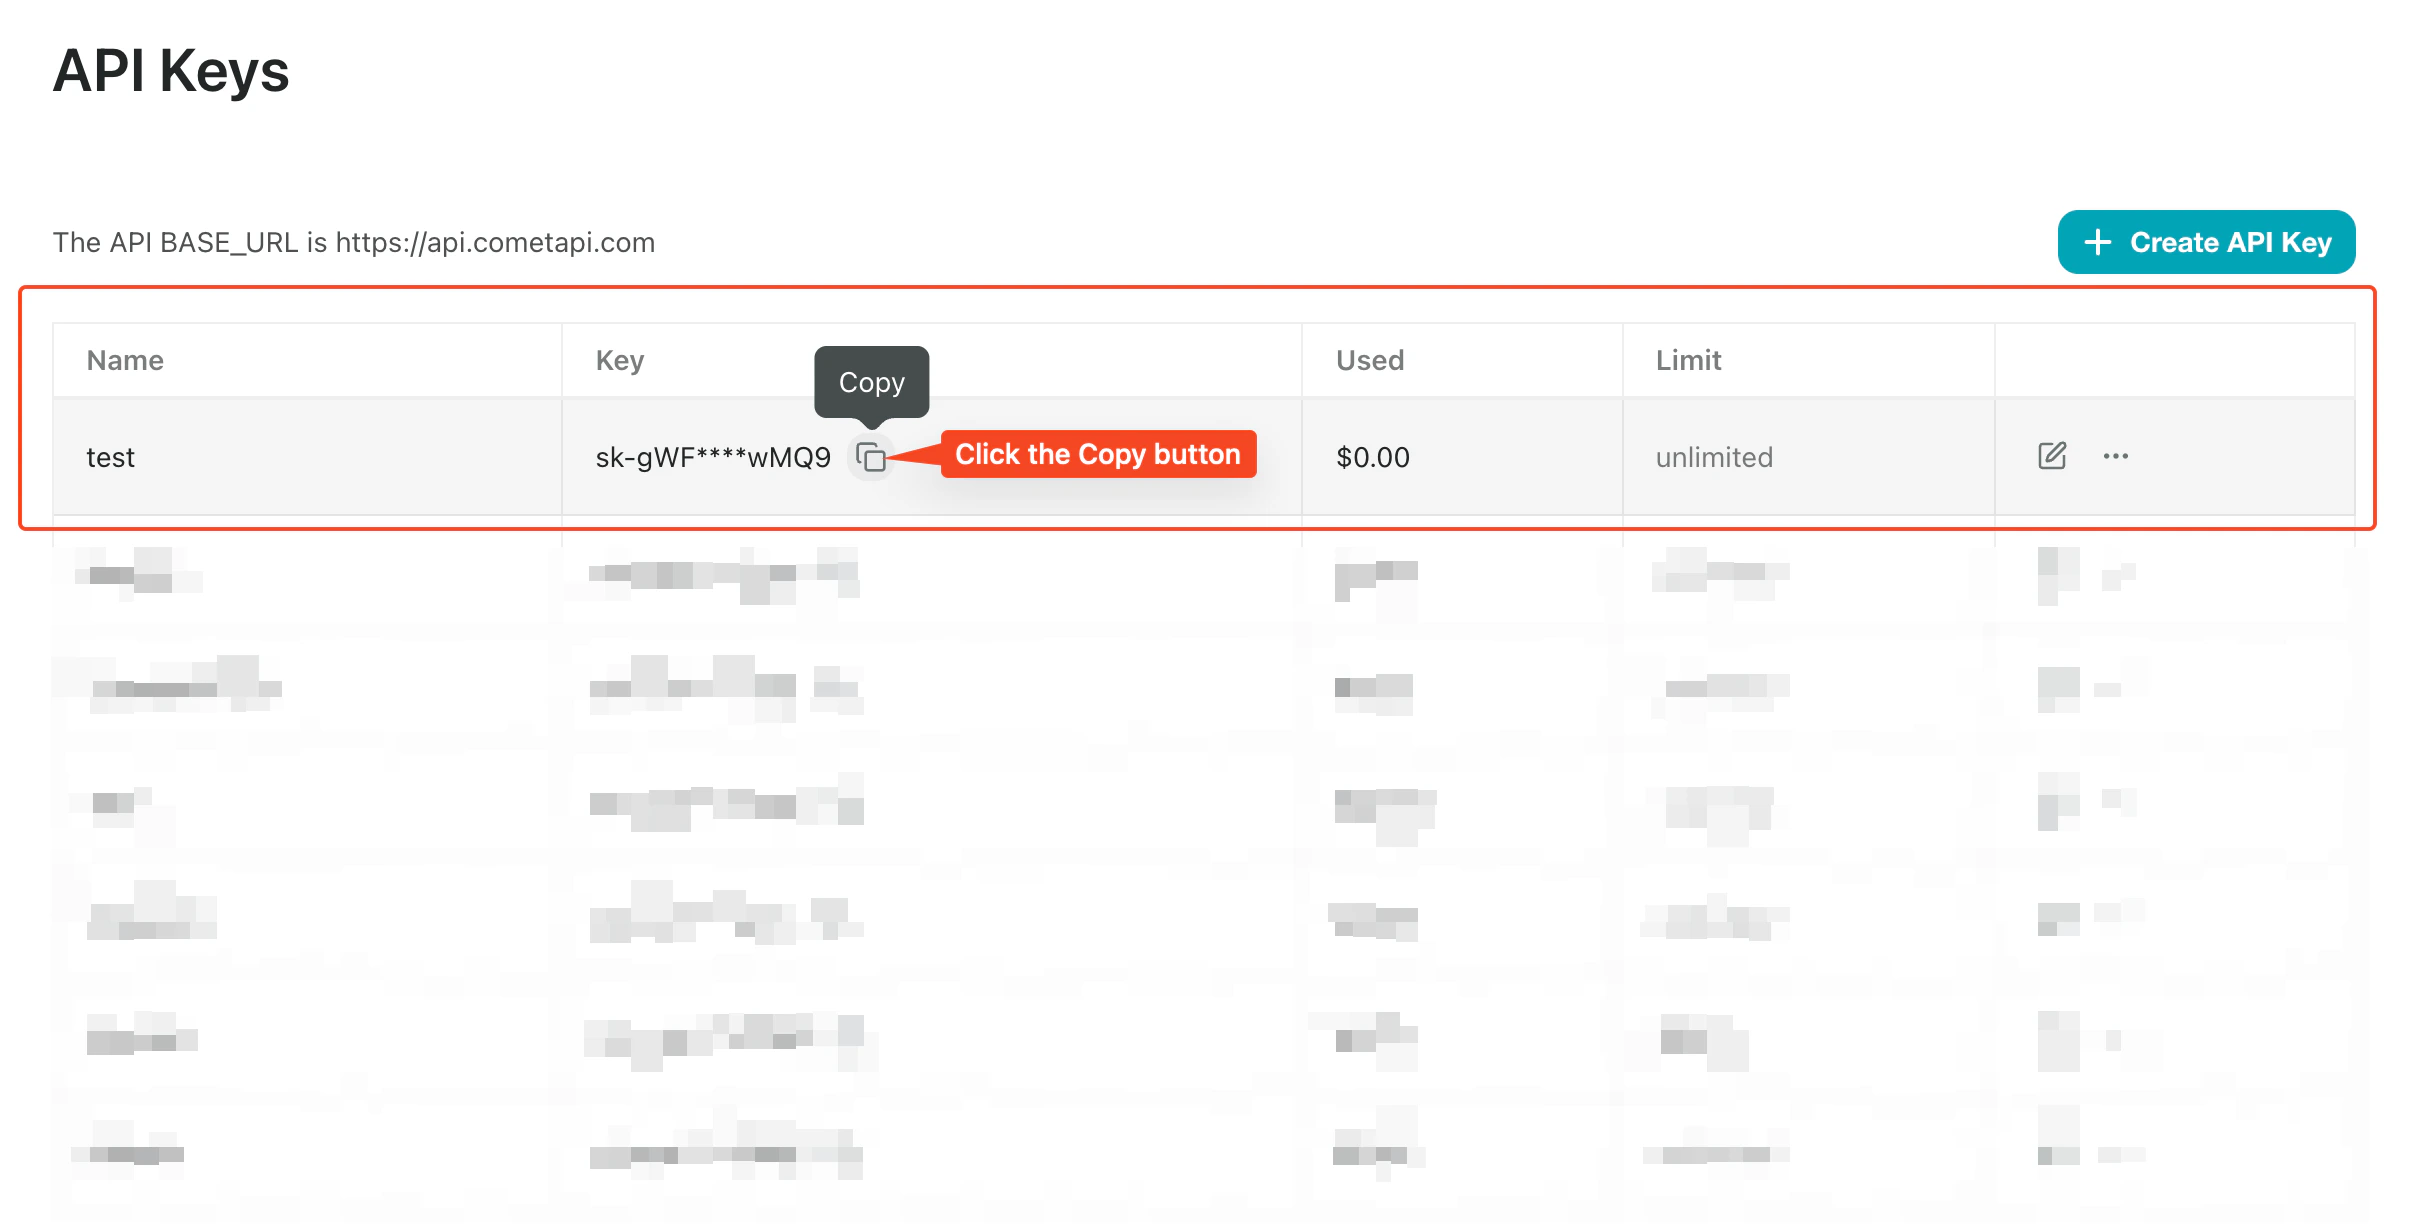
Log in to the [CometAPI console](https://www.cometapi.com/console/token). Click **Add API Key** and copy your CometAPI API key.
 **Recommended** — use the official installer:
```bash theme={null}
curl -fsSL https://openclaw.ai/install.sh | bash
```
Or install via npm:
```bash theme={null}
npm install -g openclaw@latest
```
Then run the setup wizard once:
```bash theme={null}
openclaw onboard --install-daemon
```
During onboarding, choose **Skip** in the Model/Auth step if you want to configure CometAPI manually. After onboarding, confirm the gateway is running:
```bash theme={null}
openclaw gateway status
openclaw dashboard
```
## Configuration
Write your key to `~/.openclaw/.env` so it is available to the daemon without being hardcoded in config files:
```bash theme={null}
printf 'COMETAPI_KEY=%s\n' "$COMETAPI_KEY" >> ~/.openclaw/.env
chmod 600 ~/.openclaw/.env
```
If you already inject `COMETAPI_KEY` through your shell, service manager, or a secrets workflow, skip this step — the config below uses `$\{COMETAPI_KEY\}` regardless of how the variable is set.
CometAPI supports **four API formats**. Add one or more provider blocks to `~/.openclaw/openclaw.json`:
| Provider | API Format | Endpoint called | Base URL |
| --------------------------- | ---------------------- | --------------------------- | --------------------------------- |
| `cometapi-openai` | `openai-completions` | `POST /v1/chat/completions` | `https://api.cometapi.com/v1` |
| `cometapi-openai-responses` | `openai-responses` | `POST /v1/responses` | `https://api.cometapi.com/v1` |
| `cometapi-claude` | `anthropic-messages` | `POST /messages` | `https://api.cometapi.com` |
| `cometapi-google` | `google-generative-ai` | `POST /v1beta/...` | `https://api.cometapi.com/v1beta` |
```json theme={null}
{
"agents": {
"defaults": {
"model": {
"primary": "cometapi-claude/your-claude-model-id"
}
}
},
"models": {
"mode": "merge",
"providers": {
"cometapi-openai": {
"baseUrl": "https://api.cometapi.com/v1",
"apiKey": "${COMETAPI_KEY}",
"api": "openai-completions",
"models": [{ "id": "your-chat-model-id", "name": "OpenAI-compatible text model" }]
},
"cometapi-openai-responses": {
"baseUrl": "https://api.cometapi.com/v1",
"apiKey": "${COMETAPI_KEY}",
"api": "openai-responses",
"models": [{ "id": "your-responses-model-id", "name": "Responses API model" }]
},
"cometapi-claude": {
"baseUrl": "https://api.cometapi.com",
"apiKey": "${COMETAPI_KEY}",
"api": "anthropic-messages",
"models": [{ "id": "your-claude-model-id", "name": "Claude family model" }]
},
"cometapi-google": {
"baseUrl": "https://api.cometapi.com/v1beta",
"apiKey": "${COMETAPI_KEY}",
"api": "google-generative-ai",
"models": [{ "id": "your-gemini-model-id", "name": "Gemini family model" }]
}
}
}
}
```
You can keep only the providers you need, or keep all four to route between formats using `provider/model` references.
Replace each `your-...-model-id` placeholder with a current model ID from the [CometAPI Models page](https://www.cometapi.com/models/) that matches the provider block.
Use `cometapi-openai-responses` (`api: "openai-responses"`) for models that require the OpenAI Responses API. Use `cometapi-openai` (`api: "openai-completions"`) for models on the classic Chat Completions path. Both share the same `baseUrl` (`https://api.cometapi.com/v1`); the only difference is which downstream endpoint OpenClaw calls.
The `auth-profiles.json` file is **not required** for this setup. Provider keys are resolved from `models.providers.*.apiKey` via the `$\{COMETAPI_KEY\}` env var. `auth-profiles.json` is only needed if you want per-profile credential rotation across multiple keys.
## Verification
Restart the gateway after adding `.env` or changing provider config:
```bash theme={null}
openclaw gateway restart
```
Then run diagnostics:
```bash theme={null}
openclaw models status
openclaw models list --provider cometapi-claude
openclaw doctor
```
A successful setup looks like:
* `openclaw models status` resolves the primary model to `cometapi-claude/your-claude-model-id` with no missing-auth warnings for CometAPI providers
* `openclaw models list --provider cometapi-claude` lists your configured models
* `openclaw doctor` reports no config or auth errors for CometAPI providers
**Recommended** — use the official installer:
```bash theme={null}
curl -fsSL https://openclaw.ai/install.sh | bash
```
Or install via npm:
```bash theme={null}
npm install -g openclaw@latest
```
Then run the setup wizard once:
```bash theme={null}
openclaw onboard --install-daemon
```
During onboarding, choose **Skip** in the Model/Auth step if you want to configure CometAPI manually. After onboarding, confirm the gateway is running:
```bash theme={null}
openclaw gateway status
openclaw dashboard
```
## Configuration
Write your key to `~/.openclaw/.env` so it is available to the daemon without being hardcoded in config files:
```bash theme={null}
printf 'COMETAPI_KEY=%s\n' "$COMETAPI_KEY" >> ~/.openclaw/.env
chmod 600 ~/.openclaw/.env
```
If you already inject `COMETAPI_KEY` through your shell, service manager, or a secrets workflow, skip this step — the config below uses `$\{COMETAPI_KEY\}` regardless of how the variable is set.
CometAPI supports **four API formats**. Add one or more provider blocks to `~/.openclaw/openclaw.json`:
| Provider | API Format | Endpoint called | Base URL |
| --------------------------- | ---------------------- | --------------------------- | --------------------------------- |
| `cometapi-openai` | `openai-completions` | `POST /v1/chat/completions` | `https://api.cometapi.com/v1` |
| `cometapi-openai-responses` | `openai-responses` | `POST /v1/responses` | `https://api.cometapi.com/v1` |
| `cometapi-claude` | `anthropic-messages` | `POST /messages` | `https://api.cometapi.com` |
| `cometapi-google` | `google-generative-ai` | `POST /v1beta/...` | `https://api.cometapi.com/v1beta` |
```json theme={null}
{
"agents": {
"defaults": {
"model": {
"primary": "cometapi-claude/your-claude-model-id"
}
}
},
"models": {
"mode": "merge",
"providers": {
"cometapi-openai": {
"baseUrl": "https://api.cometapi.com/v1",
"apiKey": "${COMETAPI_KEY}",
"api": "openai-completions",
"models": [{ "id": "your-chat-model-id", "name": "OpenAI-compatible text model" }]
},
"cometapi-openai-responses": {
"baseUrl": "https://api.cometapi.com/v1",
"apiKey": "${COMETAPI_KEY}",
"api": "openai-responses",
"models": [{ "id": "your-responses-model-id", "name": "Responses API model" }]
},
"cometapi-claude": {
"baseUrl": "https://api.cometapi.com",
"apiKey": "${COMETAPI_KEY}",
"api": "anthropic-messages",
"models": [{ "id": "your-claude-model-id", "name": "Claude family model" }]
},
"cometapi-google": {
"baseUrl": "https://api.cometapi.com/v1beta",
"apiKey": "${COMETAPI_KEY}",
"api": "google-generative-ai",
"models": [{ "id": "your-gemini-model-id", "name": "Gemini family model" }]
}
}
}
}
```
You can keep only the providers you need, or keep all four to route between formats using `provider/model` references.
Replace each `your-...-model-id` placeholder with a current model ID from the [CometAPI Models page](https://www.cometapi.com/models/) that matches the provider block.
Use `cometapi-openai-responses` (`api: "openai-responses"`) for models that require the OpenAI Responses API. Use `cometapi-openai` (`api: "openai-completions"`) for models on the classic Chat Completions path. Both share the same `baseUrl` (`https://api.cometapi.com/v1`); the only difference is which downstream endpoint OpenClaw calls.
The `auth-profiles.json` file is **not required** for this setup. Provider keys are resolved from `models.providers.*.apiKey` via the `$\{COMETAPI_KEY\}` env var. `auth-profiles.json` is only needed if you want per-profile credential rotation across multiple keys.
## Verification
Restart the gateway after adding `.env` or changing provider config:
```bash theme={null}
openclaw gateway restart
```
Then run diagnostics:
```bash theme={null}
openclaw models status
openclaw models list --provider cometapi-claude
openclaw doctor
```
A successful setup looks like:
* `openclaw models status` resolves the primary model to `cometapi-claude/your-claude-model-id` with no missing-auth warnings for CometAPI providers
* `openclaw models list --provider cometapi-claude` lists your configured models
* `openclaw doctor` reports no config or auth errors for CometAPI providers
 ## Switch models
```bash theme={null}
# Set the default model in config
openclaw models set cometapi-claude/your-claude-model-id
# Switch for the current chat session
/model cometapi-openai/your-chat-model-id
/model cometapi-openai-responses/your-responses-model-id
/model cometapi-claude/your-claude-model-id
/model cometapi-google/your-gemini-model-id
```
## Troubleshooting
If you are fixing a broken older setup, stop the gateway, remove `~/.openclaw`, then rerun onboarding before applying the CometAPI config:
```bash theme={null}
openclaw gateway stop
rm -rf ~/.openclaw
openclaw onboard --install-daemon
```
This removes all local config, sessions, logs, auth state, and workspaces. Then follow Steps 3–5 again.
## Switch models
```bash theme={null}
# Set the default model in config
openclaw models set cometapi-claude/your-claude-model-id
# Switch for the current chat session
/model cometapi-openai/your-chat-model-id
/model cometapi-openai-responses/your-responses-model-id
/model cometapi-claude/your-claude-model-id
/model cometapi-google/your-gemini-model-id
```
## Troubleshooting
If you are fixing a broken older setup, stop the gateway, remove `~/.openclaw`, then rerun onboarding before applying the CometAPI config:
```bash theme={null}
openclaw gateway stop
rm -rf ~/.openclaw
openclaw onboard --install-daemon
```
This removes all local config, sessions, logs, auth state, and workspaces. Then follow Steps 3–5 again.