> ## Documentation Index
> Fetch the complete documentation index at: https://apidoc.cometapi.com/llms.txt
> Use this file to discover all available pages before exploring further.
# Use WorkBuddy AI with CometAPI
> Configure the WorkBuddy AI desktop app with CometAPI through the Custom provider dialog or models.json.
Use the [WorkBuddy AI](https://www.workbuddy.ai/) desktop app with CometAPI through its OpenAI-compatible Custom provider. You can configure the connection in the app or with a `models.json` file.
Official WorkBuddy AI references:
* [Model Configuration](https://www.workbuddy.ai/docs/workbuddy/From-Beginner-to-Expert-Guide/Function-Description/Model)
* [models.json Configuration Guide](https://www.workbuddy.ai/docs/cli/models)
## Prerequisites
* [WorkBuddy AI](https://www.workbuddy.ai/) installed on your computer
* A [CometAPI](https://www.cometapi.com) account with an active API key
* A model ID from the [CometAPI model list](/overview/models)
## Choose a setup method
Use **Settings** → **Model** to add a Custom provider through the graphical interface.
Store a reusable model definition in the user-level or project-level WorkBuddy AI configuration file.
## Configure the app
In WorkBuddy AI, open **Settings** → **Model**, then select **Add Model**.
In the **Provider** field, select **Custom**. This option accepts an OpenAI-compatible API connection.
Enter the following values in the Add Model dialog:
| Field | Value |
| - | - |
| Provider | `Custom` |
| Endpoint | `https://api.cometapi.com/v1/chat/completions` |
| API Key | Your CometAPI API key |
| Model Name | The model ID from the [CometAPI model list](/overview/models) |
The endpoint includes the complete `/chat/completions` path. Enable **Custom Protocol** so WorkBuddy sends the URL exactly as entered instead of adding another `/chat/completions` path.
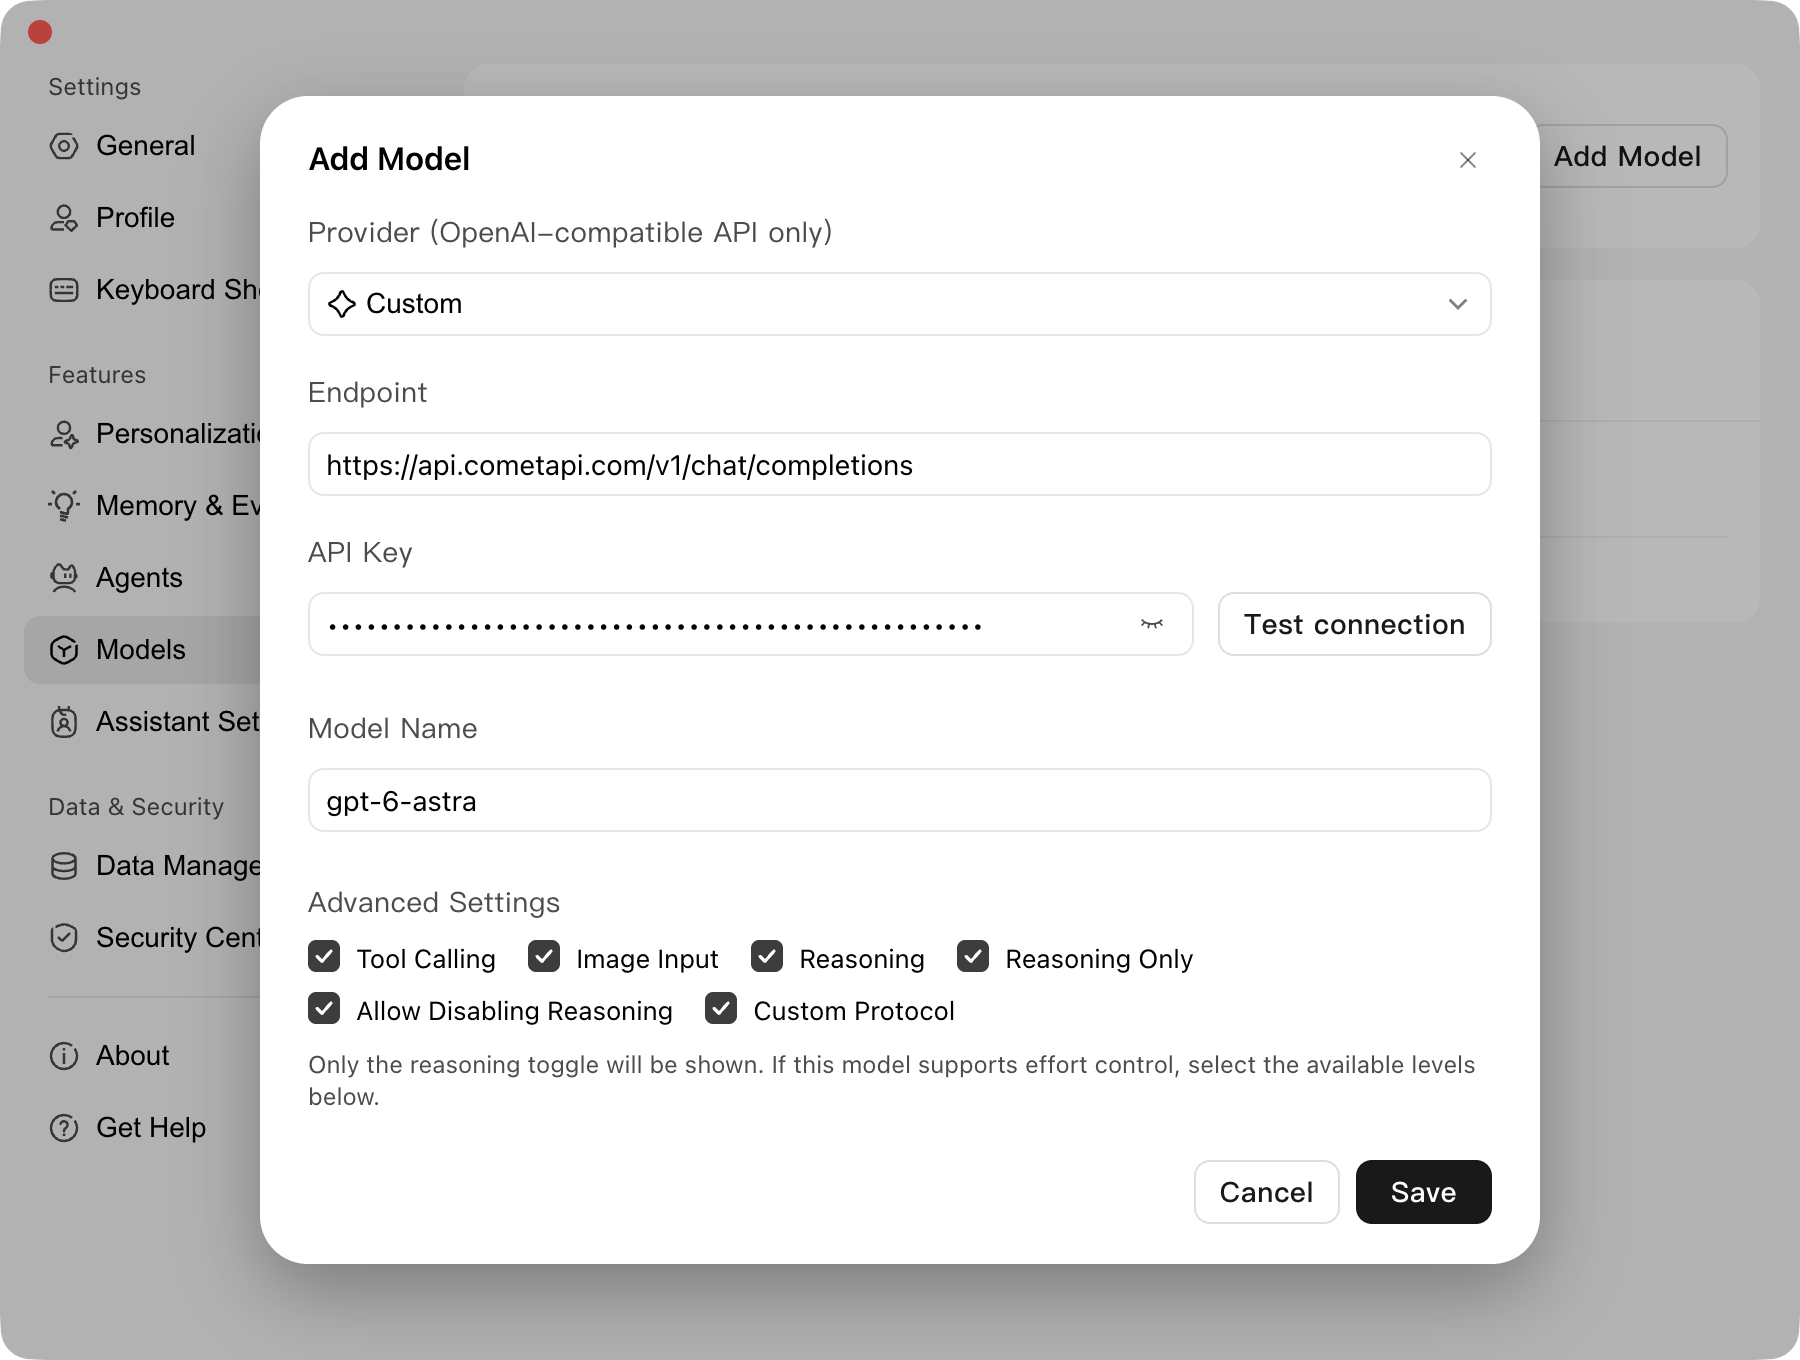 The screenshot uses `gpt-6-astra` as an example model name. Choose a model ID that is available in your CometAPI account.
Enable **Tool Calling**, **Image Input**, or **Reasoning** only when the selected model supports that capability. Use **Reasoning Only** and **Allow Disabling Reasoning** when those controls match the model's reasoning behavior.
In the Add Model dialog, click **Test connection**, then click **Save** after the connection check completes.
## Configure models.json
WorkBuddy AI reads custom models from a user-level `~/.codebuddy/models.json` file or a project-level `/.codebuddy/models.json` file. Project-level configuration takes priority for matching model IDs.
Create the configuration directory if it does not exist, then save the following JSON. The example uses an environment variable reference so that the API key does not appear in the file:
```json theme={null}
{
"models": [
{
"id": "your-model-id",
"name": "CometAPI model",
"vendor": "CometAPI",
"apiKey": "${COMETAPI_KEY}",
"url": "https://api.cometapi.com/v1/chat/completions",
"supportsToolCall": false,
"supportsImages": false,
"supportsReasoning": false
}
],
"availableModels": [
"your-model-id"
]
}
```
Set `COMETAPI_KEY` in the environment that starts WorkBuddy AI. Replace `your-model-id` with a model ID from the [CometAPI model list](/overview/models). The `url` value must be the complete OpenAI Chat Completions path. Change a capability flag to `true` only when the selected model supports that capability.
Set the file permissions to owner read/write on macOS or Linux:
```bash theme={null}
chmod 600 "$HOME/.codebuddy/models.json"
```
If you use a project-level file, create it at `/.codebuddy/models.json` and keep the file out of version control when it contains local configuration. WorkBuddy AI reloads saved `models.json` changes and labels models added through the file as custom models.
The `availableModels` array controls which model IDs appear in the model selector. If the array is empty or omitted, WorkBuddy AI displays all configured models.
## Verify the connection
After either setup method, select the CometAPI model in the WorkBuddy AI model selector and send a short prompt, such as:
```text theme={null}
Reply with one sentence: WorkBuddy AI is connected through CometAPI.
```
A response confirms that WorkBuddy AI can reach the configured CometAPI model. If the model does not appear, check that the model ID matches the CometAPI model list and that `availableModels` includes the same ID when you use that field.
## Troubleshooting
Confirm that the `id` value matches a CometAPI model ID. If `availableModels` is present, add the same ID to that array. For a project configuration, check `/.codebuddy/models.json` before the user-level file.
Check that the API key is active and that the endpoint is exactly `https://api.cometapi.com/v1/chat/completions`. For a `models.json` setup, confirm that `COMETAPI_KEY` is available in the environment that starts WorkBuddy AI.
Use the complete `/chat/completions` path in the Endpoint field and the `url` field. In the app, enable **Custom Protocol** so WorkBuddy sends the complete URL without adding another path.
Turn off capability flags that the selected model does not support. Tool calling, image input, and reasoning are independent settings.
The screenshot uses `gpt-6-astra` as an example model name. Choose a model ID that is available in your CometAPI account.
Enable **Tool Calling**, **Image Input**, or **Reasoning** only when the selected model supports that capability. Use **Reasoning Only** and **Allow Disabling Reasoning** when those controls match the model's reasoning behavior.
In the Add Model dialog, click **Test connection**, then click **Save** after the connection check completes.
## Configure models.json
WorkBuddy AI reads custom models from a user-level `~/.codebuddy/models.json` file or a project-level `/.codebuddy/models.json` file. Project-level configuration takes priority for matching model IDs.
Create the configuration directory if it does not exist, then save the following JSON. The example uses an environment variable reference so that the API key does not appear in the file:
```json theme={null}
{
"models": [
{
"id": "your-model-id",
"name": "CometAPI model",
"vendor": "CometAPI",
"apiKey": "${COMETAPI_KEY}",
"url": "https://api.cometapi.com/v1/chat/completions",
"supportsToolCall": false,
"supportsImages": false,
"supportsReasoning": false
}
],
"availableModels": [
"your-model-id"
]
}
```
Set `COMETAPI_KEY` in the environment that starts WorkBuddy AI. Replace `your-model-id` with a model ID from the [CometAPI model list](/overview/models). The `url` value must be the complete OpenAI Chat Completions path. Change a capability flag to `true` only when the selected model supports that capability.
Set the file permissions to owner read/write on macOS or Linux:
```bash theme={null}
chmod 600 "$HOME/.codebuddy/models.json"
```
If you use a project-level file, create it at `/.codebuddy/models.json` and keep the file out of version control when it contains local configuration. WorkBuddy AI reloads saved `models.json` changes and labels models added through the file as custom models.
The `availableModels` array controls which model IDs appear in the model selector. If the array is empty or omitted, WorkBuddy AI displays all configured models.
## Verify the connection
After either setup method, select the CometAPI model in the WorkBuddy AI model selector and send a short prompt, such as:
```text theme={null}
Reply with one sentence: WorkBuddy AI is connected through CometAPI.
```
A response confirms that WorkBuddy AI can reach the configured CometAPI model. If the model does not appear, check that the model ID matches the CometAPI model list and that `availableModels` includes the same ID when you use that field.
## Troubleshooting
Confirm that the `id` value matches a CometAPI model ID. If `availableModels` is present, add the same ID to that array. For a project configuration, check `/.codebuddy/models.json` before the user-level file.
Check that the API key is active and that the endpoint is exactly `https://api.cometapi.com/v1/chat/completions`. For a `models.json` setup, confirm that `COMETAPI_KEY` is available in the environment that starts WorkBuddy AI.
Use the complete `/chat/completions` path in the Endpoint field and the `url` field. In the app, enable **Custom Protocol** so WorkBuddy sends the complete URL without adding another path.
Turn off capability flags that the selected model does not support. Tool calling, image input, and reasoning are independent settings.