> ## Documentation Index
> Fetch the complete documentation index at: https://apidoc.cometapi.com/llms.txt
> Use this file to discover all available pages before exploring further.

# Activepieces を CometAPI に接続する

> このガイドでは、base URL、API key、model または provider のオプションを設定して Activepieces を CometAPI に接続する方法を説明します。

[Activepieces](https://cloud.activepieces.com/) はオープンソースの自動化プラットフォームです。組み込みの CometAPI コネクタを使えば、数秒で任意のワークフローに AI ステップを追加できます。

## 前提条件

* [Activepieces](https://cloud.activepieces.com/) アカウント
* 有効な API key を持つ [CometAPI](https://www.cometapi.com) アカウント

## セットアップ

<Steps>
  <Step title="CometAPI API キーを取得する">
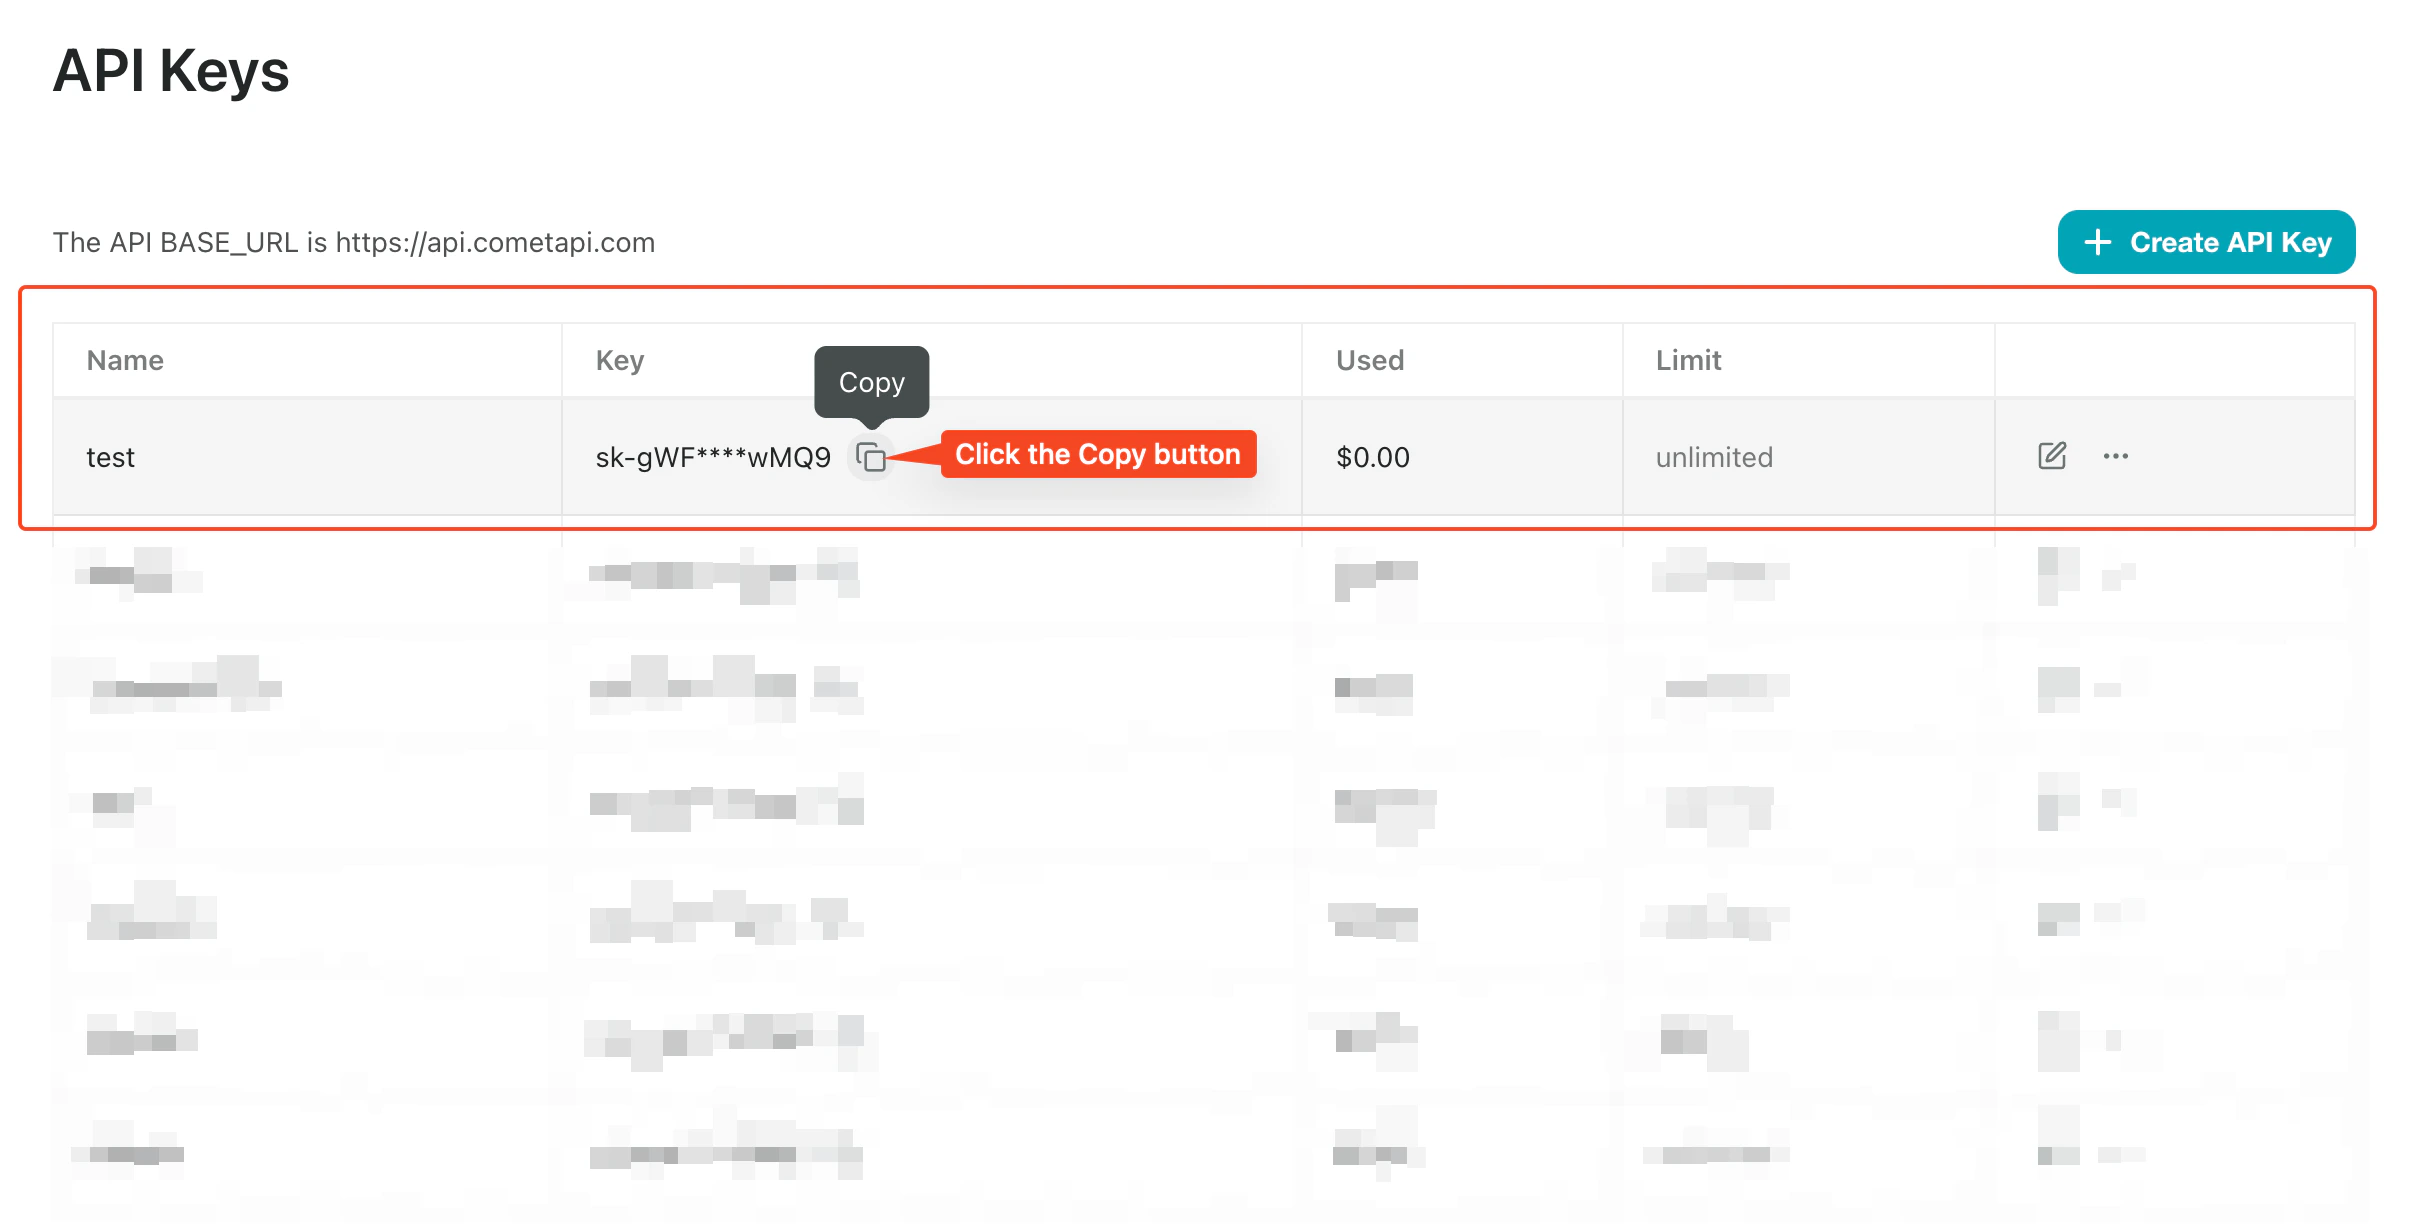
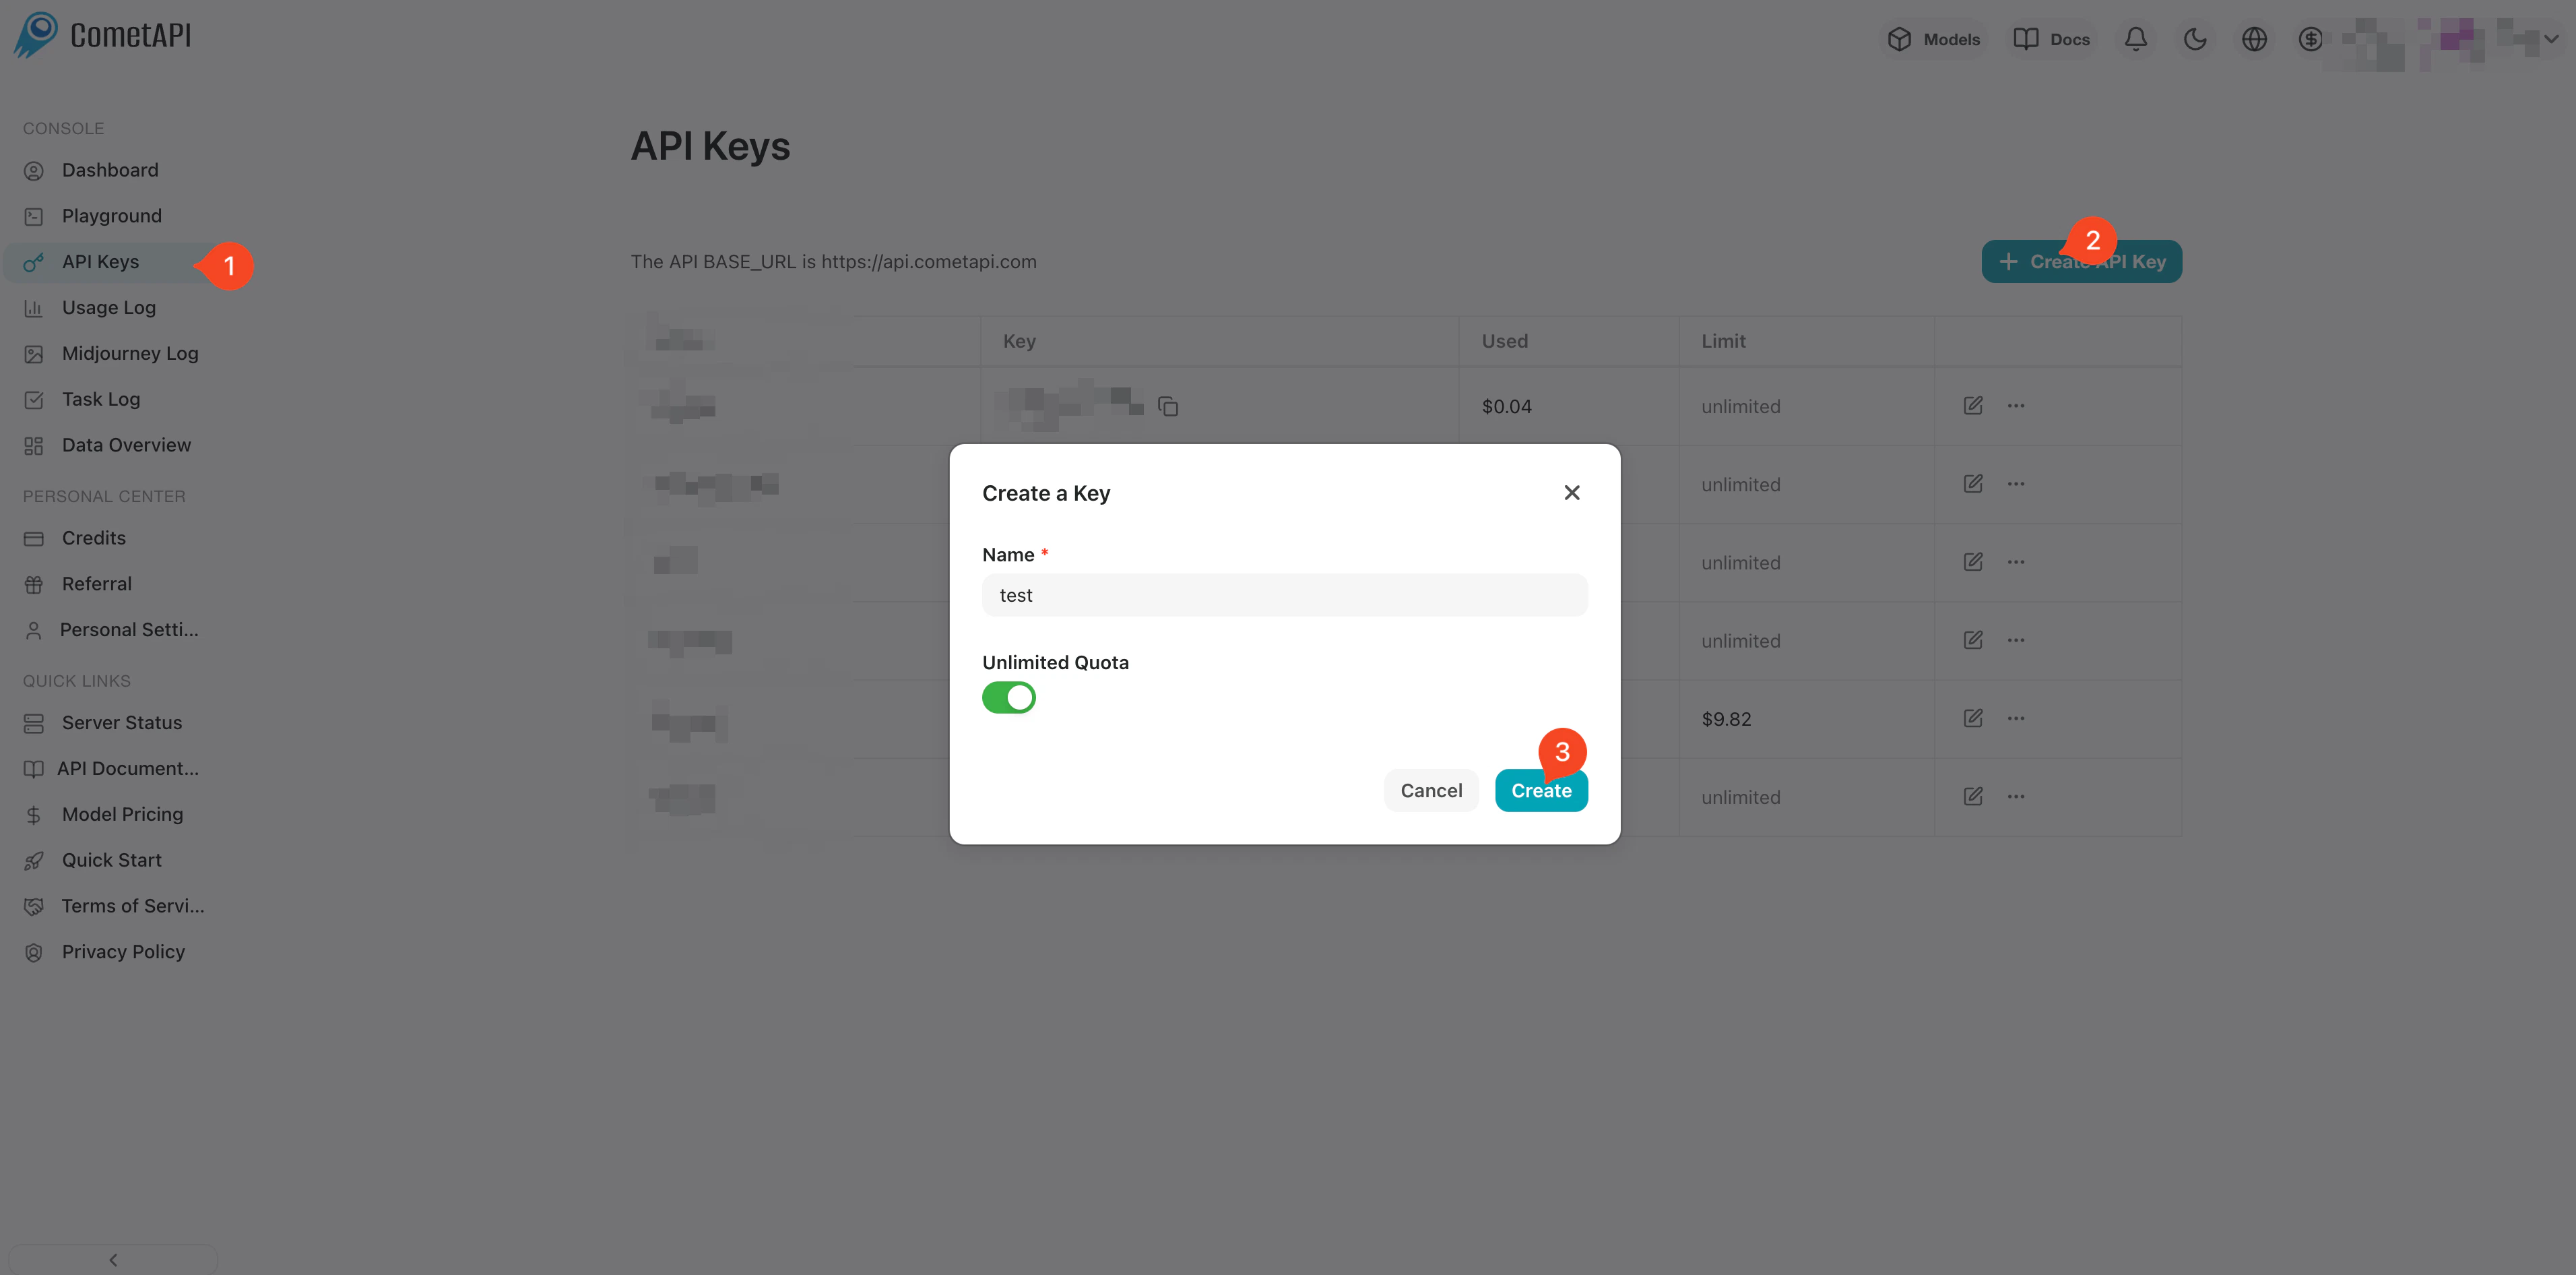
    [CometAPI ダッシュボード](https://www.cometapi.com/console)にログインします。**Add API Key** をクリックして、キーをコピーします。
    <Frame>
      <img src="https://mintcdn.com/cometapi/SZhlxZhCnMLn__BW/images/overview/810968_364191.png?fit=max&auto=format&n=SZhlxZhCnMLn__BW&q=85&s=aef81a83f29f8eb16655ed4060425f50" alt="CometAPI ダッシュボード — Add API Key ボタン" width="3824" height="1892" data-path="images/overview/810968_364191.png" />
    </Frame>

    <Frame>
      <img src="https://mintcdn.com/cometapi/HhtmQffktazbxUvS/images/overview/810968_364193.png?fit=max&auto=format&n=HhtmQffktazbxUvS&q=85&s=d893f659267150d0faf45f99eb5dffc1" alt="CometAPI API キーの詳細とベース URL" width="2434" height="1232" data-path="images/overview/810968_364193.png" />
    </Frame>
  </Step>

  <Step title="フローを作成して CometAPI ステップを追加する">
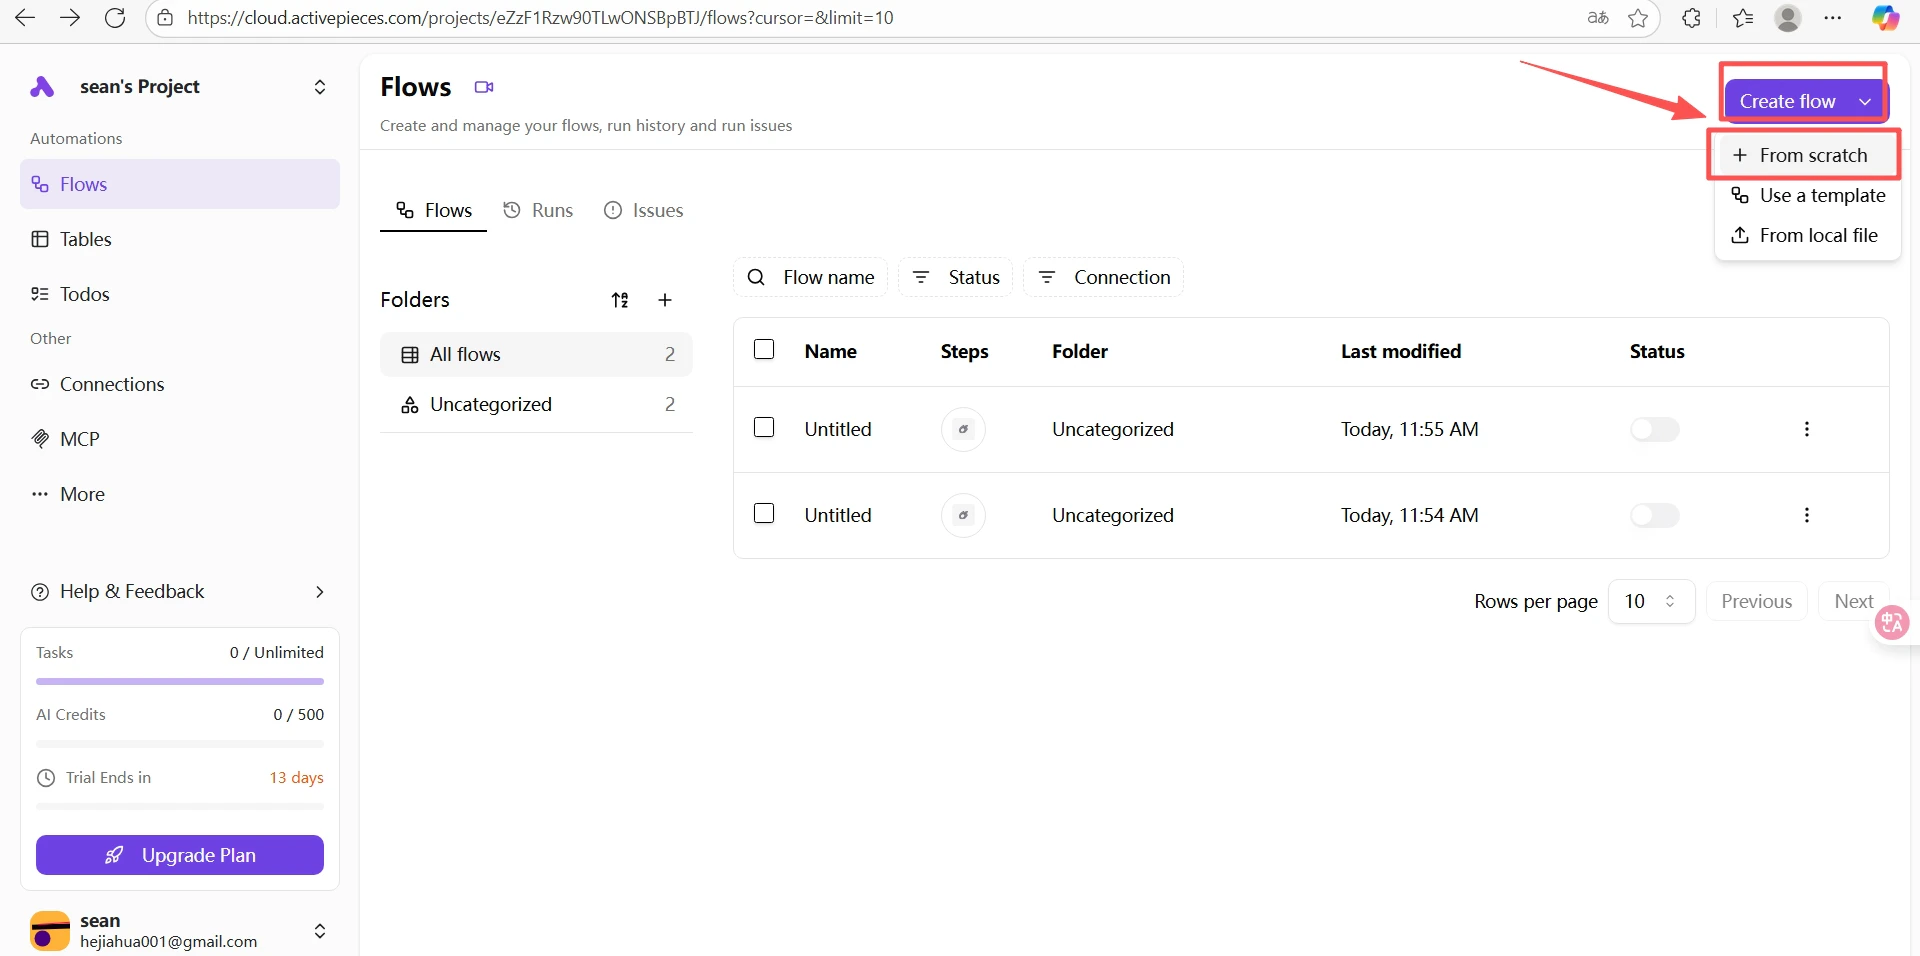
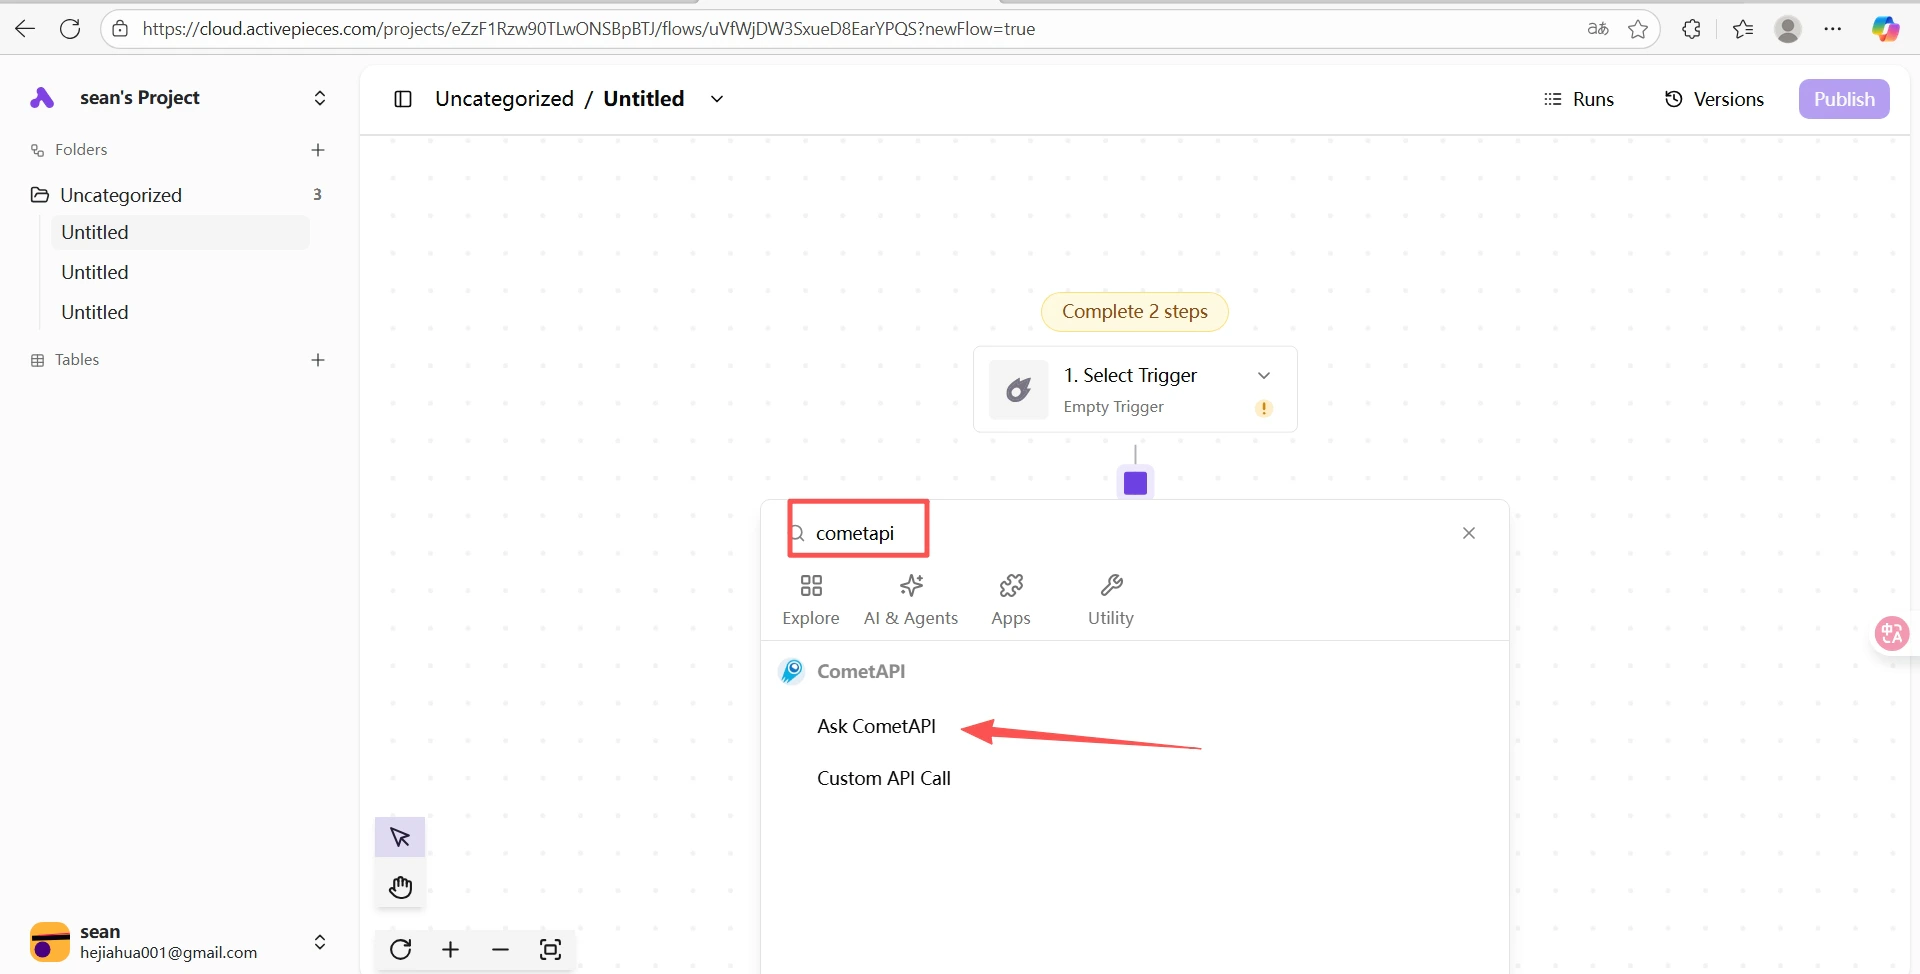
    Activepieces プロジェクトで、**Create Flow** → **From Scratch** をクリックします。キャンバス上の **+** ボタンをクリックし、`cometapi` を検索して **Ask CometAPI** を選択します。
    <Frame>
      <img src="https://mintcdn.com/cometapi/SZhlxZhCnMLn__BW/images/integrations/810968_361326.png?fit=max&auto=format&n=SZhlxZhCnMLn__BW&q=85&s=20fd998714bb23dc7c28dbad4315c152" alt="ステップを追加するための + ボタンがある Activepieces キャンバス" width="1920" height="956" data-path="images/integrations/810968_361326.png" />
    </Frame>

    <Frame>
      <img src="https://mintcdn.com/cometapi/SZhlxZhCnMLn__BW/images/integrations/810968_361327.png?fit=max&auto=format&n=SZhlxZhCnMLn__BW&q=85&s=084735cca2fbbb0b5e49672c029ff34c" alt="CometAPI コネクタが表示された検索結果" width="1920" height="974" data-path="images/integrations/810968_361327.png" />
    </Frame>

    <Frame>
      <img src="https://mintcdn.com/cometapi/SZhlxZhCnMLn__BW/images/integrations/810968_361328.png?fit=max&auto=format&n=SZhlxZhCnMLn__BW&q=85&s=a68000d40dcdfdd14af3a0954ab0c34b" alt="コネクタ一覧で Ask CometAPI ステップが選択されている状態" width="1920" height="909" data-path="images/integrations/810968_361328.png" />
    </Frame>
  </Step>

  <Step title="CometAPI ステップを設定する">
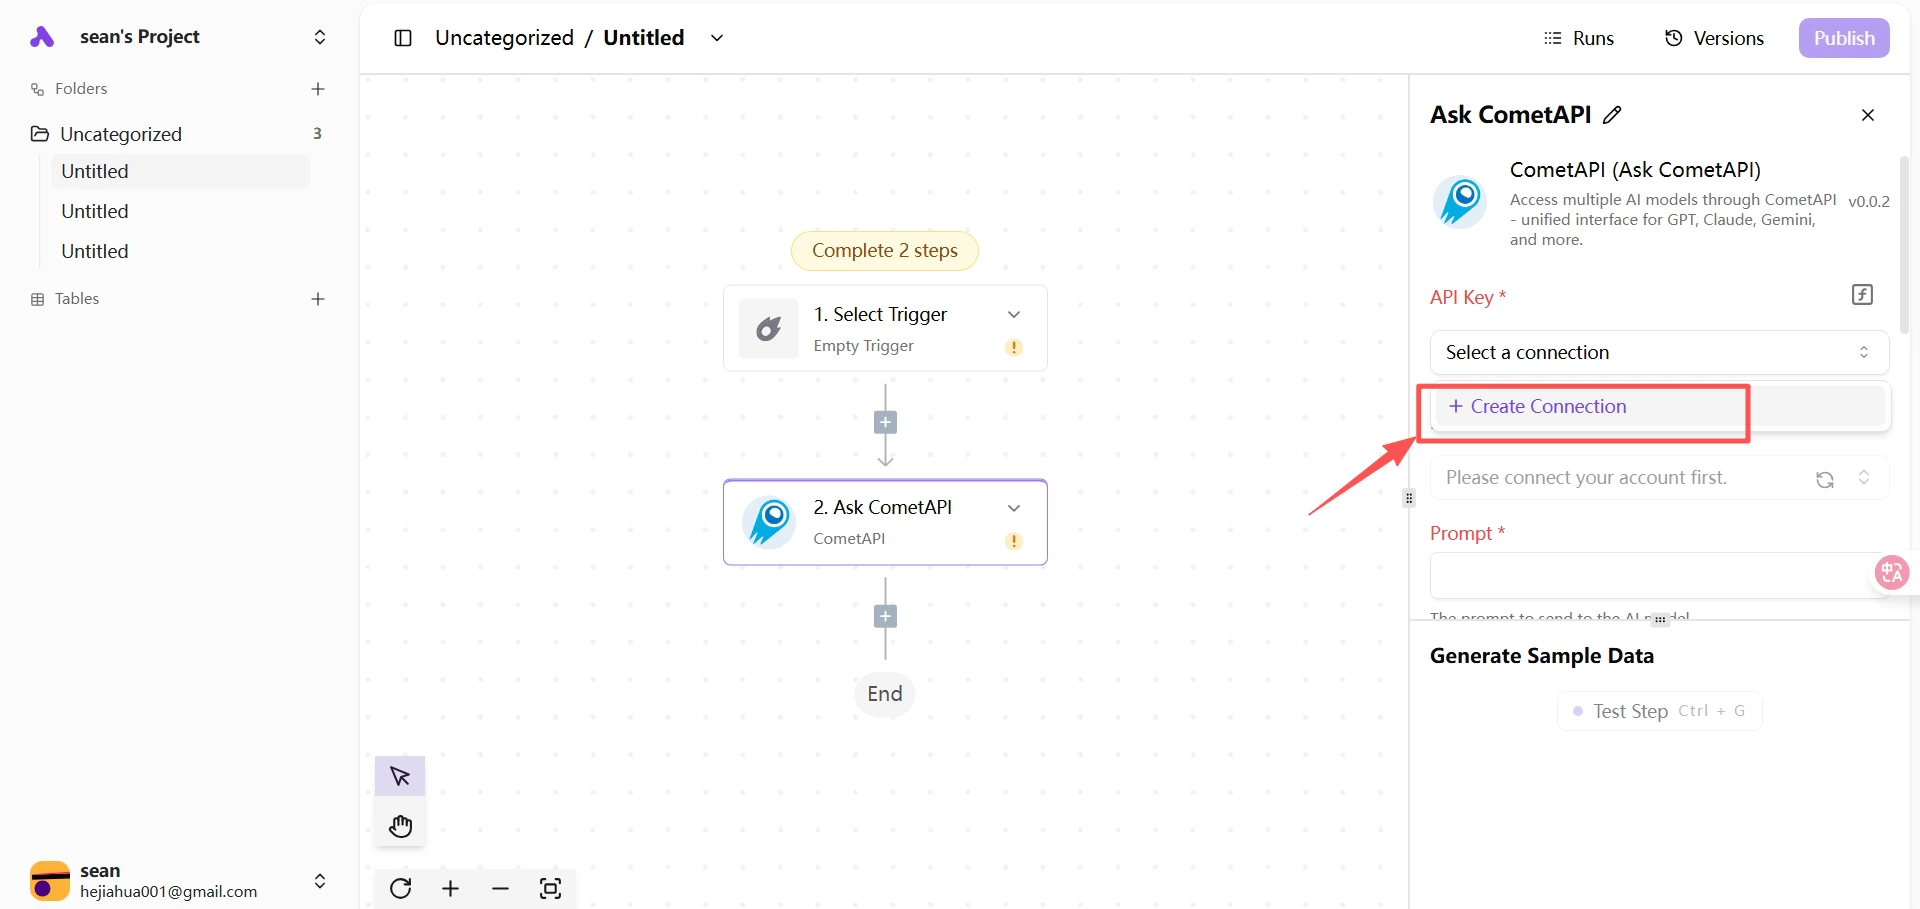
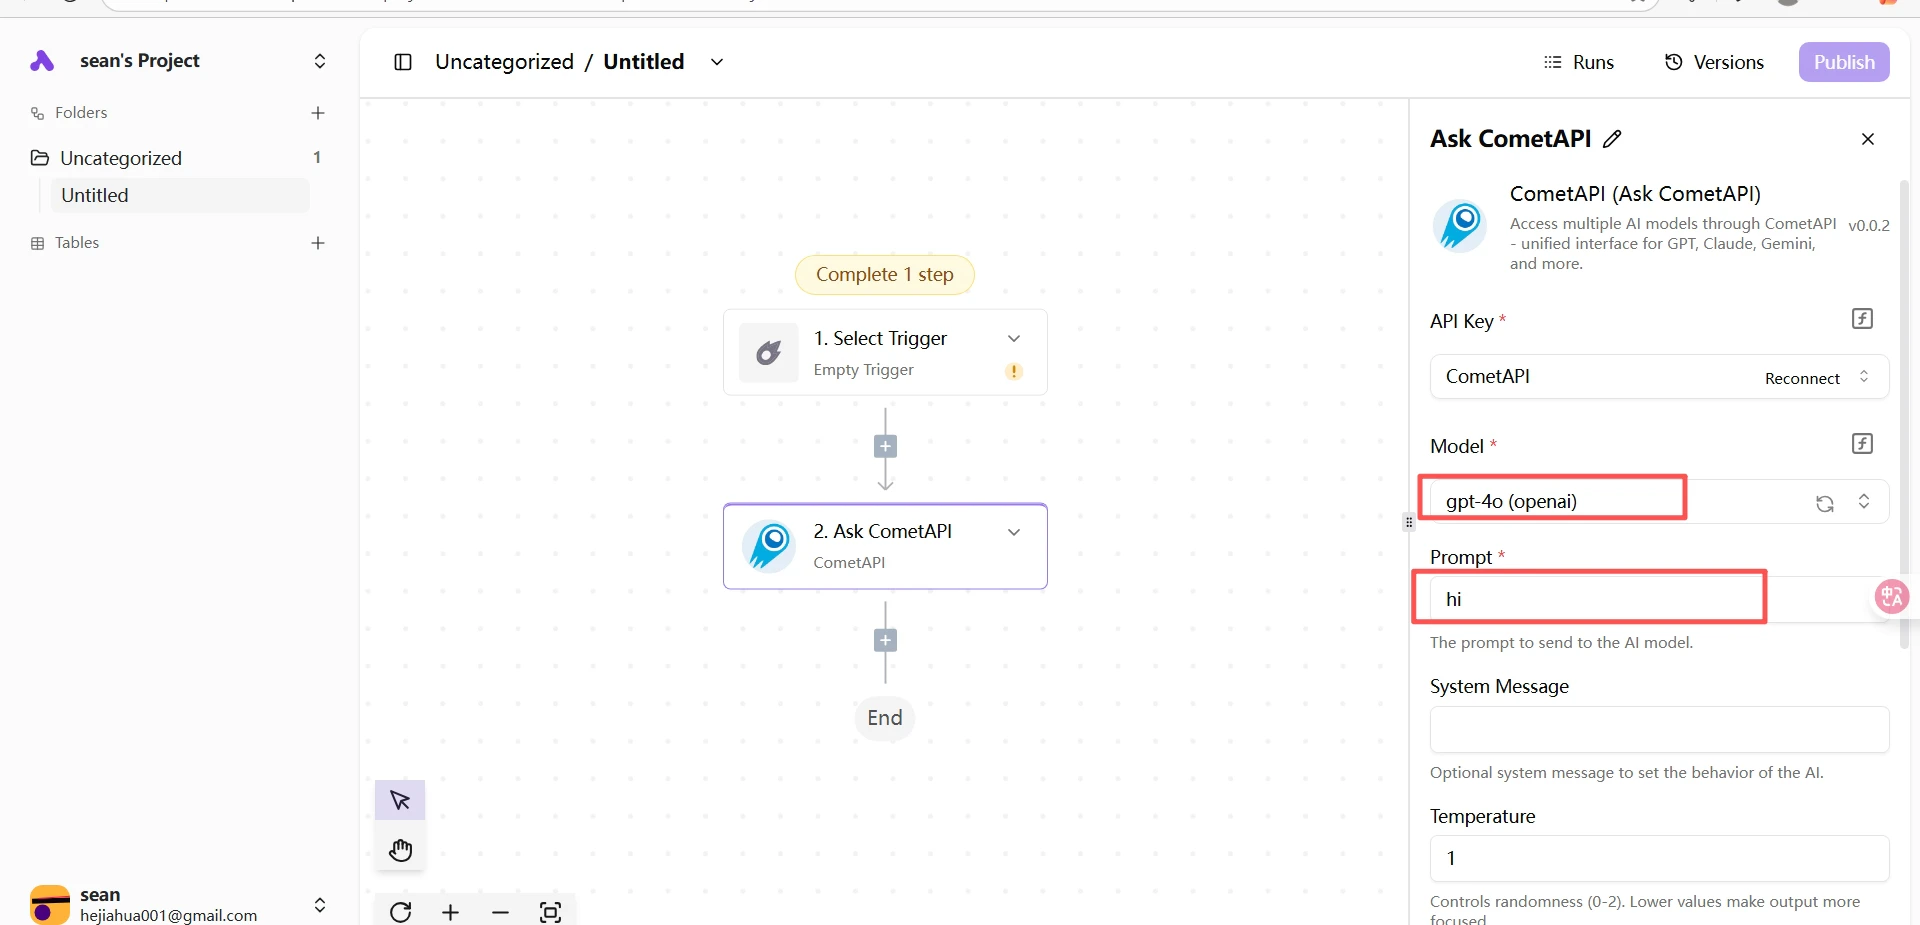
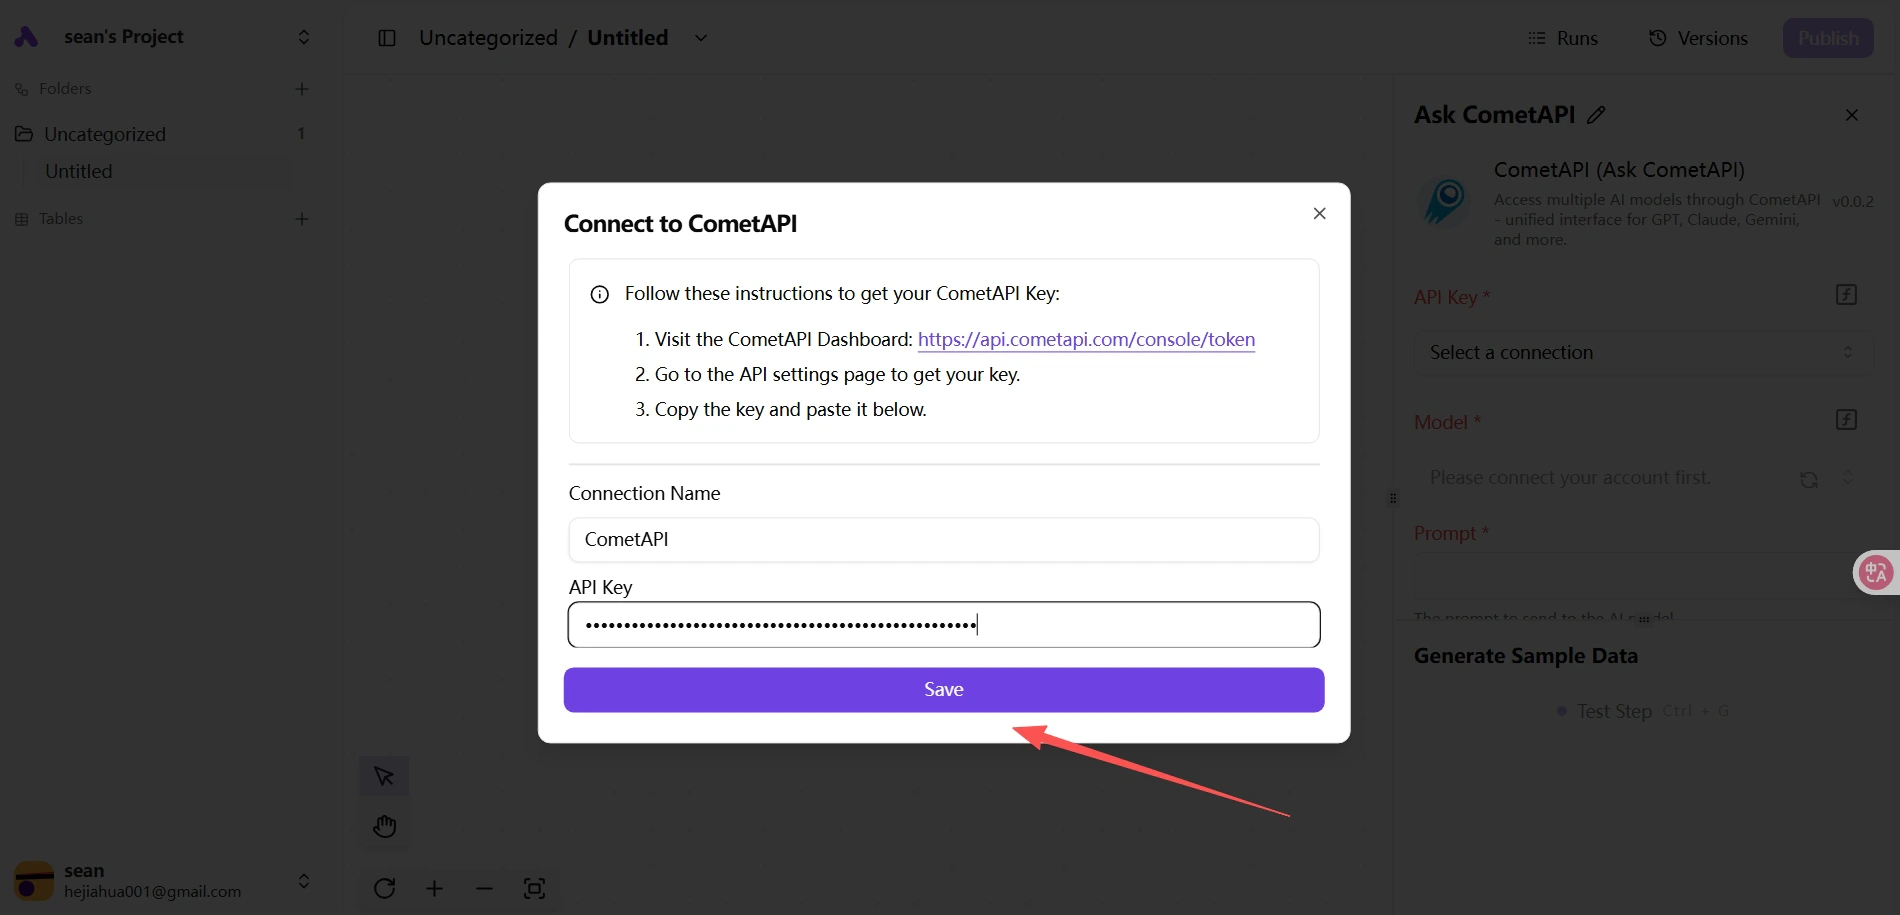
    **API Key** フィールドに API キーを貼り付けます。使用したい現在のモデルを選択し、プロンプトを入力します。
    <Frame>
      <img src="https://mintcdn.com/cometapi/SZhlxZhCnMLn__BW/images/integrations/810968_361329.png?fit=max&auto=format&n=SZhlxZhCnMLn__BW&q=85&s=b3ea4a155f705dfb8cd0956a3cfc7fc8" alt="CometAPI ステップ — API キーとモデル選択" width="1900" height="915" data-path="images/integrations/810968_361329.png" />
    </Frame>

    <Frame>
      <img src="https://mintcdn.com/cometapi/SZhlxZhCnMLn__BW/images/integrations/810968_361330.png?fit=max&auto=format&n=SZhlxZhCnMLn__BW&q=85&s=344e62888e22f3ef1d34109e95ee8baf" alt="Ask CometAPI ステップのプロンプト設定" width="1920" height="925" data-path="images/integrations/810968_361330.png" />
    </Frame>
  </Step>

  <Step title="フローをテストする">
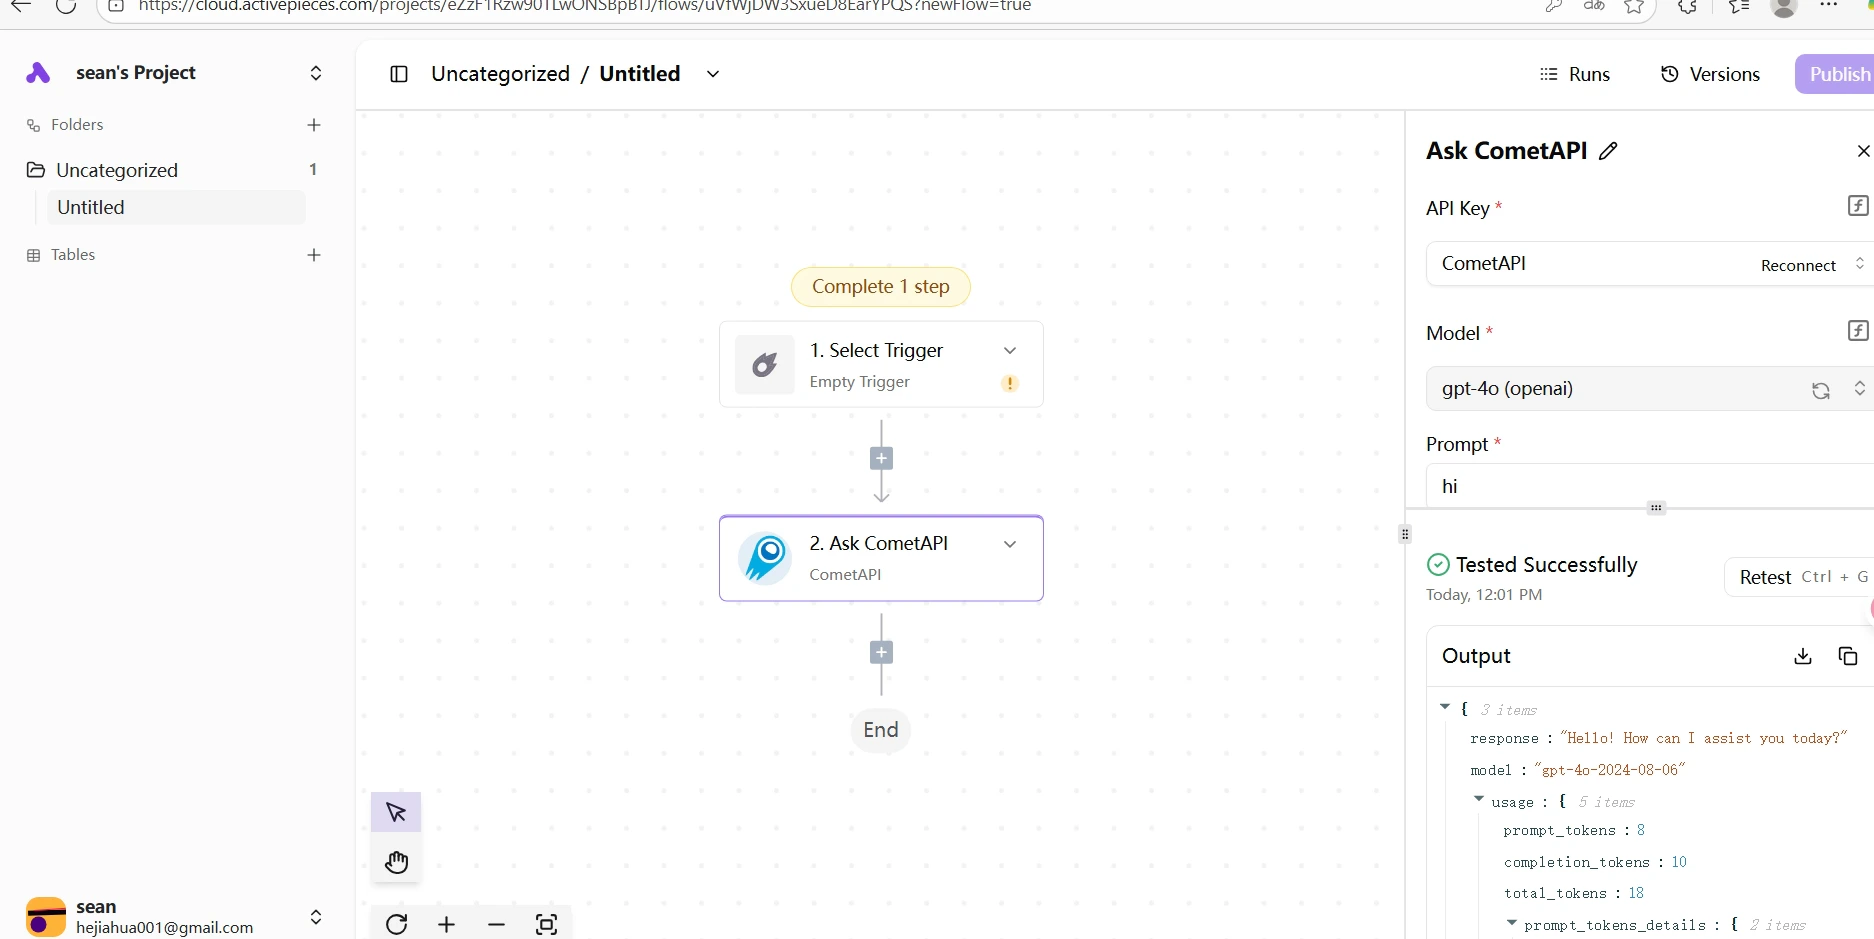
    **Test** をクリックしてステップを実行します。レスポンスが正常に返れば、連携が機能していることを確認できます。
    <Frame>
      <img src="https://mintcdn.com/cometapi/SZhlxZhCnMLn__BW/images/integrations/810968_361331.png?fit=max&auto=format&n=SZhlxZhCnMLn__BW&q=85&s=92fd6c62bcf33f681b053668a9ac6687" alt="CometAPI ステップからのテスト成功レスポンス" width="1874" height="939" data-path="images/integrations/810968_361331.png" />
    </Frame>
  </Step>
</Steps>

<Note>
  テストが失敗する場合は、API キーが正しいことと、アカウントに利用可能な残高があることを確認してください。問題が解消しない場合は、[CometAPI サポート](https://www.cometapi.com)にお問い合わせください。
</Note>

<script type="application/ld+json">
  {`
    {
    "@context": "https://schema.org",
    "@graph": [
      {
        "@type": "HowTo",
        "@id": "https://apidoc.cometapi.com/integrations/activepieces#howto",
        "name": "Activepieces を CometAPI に接続する",
        "description": "このガイドでは、ベース URL、API キー、モデルまたはプロバイダーのオプションを設定して、Activepieces を CometAPI に接続する方法を説明します。",
        "step": [
          {
            "@type": "HowToStep",
            "@id": "https://apidoc.cometapi.com/integrations/activepieces#step-1",
            "position": 1,
            "name": "CometAPI API キーを取得する",
            "text": "CometAPI アカウントを作成または開き、ダッシュボードから有効な API キーをコピーします。"
          },
          {
            "@type": "HowToStep",
            "@id": "https://apidoc.cometapi.com/integrations/activepieces#step-2",
            "position": 2,
            "name": "フローを作成して CometAPI ステップを追加する",
            "text": "Activepieces を CometAPI に接続するガイドの「フローを作成して CometAPI ステップを追加する」手順を完了します。"
          },
          {
            "@type": "HowToStep",
            "@id": "https://apidoc.cometapi.com/integrations/activepieces#step-3",
            "position": 3,
            "name": "CometAPI ステップを設定する",
            "text": "Activepieces を CometAPI に接続するガイドの「CometAPI ステップを設定する」手順を完了します。"
          },
          {
            "@type": "HowToStep",
            "@id": "https://apidoc.cometapi.com/integrations/activepieces#step-4",
            "position": 4,
            "name": "フローをテストする",
            "text": "Activepieces を CometAPI に接続するガイドの「フローをテストする」手順を完了します。"
          }
        ]
      },
      {
        "@type": "BreadcrumbList",
        "itemListElement": [
          {
            "@type": "ListItem",
            "position": 1,
            "name": "CometAPI ドキュメント",
            "item": "https://apidoc.cometapi.com/"
          },
          {
            "@type": "ListItem",
            "position": 2,
            "name": "連携",
            "item": "https://apidoc.cometapi.com/integrations"
          },
          {
            "@type": "ListItem",
            "position": 3,
            "name": "Activepieces を CometAPI に接続する",
            "item": "https://apidoc.cometapi.com/integrations/activepieces"
          }
        ]
      }
    ]
    }
    `}
</script>