> ## Documentation Index
> Fetch the complete documentation index at: https://apidoc.cometapi.com/llms.txt
> Use this file to discover all available pages before exploring further.

# BuildShip を CometAPI に接続する

> このガイドでは、base URL、API key、model または provider オプションを設定して BuildShip を CometAPI に接続する方法を説明します。

BuildShip はローコードのビジュアルバックエンドビルダーです。コミュニティ製の **CometAPI Text Generator** ノードを使用すると、あらゆるワークフローに AI 搭載のテキスト生成を追加できます。

## 前提条件

* 有効な API キーを持つ CometAPI アカウント — [こちらから取得](https://www.cometapi.com/console/token)
* BuildShip アカウント — [こちらからサインイン](https://app.buildship.com)

<Steps>
  <Step title="CometAPI API キーを取得する">
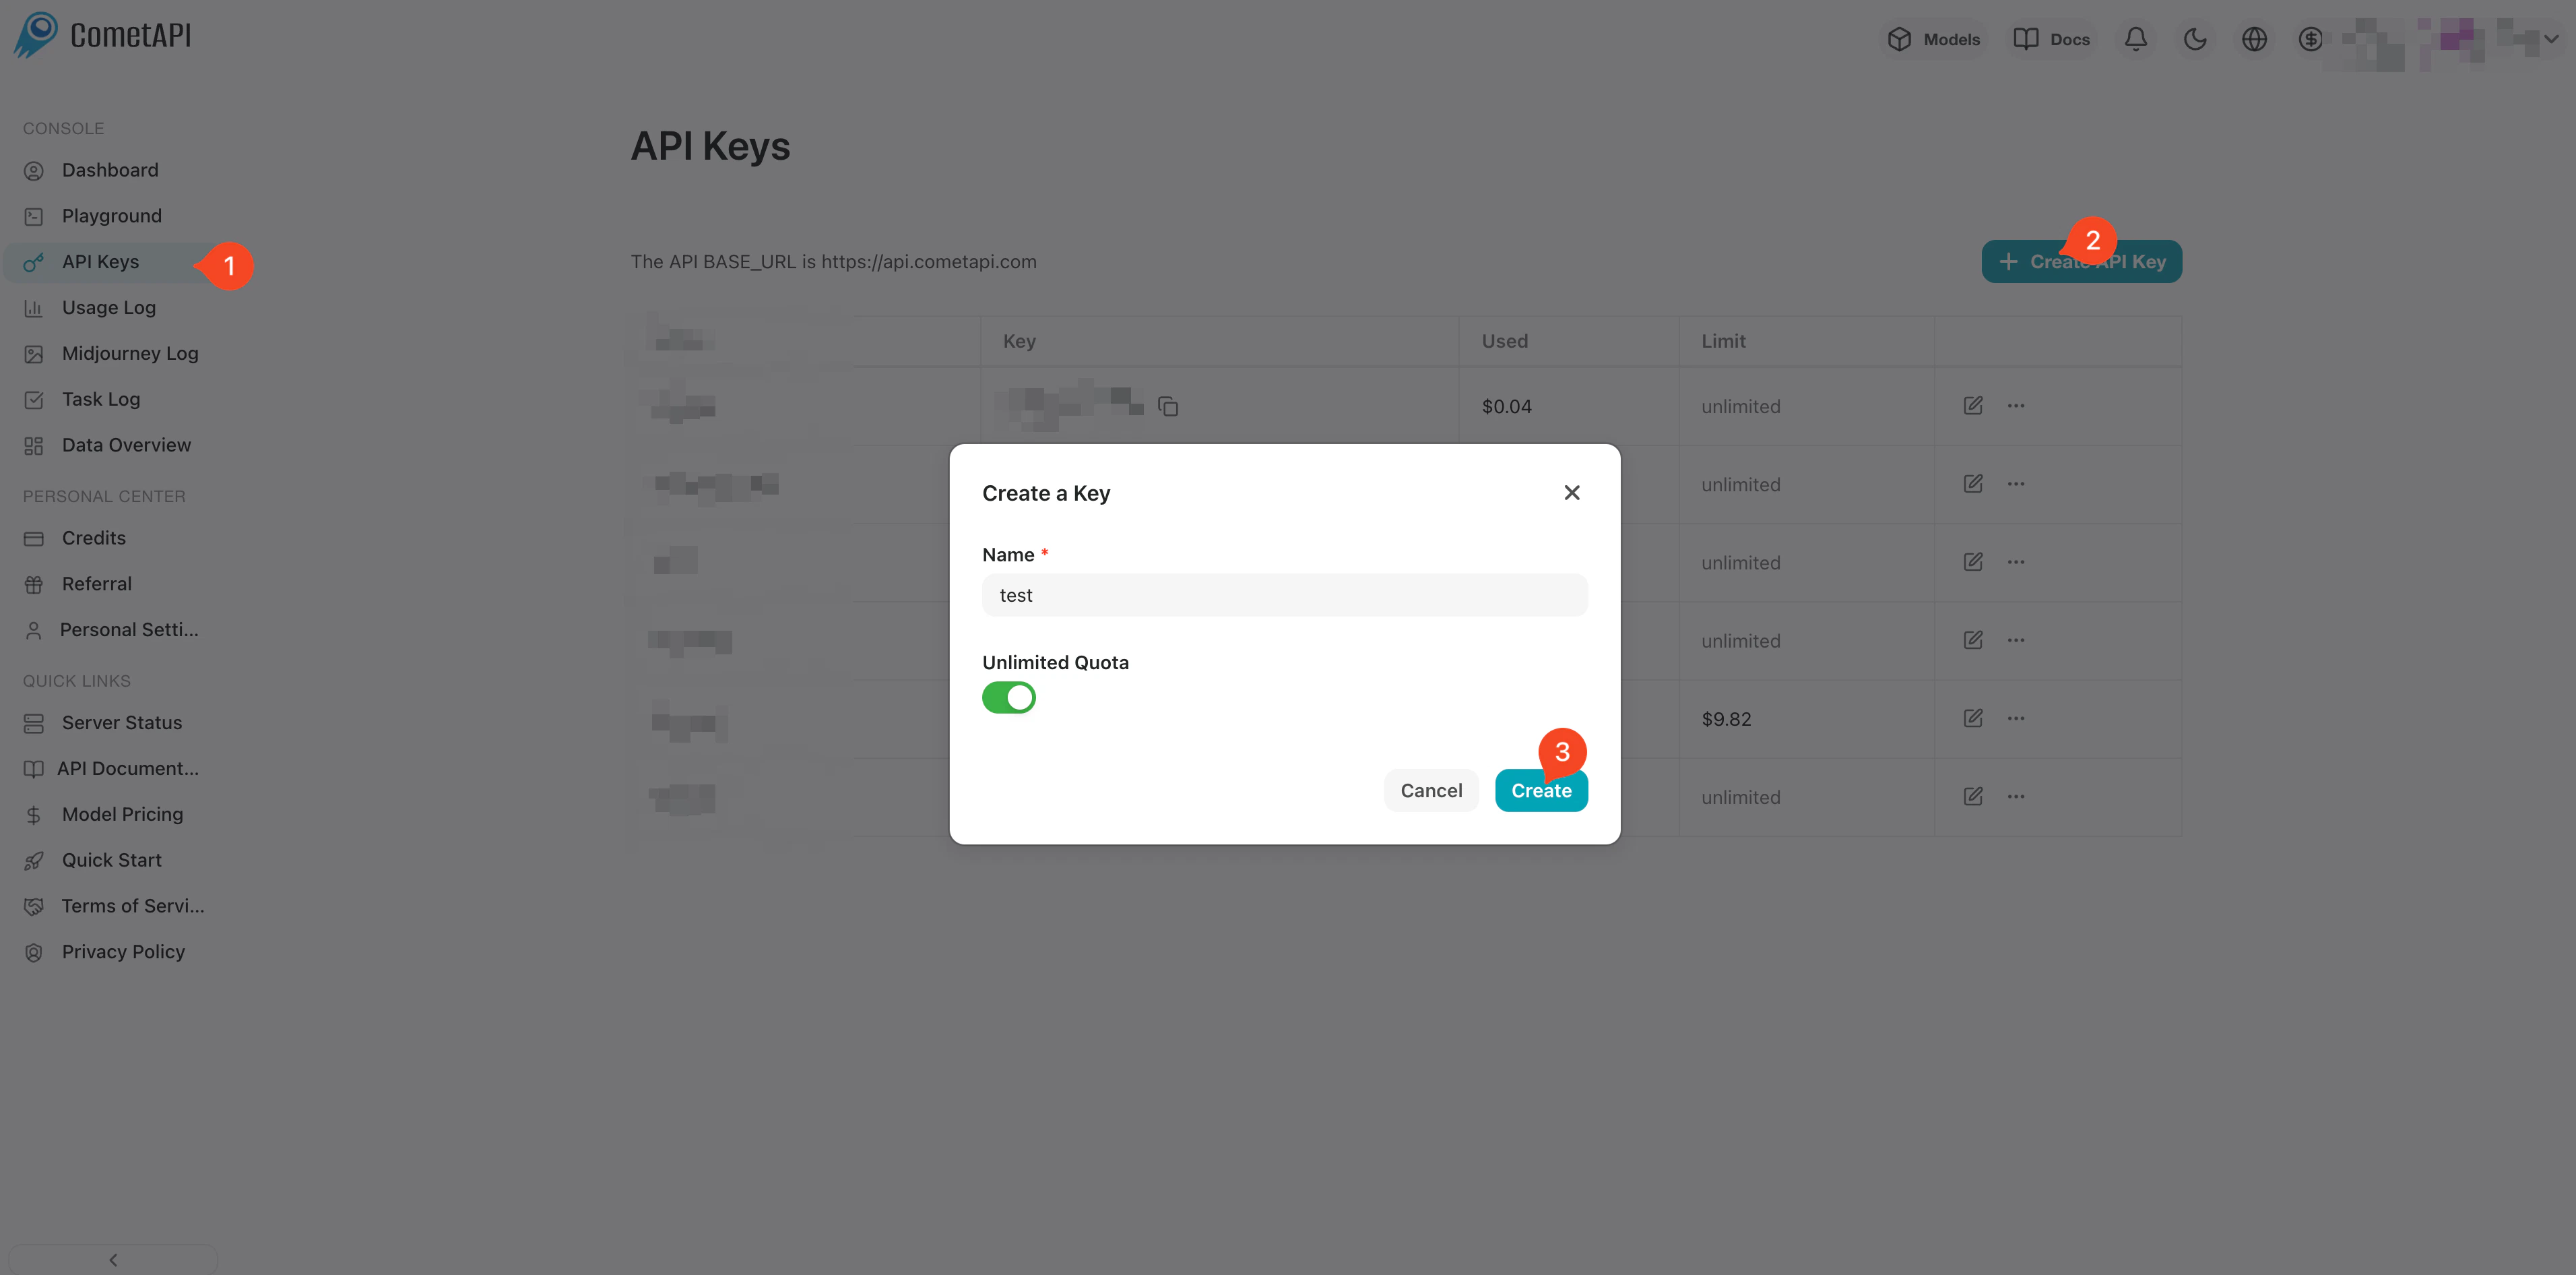
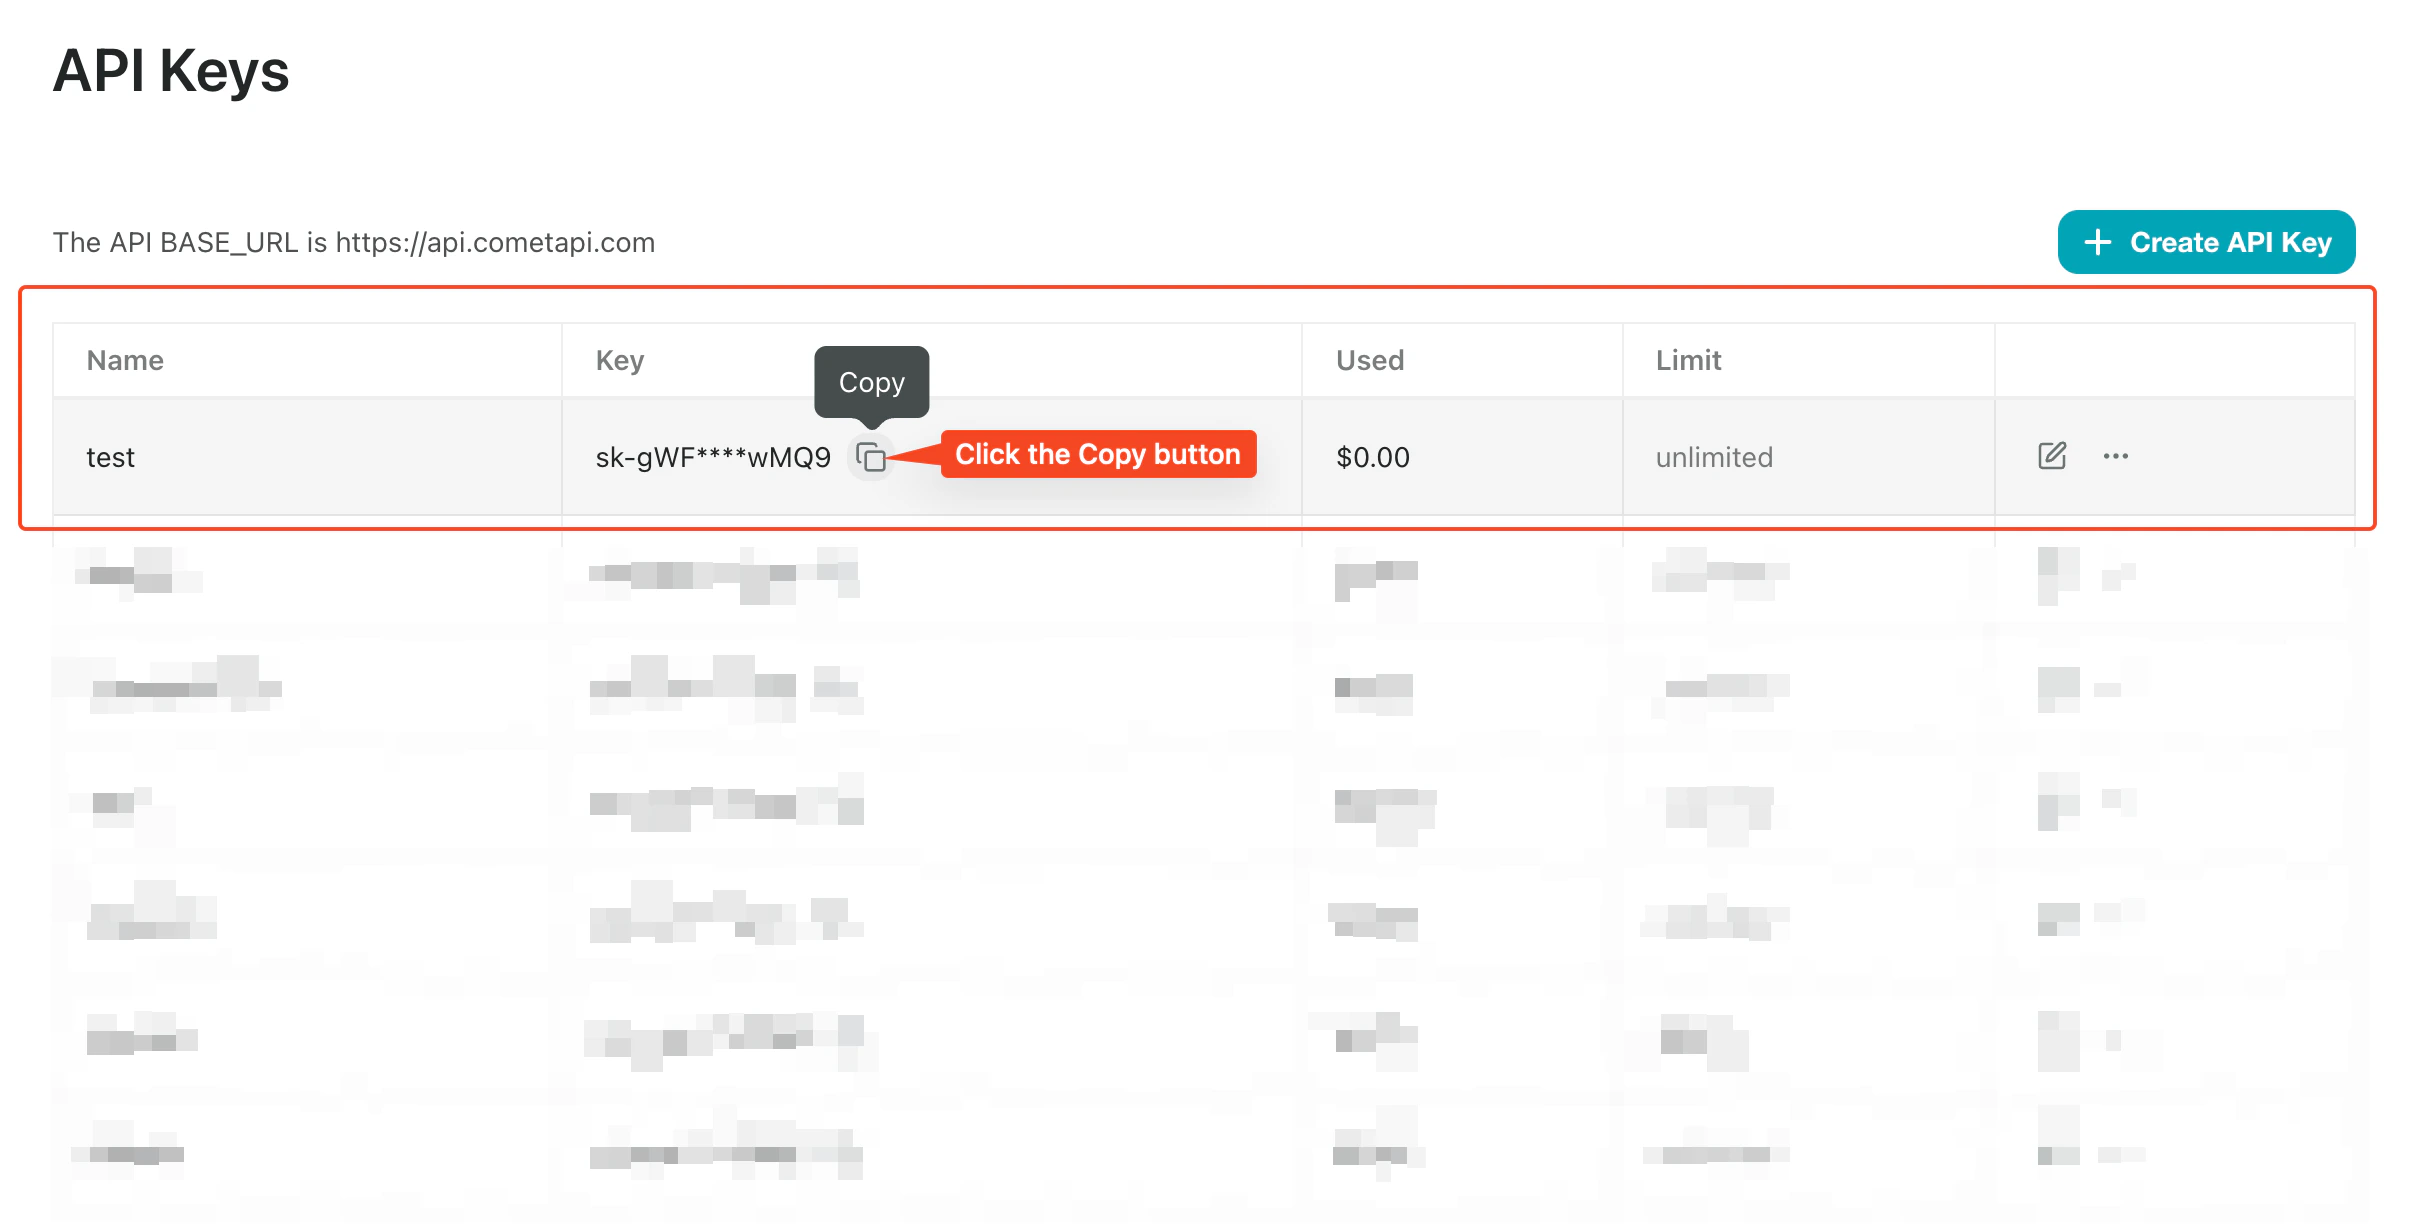
    [CometAPI コンソール](https://www.cometapi.com/console/token)にログインします。**Add API Key** をクリックし、CometAPI API キーをコピーします。
    <Frame>
      <img src="https://mintcdn.com/cometapi/SZhlxZhCnMLn__BW/images/overview/810968_364191.png?fit=max&auto=format&n=SZhlxZhCnMLn__BW&q=85&s=aef81a83f29f8eb16655ed4060425f50" alt="Add API Key ボタンが表示された CometAPI ダッシュボード" width="3824" height="1892" data-path="images/overview/810968_364191.png" />
    </Frame>

    <Frame>
      <img src="https://mintcdn.com/cometapi/HhtmQffktazbxUvS/images/overview/810968_364193.png?fit=max&auto=format&n=HhtmQffktazbxUvS&q=85&s=d893f659267150d0faf45f99eb5dffc1" alt="base URL が表示された CometAPI API キーの詳細" width="2434" height="1232" data-path="images/overview/810968_364193.png" />
    </Frame>
  </Step>

  <Step title="REST API トリガー付きのワークフローを作成する">
    1. BuildShip ダッシュボードで、**Create a new workflow → From Scratch** をクリックします。
    2. キャンバス上で **Add Trigger** をクリックし、**REST API** を選択します。これにより、ワークフロー用の呼び出し可能なエンドポイントが生成されます。
  </Step>

  <Step title="CometAPI Text Generator ノードを追加する">
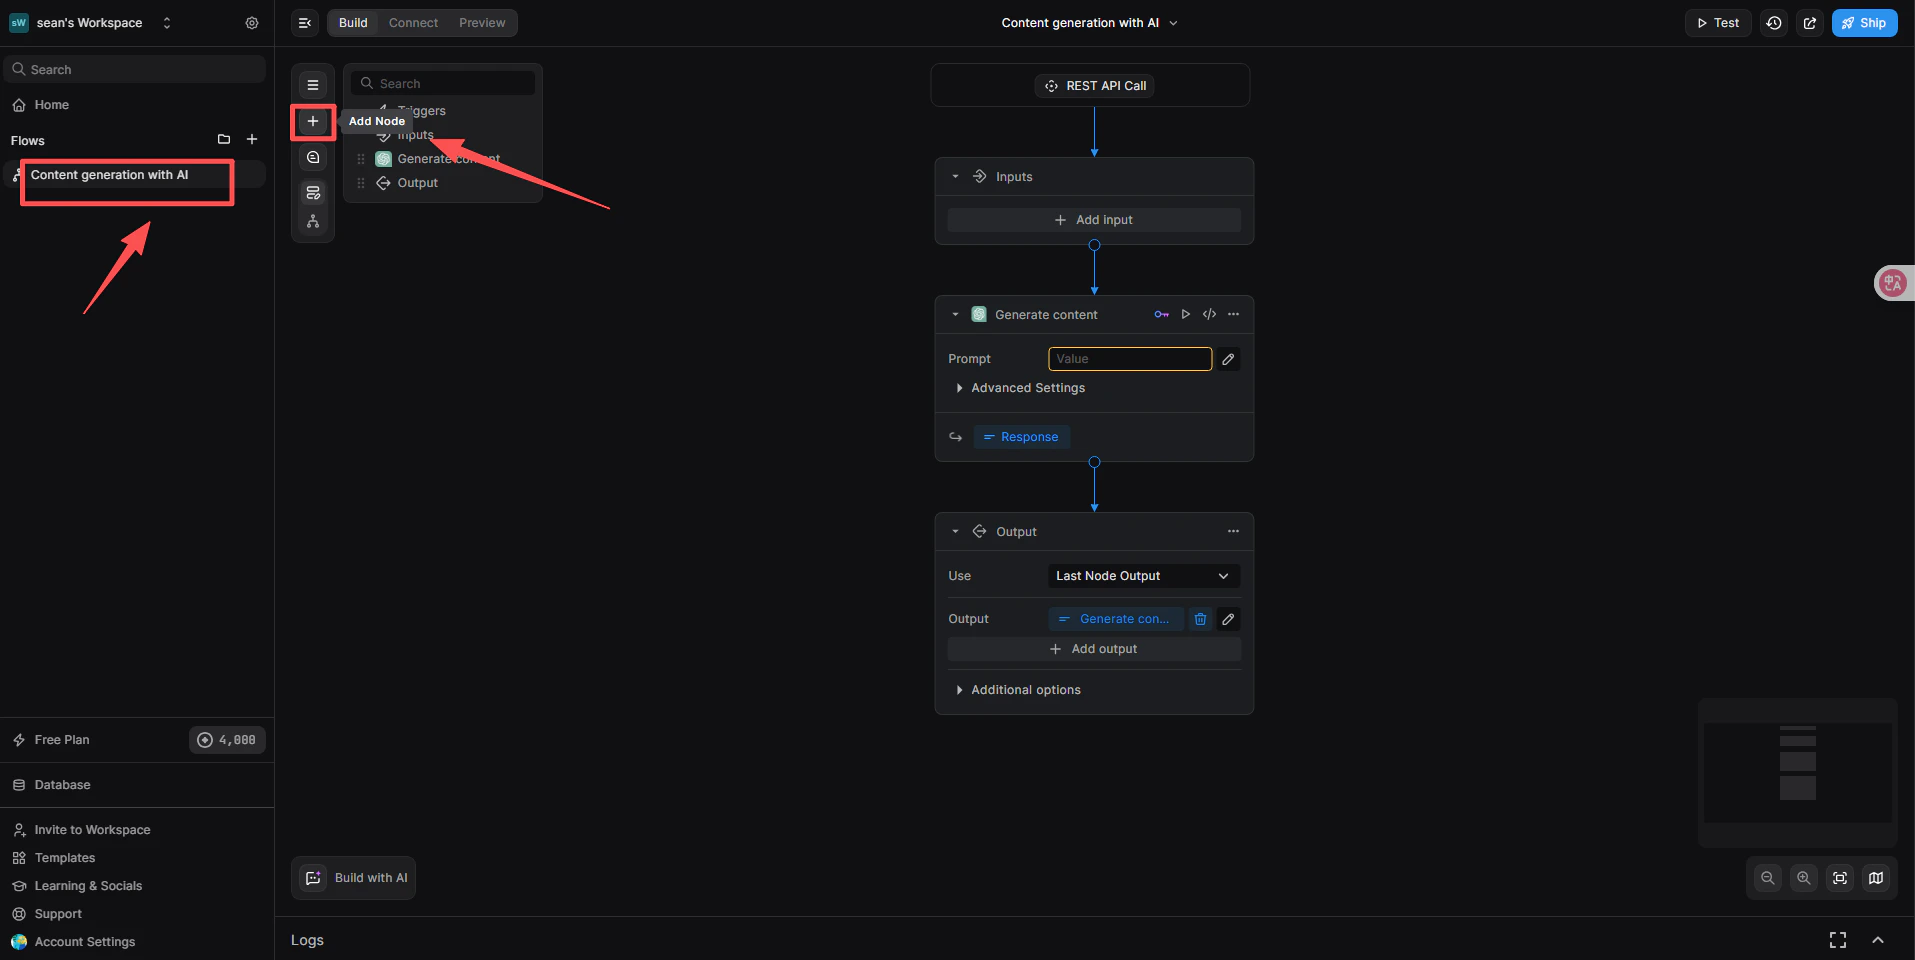
    1. REST API トリガーの下で、**+ Add a new step** をクリックします。
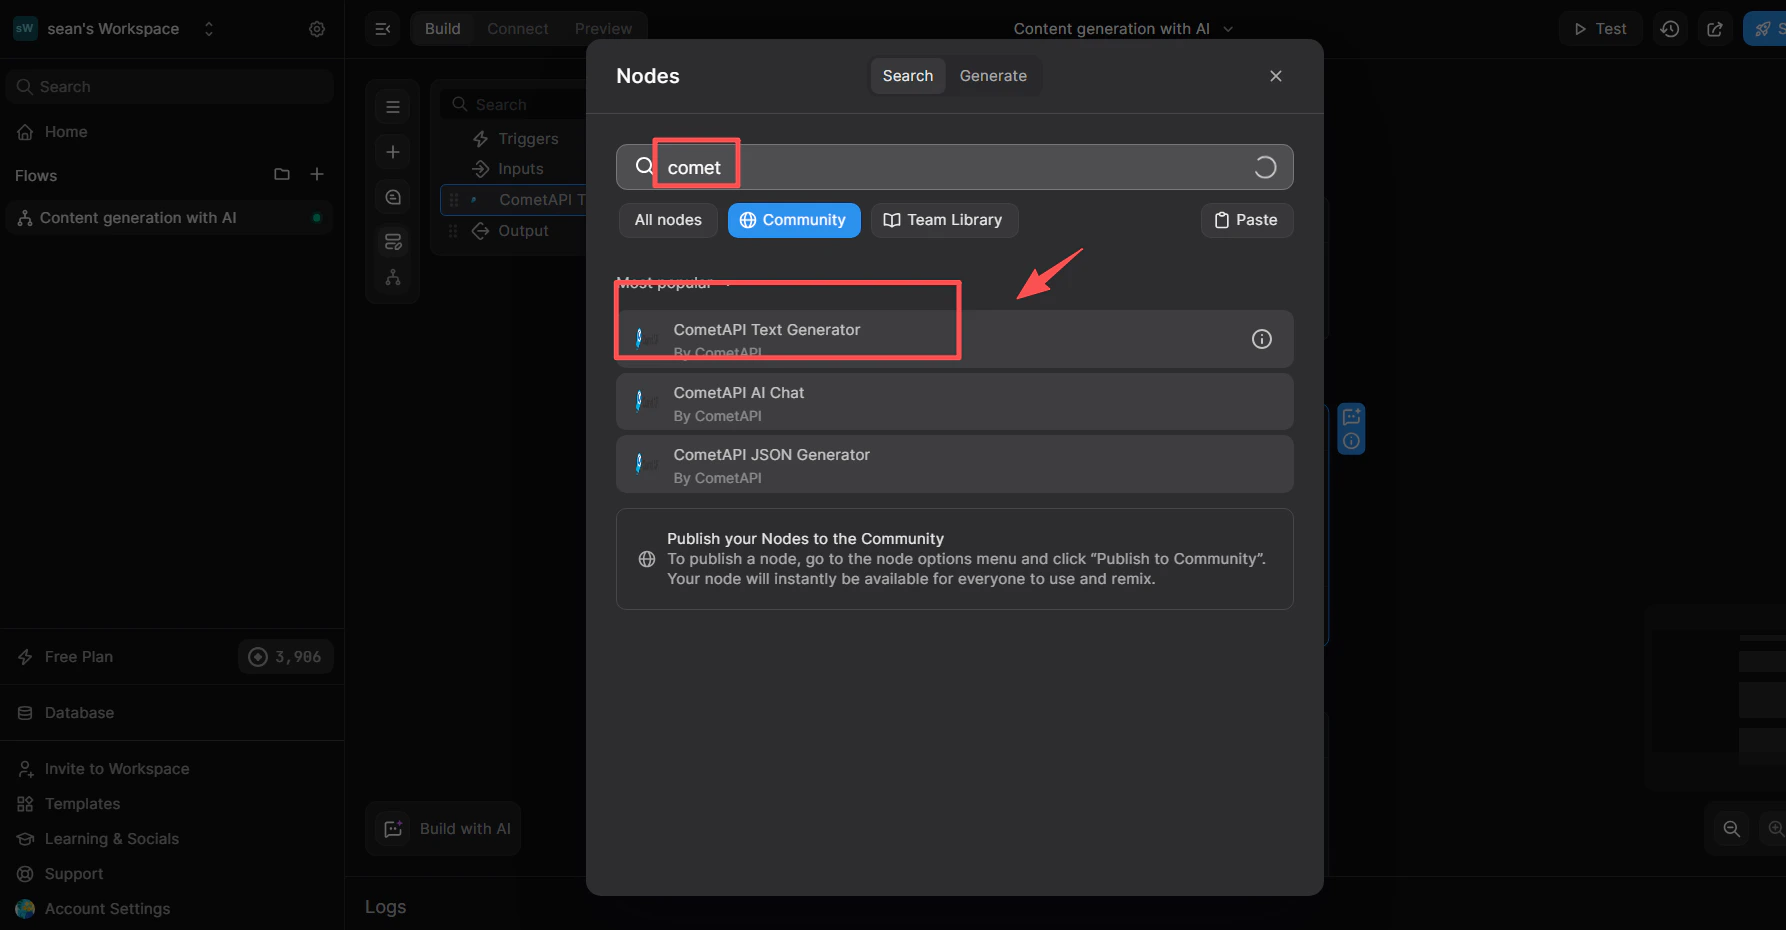
    2. ノードライブラリの検索ボックスに `cometapi` と入力します。
    3. **Community** リストから **CometAPI Text Generator** を選択します。
    <Frame>
      <img src="https://mintcdn.com/cometapi/SZhlxZhCnMLn__BW/images/integrations/810968_360694.png?fit=max&auto=format&n=SZhlxZhCnMLn__BW&q=85&s=4ac17cb84e36a7f026f618e2b5229bf2" alt="検索結果に CometAPI Text Generator が表示された BuildShip ノードライブラリ" width="1915" height="960" data-path="images/integrations/810968_360694.png" />
    </Frame>

    <Frame>
      <img src="https://mintcdn.com/cometapi/SZhlxZhCnMLn__BW/images/integrations/810968_360712.png?fit=max&auto=format&n=SZhlxZhCnMLn__BW&q=85&s=5da7aa2a5bef0d8a9ce45eceace876d1" alt="キャンバスに追加された CometAPI Text Generator ノード" width="1786" height="930" data-path="images/integrations/810968_360712.png" />
    </Frame>
  </Step>

  <Step title="CometAPI 連携をリンクする">
    このステップでは、どのキー管理システムを使うかをノードに指定します。

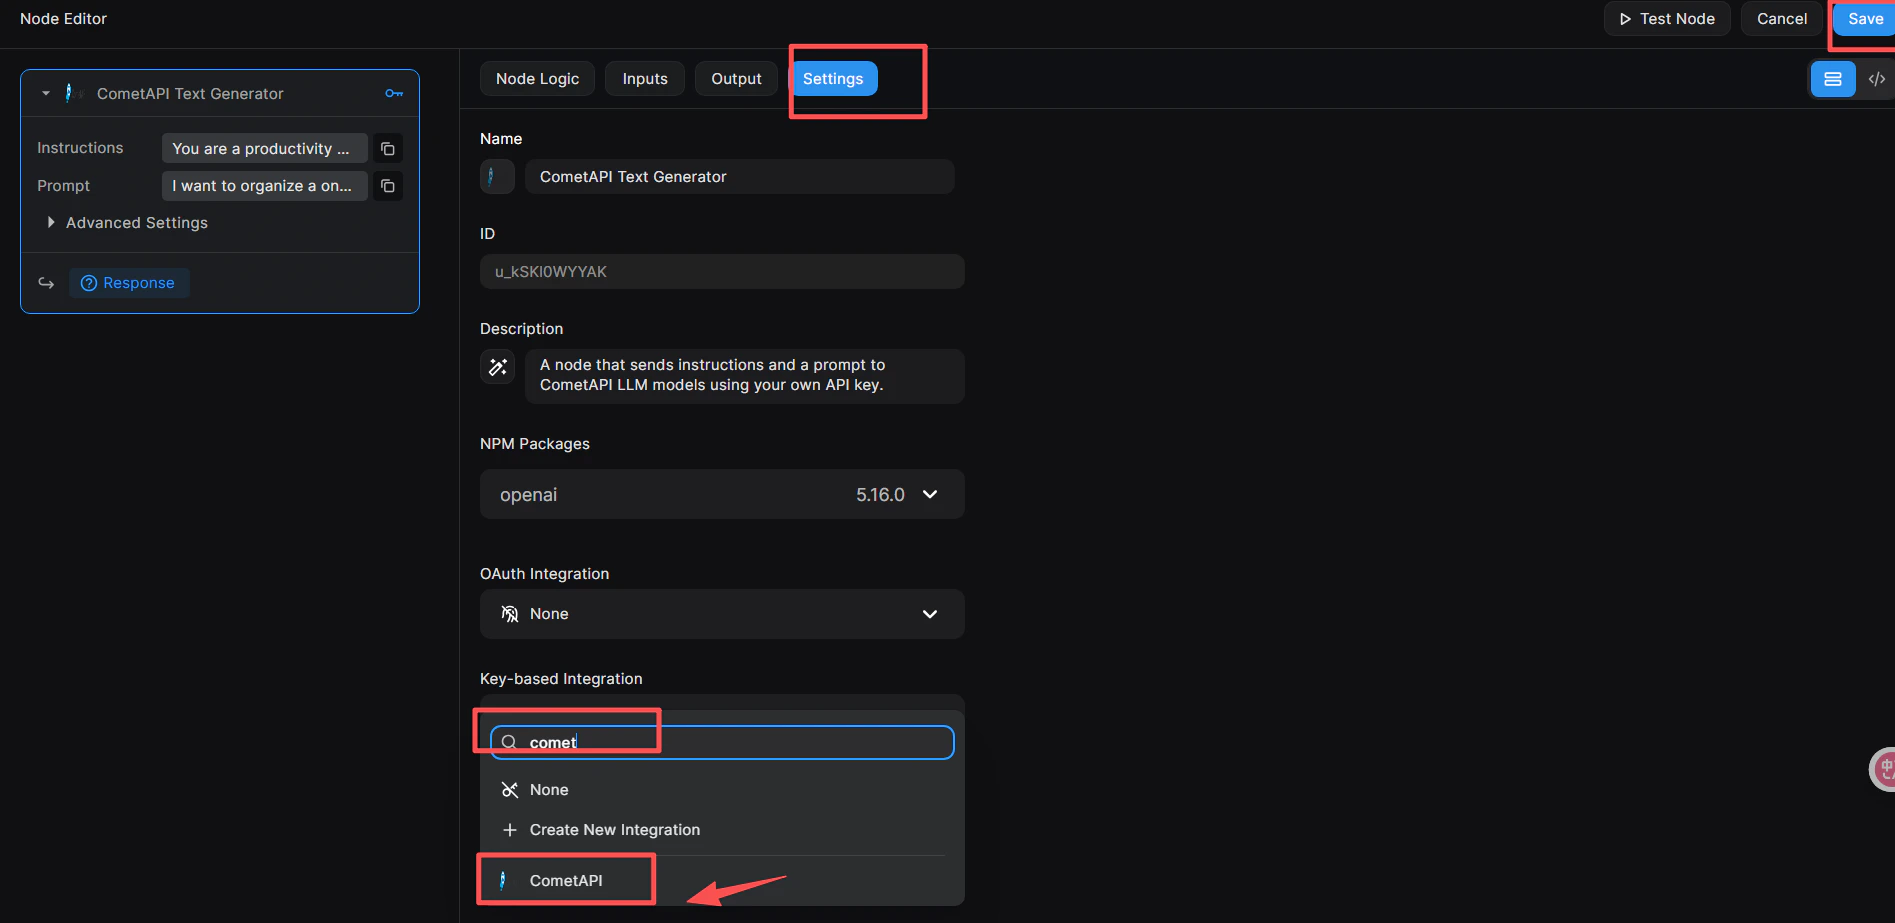
    1. ノードをクリックして、右側の **Node Editor** を開きます。
    2. **Settings** タブに切り替えます。
    3. **Key-based Integration** でドロップダウンを開き、**CometAPI** を選択します。
    4. 右上の青い **Save** ボタンをクリックします。
    <Frame>
      <img src="https://mintcdn.com/cometapi/SZhlxZhCnMLn__BW/images/integrations/810968_360713.png?fit=max&auto=format&n=SZhlxZhCnMLn__BW&q=85&s=ceea3b9fec0cf8a1ab81f70547b0a499" alt="Key-based Integration が CometAPI に設定された Node Editor の Settings タブ" width="1895" height="923" data-path="images/integrations/810968_360713.png" />
    </Frame>
  </Step>

  <Step title="API キーをノードに追加する">
    1. Node Editor で **Inputs** タブに切り替えます（またはノードを直接クリックします）。
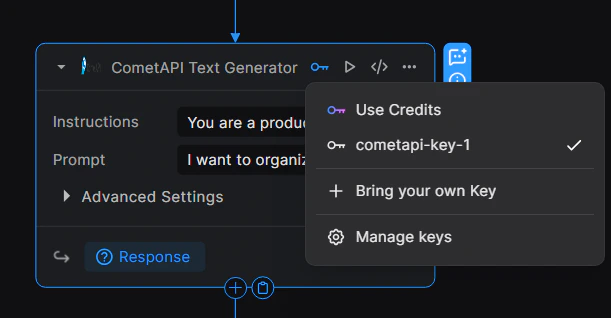
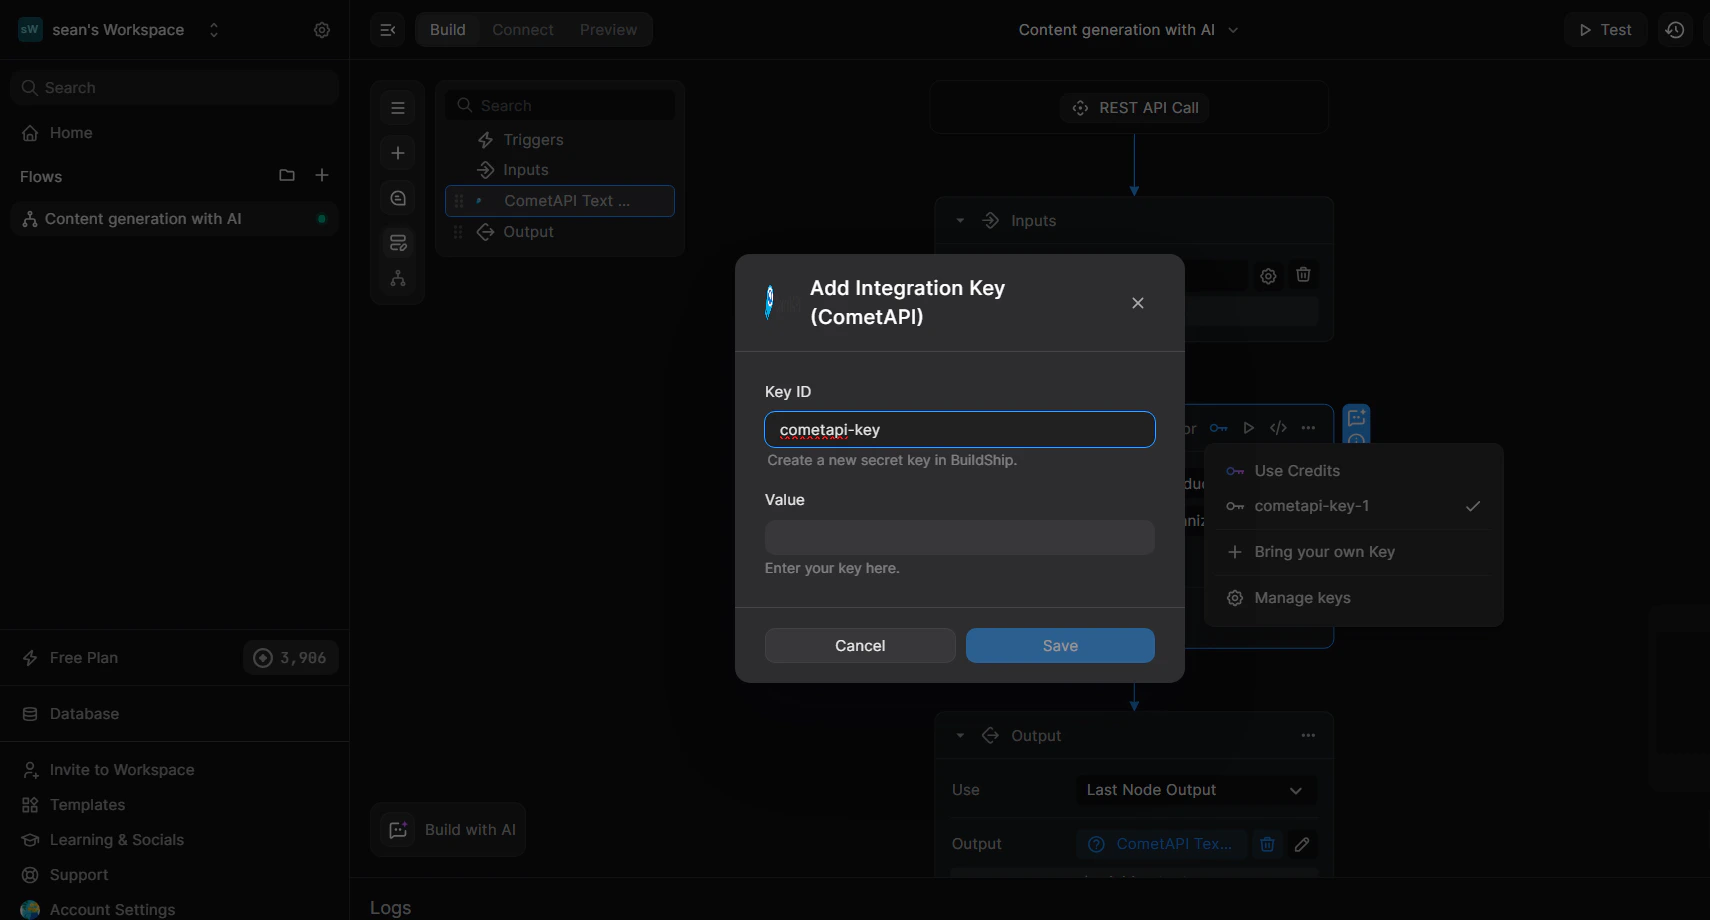
    2. ノード右上の 🔑 キーアイコンをクリックして、キードロップダウンを開きます。
    3. **+ Bring your own Key** を選択します。
    4. **Key ID** を入力し（例: `cometapi-key-1`）、**Value** に CometAPI API キーを貼り付けます。
    5. **Save** をクリックします。
    <Frame>
      <img src="https://mintcdn.com/cometapi/SZhlxZhCnMLn__BW/images/integrations/810968_360715.png?fit=max&auto=format&n=SZhlxZhCnMLn__BW&q=85&s=25c09a874e2a0ceadf2a83e1192323ca" alt="Key ID と Value フィールドが入力されたキー管理ダイアログ" width="1710" height="920" data-path="images/integrations/810968_360715.png" />
    </Frame>

    <Frame>
      <img src="https://mintcdn.com/cometapi/SZhlxZhCnMLn__BW/images/integrations/810968_360714.png?fit=max&auto=format&n=SZhlxZhCnMLn__BW&q=85&s=7a946cdb3d110605b3a9f1d7d91e022b" alt="キーが正常に関連付けられたことを示すノード" width="611" height="318" data-path="images/integrations/810968_360714.png" />
    </Frame>
  </Step>

  <Step title="入力パラメータを設定する">
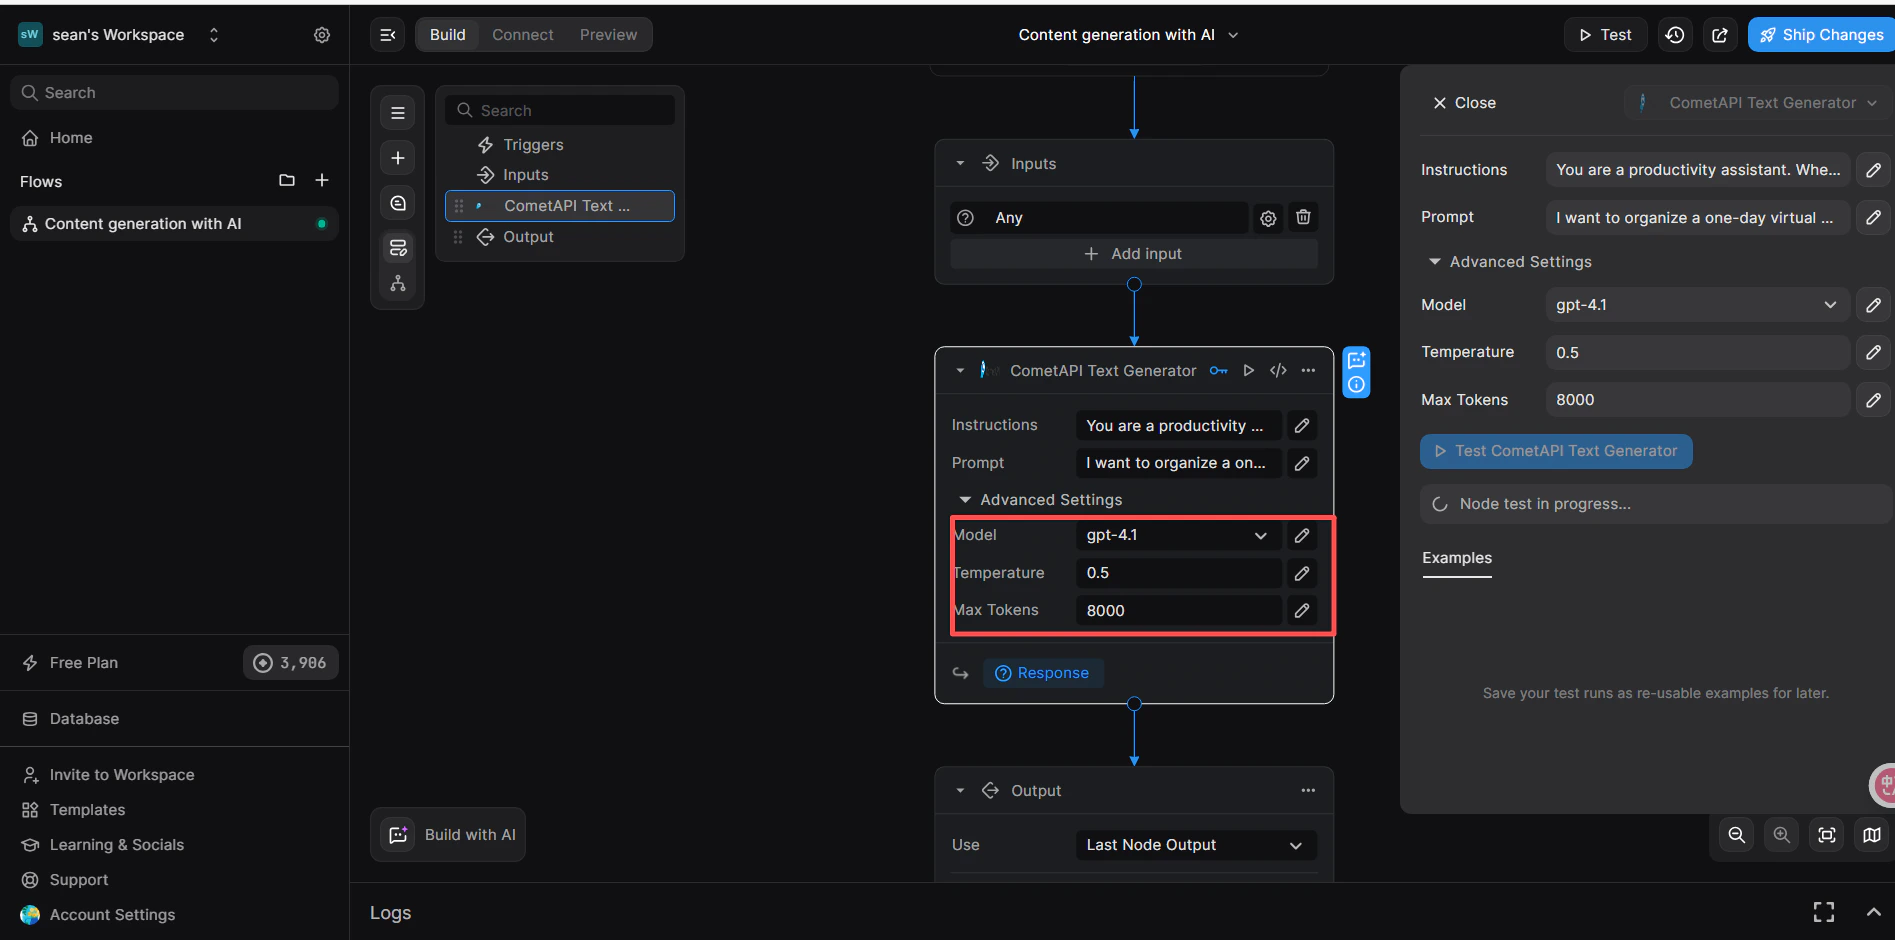
    ノードの **Inputs** タブで以下を設定します。

    * **Instructions**（任意）: system ロールを設定します。例: `You are a productivity assistant.`
    * **Prompt**: **`</>`** アイコンをクリックし、**Trigger → Body → prompt** を選択して受信リクエスト本文をマッピングします。
    * **Advanced → Model**: 使用したい現在の model ID を入力します。
    <Frame>
      <img src="https://mintcdn.com/cometapi/SZhlxZhCnMLn__BW/images/integrations/810968_360716.png?fit=max&auto=format&n=SZhlxZhCnMLn__BW&q=85&s=71431b9496c396bbe5fa8d529ca57b27" alt="Instructions、Prompt、Model が設定された CometAPI ノード" width="1895" height="940" data-path="images/integrations/810968_360716.png" />
    </Frame>
  </Step>

  <Step title="Return Response ノードを追加してテストする">
    1. CometAPI ノードの下で、**+ Add a new step** をクリックし、**Return Response** を選択します。
    2. **Body** フィールドで **`</>`** をクリックし、CometAPI Text Generator ノードの `response` 変数を選択します。
    3. 右上の **Test** をクリックし、入力形式として **JSON** を選択して、次を送信します。

    ```json theme={null}
    {
      "prompt": "hi"
    }
    ```

    4. **Result** パネルでレスポンスが正常に返れば、ワークフローが動作していることを確認できます。
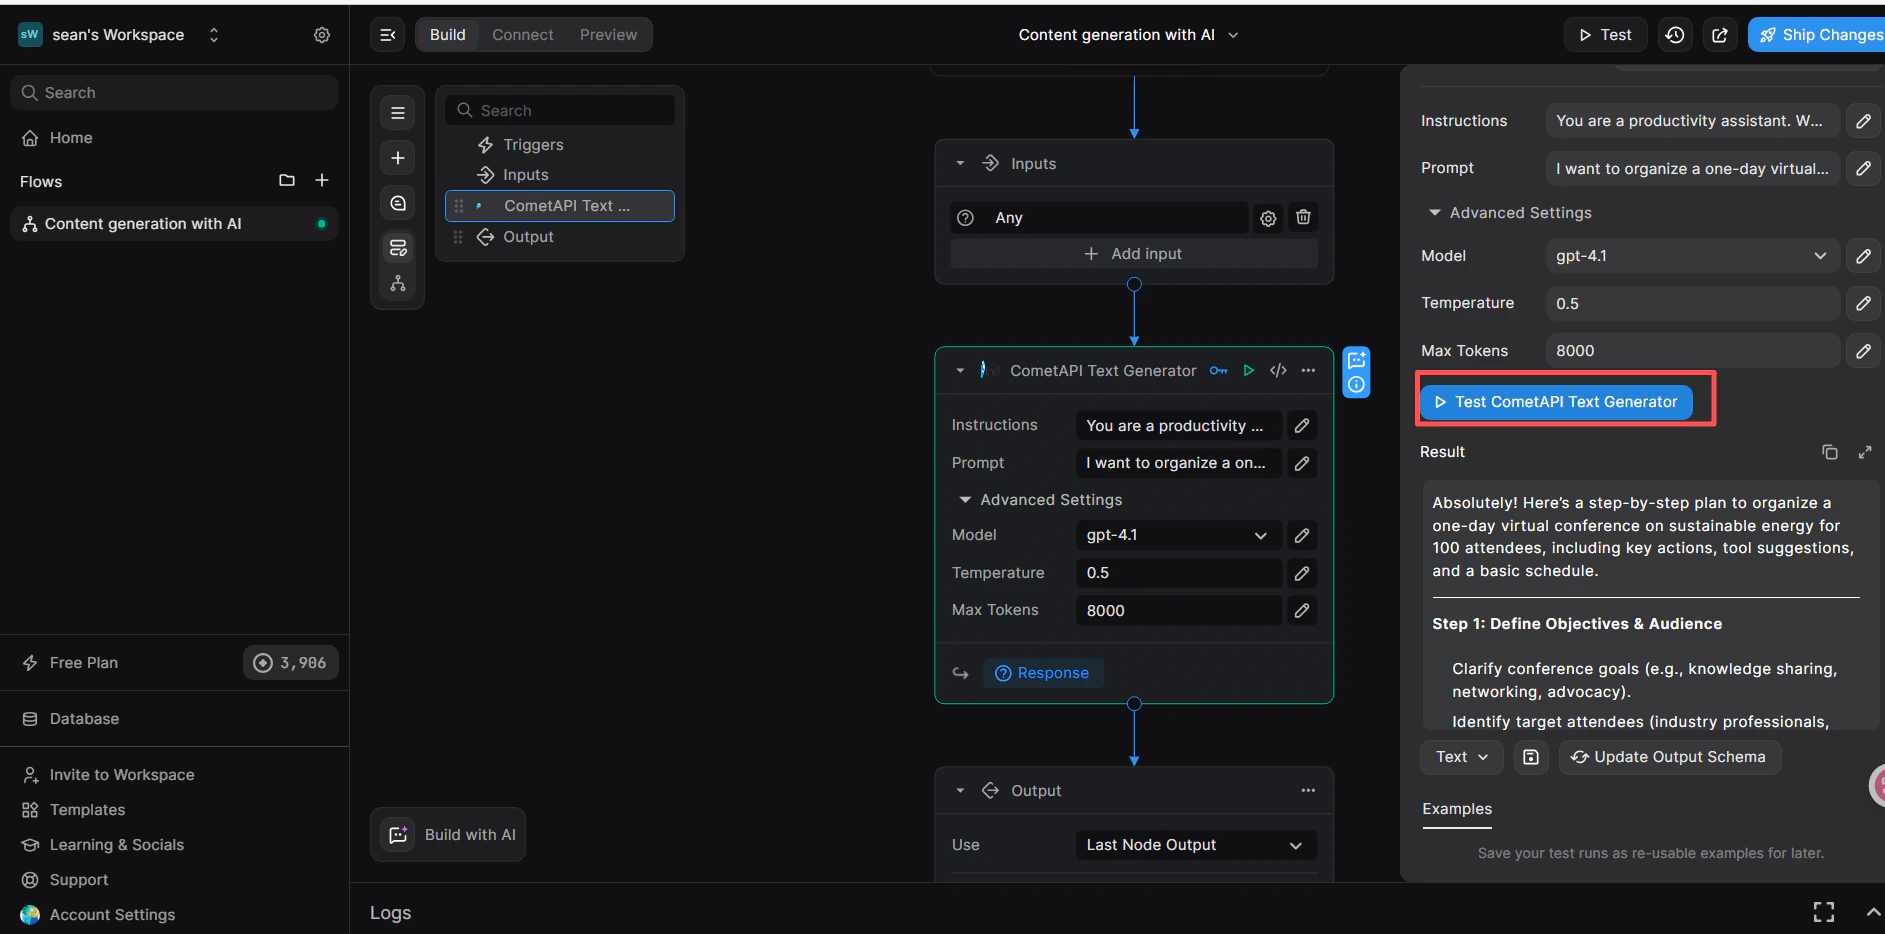
    <Frame>
      <img src="https://mintcdn.com/cometapi/SZhlxZhCnMLn__BW/images/integrations/810968_360717.png?fit=max&auto=format&n=SZhlxZhCnMLn__BW&q=85&s=561ea8bcdfd96a014dab4476840ee377" alt="CometAPI の正常なレスポンスが表示された BuildShip のテストパネル" width="1885" height="934" data-path="images/integrations/810968_360717.png" />
    </Frame>

    呼び出しに失敗する場合は、API キーと、Key-based Integration が **CometAPI** に設定されていることを確認するか、[CometAPI サポート](https://www.cometapi.com)にお問い合わせください。
  </Step>
</Steps>

<Tip>
  **Key-based Integration** のステップ（ノードを CometAPI にリンクすること）は必須です。これを省略すると、API キーが正しくても認証エラーが発生します。
</Tip>

<script type="application/ld+json">
  {`
    {
    "@context": "https://schema.org",
    "@graph": [
      {
        "@type": "HowTo",
        "@id": "https://apidoc.cometapi.com/integrations/buildship#howto",
        "name": "BuildShip を CometAPI に接続する",
        "description": "このガイドでは、base URL、API キー、model または provider オプションを設定して BuildShip を CometAPI に接続する方法を説明します。",
        "step": [
          {
            "@type": "HowToStep",
            "@id": "https://apidoc.cometapi.com/integrations/buildship#step-1",
            "position": 1,
            "name": "CometAPI API キーを取得する",
            "text": "CometAPI アカウントを作成または開き、ダッシュボードから有効な API キーをコピーします。"
          },
          {
            "@type": "HowToStep",
            "@id": "https://apidoc.cometapi.com/integrations/buildship#step-2",
            "position": 2,
            "name": "REST API トリガー付きのワークフローを作成する",
            "text": "BuildShip を CometAPI に接続するガイドの「REST API トリガー付きのワークフローを作成する」ステップを完了します。"
          },
          {
            "@type": "HowToStep",
            "@id": "https://apidoc.cometapi.com/integrations/buildship#step-3",
            "position": 3,
            "name": "CometAPI Text Generator ノードを追加する",
            "text": "BuildShip を CometAPI に接続するガイドの「CometAPI Text Generator ノードを追加する」ステップを完了します。"
          },
          {
            "@type": "HowToStep",
            "@id": "https://apidoc.cometapi.com/integrations/buildship#step-4",
            "position": 4,
            "name": "CometAPI 連携をリンクする",
            "text": "BuildShip を CometAPI に接続するガイドの「CometAPI 連携をリンクする」ステップを完了します。"
          },
          {
            "@type": "HowToStep",
            "@id": "https://apidoc.cometapi.com/integrations/buildship#step-5",
            "position": 5,
            "name": "API キーをノードに追加する",
            "text": "BuildShip を CometAPI に接続するガイドの「API キーをノードに追加する」ステップを完了します。"
          },
          {
            "@type": "HowToStep",
            "@id": "https://apidoc.cometapi.com/integrations/buildship#step-6",
            "position": 6,
            "name": "入力パラメータを設定する",
            "text": "BuildShip を CometAPI に接続するガイドの「入力パラメータを設定する」ステップを完了します。"
          },
          {
            "@type": "HowToStep",
            "@id": "https://apidoc.cometapi.com/integrations/buildship#step-7",
            "position": 7,
            "name": "Return Response ノードを追加してテストする",
            "text": "BuildShip を CometAPI に接続するガイドの「Return Response ノードを追加してテストする」ステップを完了します。"
          }
        ]
      },
      {
        "@type": "BreadcrumbList",
        "itemListElement": [
          {
            "@type": "ListItem",
            "position": 1,
            "name": "CometAPI ドキュメント",
            "item": "https://apidoc.cometapi.com/"
          },
          {
            "@type": "ListItem",
            "position": 2,
            "name": "連携",
            "item": "https://apidoc.cometapi.com/integrations"
          },
          {
            "@type": "ListItem",
            "position": 3,
            "name": "BuildShip を CometAPI に接続する",
            "item": "https://apidoc.cometapi.com/integrations/buildship"
          }
        ]
      }
    ]
    }
    `}
</script>