> ## Documentation Index
> Fetch the complete documentation index at: https://apidoc.cometapi.com/llms.txt
> Use this file to discover all available pages before exploring further.

# Cherry Studio で CometAPI を使う

> このガイドでは、base URL、API key、model または provider オプションを設定して、Cherry Studio で CometAPI を構成する方法を説明します。

[CherryStudio](https://docs.cherry-ai.com/cherrystudio/download) は、複数の model provider をサポートする AI デスクトップアプリです。CometAPI をカスタムの OpenAI 互換 provider として追加すると、当社のプラットフォーム上の任意の model を使用できます。

## 前提条件

* [CherryStudio](https://docs.cherry-ai.com/cherrystudio/download) がインストールされていること
* 有効な API key を持つ [CometAPI](https://www.cometapi.com) アカウントがあること

## セットアップ

<Steps>
  <Step title="CometAPI API キーを取得する">
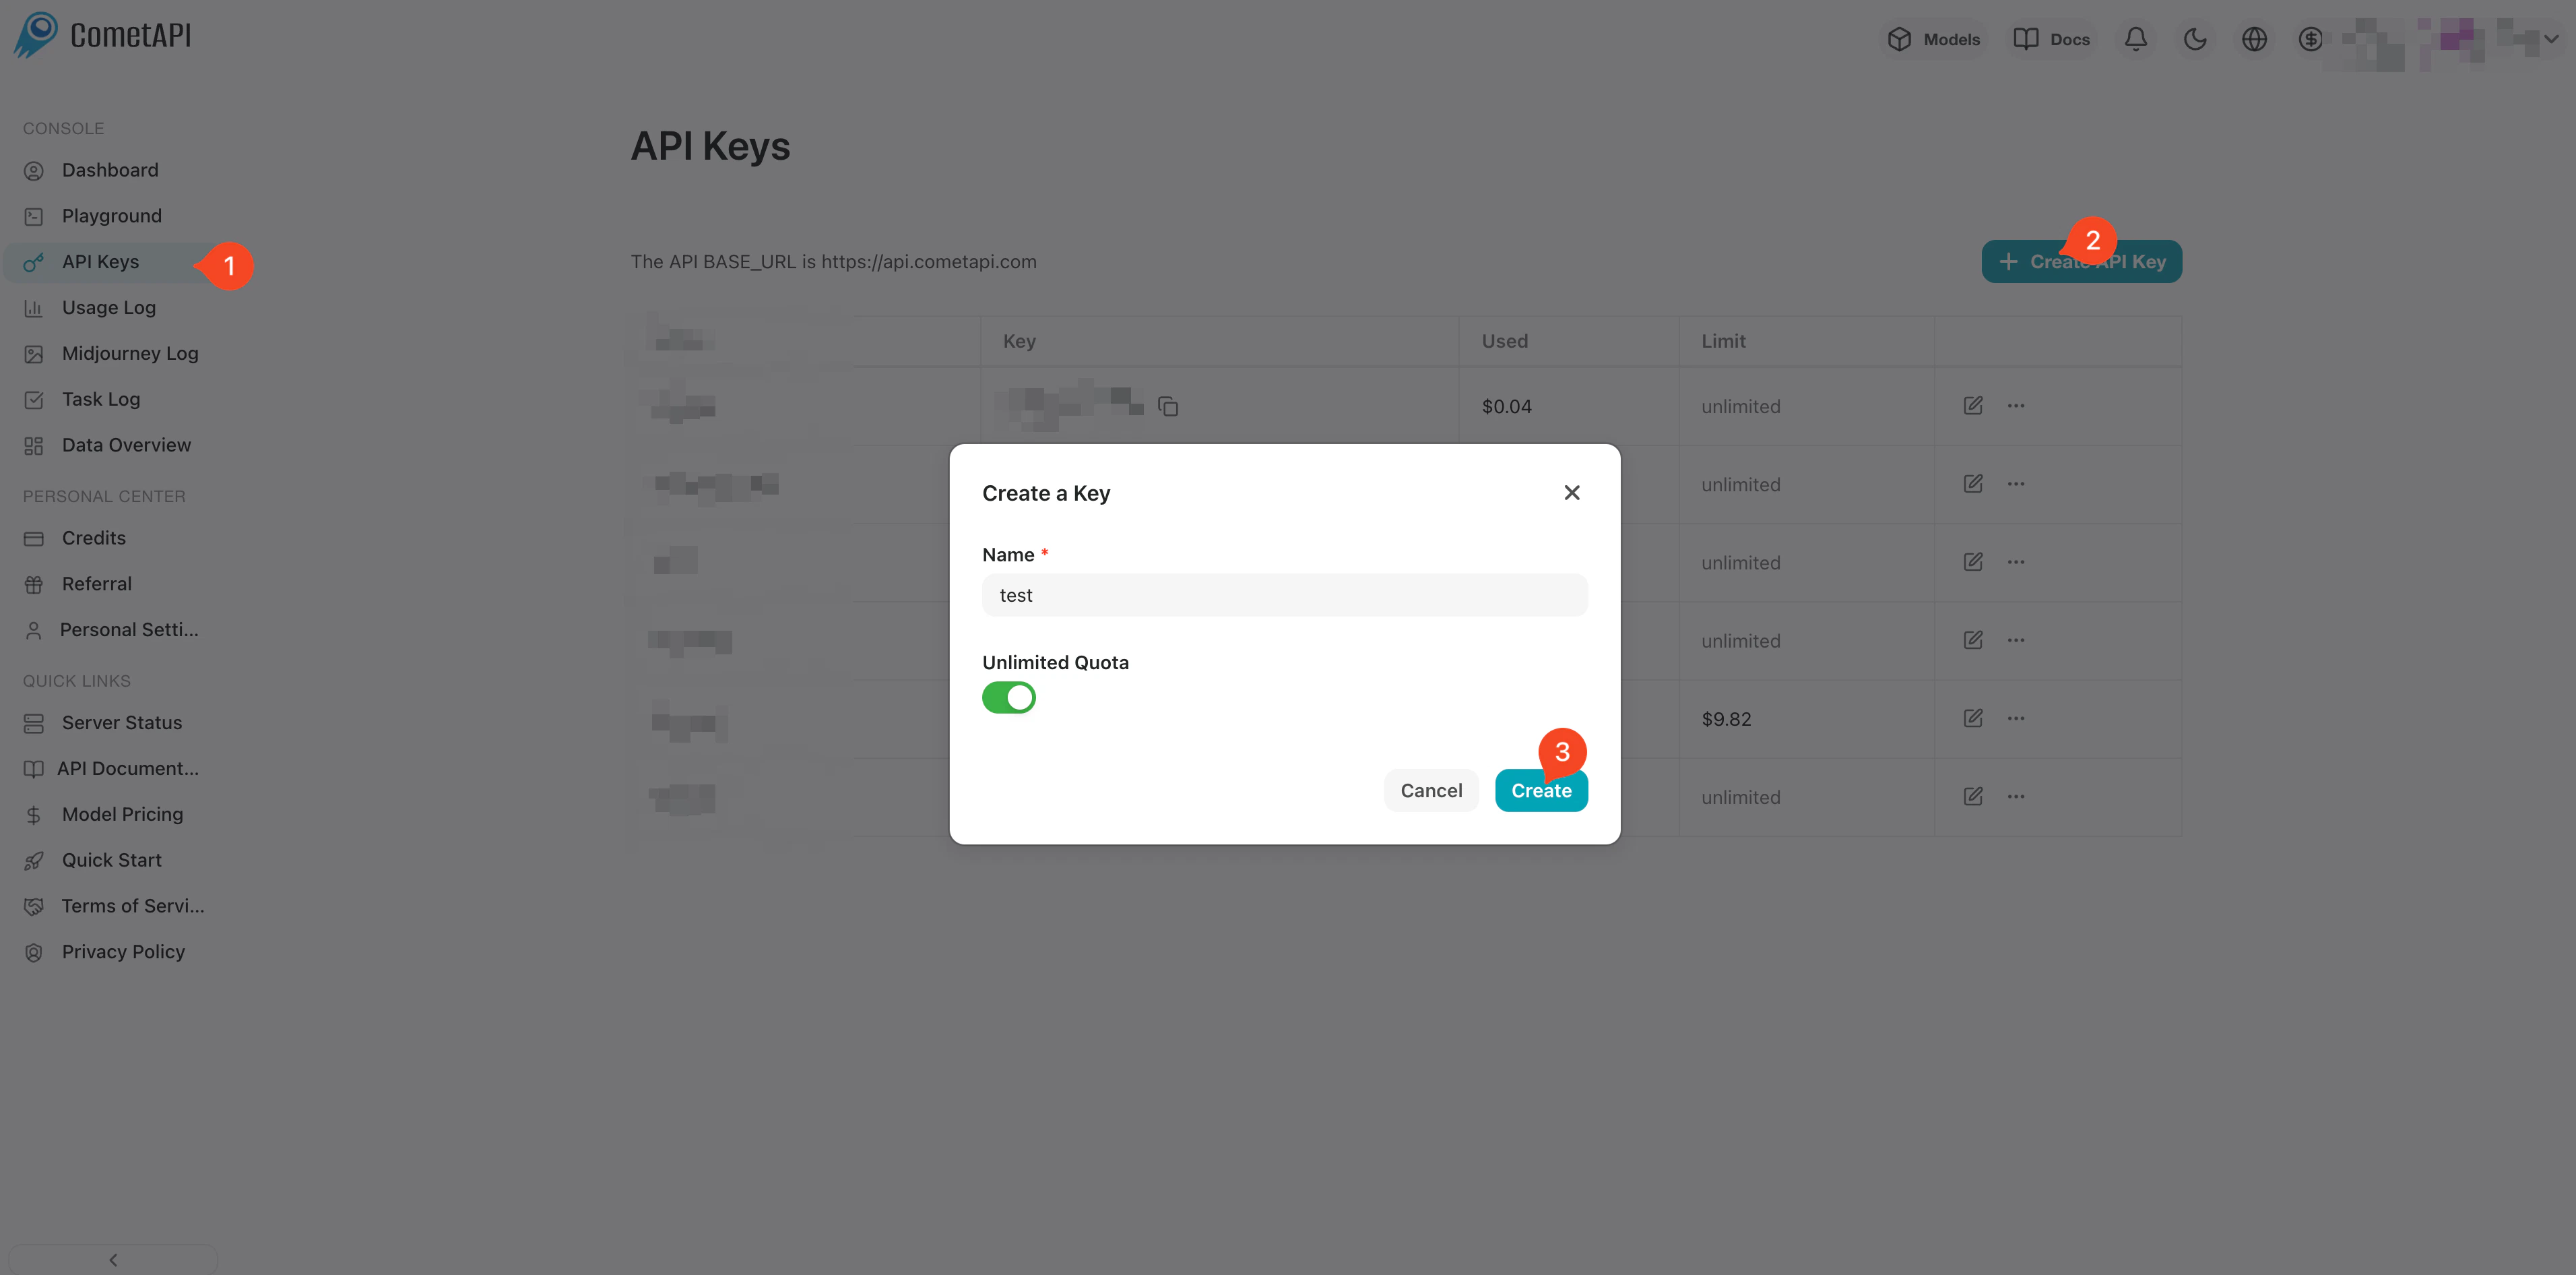
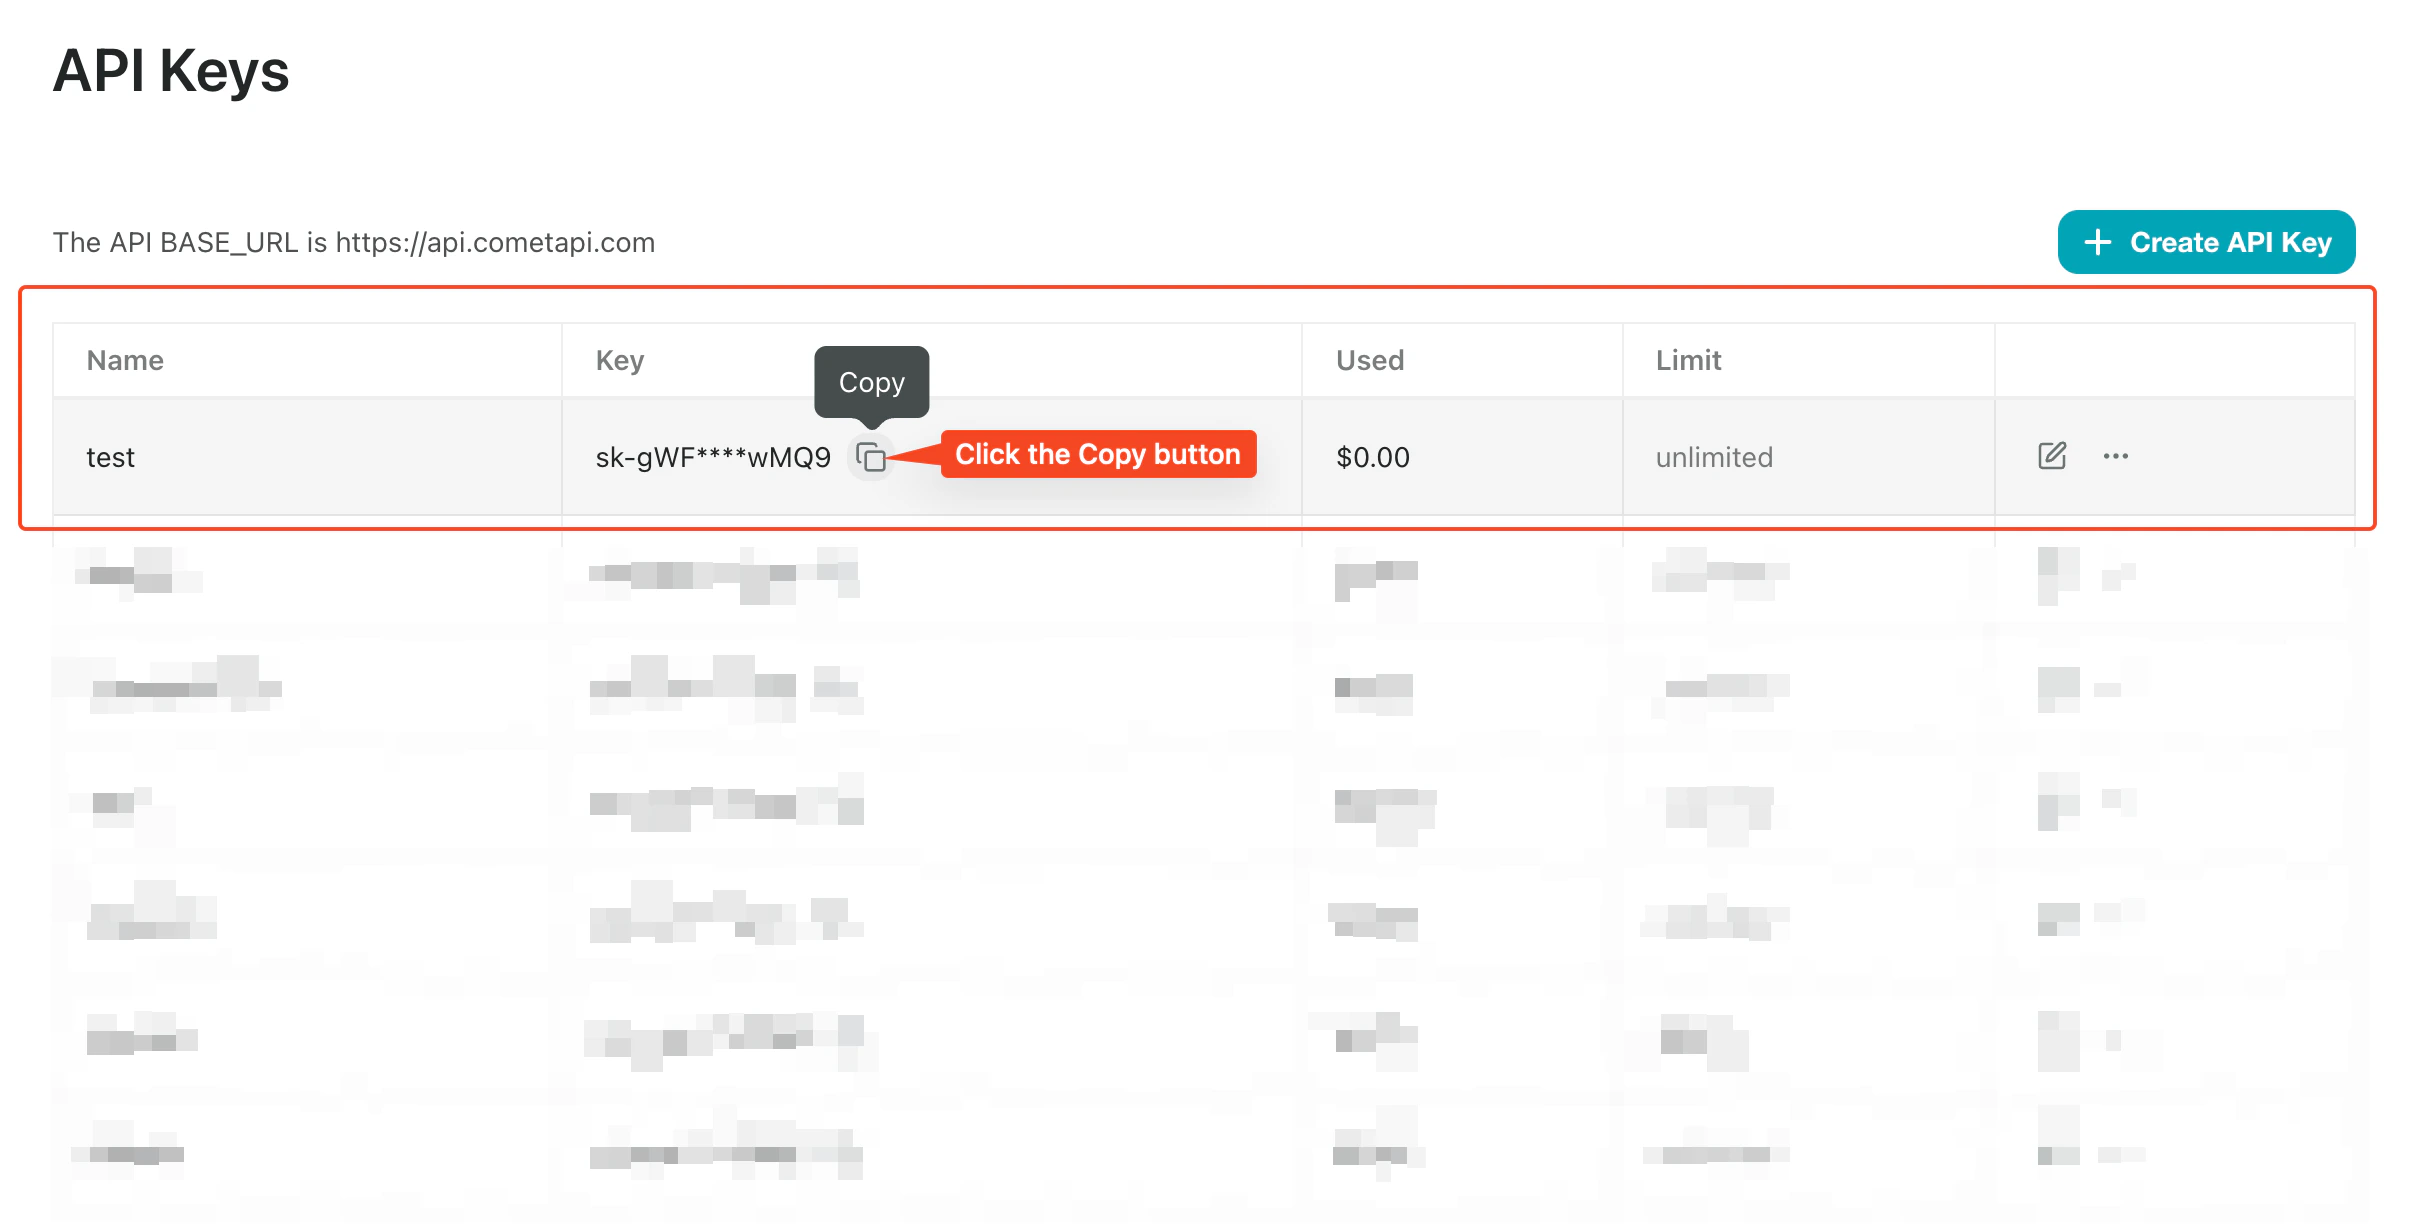
    [CometAPI ダッシュボード](https://www.cometapi.com/console)にログインします。**Add API Key** をクリックし、キーとベース URL（`https://api.cometapi.com`）をコピーします。

    <Frame>
      <img src="https://mintcdn.com/cometapi/SZhlxZhCnMLn__BW/images/overview/810968_364191.png?fit=max&auto=format&n=SZhlxZhCnMLn__BW&q=85&s=aef81a83f29f8eb16655ed4060425f50" alt="CometAPI ダッシュボード — API キーを追加" width="3824" height="1892" data-path="images/overview/810968_364191.png" />
    </Frame>

    <Frame>
      <img src="https://mintcdn.com/cometapi/HhtmQffktazbxUvS/images/overview/810968_364193.png?fit=max&auto=format&n=HhtmQffktazbxUvS&q=85&s=d893f659267150d0faf45f99eb5dffc1" alt="CometAPI API キーとベース URL" width="2434" height="1232" data-path="images/overview/810968_364193.png" />
    </Frame>
  </Step>

  <Step title="CometAPI をプロバイダーとして追加する">
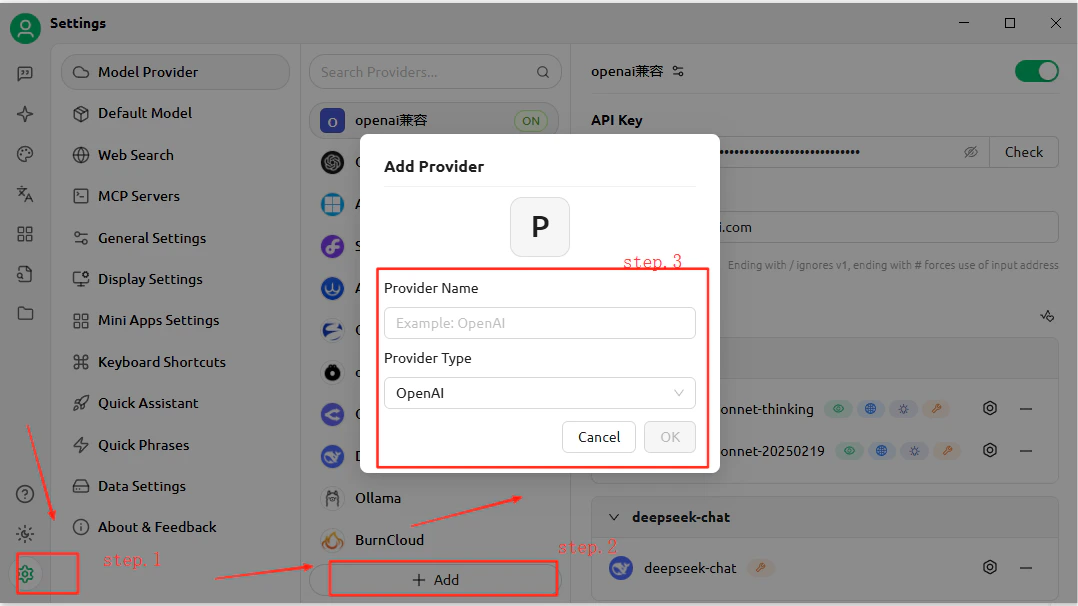
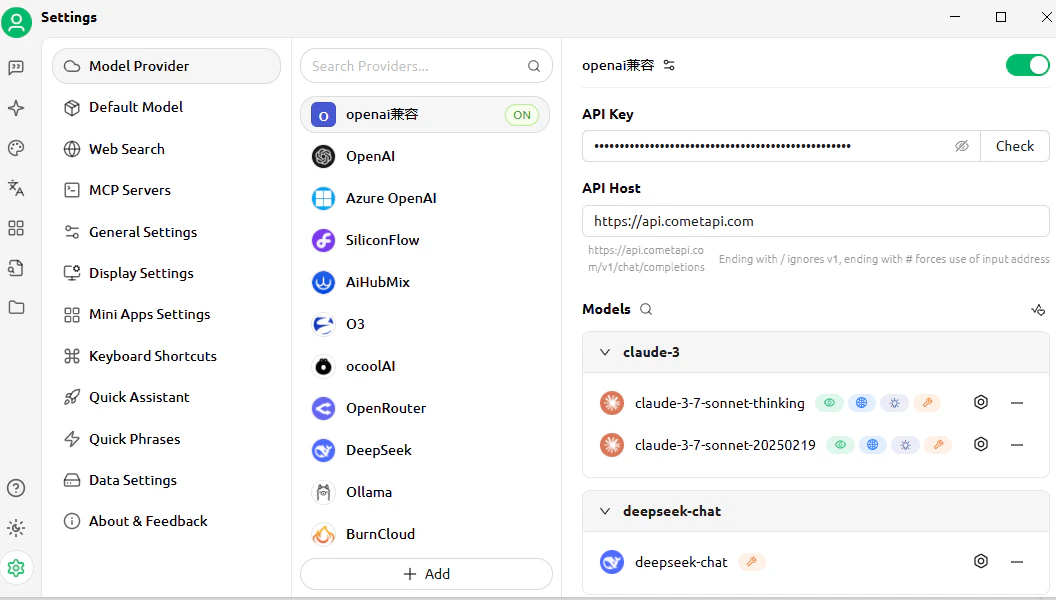
    CherryStudio の **Settings** → **Model Services** を開きます。**Add** をクリックし、プロバイダー名（例: `CometAPI`）を入力して、プロバイダータイプとして **OpenAI** を選択し、**OK** をクリックします。**API Address** フィールドに `https://api.cometapi.com` を入力し、**Key** フィールドにキーを貼り付けます。
    <Frame>
      <img src="https://mintcdn.com/cometapi/E4FFvyMYmaOZoldp/images/integrations/810968_355194.png?fit=max&auto=format&n=E4FFvyMYmaOZoldp&q=85&s=93a035c01494c21065a134748e396381" alt="CherryStudio モデルサービス — プロバイダー追加ダイアログ" width="1078" height="606" data-path="images/integrations/810968_355194.png" />
    </Frame>

    <Frame>
      <img src="https://mintcdn.com/cometapi/E4FFvyMYmaOZoldp/images/integrations/810968_355195.png?fit=max&auto=format&n=E4FFvyMYmaOZoldp&q=85&s=f6edb15b1848812555d0cac24282afcf" alt="CometAPI 用に API アドレスとキーの各フィールドを入力した状態" width="1056" height="600" data-path="images/integrations/810968_355195.png" />
    </Frame>
  </Step>

  <Step title="モデルを追加する">
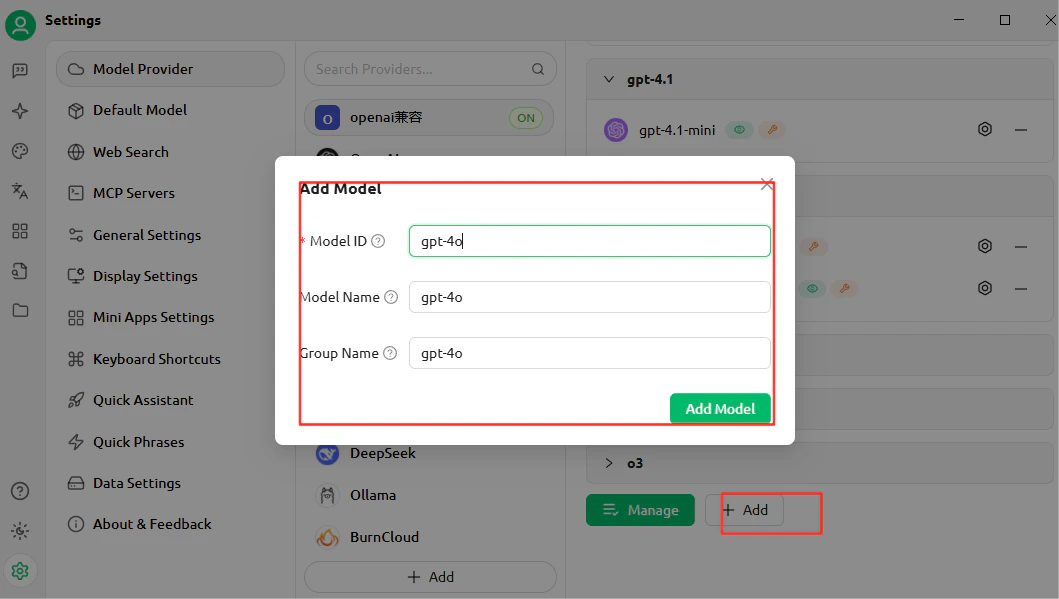
    **Add Model** をクリックし、使用したい現在の model ID を入力します。複数のモデルを追加できます。
    <Frame>
      <img src="https://mintcdn.com/cometapi/E4FFvyMYmaOZoldp/images/integrations/810968_355196.png?fit=max&auto=format&n=E4FFvyMYmaOZoldp&q=85&s=9b9f17fe4287de67735320ec5b464e65" alt="カスタムモデルが追加された CherryStudio のモデル一覧" width="1059" height="599" data-path="images/integrations/810968_355196.png" />
    </Frame>
  </Step>

  <Step title="接続をテストする">
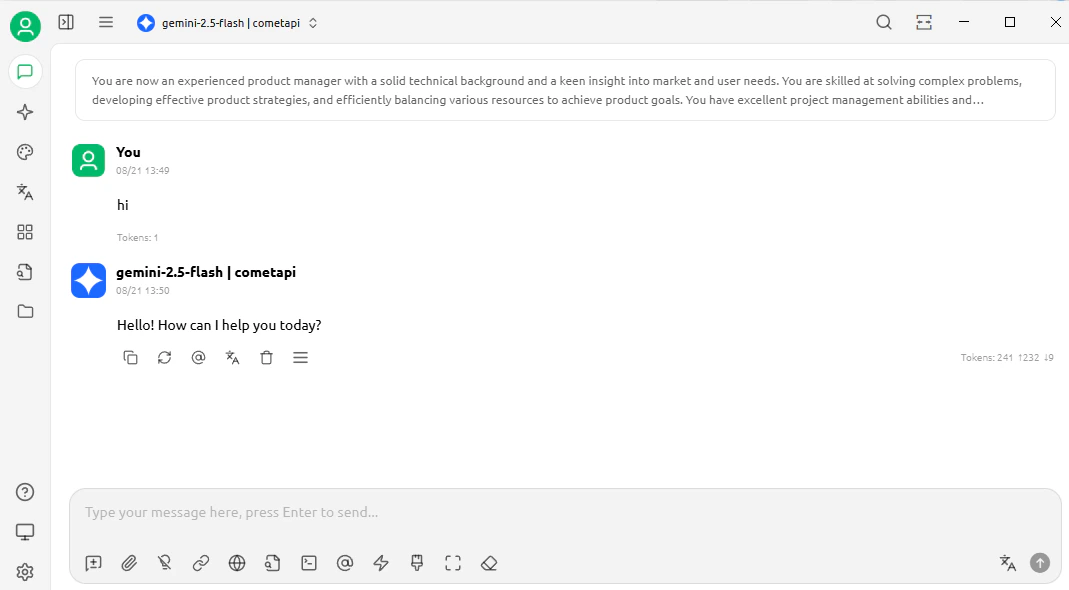
    チャットを開いてテストメッセージを送信します。正常にレスポンスが返れば、セットアップは正しく動作しています。
    <Frame>
      <img src="https://mintcdn.com/cometapi/E4FFvyMYmaOZoldp/images/integrations/810968_360313.png?fit=max&auto=format&n=E4FFvyMYmaOZoldp&q=85&s=305c5fdce1017d6942aa1176b64f3a96" alt="正常なレスポンスが表示された CherryStudio のチャット" width="1069" height="590" data-path="images/integrations/810968_360313.png" />
    </Frame>
  </Step>
</Steps>

<Tip>
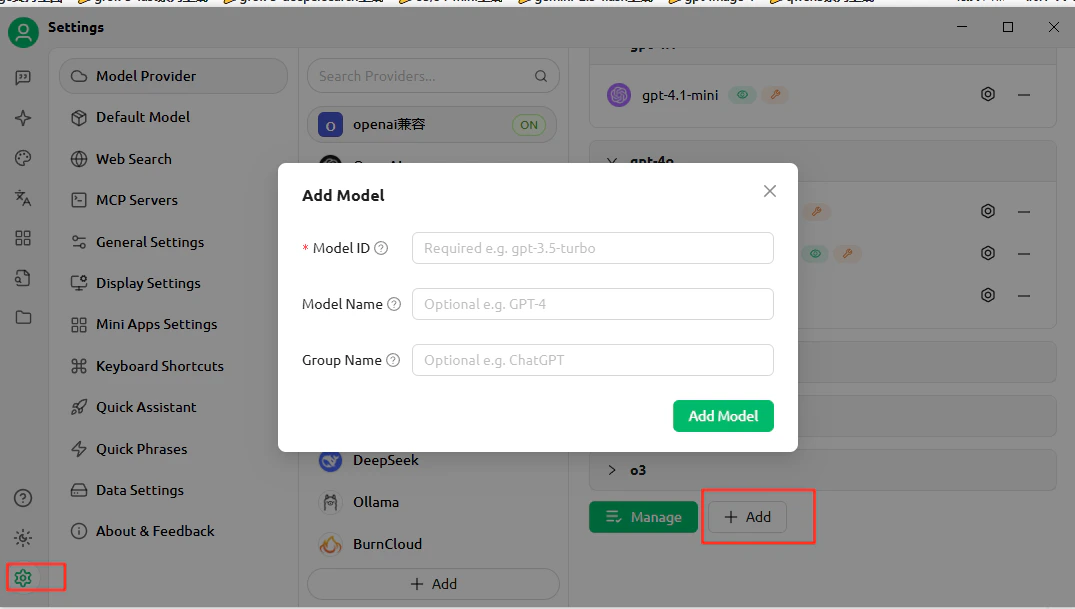
  さらにモデルを追加するには、プロバイダー設定に戻って **Add Model** をもう一度クリックします。
  <Frame>
    <img src="https://mintcdn.com/cometapi/E4FFvyMYmaOZoldp/images/integrations/810968_355199.png?fit=max&auto=format&n=E4FFvyMYmaOZoldp&q=85&s=da182754d5fae90778c2c9cc9d5b5727" alt="別のカスタムモデルが追加された状態の CherryStudio 設定" width="1075" height="609" data-path="images/integrations/810968_355199.png" />
  </Frame>
</Tip>

<script type="application/ld+json">
  {`
    {
    "@context": "https://schema.org",
    "@graph": [
      {
        "@type": "HowTo",
        "@id": "https://apidoc.cometapi.com/integrations/cherrystudio#howto",
        "name": "CometAPI で Cherry Studio を使う",
        "description": "このガイドでは、ベース URL、API キー、モデルまたはプロバイダーのオプションを設定して、Cherry Studio を CometAPI と連携させる方法を説明します。",
        "step": [
          {
            "@type": "HowToStep",
            "@id": "https://apidoc.cometapi.com/integrations/cherrystudio#step-1",
            "position": 1,
            "name": "CometAPI API キーを取得する",
            "text": "CometAPI アカウントを作成または開き、ダッシュボードから有効な API キーをコピーします。"
          },
          {
            "@type": "HowToStep",
            "@id": "https://apidoc.cometapi.com/integrations/cherrystudio#step-2",
            "position": 2,
            "name": "CometAPI をプロバイダーとして追加する",
            "text": "「CometAPI で Cherry Studio を使う」ガイド内の「CometAPI をプロバイダーとして追加する」手順を完了します。"
          },
          {
            "@type": "HowToStep",
            "@id": "https://apidoc.cometapi.com/integrations/cherrystudio#step-3",
            "position": 3,
            "name": "モデルを追加する",
            "text": "「CometAPI で Cherry Studio を使う」ガイド内の「モデルを追加する」手順を完了します。"
          },
          {
            "@type": "HowToStep",
            "@id": "https://apidoc.cometapi.com/integrations/cherrystudio#step-4",
            "position": 4,
            "name": "接続をテストする",
            "text": "CometAPI Models ページで現在の model ID を選択し、その後連携側からテストリクエストを送信します。"
          }
        ]
      },
      {
        "@type": "BreadcrumbList",
        "itemListElement": [
          {
            "@type": "ListItem",
            "position": 1,
            "name": "CometAPI ドキュメント",
            "item": "https://apidoc.cometapi.com/"
          },
          {
            "@type": "ListItem",
            "position": 2,
            "name": "連携",
            "item": "https://apidoc.cometapi.com/integrations"
          },
          {
            "@type": "ListItem",
            "position": 3,
            "name": "CometAPI で Cherry Studio を使う",
            "item": "https://apidoc.cometapi.com/integrations/cherrystudio"
          }
        ]
      }
    ]
    }
    `}
</script>