> ## Documentation Index
> Fetch the complete documentation index at: https://apidoc.cometapi.com/llms.txt
> Use this file to discover all available pages before exploring further.
# CometAPI で Claude Desktop を使う
> このガイドでは、base URL、API key、model または provider オプションを設定して、Claude Desktop を CometAPI と連携させる方法を説明します。
このガイドでは、Claude Desktop のサードパーティ推論向け Cowork を CometAPI に接続する方法を説明します。この設定により、Claude Desktop は Cowork、Projects、および対応するデスクトップワークフローから Claude Messages API リクエストを CometAPI に送信できるようになります。
公式リファレンス:
* [Claude Desktop installation and setup](https://claude.com/docs/cowork/3p/installation)
* [Claude Desktop gateway configuration](https://claude.com/docs/cowork/3p/gateway)
* [Claude Desktop configuration reference](https://claude.com/docs/cowork/3p/configuration)
Claude Desktop のサードパーティ推論には、Anthropic 互換のゲートウェイが必要です。CometAPI は [Anthropic Messages API](/api/text/anthropic-messages) を通じて Claude モデルをサポートしています。
Claude Desktop から送信したコンテンツは、CometAPI と選択したモデルプロバイダーによって処理されます。組織でそのワークフローが許可されていない限り、機密データを送信しないでください。
## 前提条件
* [claude.com/download](https://claude.com/download) からインストールした Claude Desktop
* **Developer mode** と **Configure third-party inference** を含む Claude Desktop ビルド
* 有効な API key を持つ CometAPI アカウント
* CometAPI で Claude モデルにアクセスできること
* `https://api.cometapi.com` に到達できるネットワーク経路
Claude Desktop のサインイン画面から開始します。すでに Anthropic アカウントでサインインしている場合は、サードパーティ推論を設定する前にサインアウトしてください。
## 構成
Claude Desktop を開き、サインイン画面のままにします。アプリケーションメニューで **Help** → **Troubleshooting** を開き、**Enable Developer Mode** を選択します。
Windows では、サインイン前はメニューにアクセスしづらい場合があります。メールアドレス欄にフォーカスを置き、メニューにフォーカスが移るまで `Tab` を押してから、`Enter` を押します。
開発者モードを有効にしたら、**Developer** → **Configure third-party inference** を開きます。
設定ウィンドウが開き、左側のサイドバーに複数のセクションが表示されます。CometAPI の設定には **Connection** セクションを使用します。
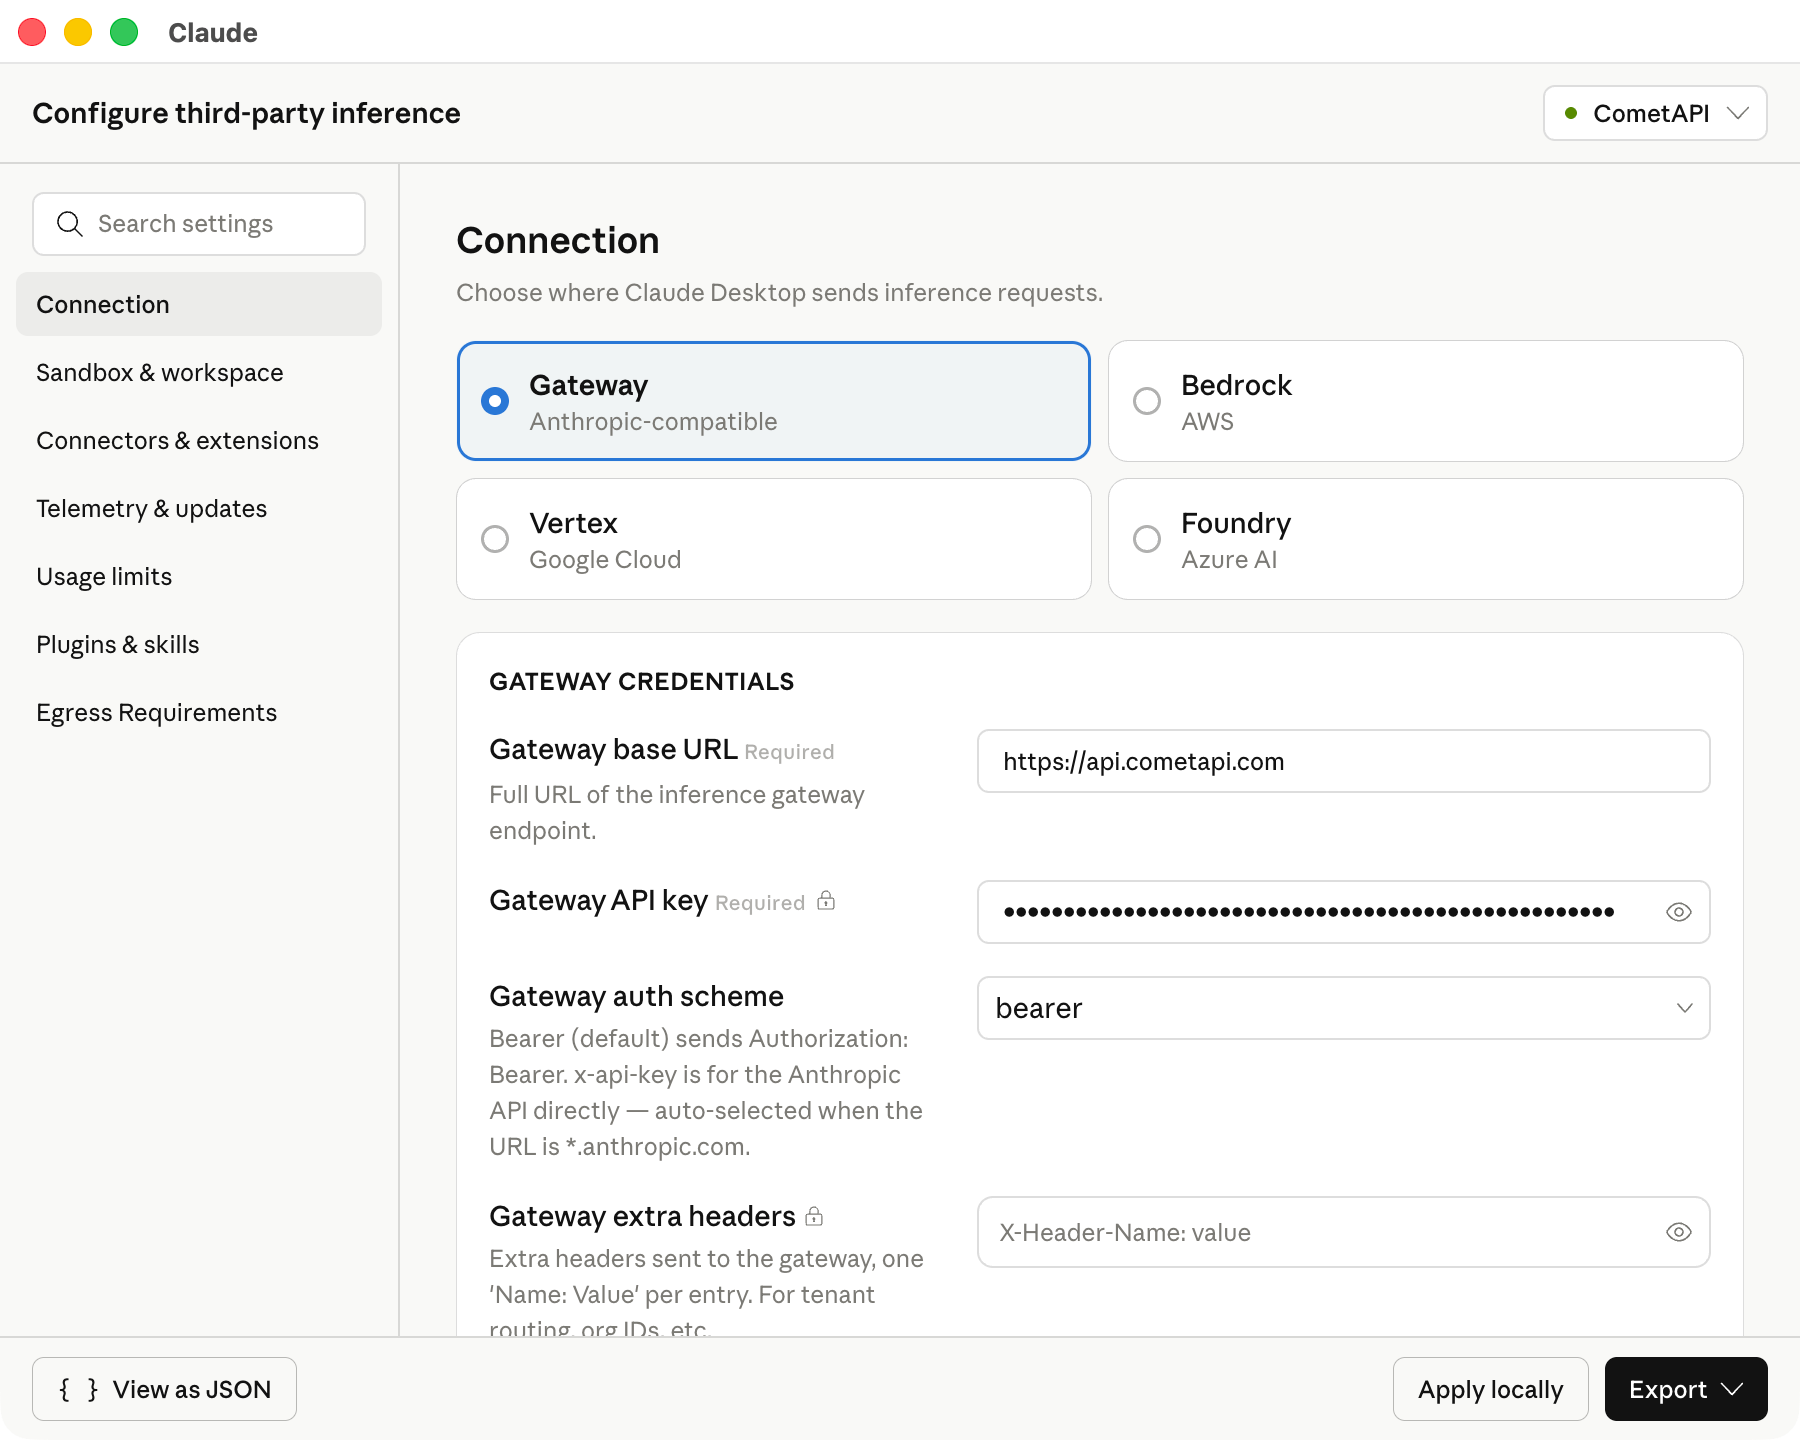
**Connection** セクションで、以下の CometAPI の値を入力します。
| Field | Value |
| --------------- | ------------------------------------ |
| 推論プロバイダー | Gateway |
| Gateway | Anthropic-compatible |
| Gateway ベース URL | `https://api.cometapi.com` |
| Gateway API キー | `$COMETAPI_KEY` のような CometAPI API キー |
| Gateway 認証方式 | Bearer |
| Gateway 追加ヘッダー | 空欄のまま |
ベース URL は表示どおりに正確に入力してください。Claude Desktop では HTTPS のベース URL が必要です。
次のスクリーンショットは、CometAPI の値が入力された Connection セクションを示しています。
 **Model list** に、以下の model ID を手動で追加します。
| Model ID | 推奨用途 |
| --------------------------- | ----------------- |
| `claude-opus-4-7` | 複雑な計画立案とエージェントタスク |
| `claude-sonnet-4-6` | 一般的なデスクトップ用途 |
| `claude-haiku-4-5-20251001` | 軽量なプロンプトと素早い下書き |
リストの最初の model がデフォルト model になります。汎用のデフォルトにしたい場合は、`claude-sonnet-4-6` を先頭に配置してください。
利用可能な model は変わることがあります。設定後に Claude Desktop に model が表示されない場合は、[CometAPI Models page](/ja/overview/models) でアクセス権を確認してください。
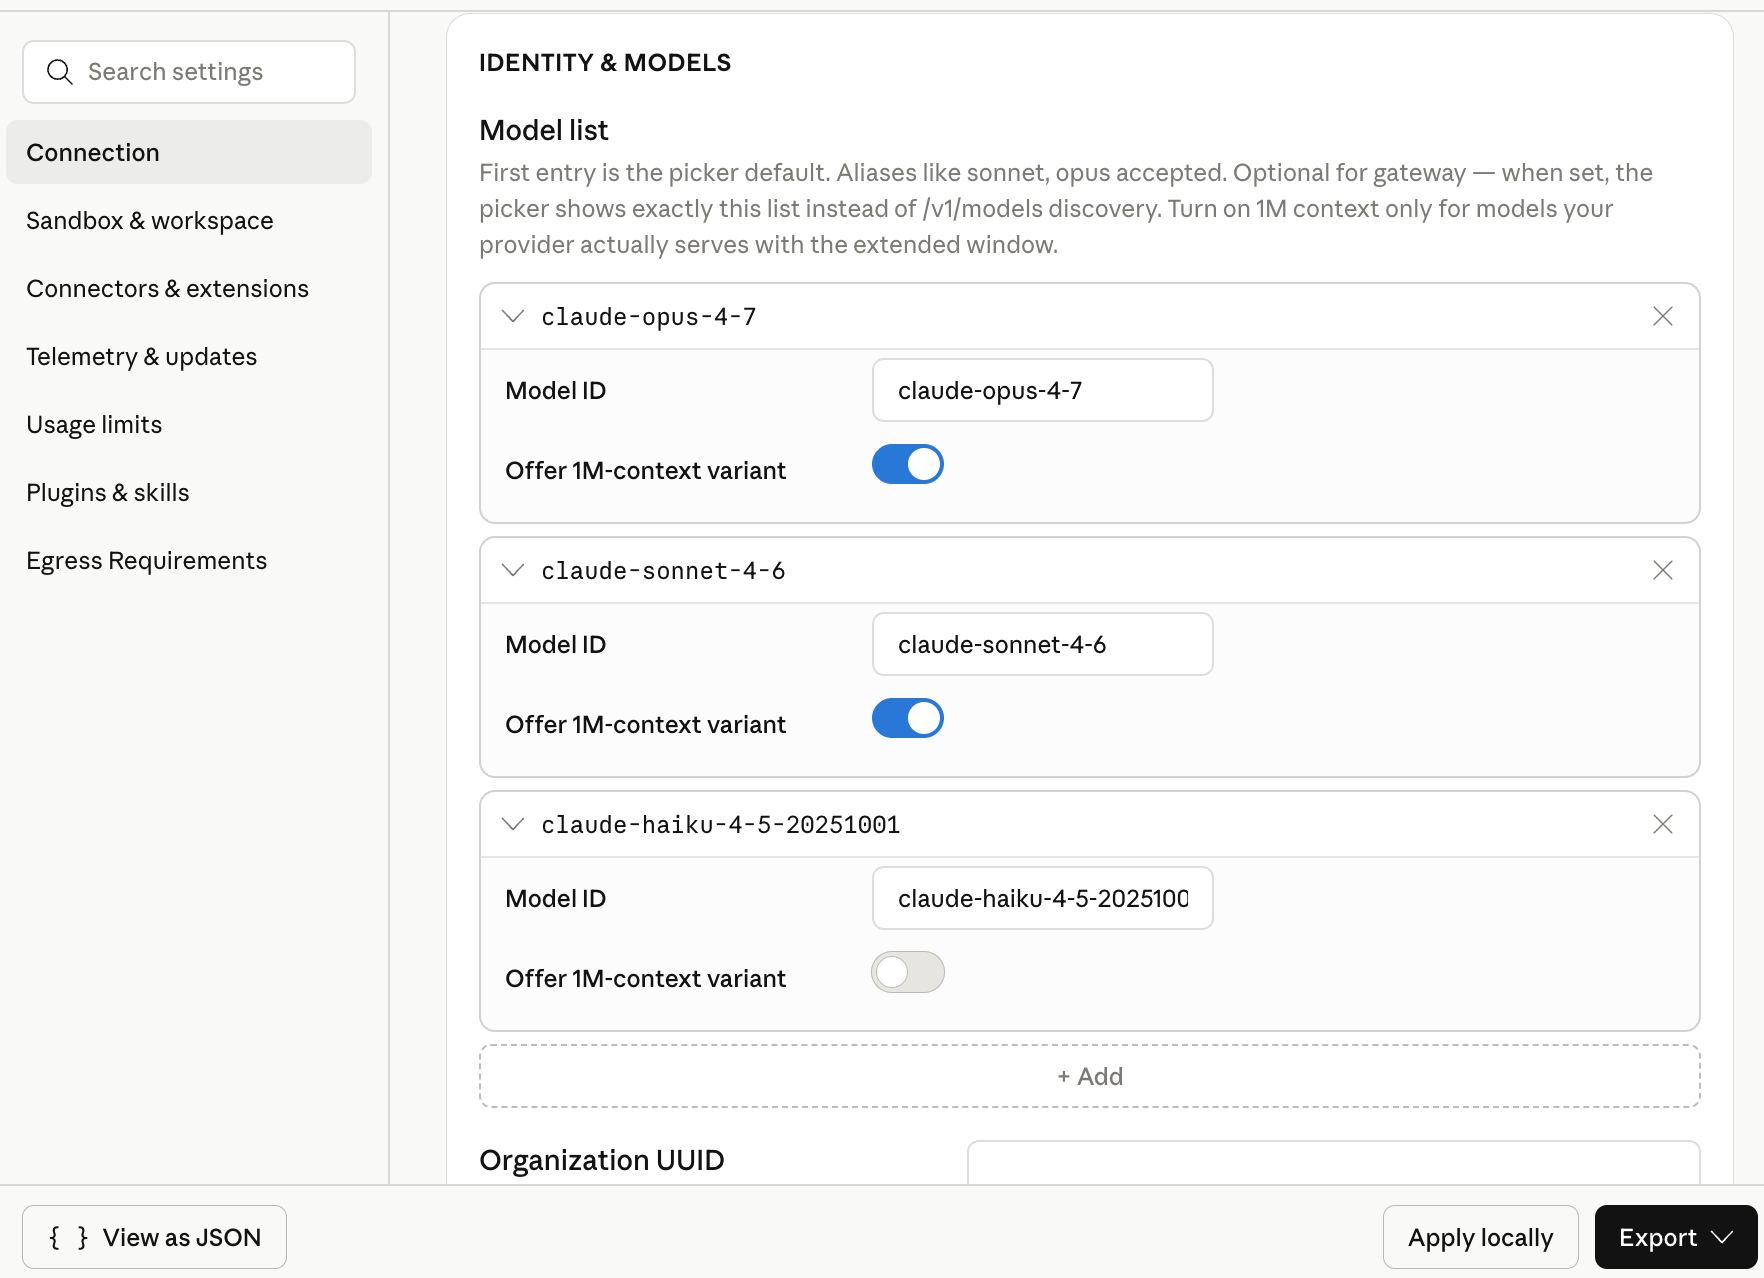
次のスクリーンショットは、CometAPI 用に 3 つの Claude model ID が設定された model list を示しています。
**Model list** に、以下の model ID を手動で追加します。
| Model ID | 推奨用途 |
| --------------------------- | ----------------- |
| `claude-opus-4-7` | 複雑な計画立案とエージェントタスク |
| `claude-sonnet-4-6` | 一般的なデスクトップ用途 |
| `claude-haiku-4-5-20251001` | 軽量なプロンプトと素早い下書き |
リストの最初の model がデフォルト model になります。汎用のデフォルトにしたい場合は、`claude-sonnet-4-6` を先頭に配置してください。
利用可能な model は変わることがあります。設定後に Claude Desktop に model が表示されない場合は、[CometAPI Models page](/ja/overview/models) でアクセス権を確認してください。
次のスクリーンショットは、CometAPI 用に 3 つの Claude model ID が設定された model list を示しています。
 **Apply locally** をクリックします。Claude Desktop は選択した設定をローカルのユーザープロファイルに書き込み、アプリを再起動します。
アプリが再起動しない場合は、Claude Desktop を完全に終了してから、もう一度開いてください。
サインイン画面で、サードパーティ推論の Cowork オプションを選択します。Cowork または Projects を開き、設定した Claude model のいずれかを選んで、短いテスト用プロンプトを送信します。
応答が正常に返ってくれば、Claude Desktop が model 呼び出しに CometAPI を使用していることが確認できます。
## 設定を確認する
外部ツールを必要としない短いプロンプトを使います。
```text theme={null}
Reply with one sentence: Claude Desktop is connected through CometAPI.
```
Claude Desktop から応答が返れば、ベース URL、API キー、model list が正しく設定されています。
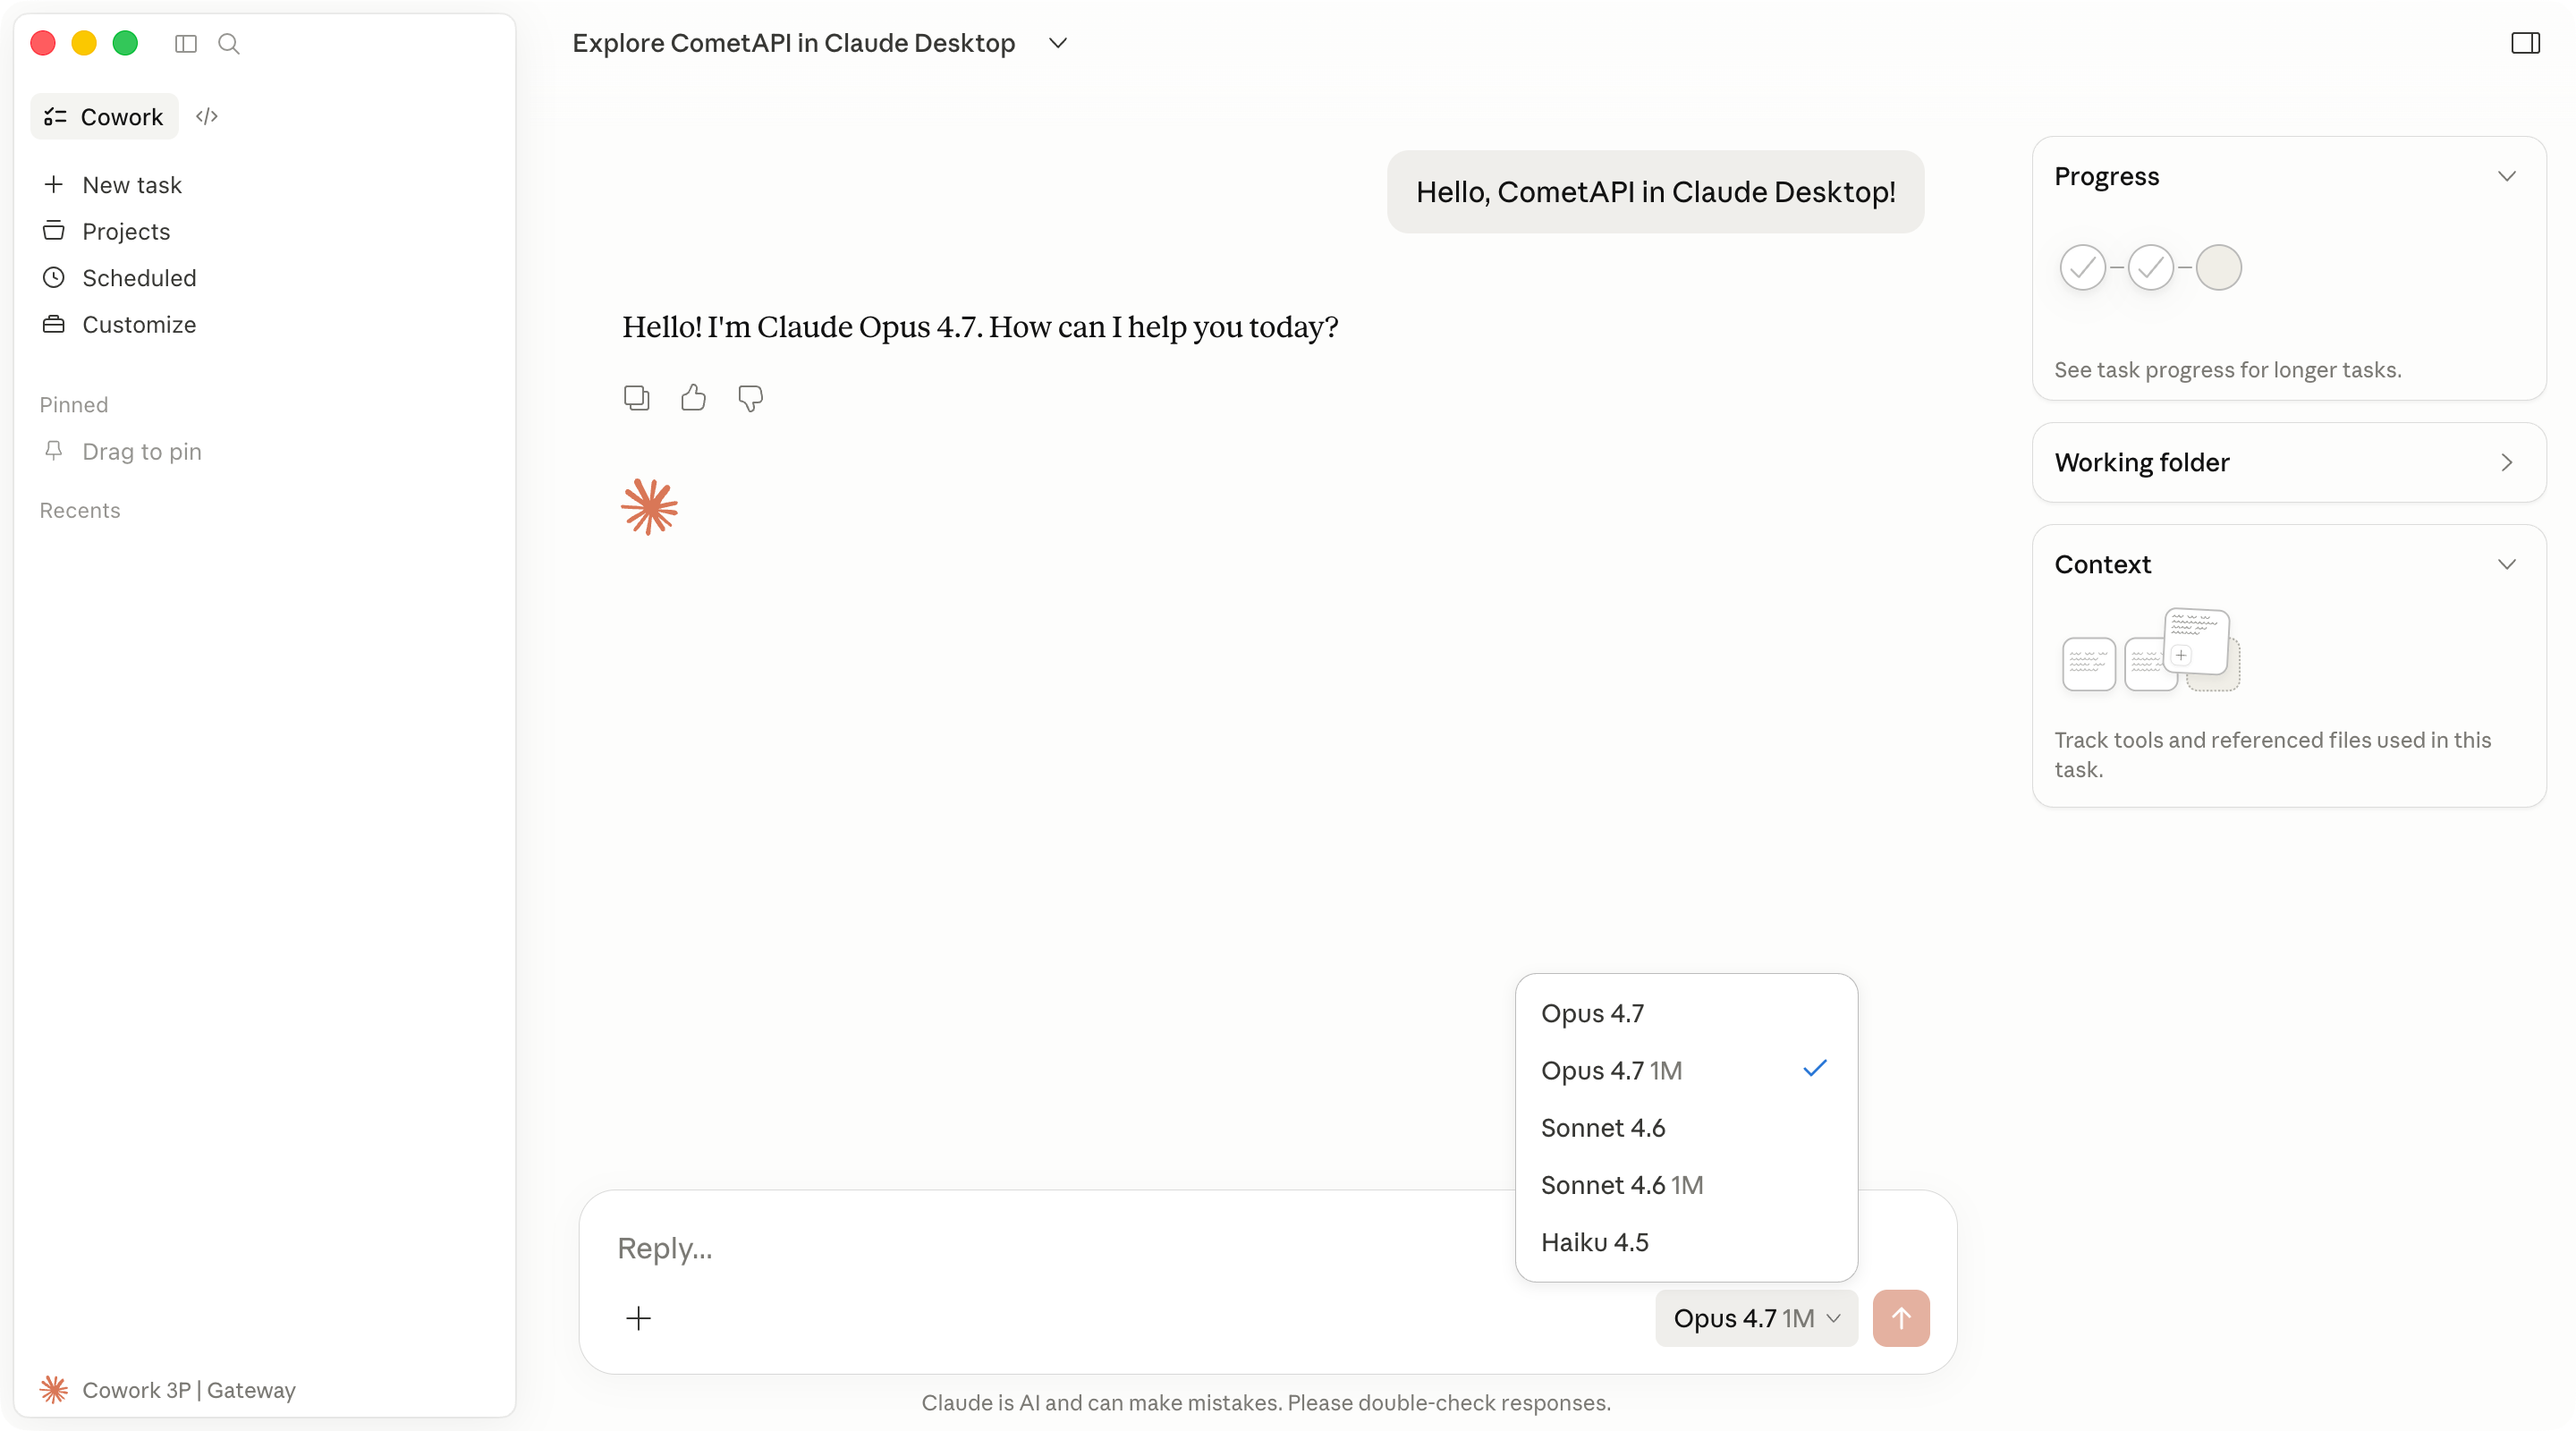
次のスクリーンショットは、CometAPI 経由で成功した Cowork の応答を示しています。
**Apply locally** をクリックします。Claude Desktop は選択した設定をローカルのユーザープロファイルに書き込み、アプリを再起動します。
アプリが再起動しない場合は、Claude Desktop を完全に終了してから、もう一度開いてください。
サインイン画面で、サードパーティ推論の Cowork オプションを選択します。Cowork または Projects を開き、設定した Claude model のいずれかを選んで、短いテスト用プロンプトを送信します。
応答が正常に返ってくれば、Claude Desktop が model 呼び出しに CometAPI を使用していることが確認できます。
## 設定を確認する
外部ツールを必要としない短いプロンプトを使います。
```text theme={null}
Reply with one sentence: Claude Desktop is connected through CometAPI.
```
Claude Desktop から応答が返れば、ベース URL、API キー、model list が正しく設定されています。
次のスクリーンショットは、CometAPI 経由で成功した Cowork の応答を示しています。
 検出された設定を確認するには、**Help** → **Troubleshooting** → **Copy Managed Configuration Report** を開きます。コピーされたレポートでは秘密の値はマスクされます。
## トラブルシューティング
**Help** → **Troubleshooting** → **Enable Developer Mode** を選択したことを確認してください。その後、Claude Desktop を完全に終了し、再度開いてください。
オプションが表示されない場合は、サードパーティ推論設定を含む Claude Desktop ビルドをインストールしてください。
次の項目を確認してください:
* **Inference provider** が **Gateway** に設定されている。
* **Gateway base URL** が `https://api.cometapi.com` である。
* **Gateway API key** に、余分なスペースを含まない CometAPI API キーが入力されている。
* **Apply locally** をクリックし、Claude Desktop を完全に再起動した。
base URL が `https://` で始まっていることを確認してください。Claude Desktop はプレーンな HTTP の gateway URL を受け付けません。
また、CometAPI アカウントが Claude モデルにアクセスできること、および API キーが削除または無効化されていないことも確認してください。
**Developer** → **Configure third-party inference** を開き直し、**Model list** のエントリを確認してください。model ID は、CometAPI が公開している ID と一致している必要があります。
各 model ID は個別のエントリとして追加してください。UI フィールドには引用符、カンマ、余分なスペースを含めないでください。
このフローでは、Claude Desktop のサードパーティ推論は Anthropic 互換の gateway を想定しています。`https://api.cometapi.com` と、上記に記載した Claude の model ID を使用してください。
Code タブは、Claude Desktop 内の Claude Code エンジンを使用します。一部のデスクトップ設定は、Cowork に適用されるのと同じようには Code セッションに適用されない場合があります。
単独でのターミナル利用については、[Claude Code integration guide](/ja/integrations/claude-code) を参照してください。
検出された設定を確認するには、**Help** → **Troubleshooting** → **Copy Managed Configuration Report** を開きます。コピーされたレポートでは秘密の値はマスクされます。
## トラブルシューティング
**Help** → **Troubleshooting** → **Enable Developer Mode** を選択したことを確認してください。その後、Claude Desktop を完全に終了し、再度開いてください。
オプションが表示されない場合は、サードパーティ推論設定を含む Claude Desktop ビルドをインストールしてください。
次の項目を確認してください:
* **Inference provider** が **Gateway** に設定されている。
* **Gateway base URL** が `https://api.cometapi.com` である。
* **Gateway API key** に、余分なスペースを含まない CometAPI API キーが入力されている。
* **Apply locally** をクリックし、Claude Desktop を完全に再起動した。
base URL が `https://` で始まっていることを確認してください。Claude Desktop はプレーンな HTTP の gateway URL を受け付けません。
また、CometAPI アカウントが Claude モデルにアクセスできること、および API キーが削除または無効化されていないことも確認してください。
**Developer** → **Configure third-party inference** を開き直し、**Model list** のエントリを確認してください。model ID は、CometAPI が公開している ID と一致している必要があります。
各 model ID は個別のエントリとして追加してください。UI フィールドには引用符、カンマ、余分なスペースを含めないでください。
このフローでは、Claude Desktop のサードパーティ推論は Anthropic 互換の gateway を想定しています。`https://api.cometapi.com` と、上記に記載した Claude の model ID を使用してください。
Code タブは、Claude Desktop 内の Claude Code エンジンを使用します。一部のデスクトップ設定は、Cowork に適用されるのと同じようには Code セッションに適用されない場合があります。
単独でのターミナル利用については、[Claude Code integration guide](/ja/integrations/claude-code) を参照してください。