> ## Documentation Index
> Fetch the complete documentation index at: https://apidoc.cometapi.com/llms.txt
> Use this file to discover all available pages before exploring further.
# Flowise を CometAPI に接続する
> base URL、API key、model または provider オプションを設定して、Flowise を CometAPI に接続するには、このガイドを使用してください。
FlowiseAI は、LLM アプリケーションを視覚的に構築するためのローコードプラットフォームです。ネイティブの **ChatCometAPI** ノードを使用して、CometAPI をチャットフロー、Q\&A システム、テキストチャットモデルを呼び出す RAG ワークフローに接続できます。
このガイドでは、テキストチャットと RAG ワークフローを扱います。画像生成ワークフローは対象外です。
## 前提条件
* 有効な API key を持つ CometAPI アカウント - [こちらで取得](https://www.cometapi.com/console/token)
* FlowiseAI アカウント、またはセルフホストされた Flowise インスタンス - [Flowise Cloud にサインイン](https://cloud.flowiseai.com/chatflows)
* [CometAPI Models page](/ja/overview/models) にある最新のテキスト model ID
* RAG の場合、ドキュメントソースに加え、Flowise がサポートする embeddings provider と vector store
## ChatCometAPI を設定する
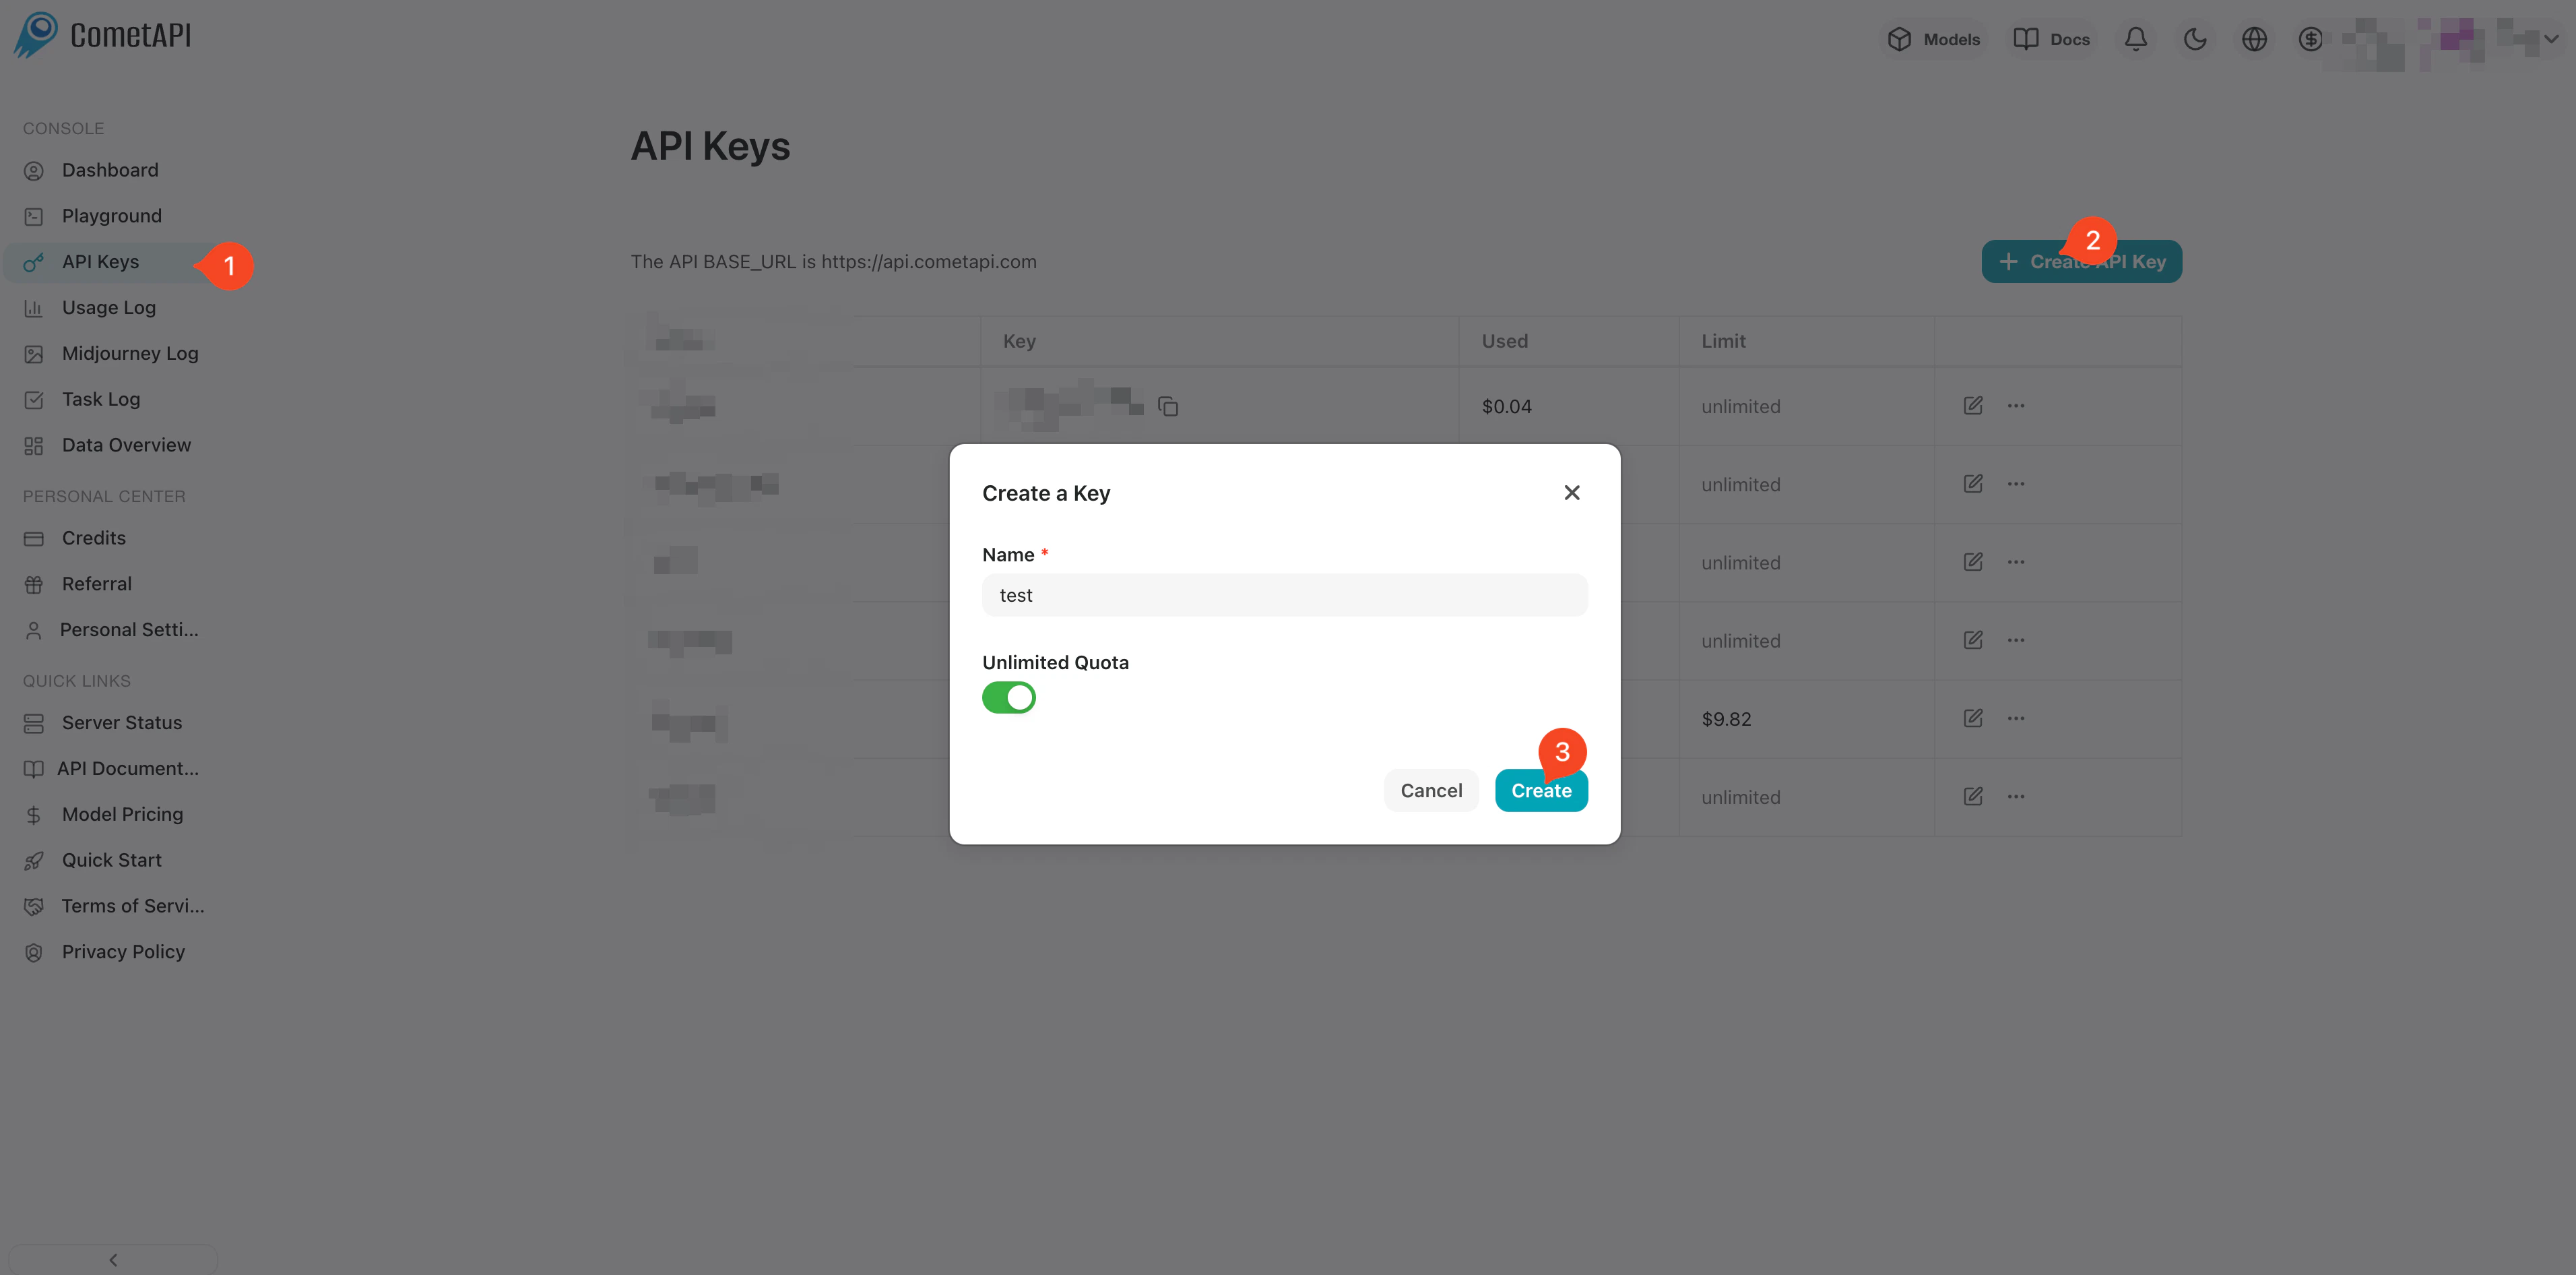
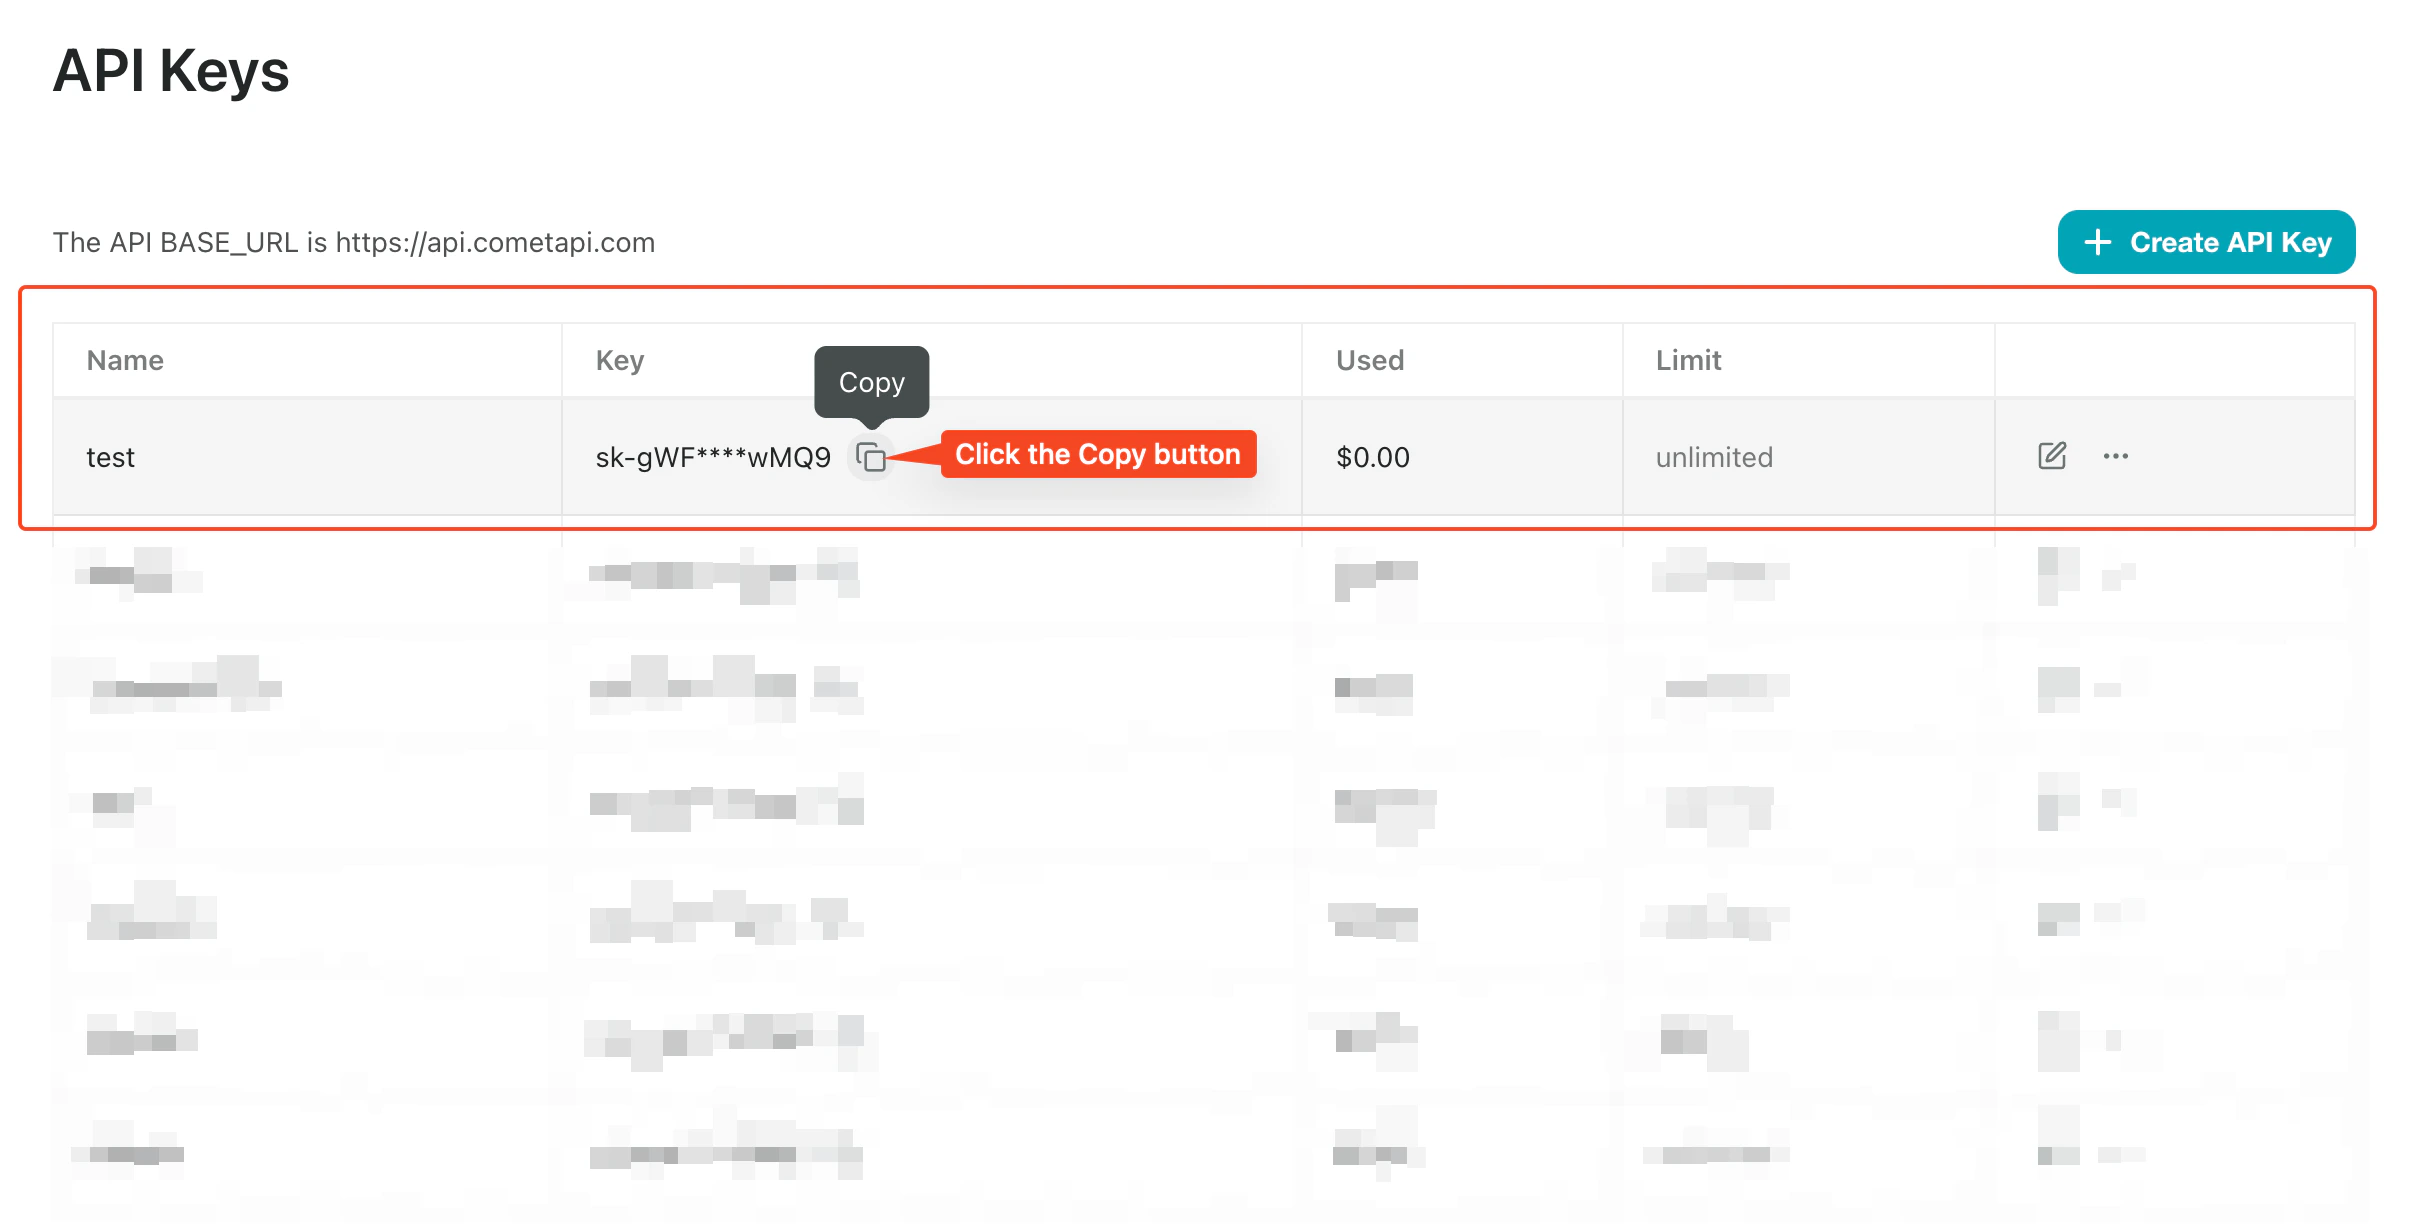
[CometAPI console](https://www.cometapi.com/console/token) にログインします。**Add API Key** をクリックし、CometAPI API key をコピーします。
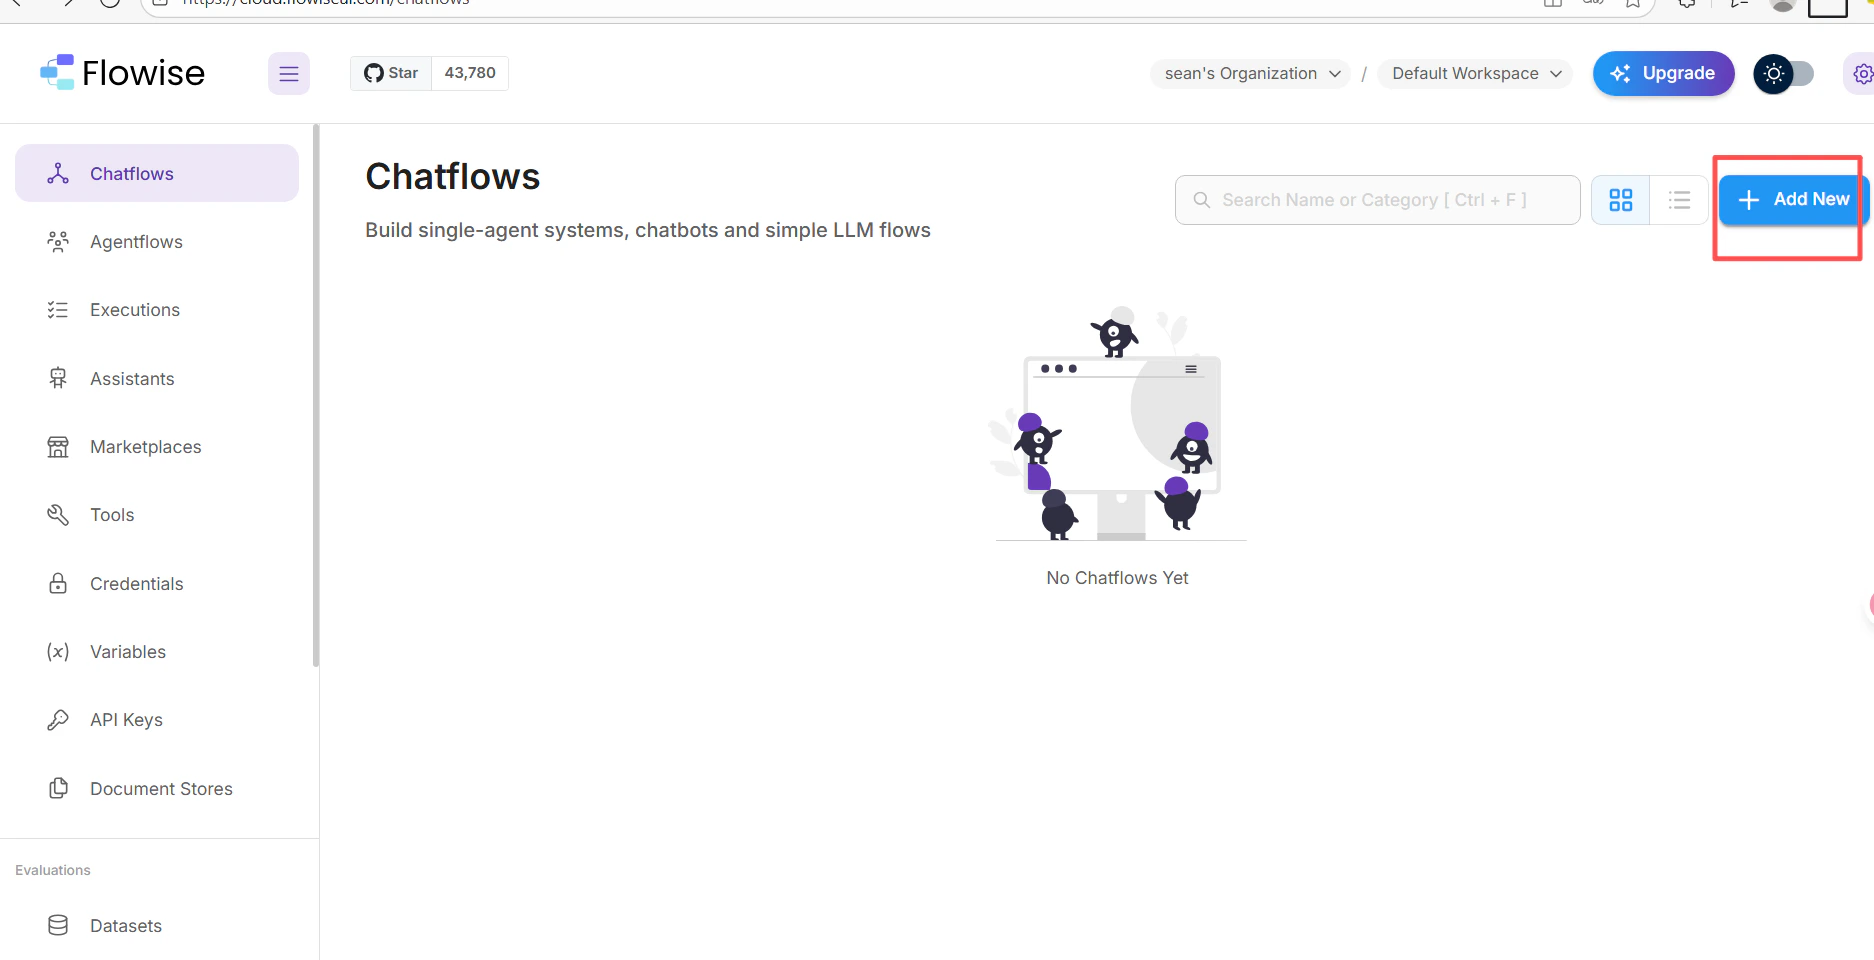
 1. FlowiseAI のチャットフローキャンバスで、**Add New** をクリックします。
 2. **cometapi** を検索し、**ChatCometAPI** ノードを選択します。
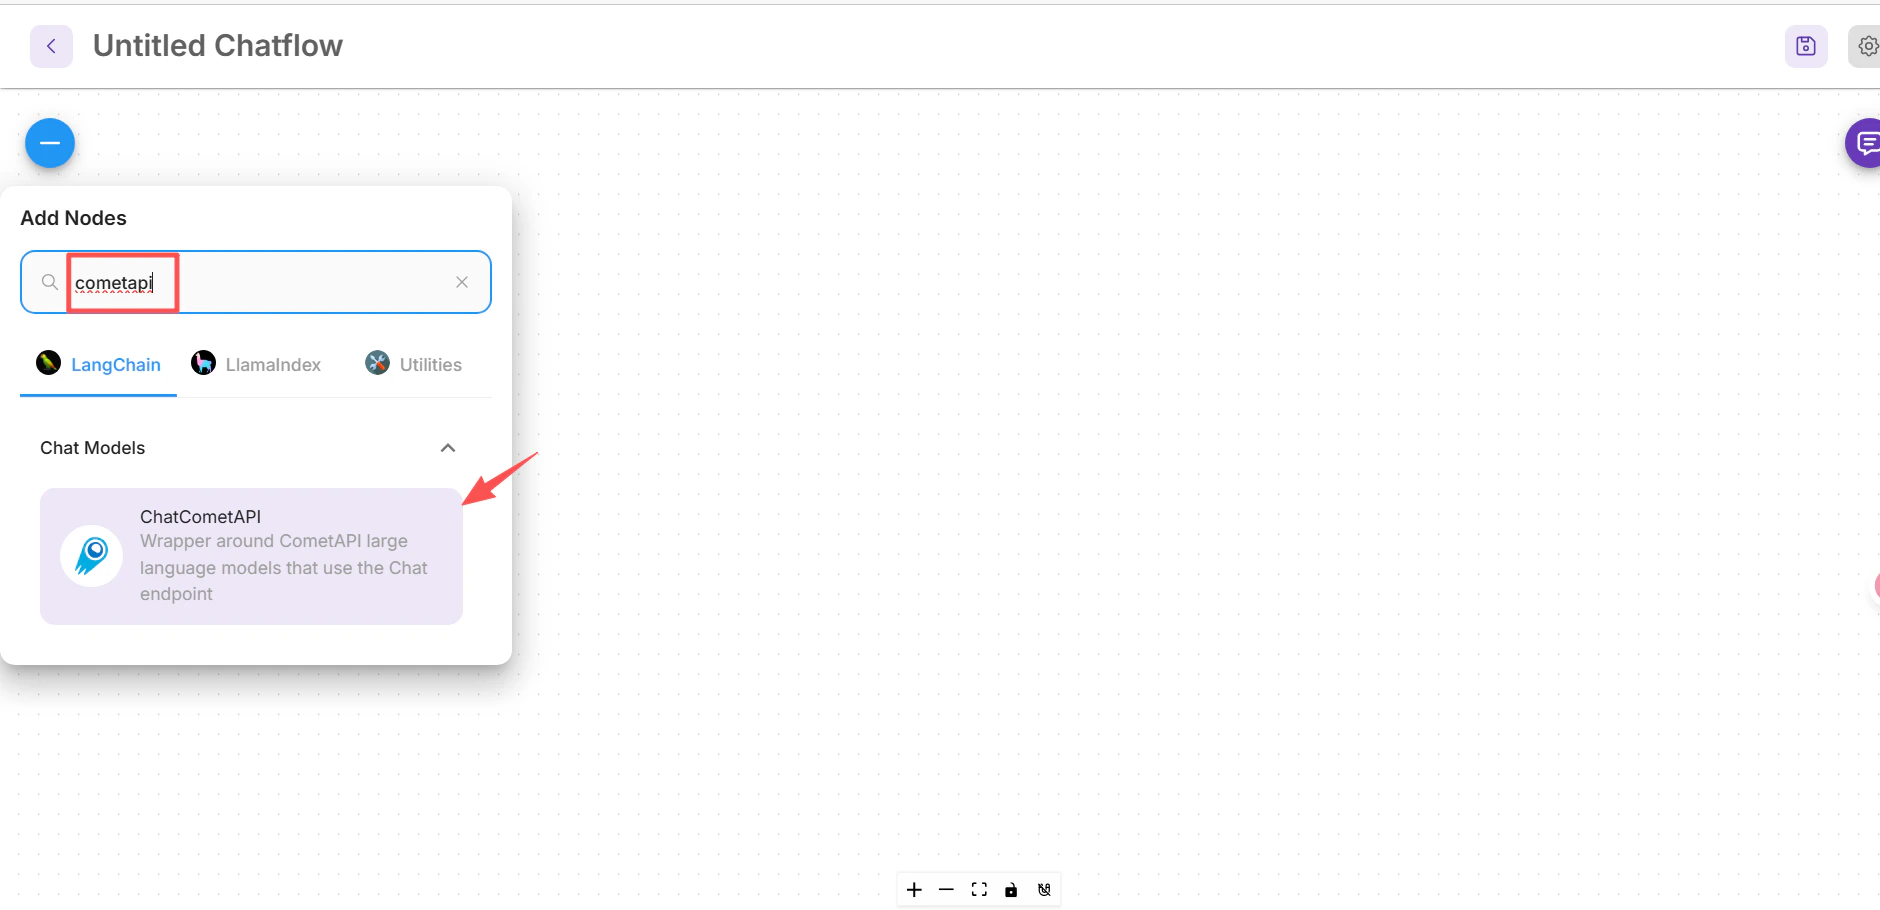 3. それをキャンバス上にドラッグします。
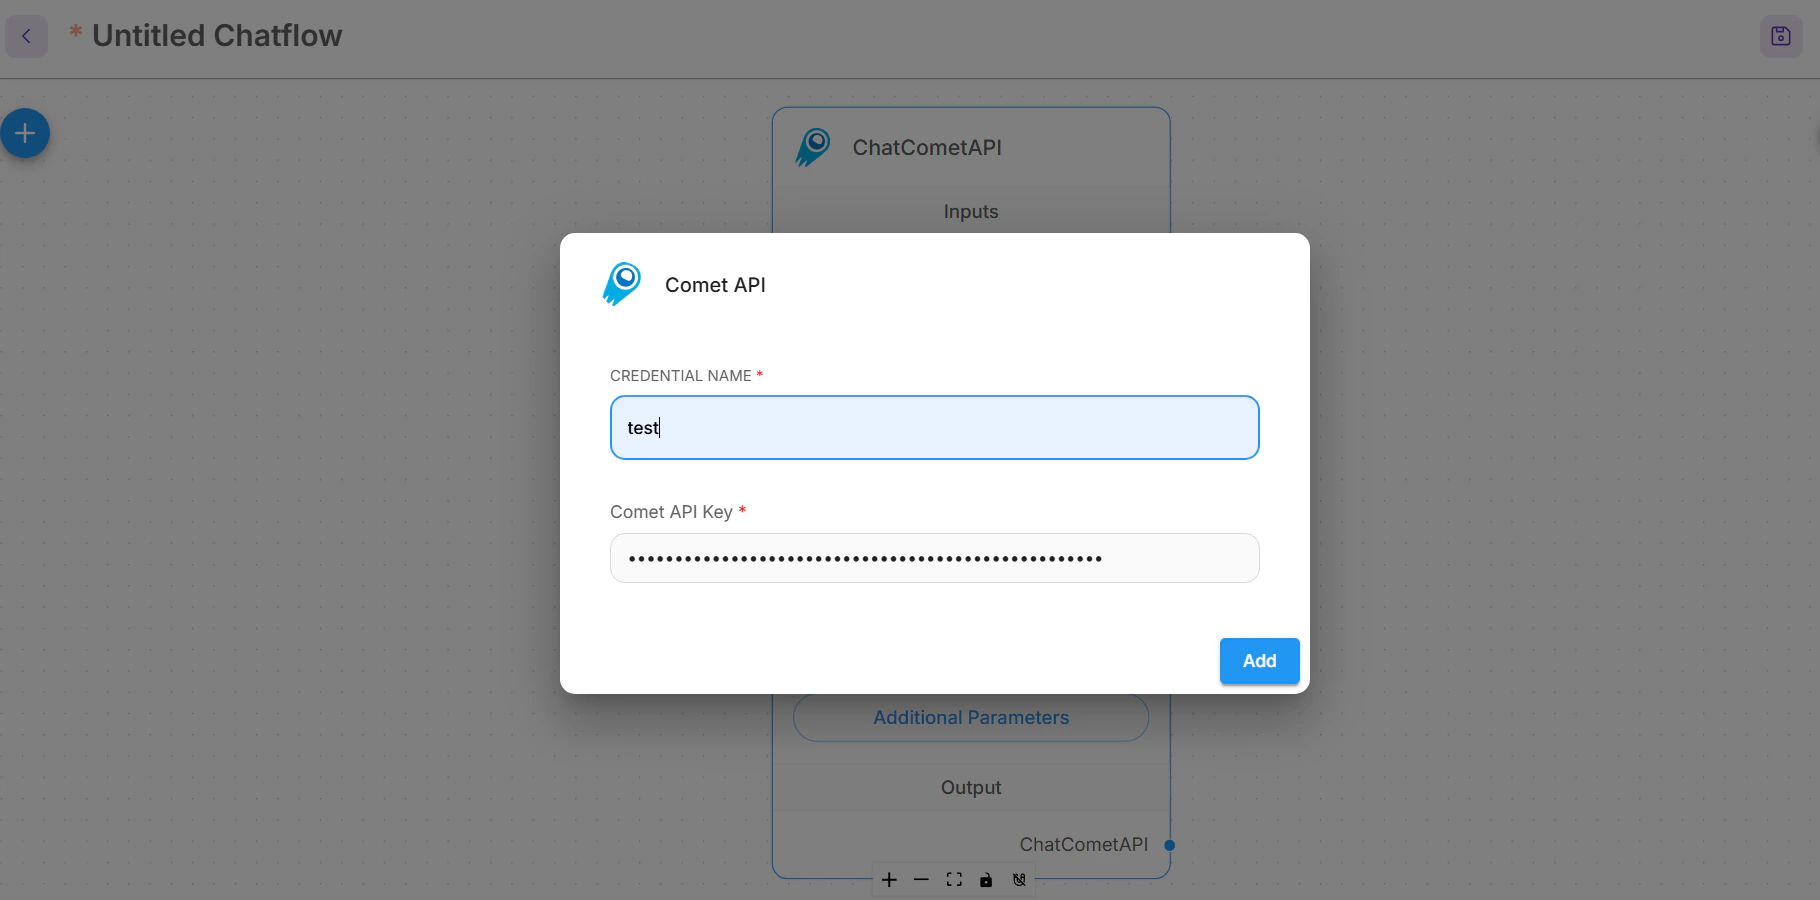
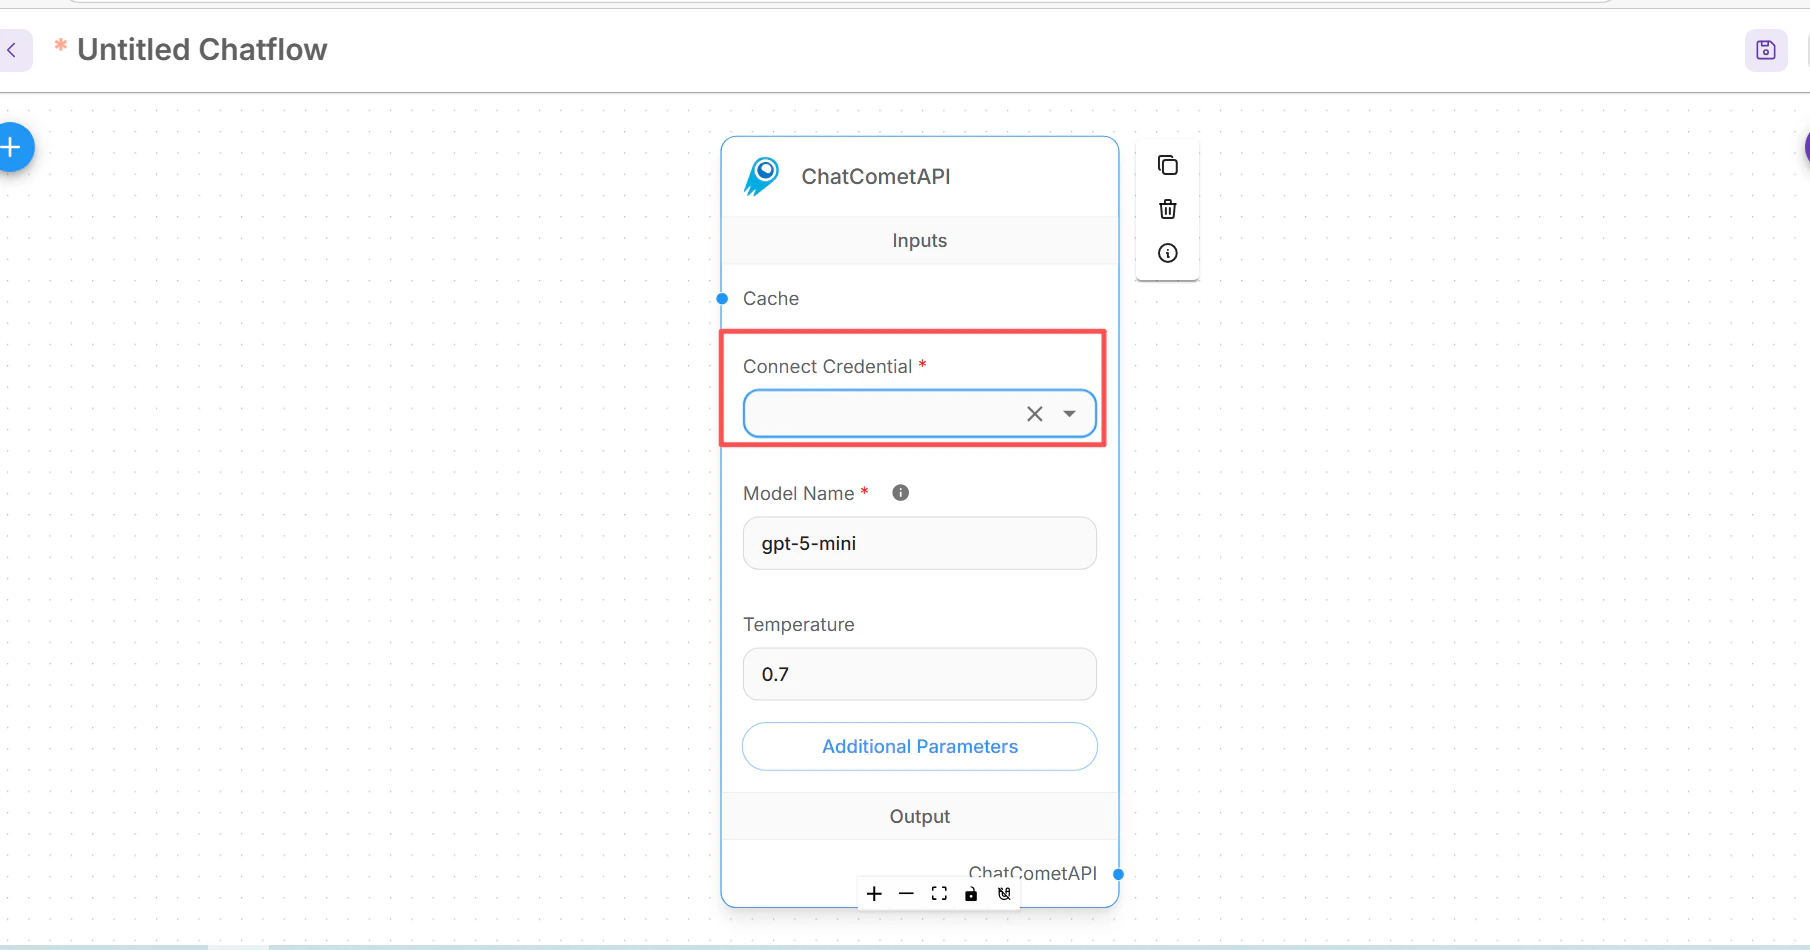 ChatCometAPI ノードで **Connect Credential** を開き、**Create New** を選択して、CometAPI API key を貼り付け、credential を保存します。
 ChatCometAPI ノードの **Additional Parameters** を展開します。
Flowise のビルドに **Base Path** フィールドが表示される場合は、次のように設定します:
```text theme={null}
https://api.cometapi.com/v1/
```
代わりに **Base Options** が表示される場合は、`basePath` エントリを追加します:
```json theme={null}
{
"basePath": "https://api.cometapi.com/v1/"
}
```
**Model Name** には呼び出したい正確なテキスト model ID を設定します(例: `your-model-id`)。**Temperature** は、ワークフローでより多くまたは少ない変化が必要な場合にのみ調整してください。
## 基本的な chatflow を作成する
**Prompt Template** ノードを追加し、chatflow がモデルに送信するプロンプトを定義します。
```text theme={null}
Question: {question}
Answer clearly and concisely.
```
ChatCometAPI ノードの **Additional Parameters** を展開します。
Flowise のビルドに **Base Path** フィールドが表示される場合は、次のように設定します:
```text theme={null}
https://api.cometapi.com/v1/
```
代わりに **Base Options** が表示される場合は、`basePath` エントリを追加します:
```json theme={null}
{
"basePath": "https://api.cometapi.com/v1/"
}
```
**Model Name** には呼び出したい正確なテキスト model ID を設定します(例: `your-model-id`)。**Temperature** は、ワークフローでより多くまたは少ない変化が必要な場合にのみ調整してください。
## 基本的な chatflow を作成する
**Prompt Template** ノードを追加し、chatflow がモデルに送信するプロンプトを定義します。
```text theme={null}
Question: {question}
Answer clearly and concisely.
```
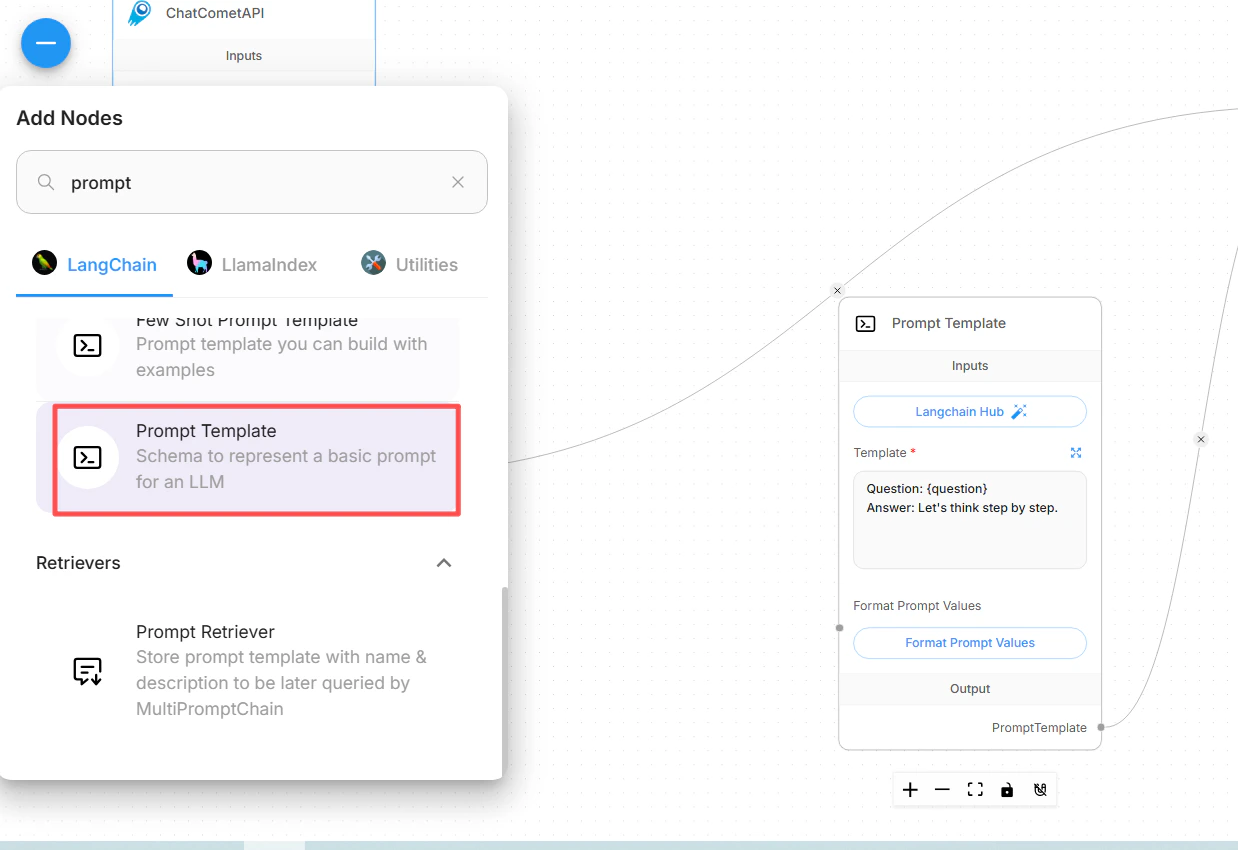
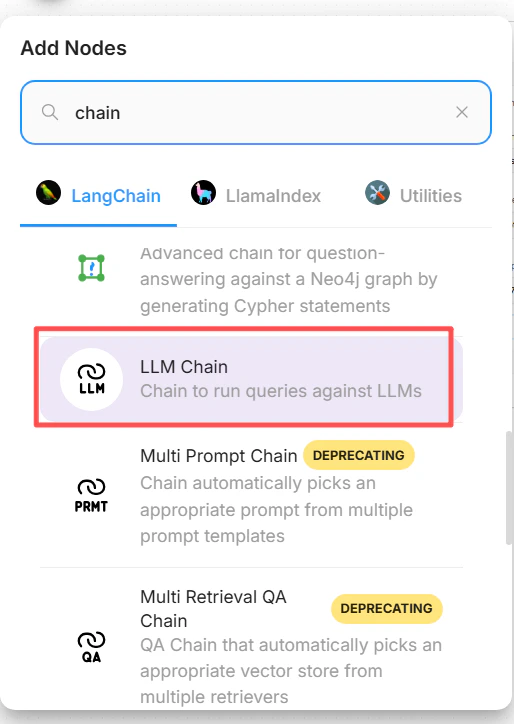
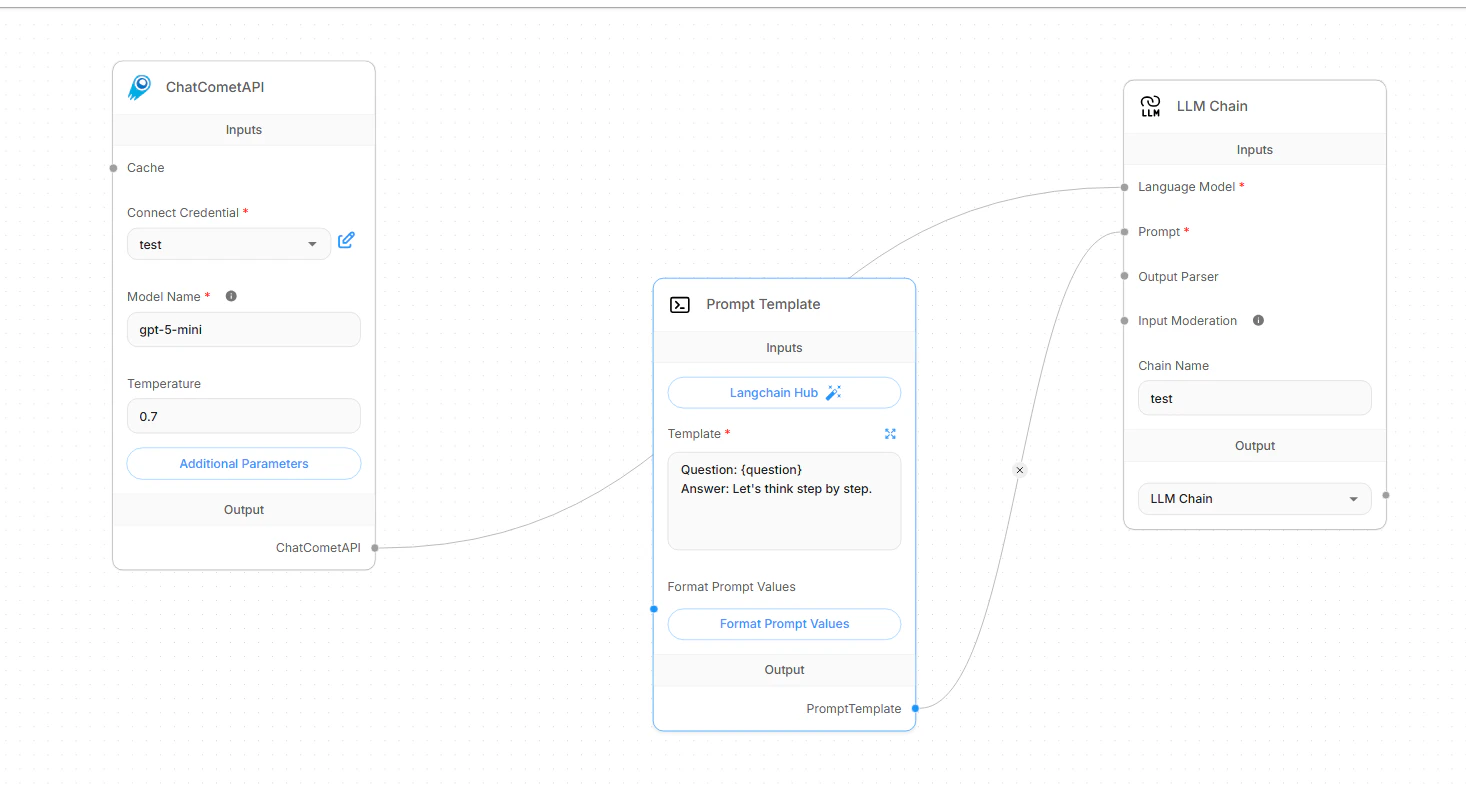
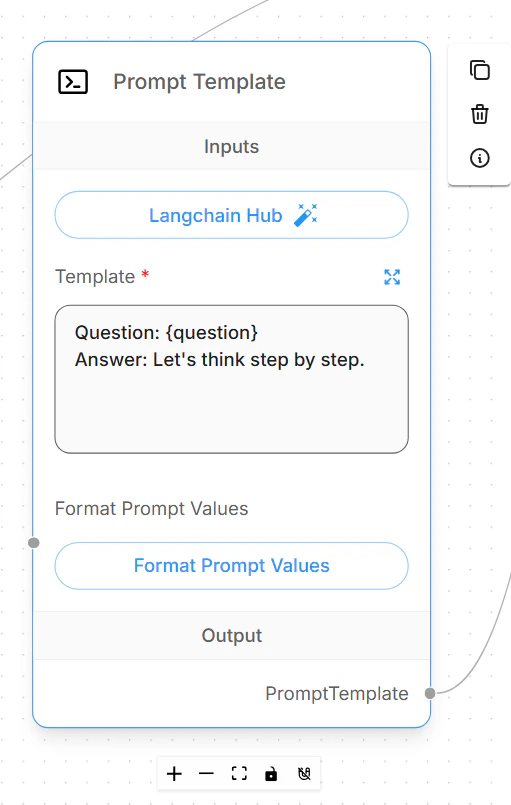 **LLM Chain** ノードを追加します。**ChatCometAPI** ノードをチェーンの **Language Model** 入力に接続し、次に **Prompt Template** ノードをチェーンの **Prompt** 入力に接続します。
 chatflow を保存し、チャットプレビューを開いて、短いテスト質問を送信します。正常な設定であれば、選択した CometAPI モデルから通常のテキスト回答が返されます。
 ## model ID を切り替える
モデルを切り替えるには、同じ CometAPI credential と base path を維持したまま、ChatCometAPI の model ID フィールドのみを変更します。
正確な model ID は [CometAPI Models page](/ja/overview/models) から使用してください。表示名、プロバイダー名、余分なスペースをコピーしないでください。
| ユースケース | Model ID value |
| ---------------- | ------------------------- |
| 一般的なチャットモデルファミリー | `your-chat-model-id` |
| 推論モデルファミリー | `your-reasoning-model-id` |
| コーディングモデルファミリー | `your-coding-model-id` |
model ID を変更したら、chatflow を保存して短いテスト用プロンプトを実行します。複数の本番フローを運用している場合は、先に chatflow を複製し、各コピーにそのモデルファミリーを反映した名前を付けてください。
## 検索拡張生成を設定する
Flowise RAG は 2 つの部分で構成されます。まず **Document Stores** でドキュメントを準備して upsert し、その後、準備した retriever を chatflow に接続します。ChatCometAPI は最終回答を生成するチャットモデルです。Document Store には、Flowise がサポートするエンベディング プロバイダーと vector store も引き続き必要です。
Flowise で **Document Stores** を開き、新しいストアを作成します。**File Loader**、**PDF Loader**、**Web Scraper** など、ソースに合った document loader を追加します。ドキュメントが十分に長く chunking が必要な場合は text splitter を追加し、その後 **Process** をクリックして生成された chunks をプレビューします。
**Upsert** または **Upsert All Chunks** をクリックします。以下を選択します。
* **Embeddings**: データと vector store に対応する Flowise の embeddings node。
* **Vector Store**: Flowise が document embeddings を保存する vector database。
* **Record Manager**: 任意。繰り返し upsert する際に重複レコードを避けたい場合に使用します。
embedding model の dimension は、vector store の index dimension と一致させてください。upsert の完了後、chatflow を構築する前に、Document Store の retrieval query test を使って関連する chunks が返されることを確認します。
chatflow で **Document Store (Vector)** または **Document Store Retriever** node を追加し、処理済みの Document Store を選択します。**Top K** には、各質問ごとに Flowise に取得させたい chunks の数を設定します。
**Conversational Retrieval QA Chain** を追加し、以下を接続します。
* **Language Model** input を **ChatCometAPI** から接続。
* **Vector Store Retriever** input を Document Store retriever から接続。
* **Memory** は、chatflow で会話履歴が必要な場合のみ接続します。
回答に引用や取得したソース chunks を含めたい場合は、**Return Source Documents** を有効にします。フローを保存し、アップロードしたドキュメントにしか答えが存在しない質問をしてみてください。
## トラブルシューティング
お使いの Flowise バージョンに **ChatCometAPI** チャットモデル連携が含まれていることを確認してください。古い Flowise デプロイやカスタマイズされた Flowise デプロイでは、Flowise を更新するか、その連携が管理者によって無効化されていないか確認してください。
CometAPI の base path を `https://api.cometapi.com/v1/` に設定してください。一部の Flowise ビルドでは、これは **Base Path** フィールドです。ほかの環境では、**Base Options** 内に `basePath` を追加してください。
ChatCometAPI の chatflow では `https://api.cometapi.com` を使わないでください。これは、chat ノードが `/v1` 配下の OpenAI 互換 `/chat/completions` ルートを呼び出すためです。
[CometAPI console](https://www.cometapi.com/console/token) からキーをコピーし直し、新しい Flowise credential を作成して、chatflow がその credential を使用していることを確認してください。同じキーが直接の API 呼び出しでは動作するのに Flowise では失敗する場合は、Flowise がまだノードに紐付いた古い credential を使っていないか確認してください。
ChatCometAPI ノード内の model ID の値を、[CometAPI Models page](/ja/overview/models) にある現在有効な正確なテキスト model ID に置き換えてください。値には引用符、provider プレフィックス、表示ラベル、末尾の空白を含めないでください。
ChatCometAPI はテキストワークフロー向けのチャットモデルノードです。チャット、チェーン、エージェント、RAG の回答生成に使用してください。この Flowise セットアップを画像生成ノードや画像専用ワークフローに使用しないでください。
まず、完全な chatflow をテストする前に、Document Store の検索クエリをテストしてください。検索結果が弱い場合は、text splitter、chunk size、chunk overlap、metadata filters、**Top K** を調整してください。引用が欠けている場合は、**Conversational Retrieval QA Chain** で **Return Source Documents** を有効にしてください。
embedding provider、ベクトルストア、ベクトル次元が一致していることを確認してください。Flowise Cloud のベクトルストアでは、多くの場合、到達可能な独自のサービス URL と credentials が必要です。`localhost` のようなローカル専用のベクトルストア URL は、Flowise Cloud からは到達できません。Record Manager は任意ですが、有効にする場合は、そのデータベース接続も個別に設定してください。
取得の **Top K** を下げる、プロンプト(Prompt)サイズを減らす、より小さい chunk を使う、または ChatCometAPI ノードにより高速な model ID を選んでください。rate limit の場合は、少し待ってから、より低い同時実行数で再試行し、その後 CometAPI console でアカウント使用量と制限を確認してください。
## model ID を切り替える
モデルを切り替えるには、同じ CometAPI credential と base path を維持したまま、ChatCometAPI の model ID フィールドのみを変更します。
正確な model ID は [CometAPI Models page](/ja/overview/models) から使用してください。表示名、プロバイダー名、余分なスペースをコピーしないでください。
| ユースケース | Model ID value |
| ---------------- | ------------------------- |
| 一般的なチャットモデルファミリー | `your-chat-model-id` |
| 推論モデルファミリー | `your-reasoning-model-id` |
| コーディングモデルファミリー | `your-coding-model-id` |
model ID を変更したら、chatflow を保存して短いテスト用プロンプトを実行します。複数の本番フローを運用している場合は、先に chatflow を複製し、各コピーにそのモデルファミリーを反映した名前を付けてください。
## 検索拡張生成を設定する
Flowise RAG は 2 つの部分で構成されます。まず **Document Stores** でドキュメントを準備して upsert し、その後、準備した retriever を chatflow に接続します。ChatCometAPI は最終回答を生成するチャットモデルです。Document Store には、Flowise がサポートするエンベディング プロバイダーと vector store も引き続き必要です。
Flowise で **Document Stores** を開き、新しいストアを作成します。**File Loader**、**PDF Loader**、**Web Scraper** など、ソースに合った document loader を追加します。ドキュメントが十分に長く chunking が必要な場合は text splitter を追加し、その後 **Process** をクリックして生成された chunks をプレビューします。
**Upsert** または **Upsert All Chunks** をクリックします。以下を選択します。
* **Embeddings**: データと vector store に対応する Flowise の embeddings node。
* **Vector Store**: Flowise が document embeddings を保存する vector database。
* **Record Manager**: 任意。繰り返し upsert する際に重複レコードを避けたい場合に使用します。
embedding model の dimension は、vector store の index dimension と一致させてください。upsert の完了後、chatflow を構築する前に、Document Store の retrieval query test を使って関連する chunks が返されることを確認します。
chatflow で **Document Store (Vector)** または **Document Store Retriever** node を追加し、処理済みの Document Store を選択します。**Top K** には、各質問ごとに Flowise に取得させたい chunks の数を設定します。
**Conversational Retrieval QA Chain** を追加し、以下を接続します。
* **Language Model** input を **ChatCometAPI** から接続。
* **Vector Store Retriever** input を Document Store retriever から接続。
* **Memory** は、chatflow で会話履歴が必要な場合のみ接続します。
回答に引用や取得したソース chunks を含めたい場合は、**Return Source Documents** を有効にします。フローを保存し、アップロードしたドキュメントにしか答えが存在しない質問をしてみてください。
## トラブルシューティング
お使いの Flowise バージョンに **ChatCometAPI** チャットモデル連携が含まれていることを確認してください。古い Flowise デプロイやカスタマイズされた Flowise デプロイでは、Flowise を更新するか、その連携が管理者によって無効化されていないか確認してください。
CometAPI の base path を `https://api.cometapi.com/v1/` に設定してください。一部の Flowise ビルドでは、これは **Base Path** フィールドです。ほかの環境では、**Base Options** 内に `basePath` を追加してください。
ChatCometAPI の chatflow では `https://api.cometapi.com` を使わないでください。これは、chat ノードが `/v1` 配下の OpenAI 互換 `/chat/completions` ルートを呼び出すためです。
[CometAPI console](https://www.cometapi.com/console/token) からキーをコピーし直し、新しい Flowise credential を作成して、chatflow がその credential を使用していることを確認してください。同じキーが直接の API 呼び出しでは動作するのに Flowise では失敗する場合は、Flowise がまだノードに紐付いた古い credential を使っていないか確認してください。
ChatCometAPI ノード内の model ID の値を、[CometAPI Models page](/ja/overview/models) にある現在有効な正確なテキスト model ID に置き換えてください。値には引用符、provider プレフィックス、表示ラベル、末尾の空白を含めないでください。
ChatCometAPI はテキストワークフロー向けのチャットモデルノードです。チャット、チェーン、エージェント、RAG の回答生成に使用してください。この Flowise セットアップを画像生成ノードや画像専用ワークフローに使用しないでください。
まず、完全な chatflow をテストする前に、Document Store の検索クエリをテストしてください。検索結果が弱い場合は、text splitter、chunk size、chunk overlap、metadata filters、**Top K** を調整してください。引用が欠けている場合は、**Conversational Retrieval QA Chain** で **Return Source Documents** を有効にしてください。
embedding provider、ベクトルストア、ベクトル次元が一致していることを確認してください。Flowise Cloud のベクトルストアでは、多くの場合、到達可能な独自のサービス URL と credentials が必要です。`localhost` のようなローカル専用のベクトルストア URL は、Flowise Cloud からは到達できません。Record Manager は任意ですが、有効にする場合は、そのデータベース接続も個別に設定してください。
取得の **Top K** を下げる、プロンプト(Prompt)サイズを減らす、より小さい chunk を使う、または ChatCometAPI ノードにより高速な model ID を選んでください。rate limit の場合は、少し待ってから、より低い同時実行数で再試行し、その後 CometAPI console でアカウント使用量と制限を確認してください。