> ## Documentation Index
> Fetch the complete documentation index at: https://apidoc.cometapi.com/llms.txt
> Use this file to discover all available pages before exploring further.
# CometAPI와 함께 Claude Desktop 사용하기
> 이 가이드를 사용해 base URL, API 키, 그리고 model 또는 provider 옵션을 설정하여 Claude Desktop을 CometAPI와 함께 구성하세요.
이 가이드를 사용해 Claude Desktop의 third-party inference용 Cowork를 CometAPI에 연결하세요. 이 구성을 사용하면 Claude Desktop이 Cowork, Projects 및 지원되는 데스크톱 워크플로에서 Claude Messages API 요청을 CometAPI로 보낼 수 있습니다.
공식 참고 자료:
* [Claude Desktop installation and setup](https://claude.com/docs/cowork/3p/installation)
* [Claude Desktop gateway configuration](https://claude.com/docs/cowork/3p/gateway)
* [Claude Desktop configuration reference](https://claude.com/docs/cowork/3p/configuration)
Claude Desktop third-party inference에는 Anthropic 호환 gateway가 필요합니다. CometAPI는 [Anthropic 메시지](/api/text/anthropic-messages) API를 통해 Claude 모델을 지원합니다.
Claude Desktop에서 전송한 콘텐츠는 CometAPI와 선택한 모델 provider에 의해 처리됩니다. 조직에서 해당 워크플로를 허용하는 경우가 아니라면 기밀 데이터를 보내지 마세요.
## 사전 요구 사항
* [claude.com/download](https://claude.com/download)에서 설치한 Claude Desktop
* **Developer mode** 및 **Configure third-party inference**가 포함된 Claude Desktop 빌드
* 활성 API 키가 있는 CometAPI 계정
* CometAPI에서 Claude 모델에 대한 접근 권한
* `https://api.cometapi.com`에 연결할 수 있는 네트워크 경로
Claude Desktop 로그인 화면에서 시작하세요. 이미 Anthropic 계정으로 로그인한 상태라면 third-party inference를 구성하기 전에 로그아웃하세요.
## 구성
Claude Desktop을 열고 로그인 화면에 머무르세요. 애플리케이션 메뉴에서 **Help** → **Troubleshooting**을 연 다음 **Enable Developer Mode**를 선택합니다.
Windows에서는 로그인 전에 메뉴에 접근하기 어려울 수 있습니다. 이메일 필드에 포커스를 두고 메뉴에 포커스가 맞춰질 때까지 `Tab`을 누른 다음 `Enter`를 누르세요.
개발자 모드가 활성화되면 **Developer** → **Configure third-party inference**를 엽니다.
구성 창이 왼쪽 사이드바에 여러 섹션과 함께 열립니다. CometAPI 설정에는 **Connection** 섹션을 사용하세요.
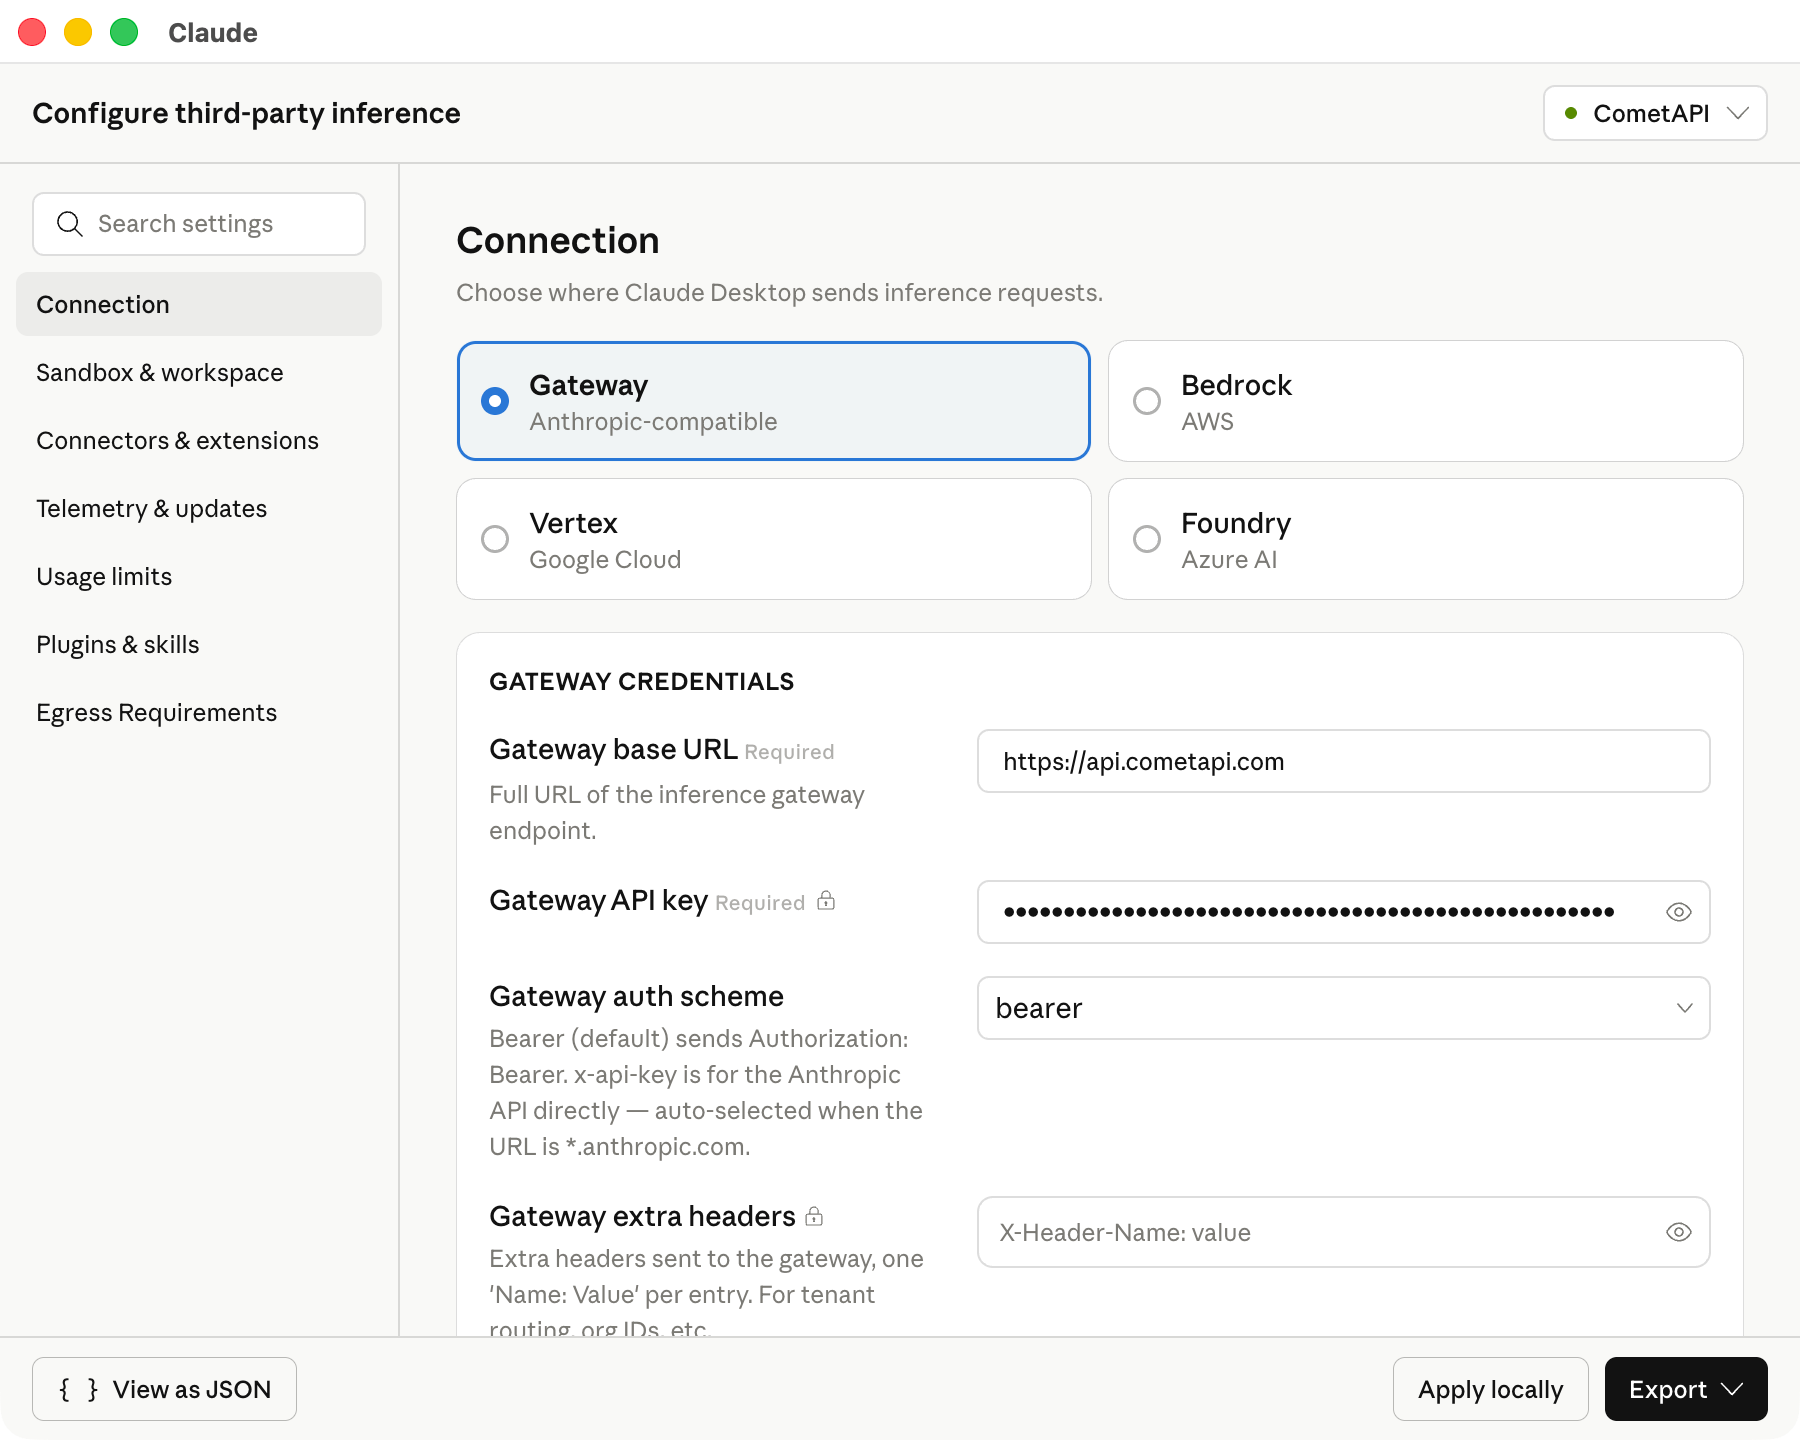
**Connection** 섹션에 아래의 CometAPI 값을 입력하세요:
| 필드 | 값 |
| -------------- | ---------------------------------- |
| 추론 제공자 | Gateway |
| Gateway | Anthropic-compatible |
| Gateway 기본 URL | `https://api.cometapi.com` |
| Gateway API 키 | `$COMETAPI_KEY`와 같은 CometAPI API 키 |
| Gateway 인증 방식 | Bearer |
| Gateway 추가 헤더 | 비워 두기 |
base URL은 표시된 그대로 정확히 유지하세요. Claude Desktop은 HTTPS base URL이 필요합니다.
다음 스크린샷은 CometAPI 값이 입력된 Connection 섹션을 보여줍니다.
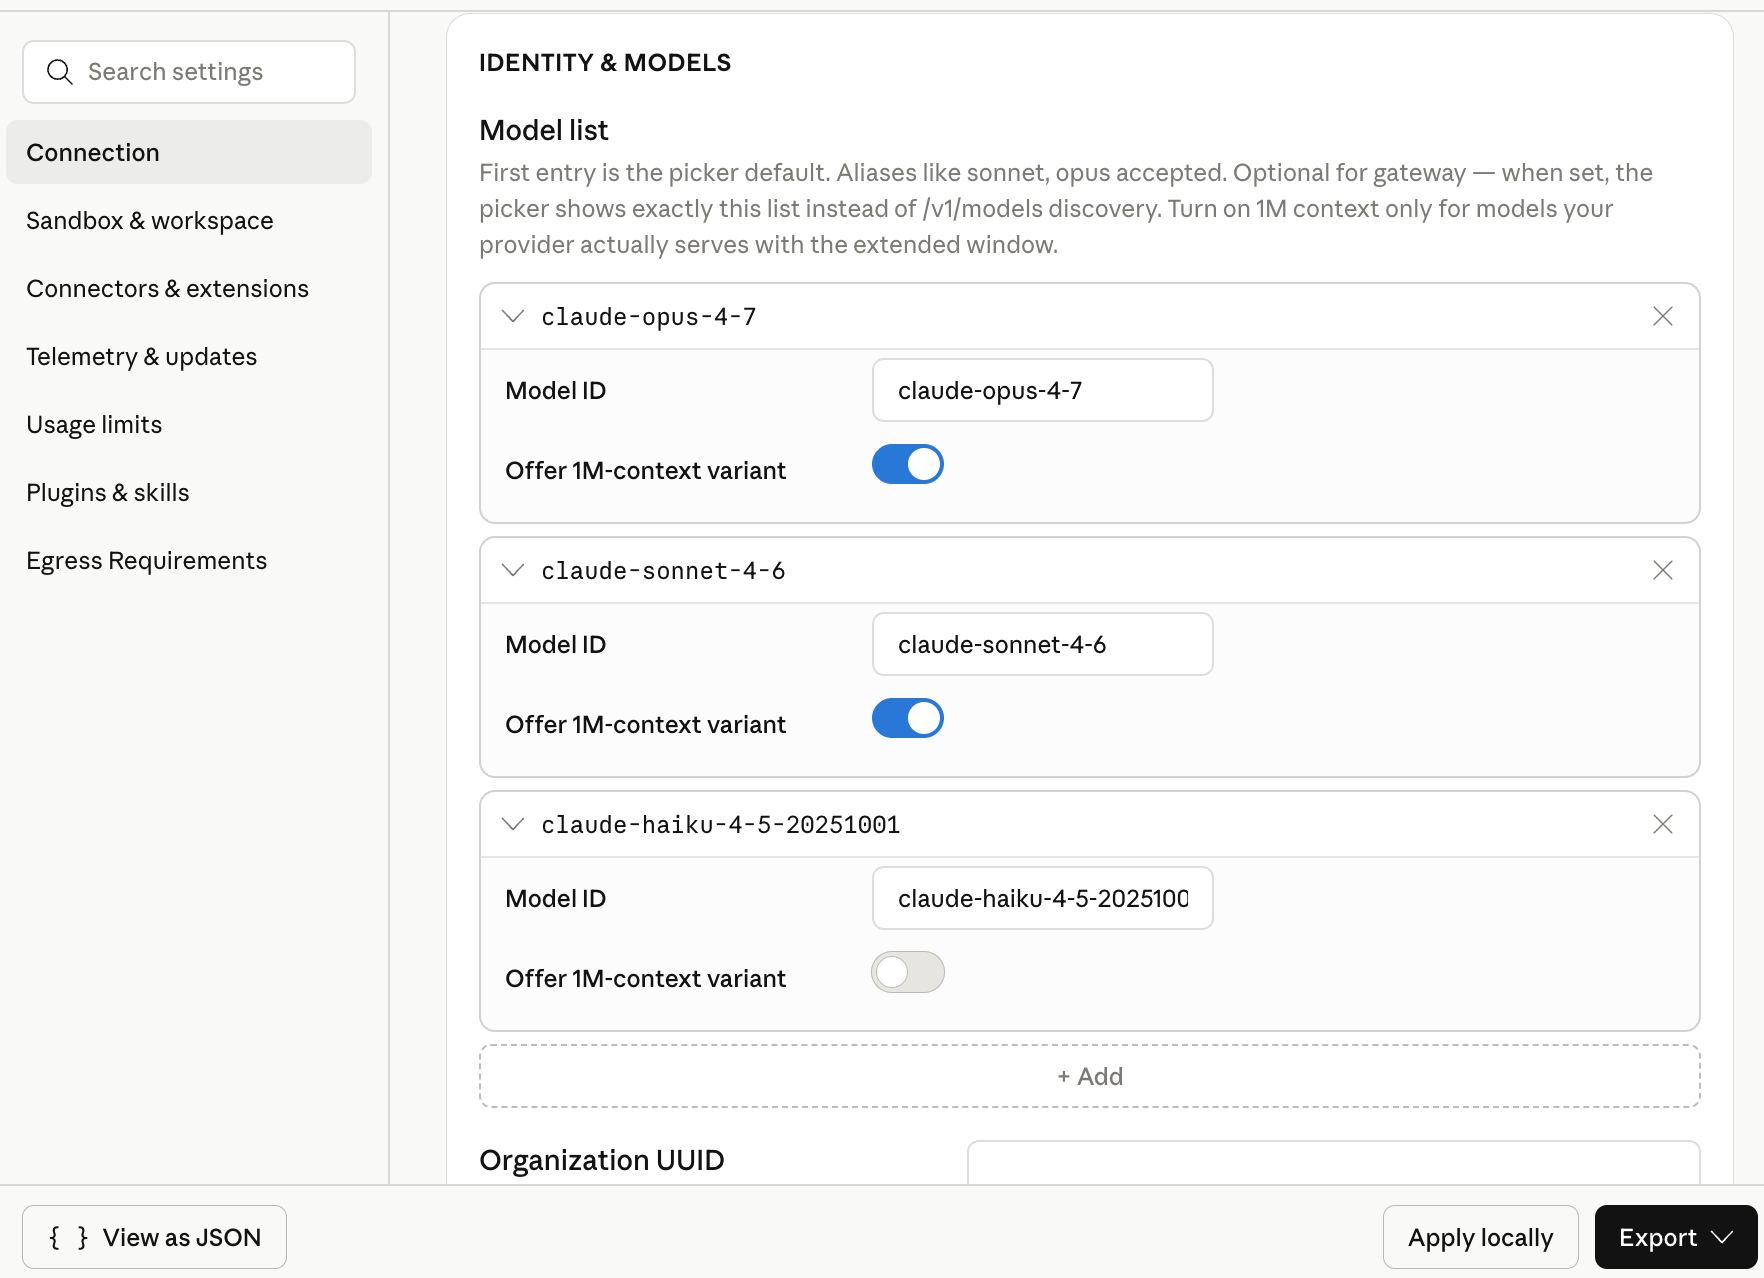
 **Model list**에 다음 model ID를 수동으로 추가하세요:
| Model ID | 권장 용도 |
| --------------------------- | ----------------------- |
| `claude-opus-4-7` | 복잡한 계획 및 에이전트 작업 |
| `claude-sonnet-4-6` | 일반적인 데스크톱 사용 |
| `claude-haiku-4-5-20251001` | 가벼운 프롬프트(Prompt)와 빠른 초안 |
목록의 첫 번째 모델이 기본 모델이 됩니다. 범용 기본값을 원한다면 `claude-sonnet-4-6`을 첫 번째에 두세요.
모델 가용성은 변경될 수 있습니다. 구성 후 Claude Desktop에 모델이 나타나지 않으면 [CometAPI Models page](/ko/overview/models)에서 접근 권한을 확인하세요.
다음 스크린샷은 CometAPI용으로 세 개의 Claude model ID가 구성된 모델 목록을 보여줍니다.
**Model list**에 다음 model ID를 수동으로 추가하세요:
| Model ID | 권장 용도 |
| --------------------------- | ----------------------- |
| `claude-opus-4-7` | 복잡한 계획 및 에이전트 작업 |
| `claude-sonnet-4-6` | 일반적인 데스크톱 사용 |
| `claude-haiku-4-5-20251001` | 가벼운 프롬프트(Prompt)와 빠른 초안 |
목록의 첫 번째 모델이 기본 모델이 됩니다. 범용 기본값을 원한다면 `claude-sonnet-4-6`을 첫 번째에 두세요.
모델 가용성은 변경될 수 있습니다. 구성 후 Claude Desktop에 모델이 나타나지 않으면 [CometAPI Models page](/ko/overview/models)에서 접근 권한을 확인하세요.
다음 스크린샷은 CometAPI용으로 세 개의 Claude model ID가 구성된 모델 목록을 보여줍니다.
 **Apply locally**를 클릭하세요. Claude Desktop은 선택한 구성을 로컬 사용자 프로필에 기록하고 앱을 다시 시작합니다.
앱이 다시 시작되지 않으면 Claude Desktop을 완전히 종료한 뒤 다시 열어보세요.
로그인 화면에서 서드파티 추론용 Cowork 옵션을 선택하세요. Cowork 또는 Projects를 열고, 구성된 Claude 모델 중 하나를 선택한 다음, 짧은 테스트 프롬프트를 보내세요.
응답이 성공적으로 반환되면 Claude Desktop이 모델 호출에 CometAPI를 사용하고 있음을 확인할 수 있습니다.
## 구성 확인
외부 도구가 필요 없는 짧은 프롬프트(Prompt)를 사용하세요:
```text theme={null}
Reply with one sentence: Claude Desktop is connected through CometAPI.
```
Claude Desktop이 응답을 반환하면 base URL, API 키, 모델 목록이 올바르게 구성된 것입니다.
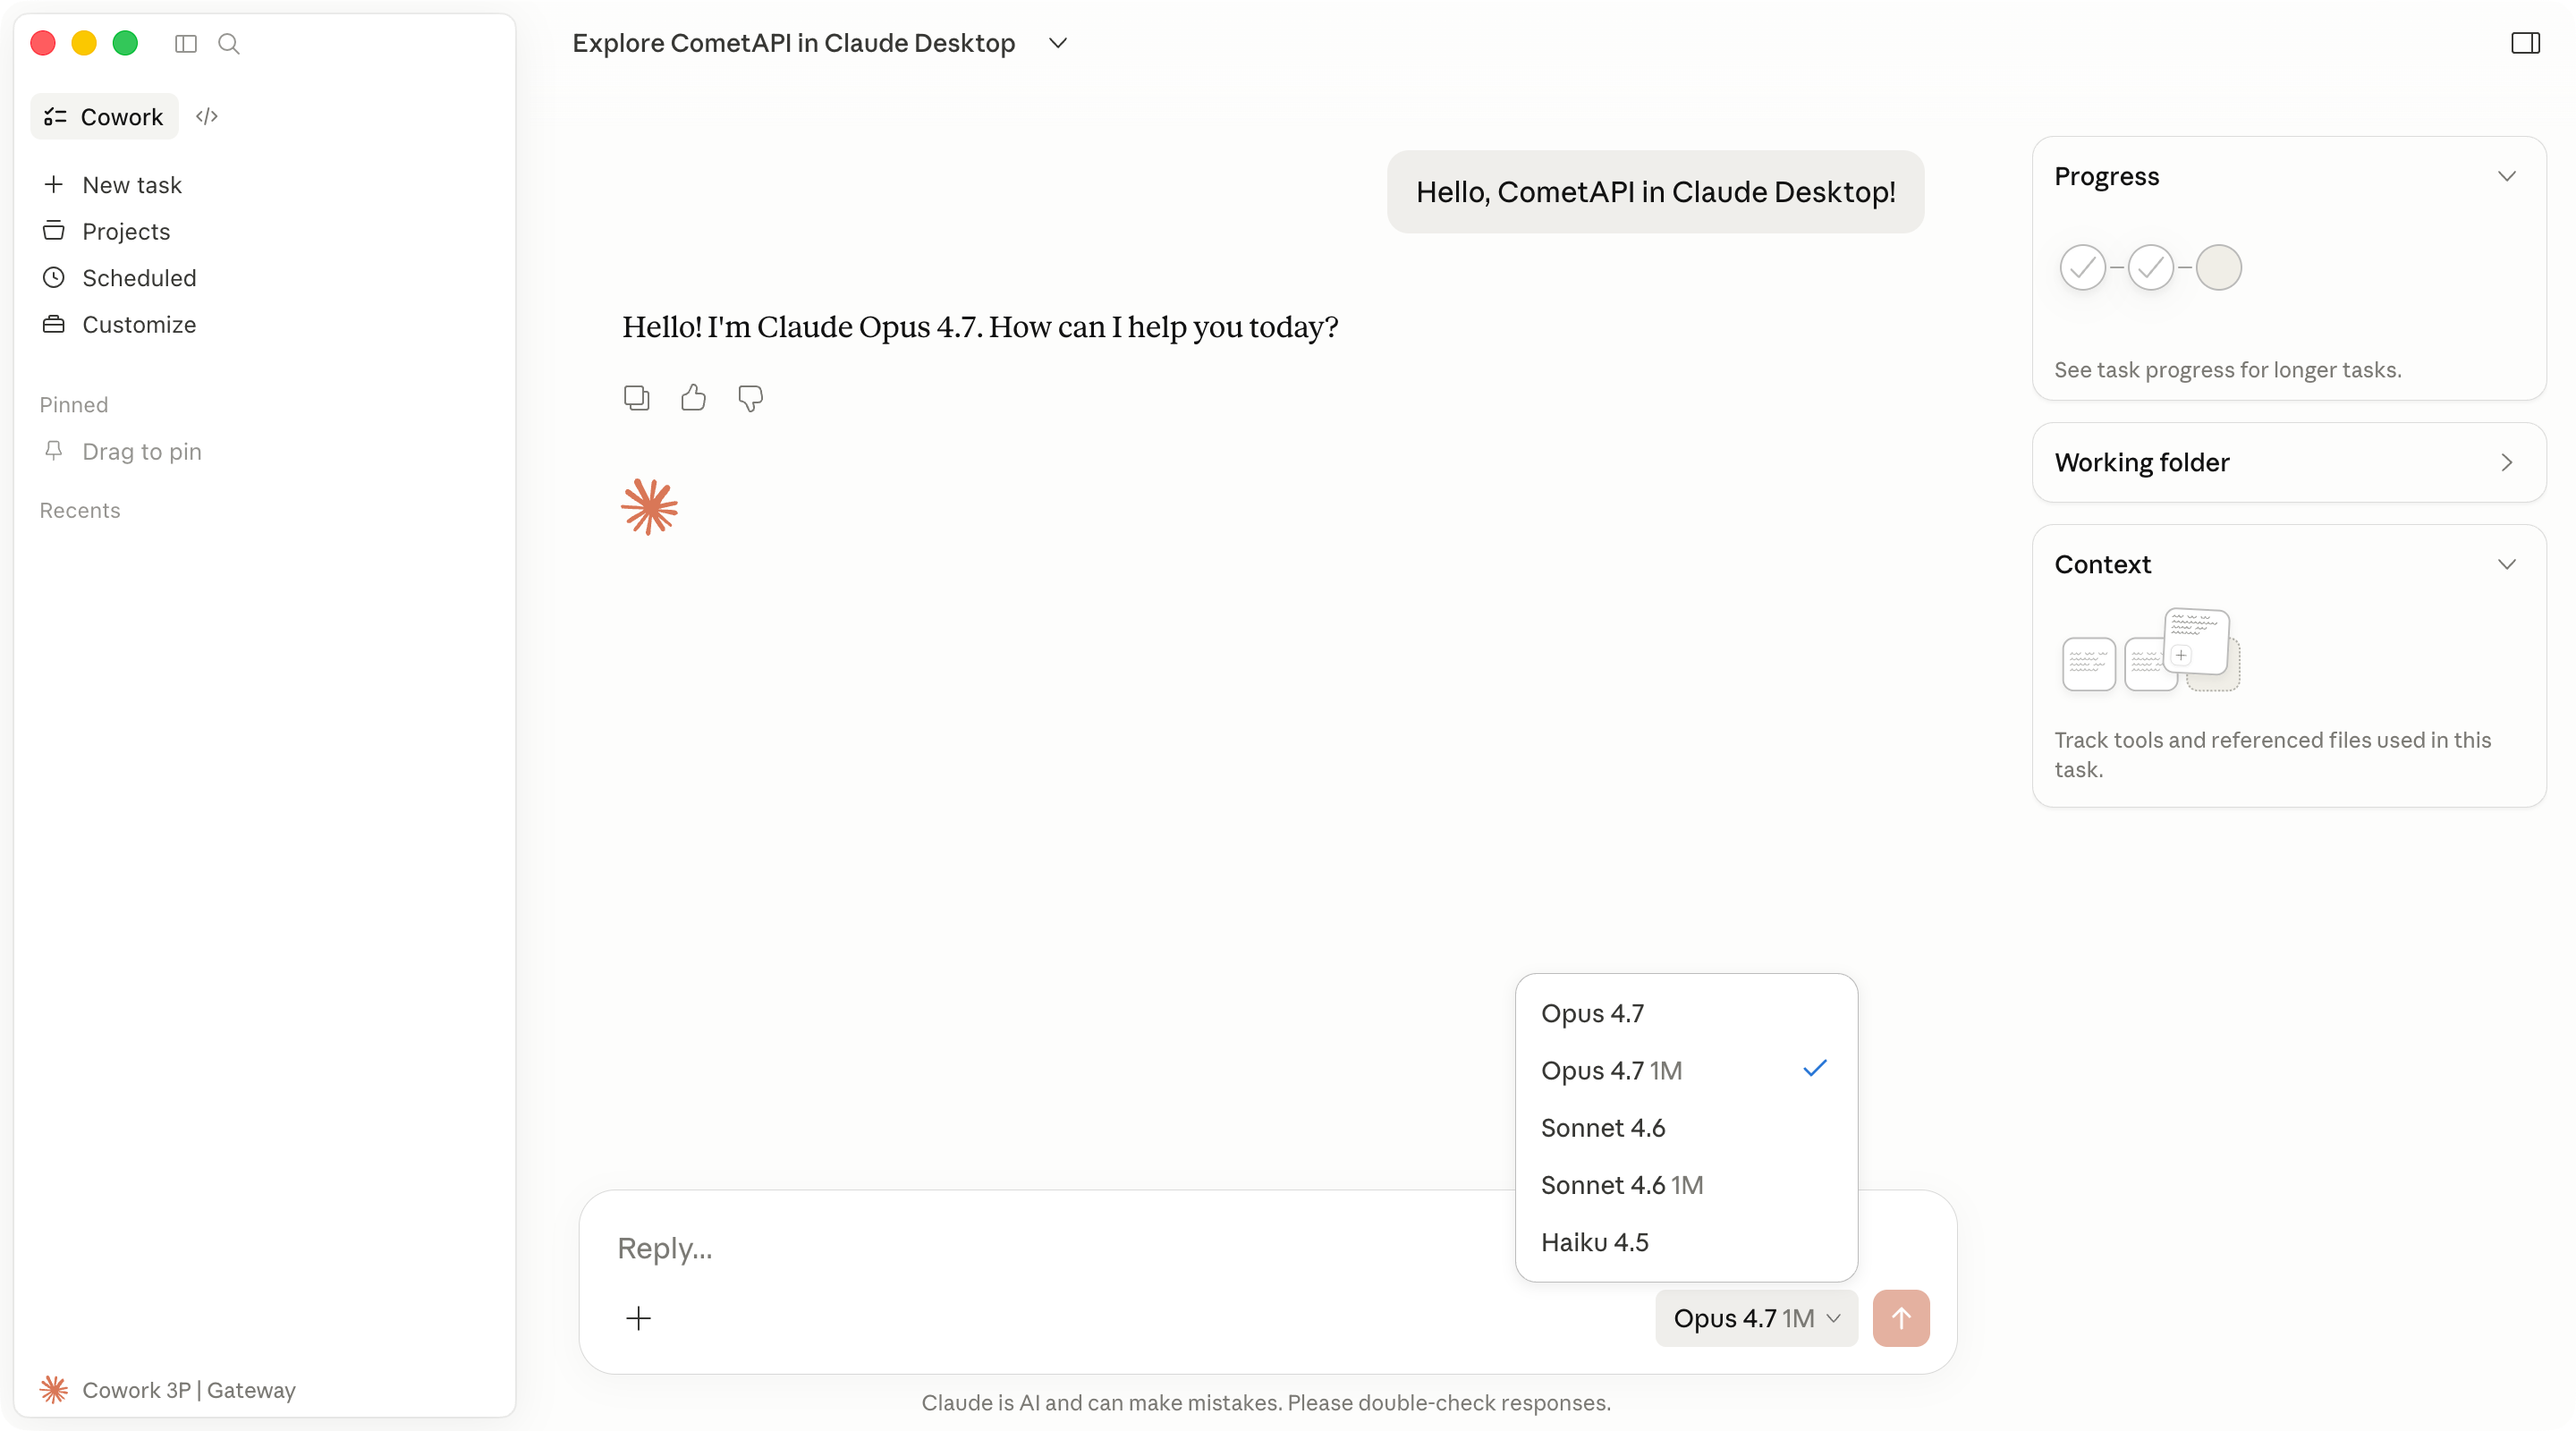
다음 스크린샷은 CometAPI를 통한 성공적인 Cowork 응답을 보여줍니다.
**Apply locally**를 클릭하세요. Claude Desktop은 선택한 구성을 로컬 사용자 프로필에 기록하고 앱을 다시 시작합니다.
앱이 다시 시작되지 않으면 Claude Desktop을 완전히 종료한 뒤 다시 열어보세요.
로그인 화면에서 서드파티 추론용 Cowork 옵션을 선택하세요. Cowork 또는 Projects를 열고, 구성된 Claude 모델 중 하나를 선택한 다음, 짧은 테스트 프롬프트를 보내세요.
응답이 성공적으로 반환되면 Claude Desktop이 모델 호출에 CometAPI를 사용하고 있음을 확인할 수 있습니다.
## 구성 확인
외부 도구가 필요 없는 짧은 프롬프트(Prompt)를 사용하세요:
```text theme={null}
Reply with one sentence: Claude Desktop is connected through CometAPI.
```
Claude Desktop이 응답을 반환하면 base URL, API 키, 모델 목록이 올바르게 구성된 것입니다.
다음 스크린샷은 CometAPI를 통한 성공적인 Cowork 응답을 보여줍니다.
 감지된 설정을 검사하려면 **Help** → **Troubleshooting** → **Copy Managed Configuration Report**를 여세요. 복사된 보고서에서는 비밀 값이 마스킹됩니다.
## 문제 해결
**Help** → **Troubleshooting** → **Enable Developer Mode**를 선택했는지 확인하세요. 그런 다음 Claude Desktop을 완전히 종료한 후 다시 여세요.
해당 옵션이 없다면, 서드파티 추론 구성 기능이 포함된 Claude Desktop 빌드를 설치하세요.
다음 항목을 확인하세요:
* **Inference provider**가 **Gateway**로 설정되어 있습니다.
* **Gateway base URL**이 `https://api.cometapi.com`입니다.
* **Gateway API key**에 추가 공백 없이 CometAPI API 키가 들어 있습니다.
* **Apply locally**를 클릭한 후 Claude Desktop을 완전히 재시작했습니다.
base URL이 `https://`로 시작하는지 확인하세요. Claude Desktop은 일반 HTTP gateway URL을 허용하지 않습니다.
또한 CometAPI 계정에 Claude 모델에 대한 액세스 권한이 있는지, 그리고 API 키가 삭제되거나 비활성화되지 않았는지도 확인하세요.
**Developer** → **Configure third-party inference**를 다시 열고 **Model list** 항목을 확인하세요. model ID는 CometAPI가 노출하는 ID와 일치해야 합니다.
각 model ID를 별도의 항목으로 추가하세요. UI 필드에 따옴표, 쉼표 또는 추가 공백을 포함하지 마세요.
이 흐름에서 Claude Desktop의 서드파티 추론은 Anthropic 호환 gateway를 기대합니다. `https://api.cometapi.com`과 위에 나열된 Claude model ID를 사용하세요.
Code 탭은 Claude Desktop 내부의 Claude Code 엔진을 사용합니다. 일부 데스크톱 설정은 Cowork에 적용되는 방식과 동일하게 Code 세션에는 적용되지 않을 수 있습니다.
독립적인 터미널 사용에 대해서는 [Claude Code integration guide](/ko/integrations/claude-code)를 참조하세요.
감지된 설정을 검사하려면 **Help** → **Troubleshooting** → **Copy Managed Configuration Report**를 여세요. 복사된 보고서에서는 비밀 값이 마스킹됩니다.
## 문제 해결
**Help** → **Troubleshooting** → **Enable Developer Mode**를 선택했는지 확인하세요. 그런 다음 Claude Desktop을 완전히 종료한 후 다시 여세요.
해당 옵션이 없다면, 서드파티 추론 구성 기능이 포함된 Claude Desktop 빌드를 설치하세요.
다음 항목을 확인하세요:
* **Inference provider**가 **Gateway**로 설정되어 있습니다.
* **Gateway base URL**이 `https://api.cometapi.com`입니다.
* **Gateway API key**에 추가 공백 없이 CometAPI API 키가 들어 있습니다.
* **Apply locally**를 클릭한 후 Claude Desktop을 완전히 재시작했습니다.
base URL이 `https://`로 시작하는지 확인하세요. Claude Desktop은 일반 HTTP gateway URL을 허용하지 않습니다.
또한 CometAPI 계정에 Claude 모델에 대한 액세스 권한이 있는지, 그리고 API 키가 삭제되거나 비활성화되지 않았는지도 확인하세요.
**Developer** → **Configure third-party inference**를 다시 열고 **Model list** 항목을 확인하세요. model ID는 CometAPI가 노출하는 ID와 일치해야 합니다.
각 model ID를 별도의 항목으로 추가하세요. UI 필드에 따옴표, 쉼표 또는 추가 공백을 포함하지 마세요.
이 흐름에서 Claude Desktop의 서드파티 추론은 Anthropic 호환 gateway를 기대합니다. `https://api.cometapi.com`과 위에 나열된 Claude model ID를 사용하세요.
Code 탭은 Claude Desktop 내부의 Claude Code 엔진을 사용합니다. 일부 데스크톱 설정은 Cowork에 적용되는 방식과 동일하게 Code 세션에는 적용되지 않을 수 있습니다.
독립적인 터미널 사용에 대해서는 [Claude Code integration guide](/ko/integrations/claude-code)를 참조하세요.