> ## Documentation Index
> Fetch the complete documentation index at: https://apidoc.cometapi.com/llms.txt
> Use this file to discover all available pages before exploring further.

# Kết nối BuildShip với CometAPI

> Sử dụng hướng dẫn này để kết nối BuildShip với CometAPI bằng cách thiết lập base URL, API key và các tùy chọn model hoặc provider.

BuildShip là một công cụ xây dựng backend trực quan theo kiểu low-code. Sử dụng node cộng đồng **CometAPI Text Generator** để thêm khả năng tạo văn bản bằng AI vào bất kỳ workflow nào.

## Điều kiện tiên quyết

* Một tài khoản CometAPI với API key đang hoạt động — [lấy tại đây](https://www.cometapi.com/console/token)
* Một tài khoản BuildShip — [đăng nhập tại đây](https://app.buildship.com)

<Steps>
  <Step title="Lấy CometAPI API key của bạn">
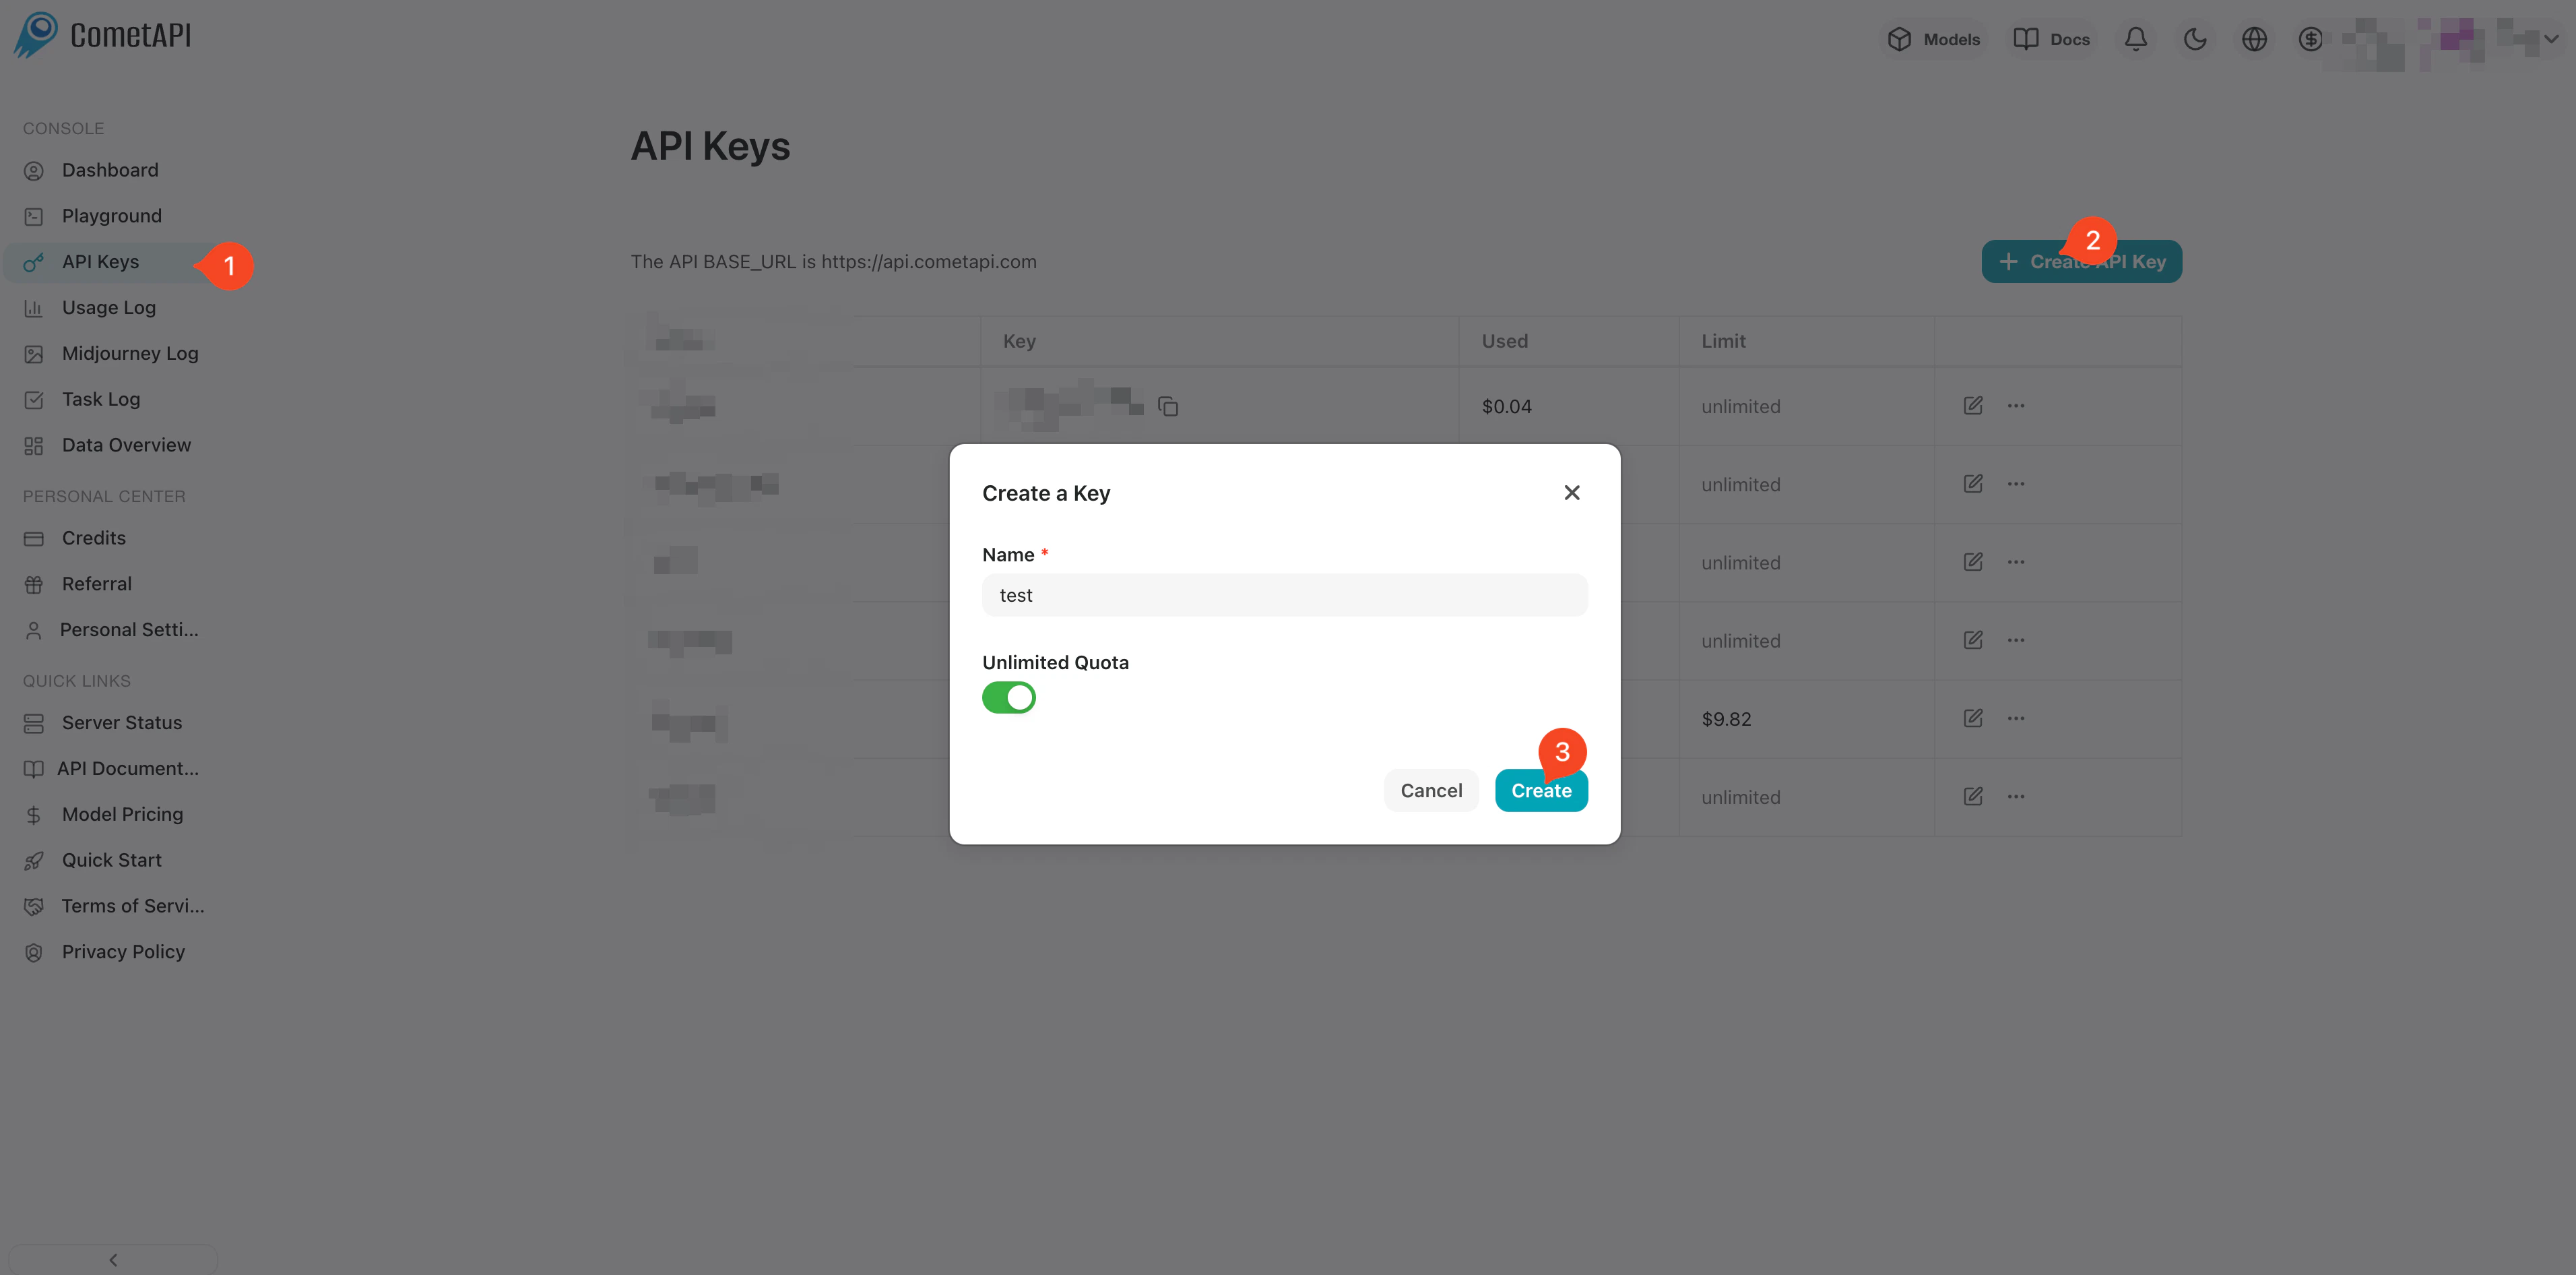
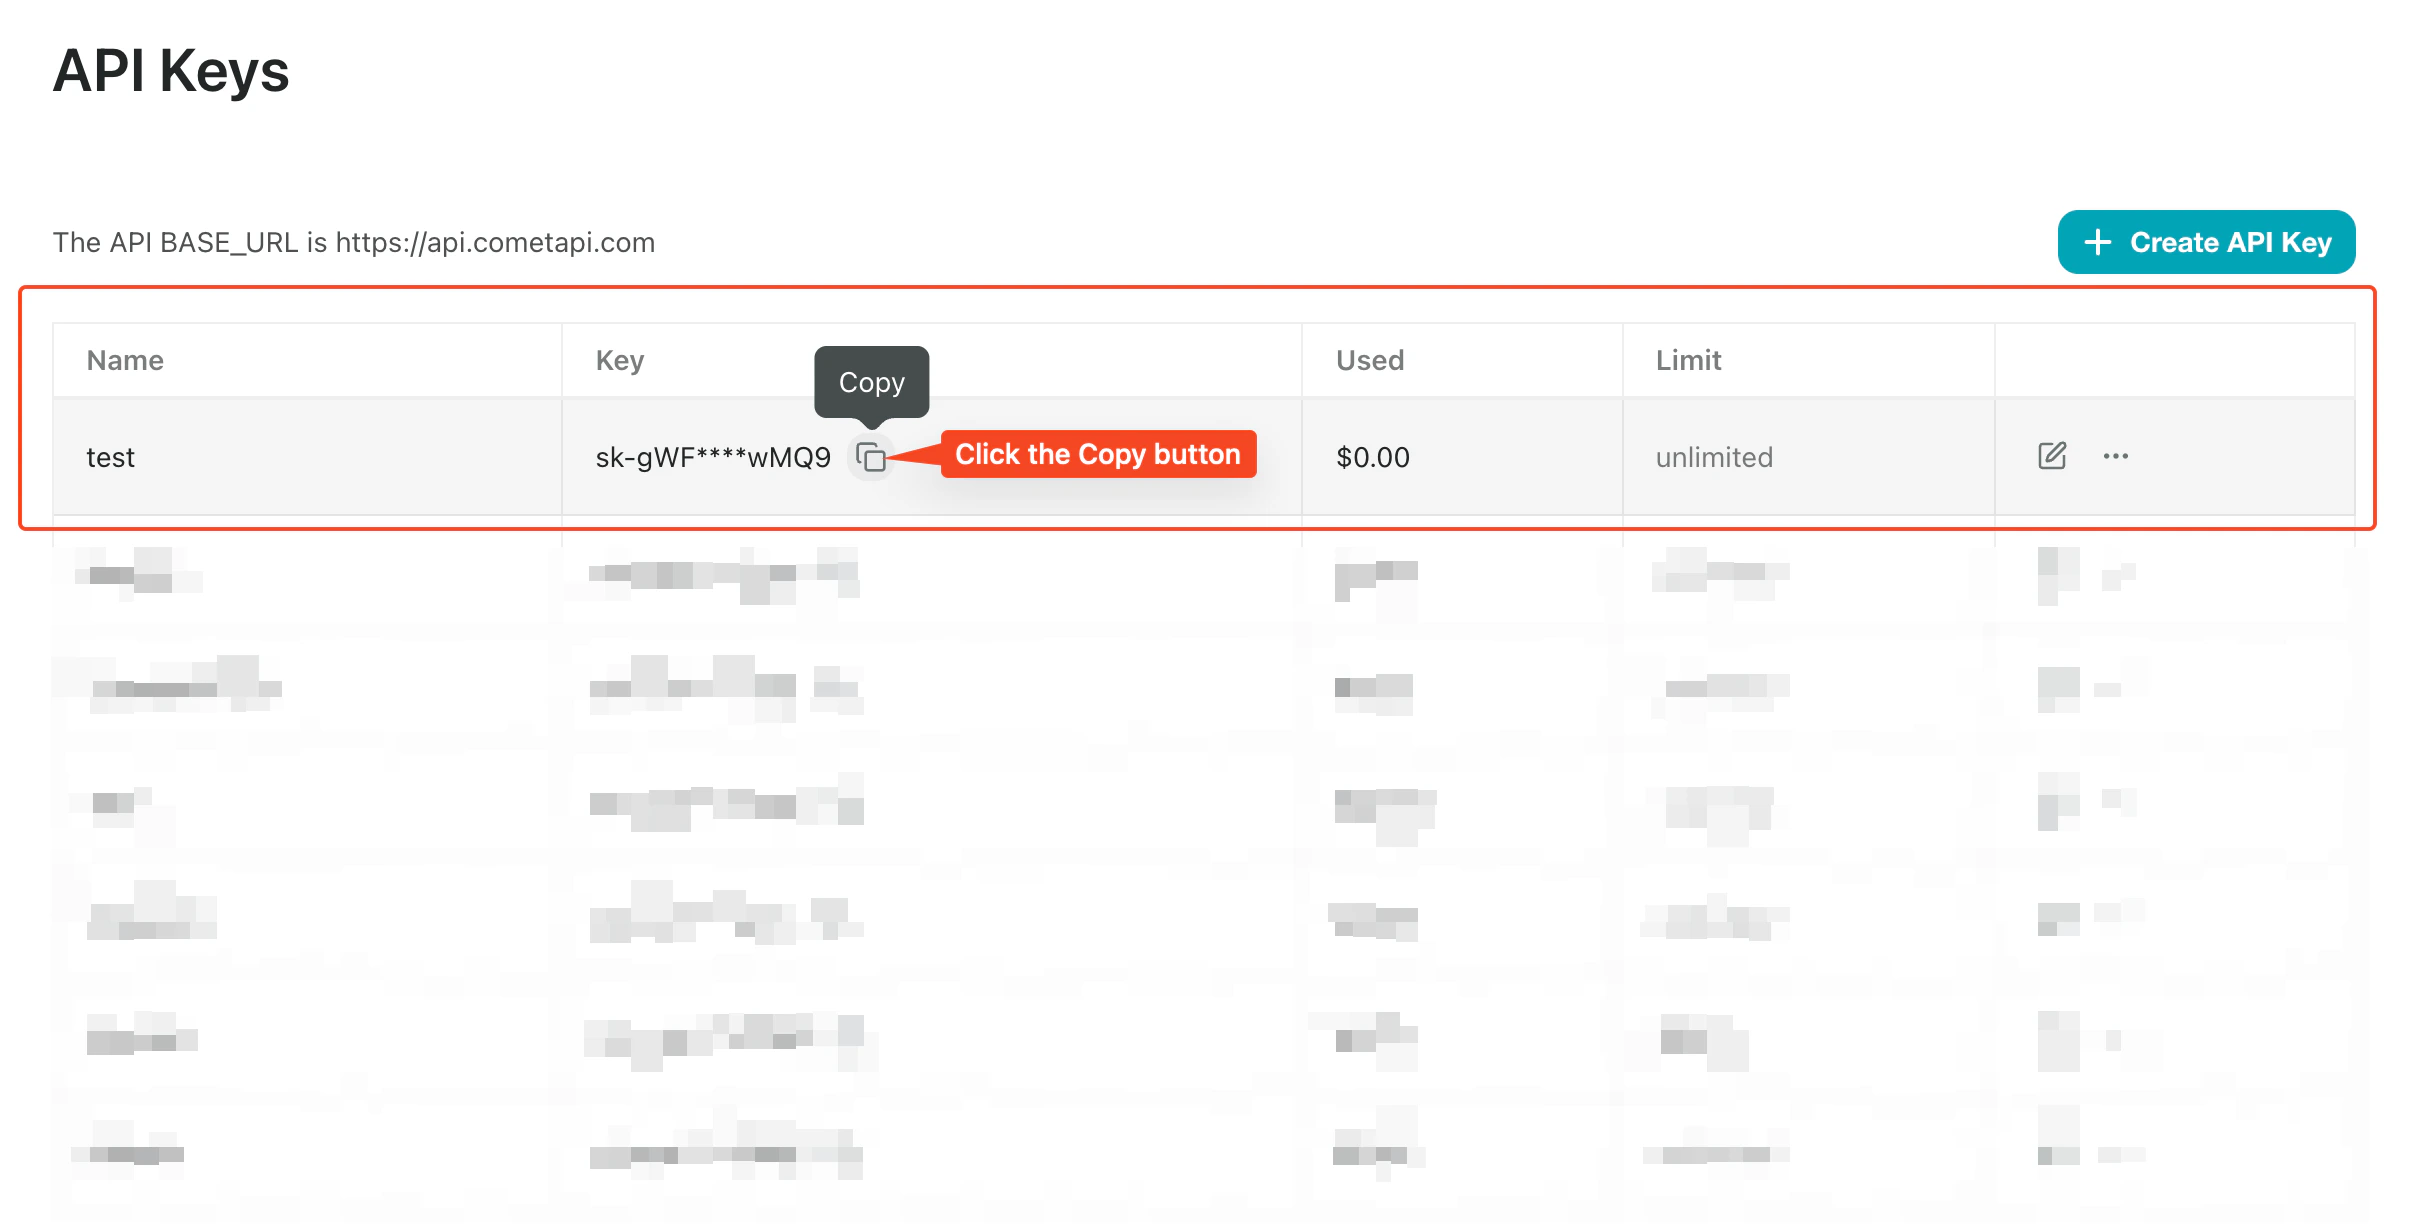
    Đăng nhập vào [bảng điều khiển CometAPI](https://www.cometapi.com/console/token). Nhấp vào **Add API Key** và sao chép CometAPI API key của bạn.
    <Frame>
      <img src="https://mintcdn.com/cometapi/SZhlxZhCnMLn__BW/images/overview/810968_364191.png?fit=max&auto=format&n=SZhlxZhCnMLn__BW&q=85&s=aef81a83f29f8eb16655ed4060425f50" alt="Bảng điều khiển CometAPI hiển thị nút Add API Key" width="3824" height="1892" data-path="images/overview/810968_364191.png" />
    </Frame>

    <Frame>
      <img src="https://mintcdn.com/cometapi/HhtmQffktazbxUvS/images/overview/810968_364193.png?fit=max&auto=format&n=HhtmQffktazbxUvS&q=85&s=d893f659267150d0faf45f99eb5dffc1" alt="Chi tiết CometAPI API key với base URL" width="2434" height="1232" data-path="images/overview/810968_364193.png" />
    </Frame>
  </Step>

  <Step title="Tạo một workflow với trigger REST API">
    1. Trong bảng điều khiển BuildShip, nhấp **Create a new workflow → From Scratch**.
    2. Trên canvas, nhấp **Add Trigger** và chọn **REST API**. Thao tác này tạo một endpoint có thể gọi được cho workflow.
  </Step>

  <Step title="Thêm node CometAPI Text Generator">
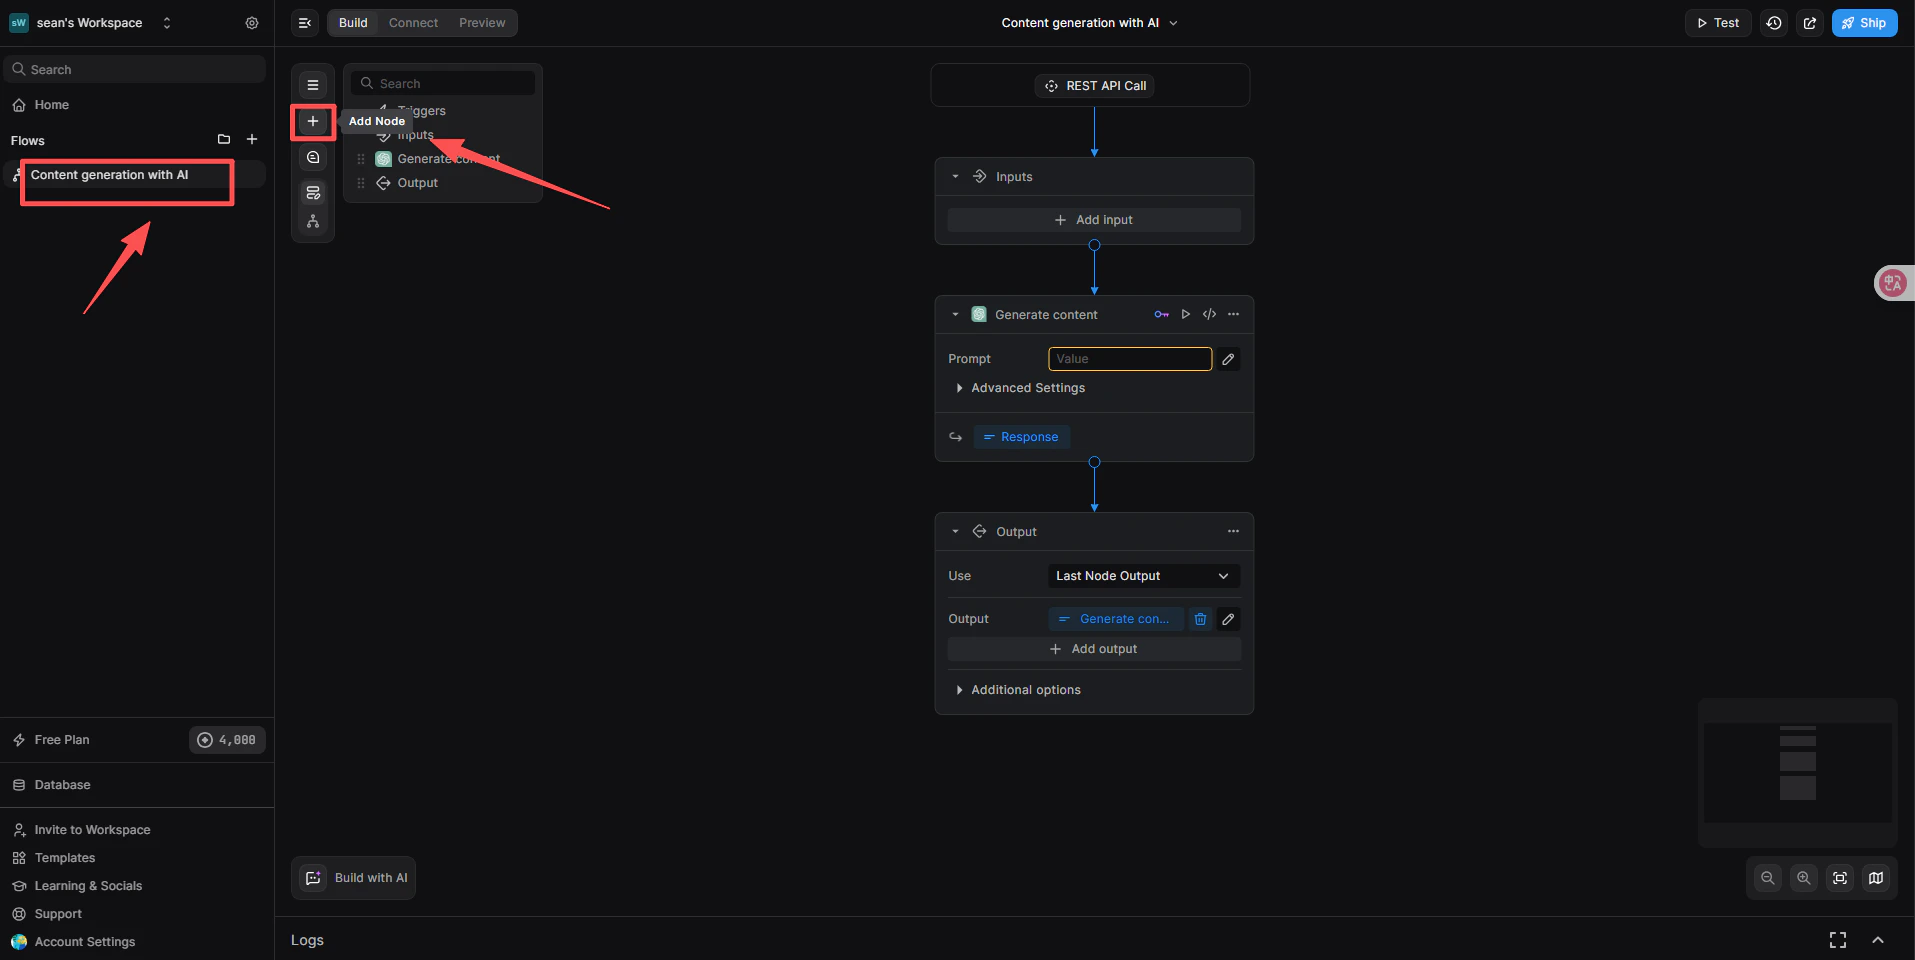
    1. Bên dưới trigger REST API, nhấp **+ Add a new step**.
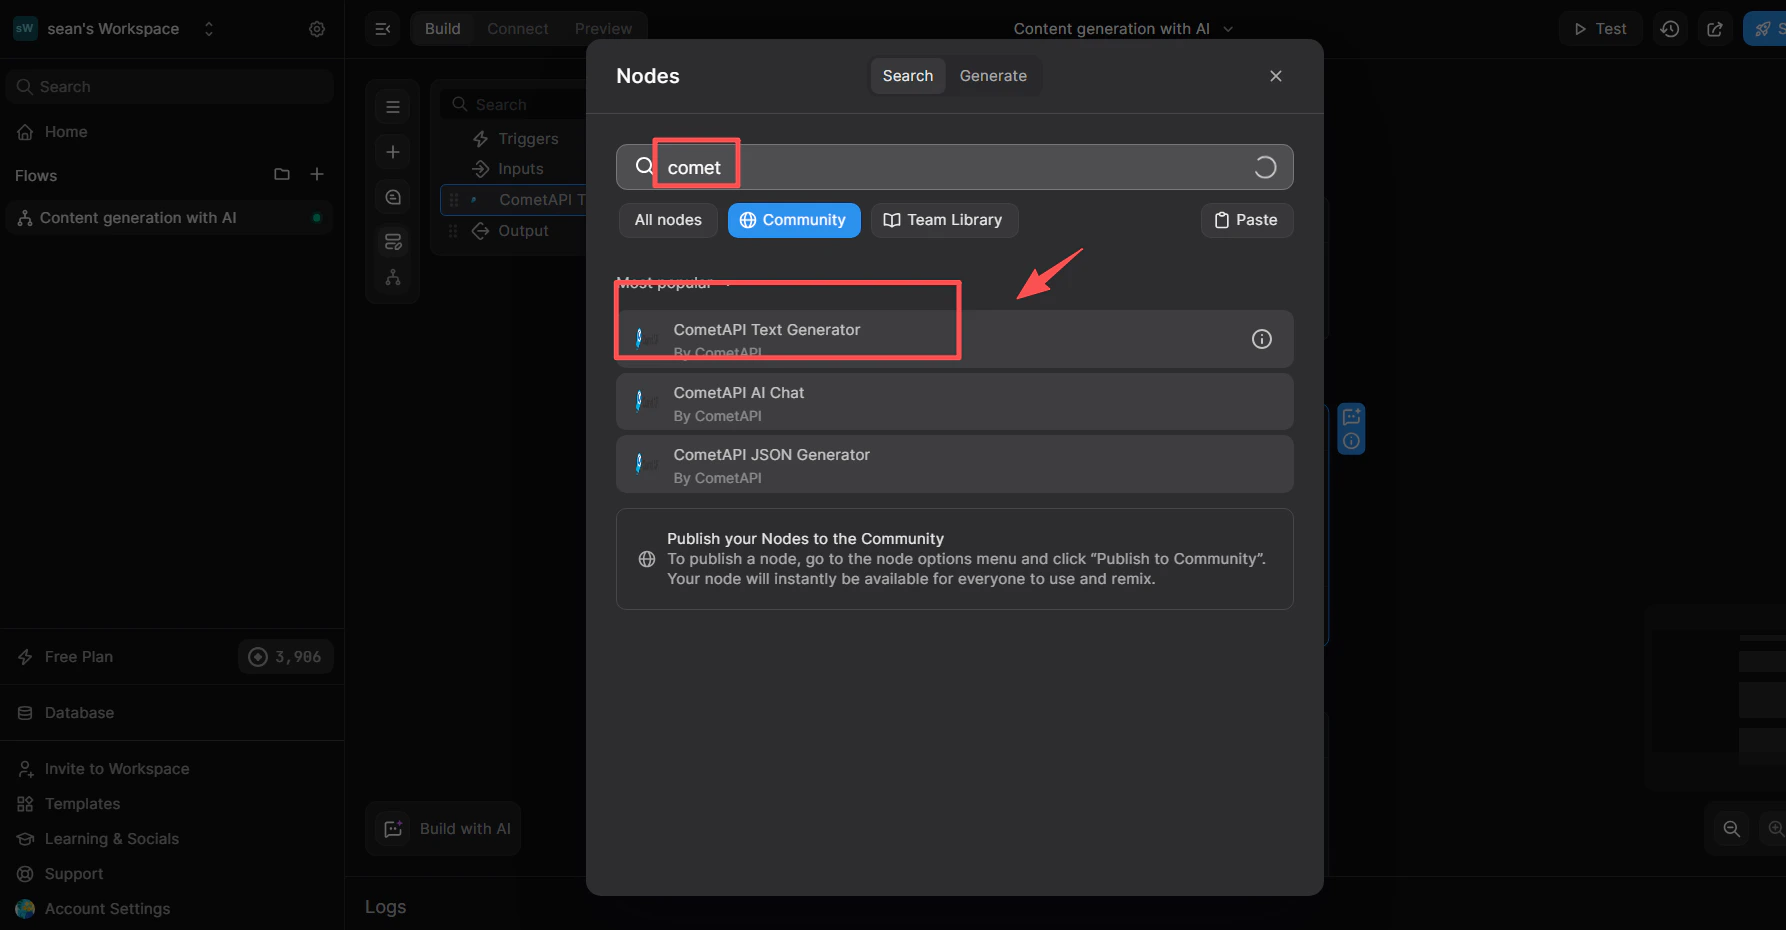
    2. Trong ô tìm kiếm của thư viện node, nhập `cometapi`.
    3. Từ danh sách **Community**, chọn **CometAPI Text Generator**.
    <Frame>
      <img src="https://mintcdn.com/cometapi/SZhlxZhCnMLn__BW/images/integrations/810968_360694.png?fit=max&auto=format&n=SZhlxZhCnMLn__BW&q=85&s=4ac17cb84e36a7f026f618e2b5229bf2" alt="Thư viện node BuildShip hiển thị CometAPI Text Generator trong kết quả tìm kiếm" width="1915" height="960" data-path="images/integrations/810968_360694.png" />
    </Frame>

    <Frame>
      <img src="https://mintcdn.com/cometapi/SZhlxZhCnMLn__BW/images/integrations/810968_360712.png?fit=max&auto=format&n=SZhlxZhCnMLn__BW&q=85&s=5da7aa2a5bef0d8a9ce45eceace876d1" alt="Node CometAPI Text Generator đã được thêm vào canvas" width="1786" height="930" data-path="images/integrations/810968_360712.png" />
    </Frame>
  </Step>

  <Step title="Liên kết integration CometAPI">
    Bước này cho node biết cần sử dụng hệ thống quản lý key nào.

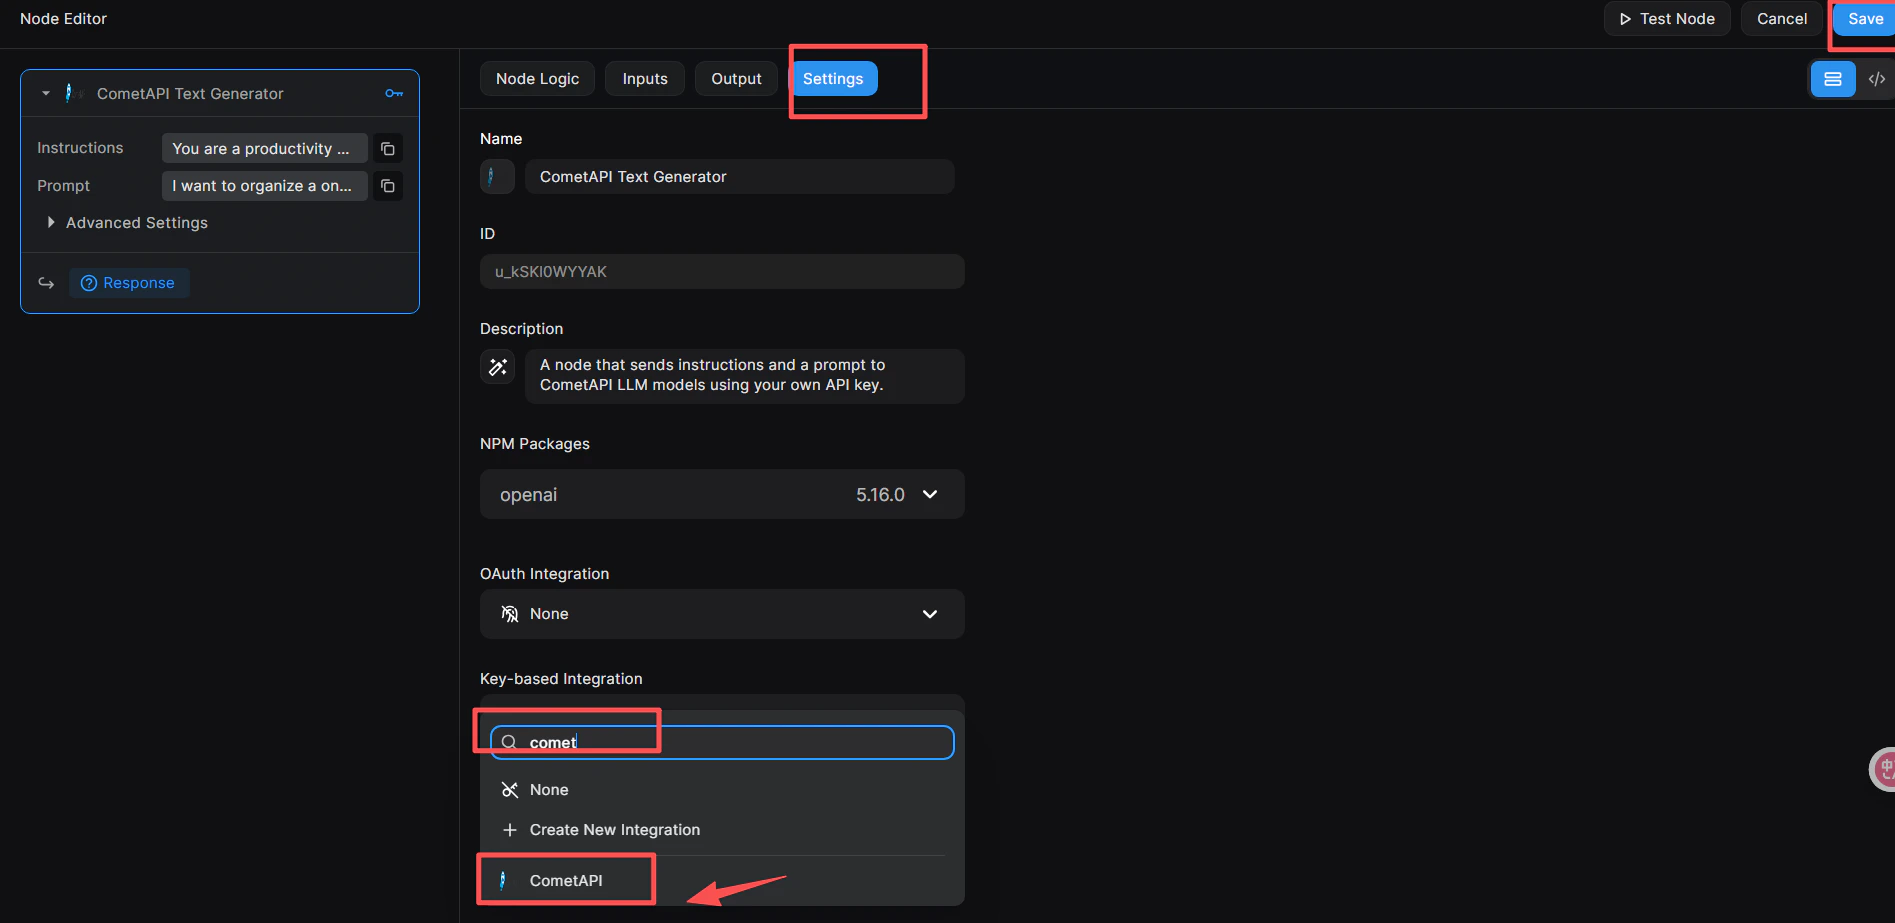
    1. Nhấp vào node để mở **Node Editor** ở bên phải.
    2. Chuyển sang tab **Settings**.
    3. Trong **Key-based Integration**, mở danh sách thả xuống và chọn **CometAPI**.
    4. Nhấp nút **Save** màu xanh ở góc trên bên phải.
    <Frame>
      <img src="https://mintcdn.com/cometapi/SZhlxZhCnMLn__BW/images/integrations/810968_360713.png?fit=max&auto=format&n=SZhlxZhCnMLn__BW&q=85&s=ceea3b9fec0cf8a1ab81f70547b0a499" alt="Tab Settings của Node Editor với Key-based Integration được đặt thành CometAPI" width="1895" height="923" data-path="images/integrations/810968_360713.png" />
    </Frame>
  </Step>

  <Step title="Thêm API key của bạn vào node">
    1. Trong Node Editor, chuyển sang tab **Inputs** (hoặc nhấp trực tiếp vào node).
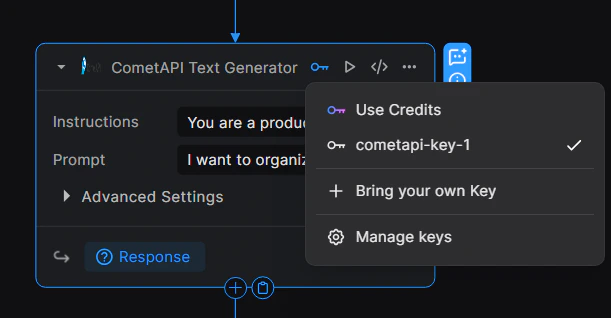
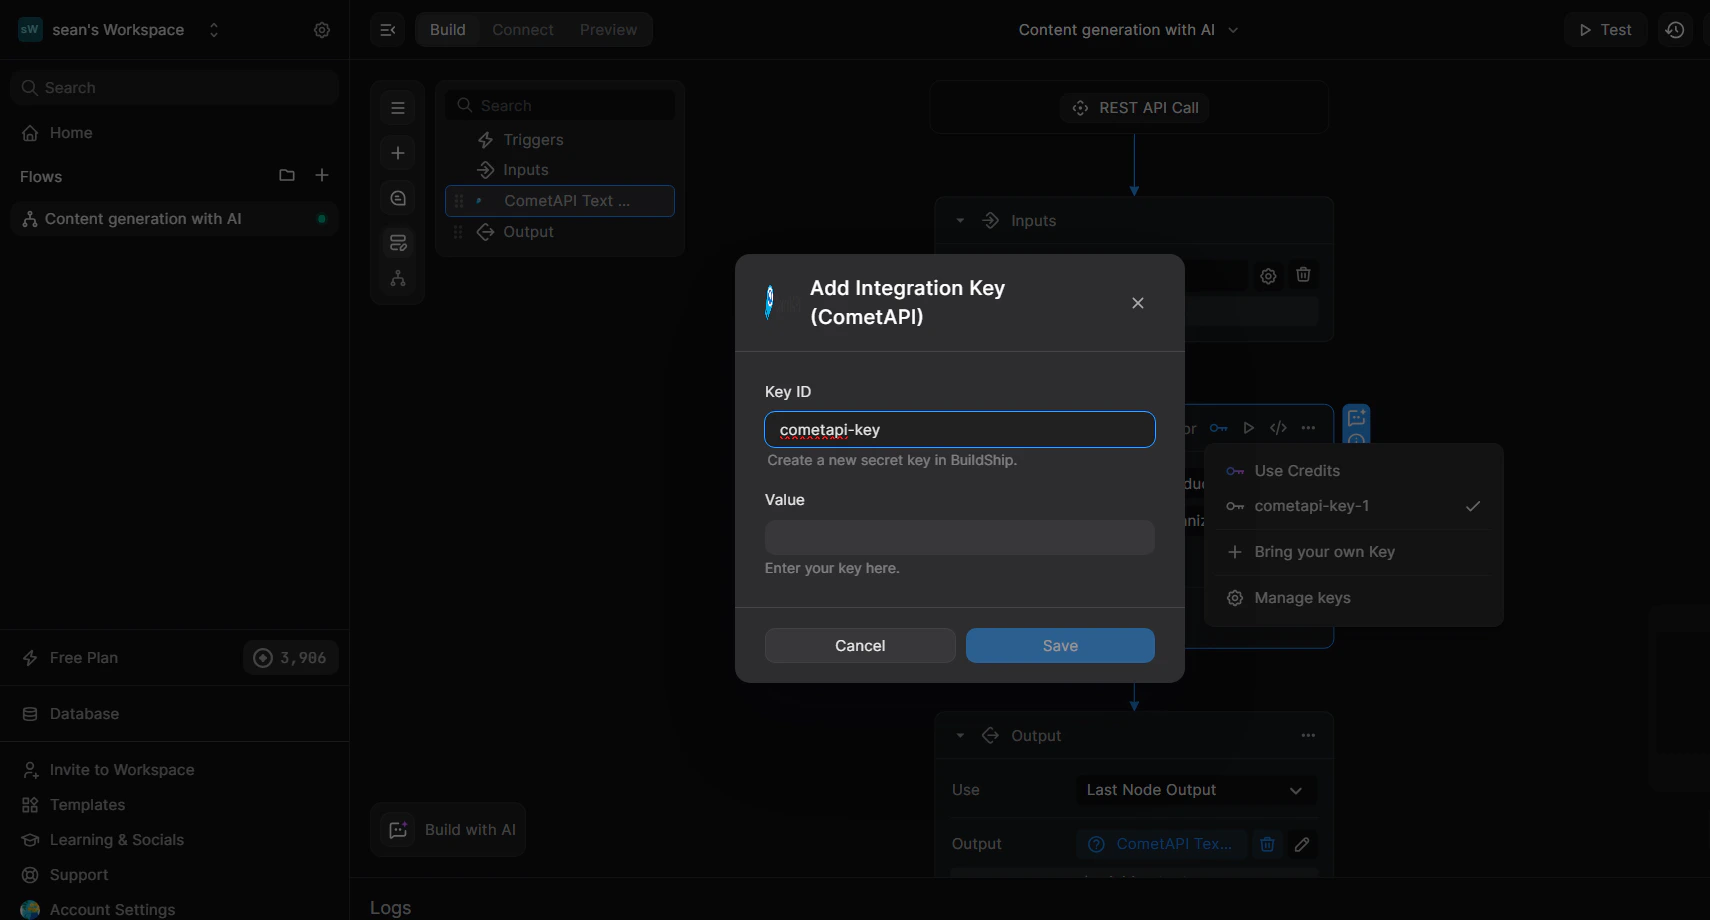
    2. Nhấp biểu tượng key 🔑 ở góc trên bên phải của node để mở danh sách key.
    3. Chọn **+ Bring your own Key**.
    4. Nhập **Key ID** (ví dụ: `cometapi-key-1`) và dán CometAPI API key của bạn vào **Value**.
    5. Nhấp **Save**.
    <Frame>
      <img src="https://mintcdn.com/cometapi/SZhlxZhCnMLn__BW/images/integrations/810968_360715.png?fit=max&auto=format&n=SZhlxZhCnMLn__BW&q=85&s=25c09a874e2a0ceadf2a83e1192323ca" alt="Hộp thoại quản lý key với các trường Key ID và Value đã được điền" width="1710" height="920" data-path="images/integrations/810968_360715.png" />
    </Frame>

    <Frame>
      <img src="https://mintcdn.com/cometapi/SZhlxZhCnMLn__BW/images/integrations/810968_360714.png?fit=max&auto=format&n=SZhlxZhCnMLn__BW&q=85&s=7a946cdb3d110605b3a9f1d7d91e022b" alt="Node hiển thị key đã được liên kết thành công" width="611" height="318" data-path="images/integrations/810968_360714.png" />
    </Frame>
  </Step>

  <Step title="Cấu hình các tham số đầu vào">
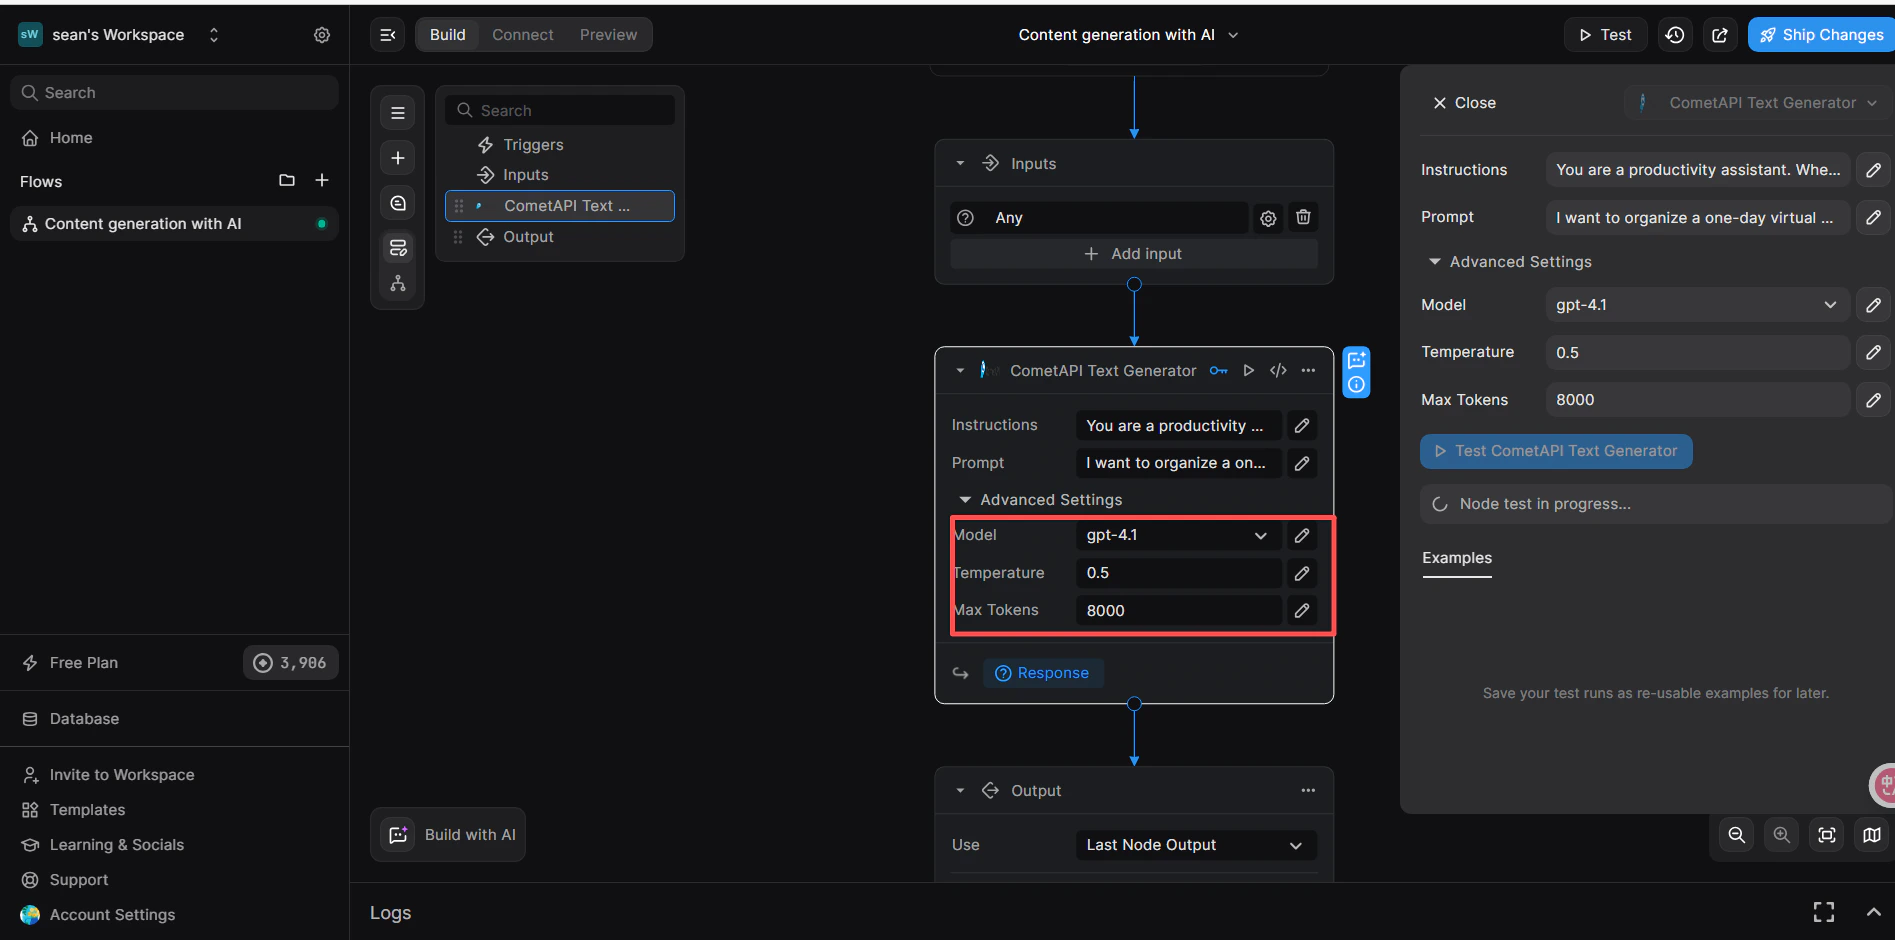
    Trong tab **Inputs** của node:

    * **Instructions** (tùy chọn): đặt vai trò hệ thống, ví dụ: `You are a productivity assistant.`
    * **Prompt**: nhấp biểu tượng **`</>`**, sau đó chọn **Trigger → Body → prompt** để ánh xạ phần body của request đến.
    * **Advanced → Model**: nhập model ID hiện tại mà bạn muốn sử dụng.
    <Frame>
      <img src="https://mintcdn.com/cometapi/SZhlxZhCnMLn__BW/images/integrations/810968_360716.png?fit=max&auto=format&n=SZhlxZhCnMLn__BW&q=85&s=71431b9496c396bbe5fa8d529ca57b27" alt="Node CometAPI với Instructions, Prompt và Model đã được cấu hình" width="1895" height="940" data-path="images/integrations/810968_360716.png" />
    </Frame>
  </Step>

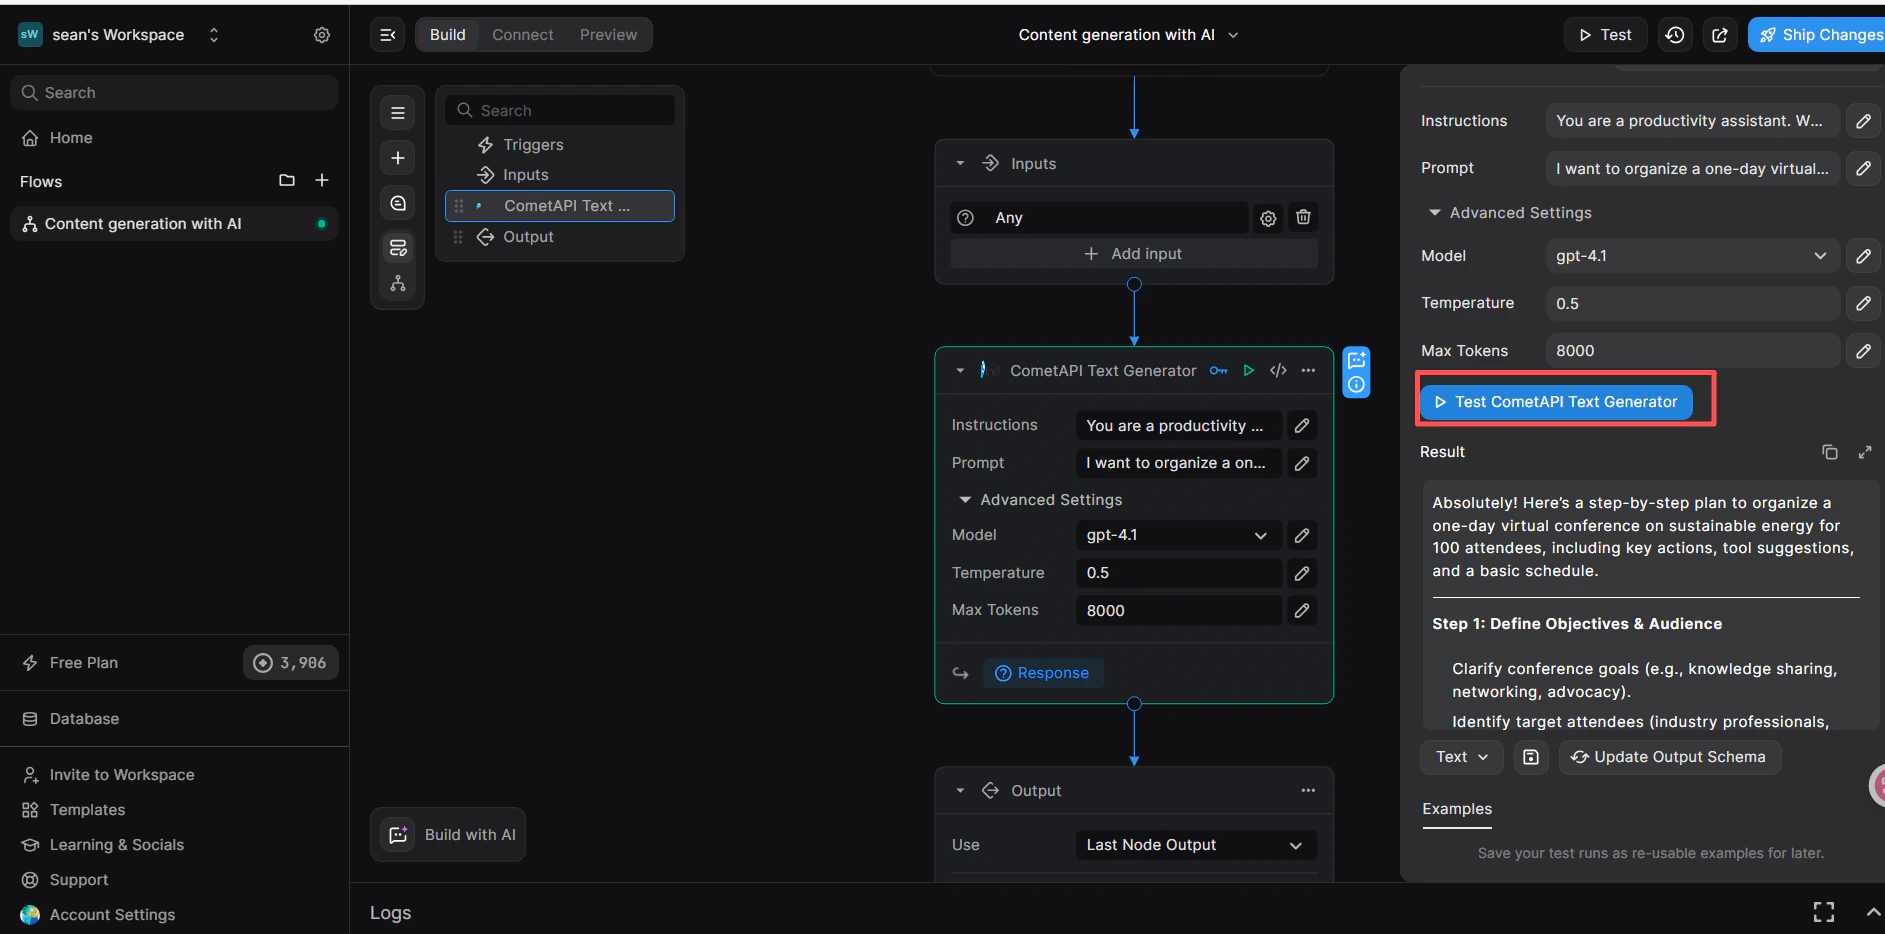
  <Step title="Thêm node Return Response và kiểm thử">
    1. Bên dưới node CometAPI, nhấp **+ Add a new step** và chọn **Return Response**.
    2. Trong trường **Body**, nhấp **`</>`** và chọn biến `response` từ node CometAPI Text Generator.
    3. Nhấp **Test** ở góc trên bên phải, chọn định dạng đầu vào **JSON**, rồi gửi:

    ```json theme={null}
    {
      "prompt": "hi"
    }
    ```

    4. Phản hồi thành công trong bảng **Result** xác nhận rằng workflow đang hoạt động.
    <Frame>
      <img src="https://mintcdn.com/cometapi/SZhlxZhCnMLn__BW/images/integrations/810968_360717.png?fit=max&auto=format&n=SZhlxZhCnMLn__BW&q=85&s=561ea8bcdfd96a014dab4476840ee377" alt="Bảng kiểm thử BuildShip hiển thị phản hồi CometAPI thành công" width="1885" height="934" data-path="images/integrations/810968_360717.png" />
    </Frame>

    Nếu lệnh gọi thất bại, hãy kiểm tra API key của bạn và đảm bảo Key-based Integration được đặt là **CometAPI**, hoặc liên hệ [bộ phận hỗ trợ CometAPI](https://www.cometapi.com).
  </Step>
</Steps>

<Tip>
  Bước **Key-based Integration** (liên kết node với CometAPI) là bắt buộc — nếu bỏ qua, sẽ xảy ra lỗi xác thực ngay cả khi API key của bạn là chính xác.
</Tip>

<script type="application/ld+json">
  {`
    {
    "@context": "https://schema.org",
    "@graph": [
      {
        "@type": "HowTo",
        "@id": "https://apidoc.cometapi.com/integrations/buildship#howto",
        "name": "Kết nối BuildShip với CometAPI",
        "description": "Sử dụng hướng dẫn này để kết nối BuildShip với CometAPI bằng cách thiết lập base URL, API key và các tùy chọn model hoặc provider.",
        "step": [
          {
            "@type": "HowToStep",
            "@id": "https://apidoc.cometapi.com/integrations/buildship#step-1",
            "position": 1,
            "name": "Lấy CometAPI API key của bạn",
            "text": "Tạo hoặc mở tài khoản CometAPI của bạn, sau đó sao chép một API key đang hoạt động từ bảng điều khiển."
          },
          {
            "@type": "HowToStep",
            "@id": "https://apidoc.cometapi.com/integrations/buildship#step-2",
            "position": 2,
            "name": "Tạo một workflow với trigger REST API",
            "text": "Hoàn thành bước Tạo một workflow với trigger REST API trong hướng dẫn Kết nối BuildShip với CometAPI."
          },
          {
            "@type": "HowToStep",
            "@id": "https://apidoc.cometapi.com/integrations/buildship#step-3",
            "position": 3,
            "name": "Thêm node CometAPI Text Generator",
            "text": "Hoàn thành bước Thêm node CometAPI Text Generator trong hướng dẫn Kết nối BuildShip với CometAPI."
          },
          {
            "@type": "HowToStep",
            "@id": "https://apidoc.cometapi.com/integrations/buildship#step-4",
            "position": 4,
            "name": "Liên kết integration CometAPI",
            "text": "Hoàn thành bước Liên kết integration CometAPI trong hướng dẫn Kết nối BuildShip với CometAPI."
          },
          {
            "@type": "HowToStep",
            "@id": "https://apidoc.cometapi.com/integrations/buildship#step-5",
            "position": 5,
            "name": "Thêm API key của bạn vào node",
            "text": "Hoàn thành bước Thêm API key của bạn vào node trong hướng dẫn Kết nối BuildShip với CometAPI."
          },
          {
            "@type": "HowToStep",
            "@id": "https://apidoc.cometapi.com/integrations/buildship#step-6",
            "position": 6,
            "name": "Cấu hình các tham số đầu vào",
            "text": "Hoàn thành bước Cấu hình các tham số đầu vào trong hướng dẫn Kết nối BuildShip với CometAPI."
          },
          {
            "@type": "HowToStep",
            "@id": "https://apidoc.cometapi.com/integrations/buildship#step-7",
            "position": 7,
            "name": "Thêm node Return Response và kiểm thử",
            "text": "Hoàn thành bước Thêm node Return Response và kiểm thử trong hướng dẫn Kết nối BuildShip với CometAPI."
          }
        ]
      },
      {
        "@type": "BreadcrumbList",
        "itemListElement": [
          {
            "@type": "ListItem",
            "position": 1,
            "name": "Tài liệu CometAPI",
            "item": "https://apidoc.cometapi.com/"
          },
          {
            "@type": "ListItem",
            "position": 2,
            "name": "Tích hợp",
            "item": "https://apidoc.cometapi.com/integrations"
          },
          {
            "@type": "ListItem",
            "position": 3,
            "name": "Kết nối BuildShip với CometAPI",
            "item": "https://apidoc.cometapi.com/integrations/buildship"
          }
        ]
      }
    ]
    }
    `}
</script>