> ## Documentation Index
> Fetch the complete documentation index at: https://apidoc.cometapi.com/llms.txt
> Use this file to discover all available pages before exploring further.
# Sử dụng OpenClaw với CometAPI
> Sử dụng hướng dẫn này để cấu hình OpenClaw với CometAPI bằng cách thiết lập base URL, API key, và các tùy chọn model hoặc provider.
Sử dụng [CometAPI](https://www.cometapi.com) làm nhà cung cấp model cho [OpenClaw](https://openclaw.ai) — hơn 500 model trong một API.
## Điều kiện tiên quyết
* Node.js ≥ 22 — khuyến nghị cài qua [nvm](https://github.com/nvm-sh/nvm)
* Tài khoản CometAPI có API key đang hoạt động — [lấy tại đây](https://www.cometapi.com/console/token)
## Cài đặt
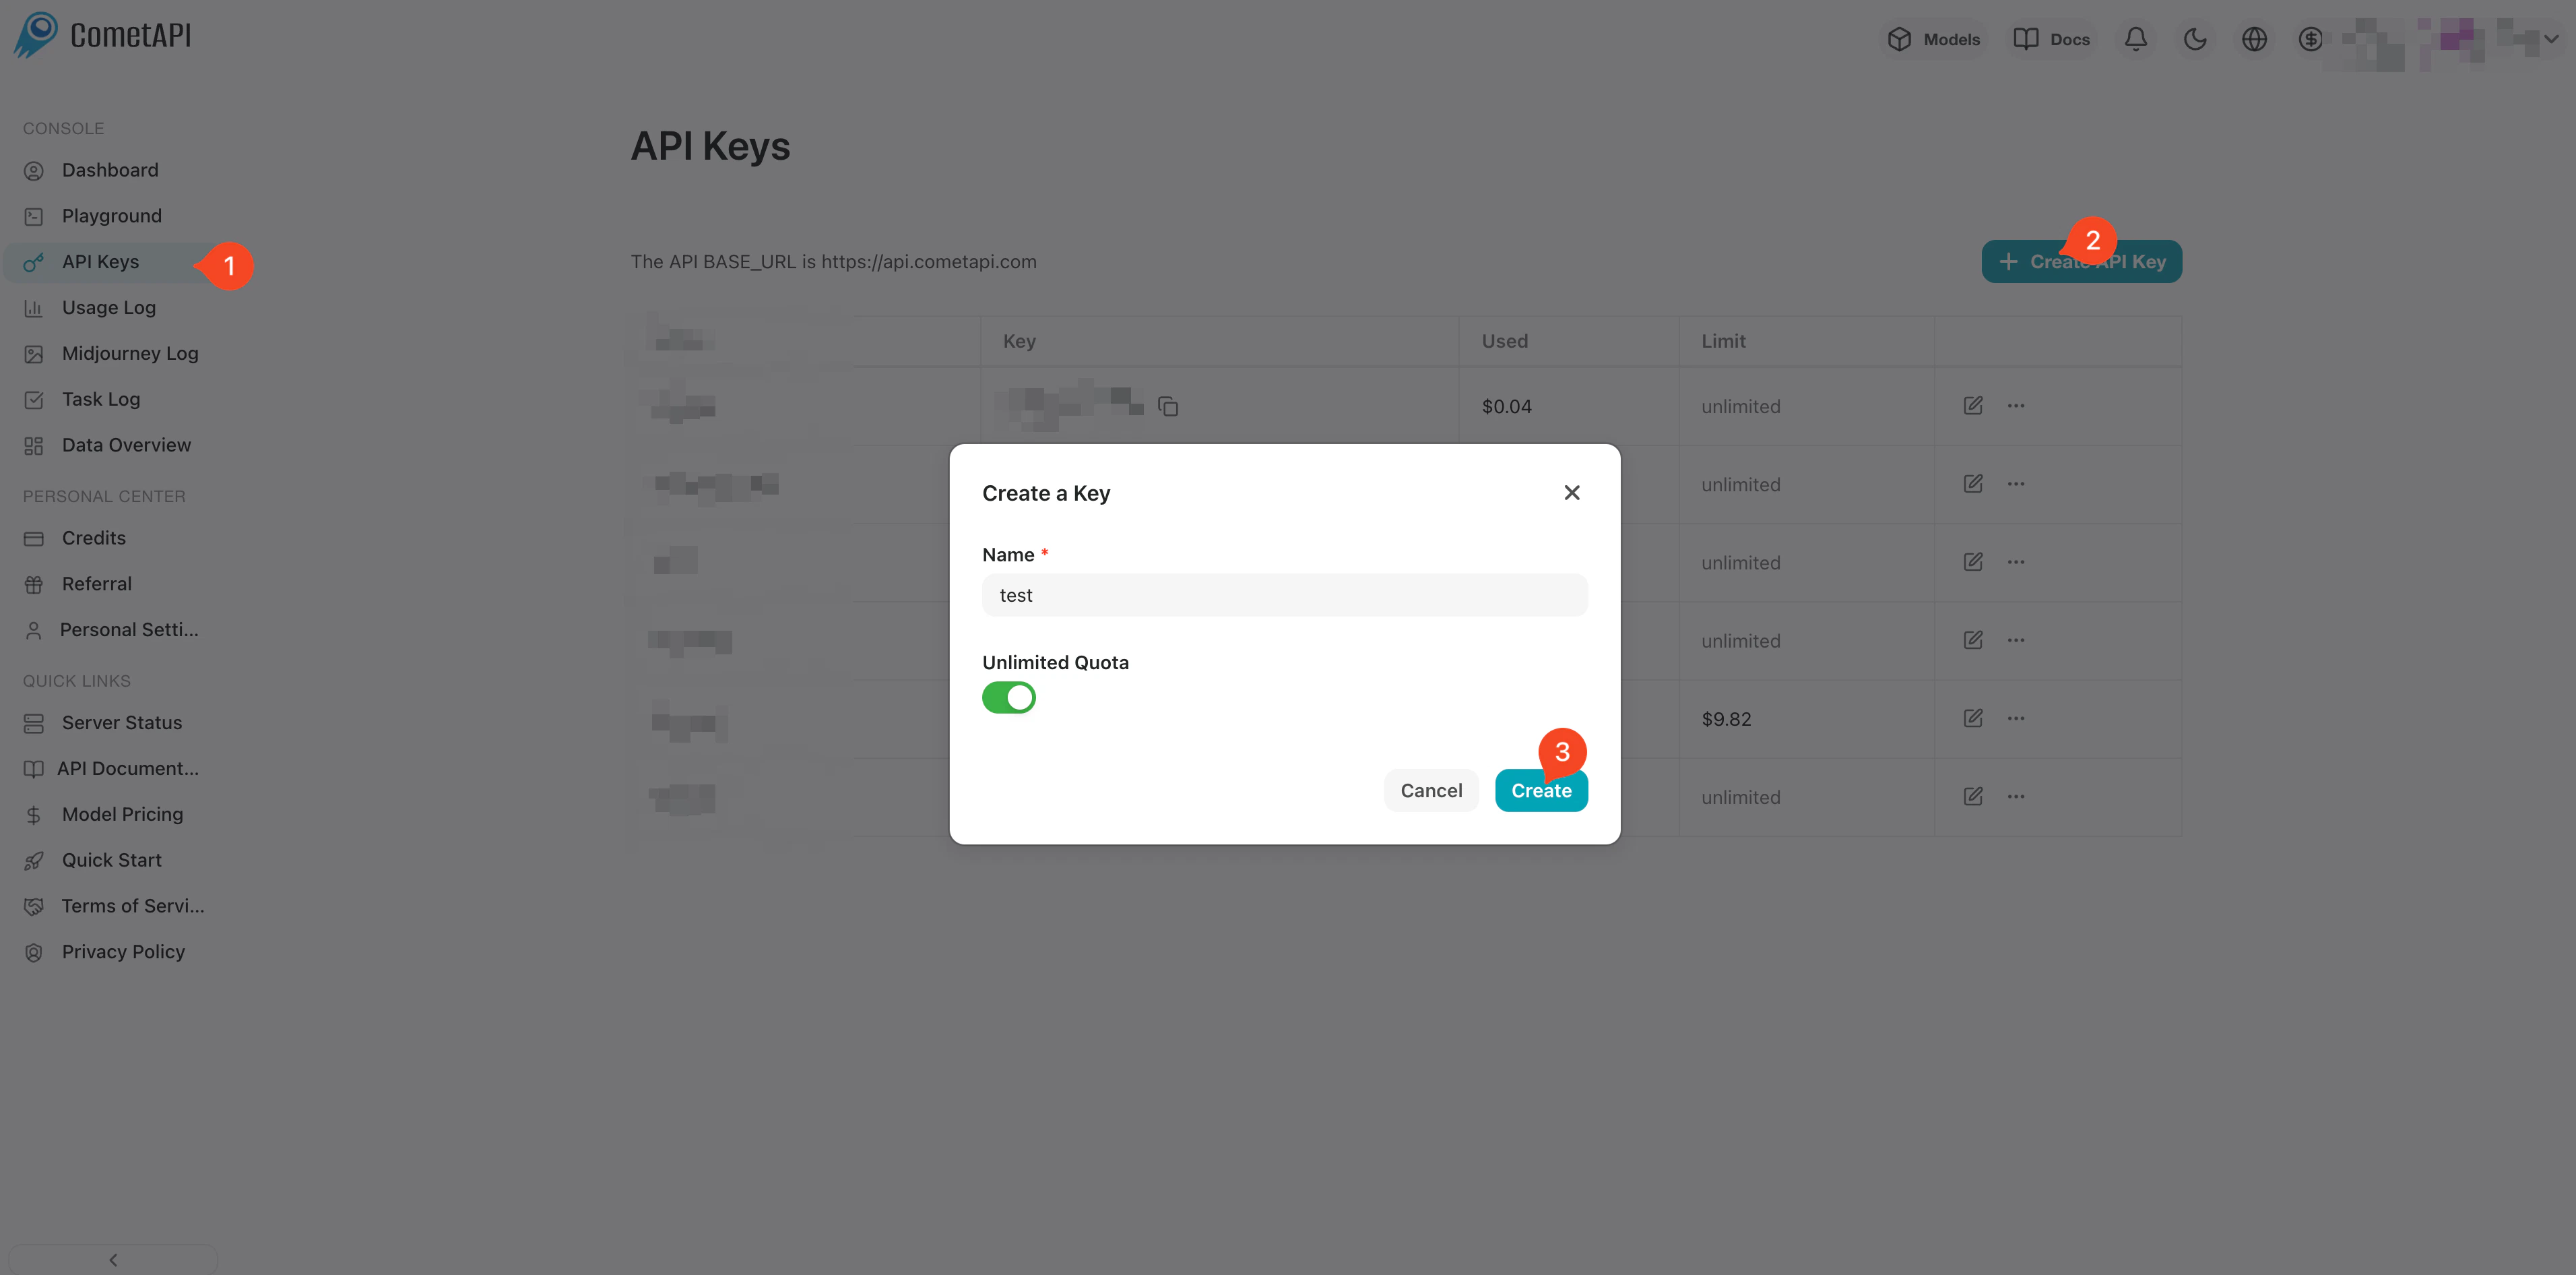
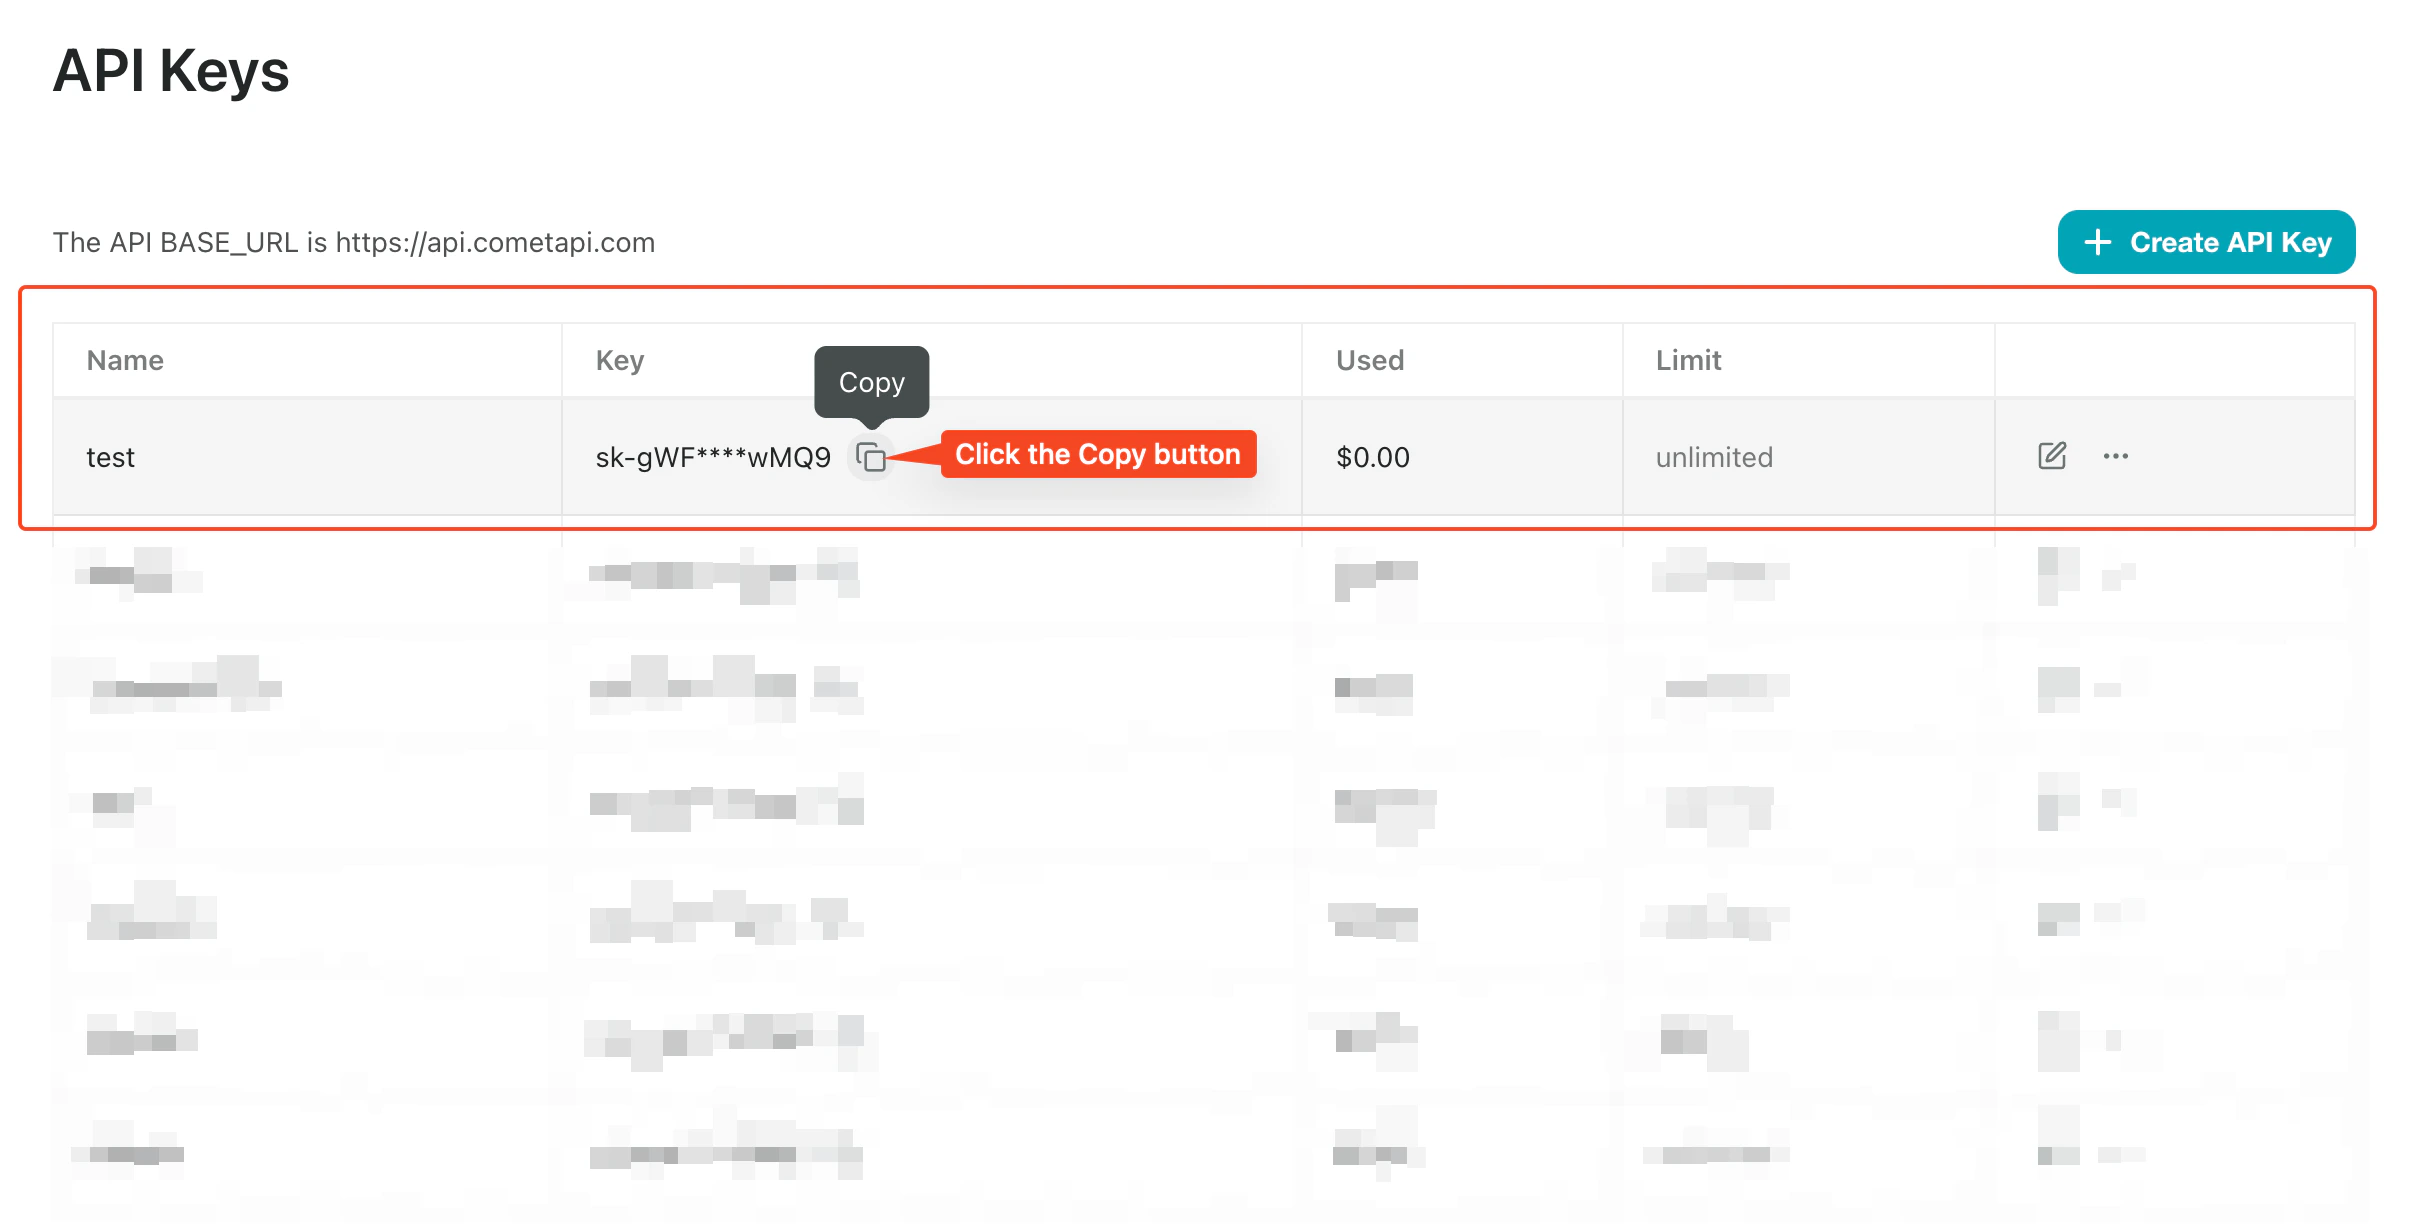
Đăng nhập vào [bảng điều khiển CometAPI](https://www.cometapi.com/console/token). Nhấp vào **Add API Key** và sao chép CometAPI API key của bạn.
 **Khuyến nghị** — sử dụng trình cài đặt chính thức:
```bash theme={null}
curl -fsSL https://openclaw.ai/install.sh | bash
```
Hoặc cài đặt qua npm:
```bash theme={null}
npm install -g openclaw@latest
```
Sau đó chạy trình hướng dẫn thiết lập một lần:
```bash theme={null}
openclaw onboard --install-daemon
```
Trong quá trình onboard, hãy chọn **Skip** ở bước Model/Auth nếu bạn muốn cấu hình CometAPI thủ công. Sau khi onboard xong, xác nhận gateway đang chạy:
```bash theme={null}
openclaw gateway status
openclaw dashboard
```
## Cấu hình
Ghi khóa của bạn vào `~/.openclaw/.env` để daemon có thể sử dụng mà không cần hardcode trong các tệp cấu hình:
```bash theme={null}
printf 'COMETAPI_KEY=%s\n' "$COMETAPI_KEY" >> ~/.openclaw/.env
chmod 600 ~/.openclaw/.env
```
Nếu bạn đã đưa `COMETAPI_KEY` vào thông qua shell, trình quản lý dịch vụ hoặc quy trình secrets, hãy bỏ qua bước này — cấu hình bên dưới sử dụng `$\{COMETAPI_KEY\}` bất kể biến được thiết lập theo cách nào.
CometAPI hỗ trợ **bốn định dạng API**. Thêm một hoặc nhiều khối provider vào `~/.openclaw/openclaw.json`:
| Provider | API Format | Endpoint called | Base URL |
| --------------------------- | ---------------------- | --------------------------- | --------------------------------- |
| `cometapi-openai` | `openai-completions` | `POST /v1/chat/completions` | `https://api.cometapi.com/v1` |
| `cometapi-openai-responses` | `openai-responses` | `POST /v1/responses` | `https://api.cometapi.com/v1` |
| `cometapi-claude` | `anthropic-messages` | `POST /messages` | `https://api.cometapi.com` |
| `cometapi-google` | `google-generative-ai` | `POST /v1beta/...` | `https://api.cometapi.com/v1beta` |
```json theme={null}
{
"agents": {
"defaults": {
"model": {
"primary": "cometapi-claude/your-claude-model-id"
}
}
},
"models": {
"mode": "merge",
"providers": {
"cometapi-openai": {
"baseUrl": "https://api.cometapi.com/v1",
"apiKey": "${COMETAPI_KEY}",
"api": "openai-completions",
"models": [{ "id": "your-chat-model-id", "name": "OpenAI-compatible text model" }]
},
"cometapi-openai-responses": {
"baseUrl": "https://api.cometapi.com/v1",
"apiKey": "${COMETAPI_KEY}",
"api": "openai-responses",
"models": [{ "id": "your-responses-model-id", "name": "Responses API model" }]
},
"cometapi-claude": {
"baseUrl": "https://api.cometapi.com",
"apiKey": "${COMETAPI_KEY}",
"api": "anthropic-messages",
"models": [{ "id": "your-claude-model-id", "name": "Claude family model" }]
},
"cometapi-google": {
"baseUrl": "https://api.cometapi.com/v1beta",
"apiKey": "${COMETAPI_KEY}",
"api": "google-generative-ai",
"models": [{ "id": "your-gemini-model-id", "name": "Gemini family model" }]
}
}
}
}
```
Bạn có thể chỉ giữ lại các provider mình cần, hoặc giữ cả bốn để định tuyến giữa các định dạng bằng tham chiếu `provider/model`.
Thay từng placeholder `your-...-model-id` bằng model ID hiện tại từ [trang CometAPI Models](https://www.cometapi.com/models/) tương ứng với khối provider.
Sử dụng `cometapi-openai-responses` (`api: "openai-responses"`) cho các model yêu cầu OpenAI Responses API. Sử dụng `cometapi-openai` (`api: "openai-completions"`) cho các model trên đường dẫn Chat Completions cổ điển. Cả hai đều dùng chung `baseUrl` (`https://api.cometapi.com/v1`); điểm khác biệt duy nhất là endpoint downstream mà OpenClaw gọi.
Tệp `auth-profiles.json` **không bắt buộc** cho thiết lập này. Khóa provider được phân giải từ `models.providers.*.apiKey` thông qua biến môi trường `$\{COMETAPI_KEY\}`. `auth-profiles.json` chỉ cần thiết nếu bạn muốn xoay vòng thông tin xác thực theo từng profile trên nhiều khóa.
## Xác minh
Khởi động lại gateway sau khi thêm `.env` hoặc thay đổi cấu hình provider:
```bash theme={null}
openclaw gateway restart
```
Sau đó chạy chẩn đoán:
```bash theme={null}
openclaw models status
openclaw models list --provider cometapi-claude
openclaw doctor
```
Một thiết lập thành công sẽ có dạng:
* `openclaw models status` phân giải model chính thành `cometapi-claude/your-claude-model-id` và không có cảnh báo thiếu xác thực cho các provider CometAPI
* `openclaw models list --provider cometapi-claude` liệt kê các model bạn đã cấu hình
* `openclaw doctor` báo cáo không có lỗi cấu hình hoặc xác thực cho các provider CometAPI
**Khuyến nghị** — sử dụng trình cài đặt chính thức:
```bash theme={null}
curl -fsSL https://openclaw.ai/install.sh | bash
```
Hoặc cài đặt qua npm:
```bash theme={null}
npm install -g openclaw@latest
```
Sau đó chạy trình hướng dẫn thiết lập một lần:
```bash theme={null}
openclaw onboard --install-daemon
```
Trong quá trình onboard, hãy chọn **Skip** ở bước Model/Auth nếu bạn muốn cấu hình CometAPI thủ công. Sau khi onboard xong, xác nhận gateway đang chạy:
```bash theme={null}
openclaw gateway status
openclaw dashboard
```
## Cấu hình
Ghi khóa của bạn vào `~/.openclaw/.env` để daemon có thể sử dụng mà không cần hardcode trong các tệp cấu hình:
```bash theme={null}
printf 'COMETAPI_KEY=%s\n' "$COMETAPI_KEY" >> ~/.openclaw/.env
chmod 600 ~/.openclaw/.env
```
Nếu bạn đã đưa `COMETAPI_KEY` vào thông qua shell, trình quản lý dịch vụ hoặc quy trình secrets, hãy bỏ qua bước này — cấu hình bên dưới sử dụng `$\{COMETAPI_KEY\}` bất kể biến được thiết lập theo cách nào.
CometAPI hỗ trợ **bốn định dạng API**. Thêm một hoặc nhiều khối provider vào `~/.openclaw/openclaw.json`:
| Provider | API Format | Endpoint called | Base URL |
| --------------------------- | ---------------------- | --------------------------- | --------------------------------- |
| `cometapi-openai` | `openai-completions` | `POST /v1/chat/completions` | `https://api.cometapi.com/v1` |
| `cometapi-openai-responses` | `openai-responses` | `POST /v1/responses` | `https://api.cometapi.com/v1` |
| `cometapi-claude` | `anthropic-messages` | `POST /messages` | `https://api.cometapi.com` |
| `cometapi-google` | `google-generative-ai` | `POST /v1beta/...` | `https://api.cometapi.com/v1beta` |
```json theme={null}
{
"agents": {
"defaults": {
"model": {
"primary": "cometapi-claude/your-claude-model-id"
}
}
},
"models": {
"mode": "merge",
"providers": {
"cometapi-openai": {
"baseUrl": "https://api.cometapi.com/v1",
"apiKey": "${COMETAPI_KEY}",
"api": "openai-completions",
"models": [{ "id": "your-chat-model-id", "name": "OpenAI-compatible text model" }]
},
"cometapi-openai-responses": {
"baseUrl": "https://api.cometapi.com/v1",
"apiKey": "${COMETAPI_KEY}",
"api": "openai-responses",
"models": [{ "id": "your-responses-model-id", "name": "Responses API model" }]
},
"cometapi-claude": {
"baseUrl": "https://api.cometapi.com",
"apiKey": "${COMETAPI_KEY}",
"api": "anthropic-messages",
"models": [{ "id": "your-claude-model-id", "name": "Claude family model" }]
},
"cometapi-google": {
"baseUrl": "https://api.cometapi.com/v1beta",
"apiKey": "${COMETAPI_KEY}",
"api": "google-generative-ai",
"models": [{ "id": "your-gemini-model-id", "name": "Gemini family model" }]
}
}
}
}
```
Bạn có thể chỉ giữ lại các provider mình cần, hoặc giữ cả bốn để định tuyến giữa các định dạng bằng tham chiếu `provider/model`.
Thay từng placeholder `your-...-model-id` bằng model ID hiện tại từ [trang CometAPI Models](https://www.cometapi.com/models/) tương ứng với khối provider.
Sử dụng `cometapi-openai-responses` (`api: "openai-responses"`) cho các model yêu cầu OpenAI Responses API. Sử dụng `cometapi-openai` (`api: "openai-completions"`) cho các model trên đường dẫn Chat Completions cổ điển. Cả hai đều dùng chung `baseUrl` (`https://api.cometapi.com/v1`); điểm khác biệt duy nhất là endpoint downstream mà OpenClaw gọi.
Tệp `auth-profiles.json` **không bắt buộc** cho thiết lập này. Khóa provider được phân giải từ `models.providers.*.apiKey` thông qua biến môi trường `$\{COMETAPI_KEY\}`. `auth-profiles.json` chỉ cần thiết nếu bạn muốn xoay vòng thông tin xác thực theo từng profile trên nhiều khóa.
## Xác minh
Khởi động lại gateway sau khi thêm `.env` hoặc thay đổi cấu hình provider:
```bash theme={null}
openclaw gateway restart
```
Sau đó chạy chẩn đoán:
```bash theme={null}
openclaw models status
openclaw models list --provider cometapi-claude
openclaw doctor
```
Một thiết lập thành công sẽ có dạng:
* `openclaw models status` phân giải model chính thành `cometapi-claude/your-claude-model-id` và không có cảnh báo thiếu xác thực cho các provider CometAPI
* `openclaw models list --provider cometapi-claude` liệt kê các model bạn đã cấu hình
* `openclaw doctor` báo cáo không có lỗi cấu hình hoặc xác thực cho các provider CometAPI
 ## Chuyển model
```bash theme={null}
# Set the default model in config
openclaw models set cometapi-claude/your-claude-model-id
# Switch for the current chat session
/model cometapi-openai/your-chat-model-id
/model cometapi-openai-responses/your-responses-model-id
/model cometapi-claude/your-claude-model-id
/model cometapi-google/your-gemini-model-id
```
## Khắc phục sự cố
Nếu bạn đang sửa một thiết lập cũ bị lỗi, hãy dừng gateway, xóa `~/.openclaw`, sau đó chạy lại quy trình thiết lập ban đầu trước khi áp dụng cấu hình CometAPI:
```bash theme={null}
openclaw gateway stop
rm -rf ~/.openclaw
openclaw onboard --install-daemon
```
Thao tác này sẽ xóa toàn bộ cấu hình cục bộ, phiên, nhật ký, trạng thái xác thực và workspace. Sau đó hãy làm lại các Bước 3–5.
## Chuyển model
```bash theme={null}
# Set the default model in config
openclaw models set cometapi-claude/your-claude-model-id
# Switch for the current chat session
/model cometapi-openai/your-chat-model-id
/model cometapi-openai-responses/your-responses-model-id
/model cometapi-claude/your-claude-model-id
/model cometapi-google/your-gemini-model-id
```
## Khắc phục sự cố
Nếu bạn đang sửa một thiết lập cũ bị lỗi, hãy dừng gateway, xóa `~/.openclaw`, sau đó chạy lại quy trình thiết lập ban đầu trước khi áp dụng cấu hình CometAPI:
```bash theme={null}
openclaw gateway stop
rm -rf ~/.openclaw
openclaw onboard --install-daemon
```
Thao tác này sẽ xóa toàn bộ cấu hình cục bộ, phiên, nhật ký, trạng thái xác thực và workspace. Sau đó hãy làm lại các Bước 3–5.