> ## Documentation Index
> Fetch the complete documentation index at: https://apidoc.cometapi.com/llms.txt
> Use this file to discover all available pages before exploring further.
# 使用 CometAPI 与 OpenClaw
> 使用本指南通过设置 base URL、API key 以及 model 或 provider 选项,将 OpenClaw 配置为使用 CometAPI。
使用 [CometAPI](https://www.cometapi.com) 作为 [OpenClaw](https://openclaw.ai) 的模型提供方——一个 API 接入 500+ 模型。
## 前置条件
* Node.js ≥ 22 —— 推荐通过 [nvm](https://github.com/nvm-sh/nvm) 安装
* 一个拥有有效 API key 的 CometAPI 账户 —— [在这里获取](https://www.cometapi.com/console/token)
## 安装
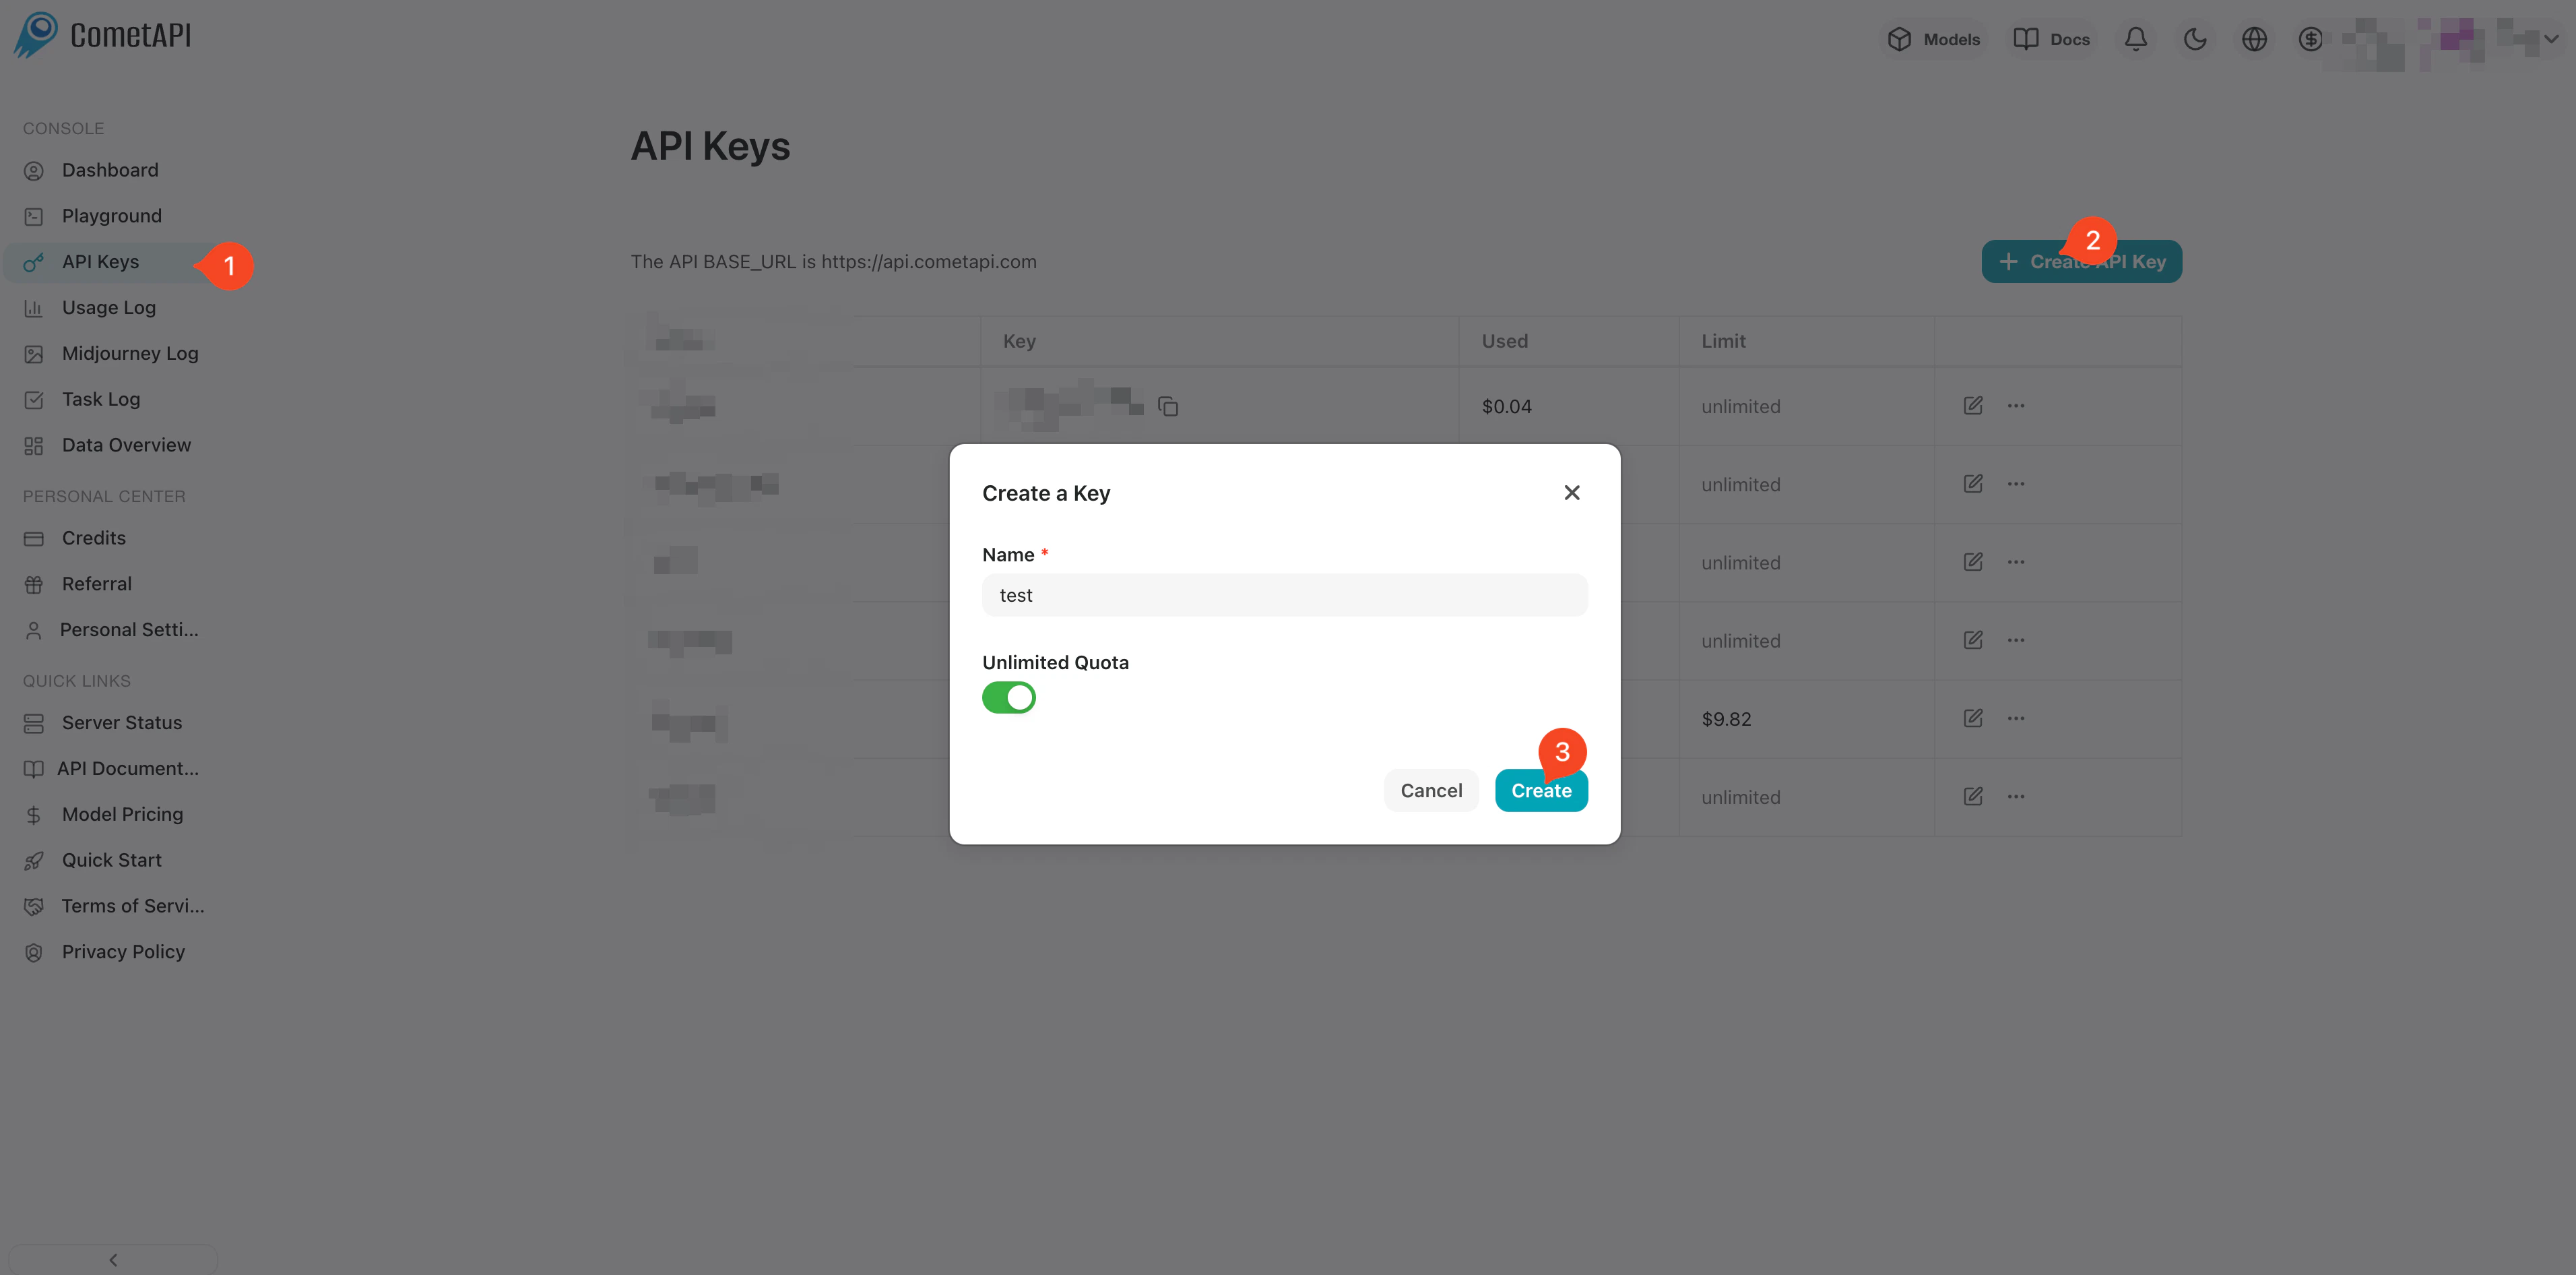
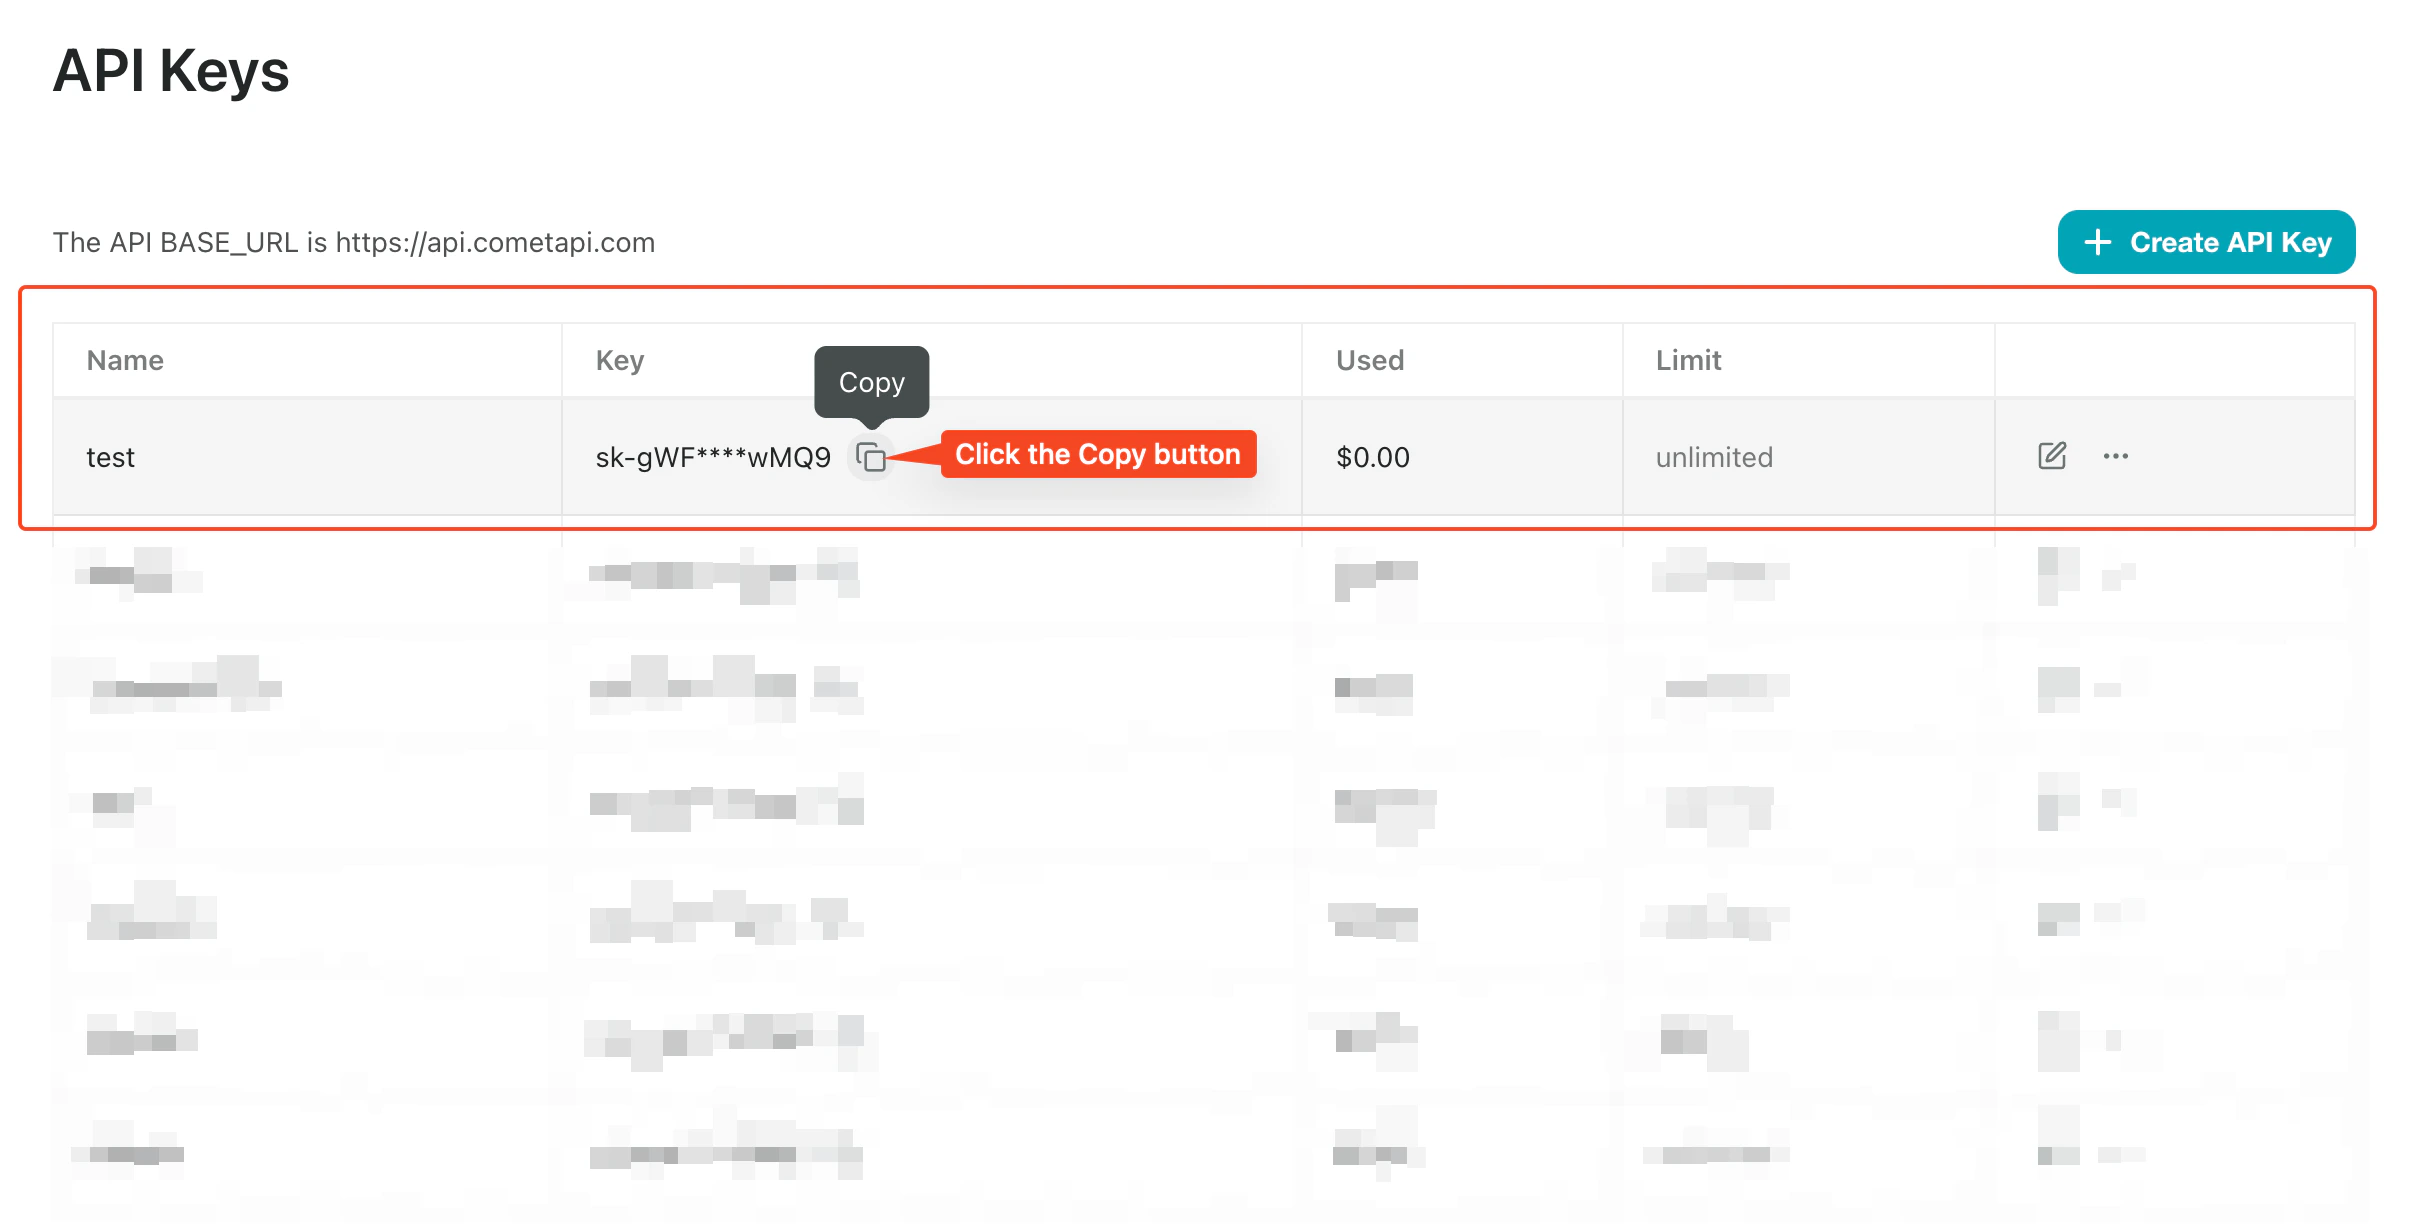
登录 [CometAPI 控制台](https://www.cometapi.com/console/token)。点击 **Add API Key** 并复制你的 CometAPI API key。
 **推荐** —— 使用官方安装器:
```bash theme={null}
curl -fsSL https://openclaw.ai/install.sh | bash
```
或通过 npm 安装:
```bash theme={null}
npm install -g openclaw@latest
```
然后运行一次设置向导:
```bash theme={null}
openclaw onboard --install-daemon
```
在初始化过程中,如果你想手动配置 CometAPI,请在 Model/Auth 步骤中选择 **Skip**。初始化完成后,确认网关正在运行:
```bash theme={null}
openclaw gateway status
openclaw dashboard
```
## 配置
将你的密钥写入 `~/.openclaw/.env`,这样守护进程就可以使用它,而无需将其硬编码到配置文件中:
```bash theme={null}
printf 'COMETAPI_KEY=%s\n' "$COMETAPI_KEY" >> ~/.openclaw/.env
chmod 600 ~/.openclaw/.env
```
如果你已经通过 shell、服务管理器或 secrets 工作流注入了 `COMETAPI_KEY`,请跳过此步骤——无论变量是如何设置的,下面的配置都会使用 `$\{COMETAPI_KEY\}`。
CometAPI 支持**四种 API 格式**。将一个或多个 provider 块添加到 `~/.openclaw/openclaw.json` 中:
| Provider | API 格式 | 调用的端点 | Base URL |
| --------------------------- | ---------------------- | --------------------------- | --------------------------------- |
| `cometapi-openai` | `openai-completions` | `POST /v1/chat/completions` | `https://api.cometapi.com/v1` |
| `cometapi-openai-responses` | `openai-responses` | `POST /v1/responses` | `https://api.cometapi.com/v1` |
| `cometapi-claude` | `anthropic-messages` | `POST /messages` | `https://api.cometapi.com` |
| `cometapi-google` | `google-generative-ai` | `POST /v1beta/...` | `https://api.cometapi.com/v1beta` |
```json theme={null}
{
"agents": {
"defaults": {
"model": {
"primary": "cometapi-claude/your-claude-model-id"
}
}
},
"models": {
"mode": "merge",
"providers": {
"cometapi-openai": {
"baseUrl": "https://api.cometapi.com/v1",
"apiKey": "${COMETAPI_KEY}",
"api": "openai-completions",
"models": [{ "id": "your-chat-model-id", "name": "OpenAI-compatible text model" }]
},
"cometapi-openai-responses": {
"baseUrl": "https://api.cometapi.com/v1",
"apiKey": "${COMETAPI_KEY}",
"api": "openai-responses",
"models": [{ "id": "your-responses-model-id", "name": "Responses API model" }]
},
"cometapi-claude": {
"baseUrl": "https://api.cometapi.com",
"apiKey": "${COMETAPI_KEY}",
"api": "anthropic-messages",
"models": [{ "id": "your-claude-model-id", "name": "Claude family model" }]
},
"cometapi-google": {
"baseUrl": "https://api.cometapi.com/v1beta",
"apiKey": "${COMETAPI_KEY}",
"api": "google-generative-ai",
"models": [{ "id": "your-gemini-model-id", "name": "Gemini family model" }]
}
}
}
}
```
你可以只保留所需的 providers,也可以保留全部四个,以便使用 `provider/model` 引用在不同格式之间进行路由。
将每个 `your-...-model-id` 占位符替换为来自 [CometAPI Models page](https://www.cometapi.com/models/) 且与对应 provider 块匹配的当前 model ID。
对于需要 OpenAI Responses API 的模型,请使用 `cometapi-openai-responses`(`api: "openai-responses"`)。对于使用经典聊天补全路径的模型,请使用 `cometapi-openai`(`api: "openai-completions"`)。两者共享相同的 `baseUrl`(`https://api.cometapi.com/v1`);唯一的区别在于 OpenClaw 调用的是哪个下游端点。
此设置**不需要** `auth-profiles.json` 文件。Provider 密钥通过 `models.providers.*.apiKey` 中的 `$\{COMETAPI_KEY\}` 环境变量解析。只有当你想在多个密钥之间按 profile 轮换凭据时,才需要 `auth-profiles.json`。
## 验证
在添加 `.env` 或更改提供商配置后,重启网关:
```bash theme={null}
openclaw gateway restart
```
然后运行诊断:
```bash theme={null}
openclaw models status
openclaw models list --provider cometapi-claude
openclaw doctor
```
成功的设置应如下所示:
* `openclaw models status` 会将主模型解析为 `cometapi-claude/your-claude-model-id`,并且不会对 CometAPI 提供商显示缺少认证的警告
* `openclaw models list --provider cometapi-claude` 会列出你配置的模型
* `openclaw doctor` 会报告 CometAPI 提供商没有配置或认证错误
**推荐** —— 使用官方安装器:
```bash theme={null}
curl -fsSL https://openclaw.ai/install.sh | bash
```
或通过 npm 安装:
```bash theme={null}
npm install -g openclaw@latest
```
然后运行一次设置向导:
```bash theme={null}
openclaw onboard --install-daemon
```
在初始化过程中,如果你想手动配置 CometAPI,请在 Model/Auth 步骤中选择 **Skip**。初始化完成后,确认网关正在运行:
```bash theme={null}
openclaw gateway status
openclaw dashboard
```
## 配置
将你的密钥写入 `~/.openclaw/.env`,这样守护进程就可以使用它,而无需将其硬编码到配置文件中:
```bash theme={null}
printf 'COMETAPI_KEY=%s\n' "$COMETAPI_KEY" >> ~/.openclaw/.env
chmod 600 ~/.openclaw/.env
```
如果你已经通过 shell、服务管理器或 secrets 工作流注入了 `COMETAPI_KEY`,请跳过此步骤——无论变量是如何设置的,下面的配置都会使用 `$\{COMETAPI_KEY\}`。
CometAPI 支持**四种 API 格式**。将一个或多个 provider 块添加到 `~/.openclaw/openclaw.json` 中:
| Provider | API 格式 | 调用的端点 | Base URL |
| --------------------------- | ---------------------- | --------------------------- | --------------------------------- |
| `cometapi-openai` | `openai-completions` | `POST /v1/chat/completions` | `https://api.cometapi.com/v1` |
| `cometapi-openai-responses` | `openai-responses` | `POST /v1/responses` | `https://api.cometapi.com/v1` |
| `cometapi-claude` | `anthropic-messages` | `POST /messages` | `https://api.cometapi.com` |
| `cometapi-google` | `google-generative-ai` | `POST /v1beta/...` | `https://api.cometapi.com/v1beta` |
```json theme={null}
{
"agents": {
"defaults": {
"model": {
"primary": "cometapi-claude/your-claude-model-id"
}
}
},
"models": {
"mode": "merge",
"providers": {
"cometapi-openai": {
"baseUrl": "https://api.cometapi.com/v1",
"apiKey": "${COMETAPI_KEY}",
"api": "openai-completions",
"models": [{ "id": "your-chat-model-id", "name": "OpenAI-compatible text model" }]
},
"cometapi-openai-responses": {
"baseUrl": "https://api.cometapi.com/v1",
"apiKey": "${COMETAPI_KEY}",
"api": "openai-responses",
"models": [{ "id": "your-responses-model-id", "name": "Responses API model" }]
},
"cometapi-claude": {
"baseUrl": "https://api.cometapi.com",
"apiKey": "${COMETAPI_KEY}",
"api": "anthropic-messages",
"models": [{ "id": "your-claude-model-id", "name": "Claude family model" }]
},
"cometapi-google": {
"baseUrl": "https://api.cometapi.com/v1beta",
"apiKey": "${COMETAPI_KEY}",
"api": "google-generative-ai",
"models": [{ "id": "your-gemini-model-id", "name": "Gemini family model" }]
}
}
}
}
```
你可以只保留所需的 providers,也可以保留全部四个,以便使用 `provider/model` 引用在不同格式之间进行路由。
将每个 `your-...-model-id` 占位符替换为来自 [CometAPI Models page](https://www.cometapi.com/models/) 且与对应 provider 块匹配的当前 model ID。
对于需要 OpenAI Responses API 的模型,请使用 `cometapi-openai-responses`(`api: "openai-responses"`)。对于使用经典聊天补全路径的模型,请使用 `cometapi-openai`(`api: "openai-completions"`)。两者共享相同的 `baseUrl`(`https://api.cometapi.com/v1`);唯一的区别在于 OpenClaw 调用的是哪个下游端点。
此设置**不需要** `auth-profiles.json` 文件。Provider 密钥通过 `models.providers.*.apiKey` 中的 `$\{COMETAPI_KEY\}` 环境变量解析。只有当你想在多个密钥之间按 profile 轮换凭据时,才需要 `auth-profiles.json`。
## 验证
在添加 `.env` 或更改提供商配置后,重启网关:
```bash theme={null}
openclaw gateway restart
```
然后运行诊断:
```bash theme={null}
openclaw models status
openclaw models list --provider cometapi-claude
openclaw doctor
```
成功的设置应如下所示:
* `openclaw models status` 会将主模型解析为 `cometapi-claude/your-claude-model-id`,并且不会对 CometAPI 提供商显示缺少认证的警告
* `openclaw models list --provider cometapi-claude` 会列出你配置的模型
* `openclaw doctor` 会报告 CometAPI 提供商没有配置或认证错误
 ## 切换模型
```bash theme={null}
# Set the default model in config
openclaw models set cometapi-claude/your-claude-model-id
# Switch for the current chat session
/model cometapi-openai/your-chat-model-id
/model cometapi-openai-responses/your-responses-model-id
/model cometapi-claude/your-claude-model-id
/model cometapi-google/your-gemini-model-id
```
## 故障排查
如果你是在修复损坏的旧安装,请先停止 gateway,删除 `~/.openclaw`,然后在应用 CometAPI 配置之前重新运行引导流程:
```bash theme={null}
openclaw gateway stop
rm -rf ~/.openclaw
openclaw onboard --install-daemon
```
这会删除所有本地配置、会话、日志、认证状态和工作区。然后再次按照步骤 3–5 操作。
## 切换模型
```bash theme={null}
# Set the default model in config
openclaw models set cometapi-claude/your-claude-model-id
# Switch for the current chat session
/model cometapi-openai/your-chat-model-id
/model cometapi-openai-responses/your-responses-model-id
/model cometapi-claude/your-claude-model-id
/model cometapi-google/your-gemini-model-id
```
## 故障排查
如果你是在修复损坏的旧安装,请先停止 gateway,删除 `~/.openclaw`,然后在应用 CometAPI 配置之前重新运行引导流程:
```bash theme={null}
openclaw gateway stop
rm -rf ~/.openclaw
openclaw onboard --install-daemon
```
这会删除所有本地配置、会话、日志、认证状态和工作区。然后再次按照步骤 3–5 操作。