> ## Documentation Index
> Fetch the complete documentation index at: https://apidoc.cometapi.com/llms.txt
> Use this file to discover all available pages before exploring further.
# 使用 Claude Desktop 搭配 CometAPI
> 使用本指南透過設定 base URL、API key,以及 model 或 provider 選項,將 Claude Desktop 設定為搭配 CometAPI 使用。
使用本指南將 Claude Desktop 的第三方推論 Cowork 連接到 CometAPI。此設定可讓 Claude Desktop 從 Cowork、Projects 與支援的桌面工作流程,將 Claude Messages API 請求傳送至 CometAPI。
官方參考資料:
* [Claude Desktop installation and setup](https://claude.com/docs/cowork/3p/installation)
* [Claude Desktop gateway configuration](https://claude.com/docs/cowork/3p/gateway)
* [Claude Desktop configuration reference](https://claude.com/docs/cowork/3p/configuration)
Claude Desktop 第三方推論需要 Anthropic 相容的 gateway。CometAPI 透過 [Anthropic Messages API](/api/text/anthropic-messages) 支援 Claude 模型。
你從 Claude Desktop 傳送的內容會由 CometAPI 與所選的模型供應商處理。除非你的組織允許該工作流程,否則請勿傳送機密資料。
## 先決條件
* 從 [claude.com/download](https://claude.com/download) 安裝 Claude Desktop
* 包含 **Developer mode** 與 **Configure third-party inference** 的 Claude Desktop 版本
* 擁有啟用中 API key 的 CometAPI 帳戶
* 可在 CometAPI 中存取 Claude 模型
* 可連線至 `https://api.cometapi.com` 的網路路徑
從 Claude Desktop 的登入畫面開始。如果你已經使用 Anthropic 帳戶登入,請先登出,再設定第三方推論。
## 設定
開啟 Claude Desktop 並停留在登入畫面。在應用程式選單中,開啟 **Help** → **Troubleshooting**,然後選擇 **Enable Developer Mode**。
在 Windows 上,登入前可能不容易操作到選單。先將焦點移到電子郵件欄位,按 `Tab` 直到選單取得焦點,然後按 `Enter`。
啟用開發者模式後,開啟 **Developer** → **Configure third-party inference**。
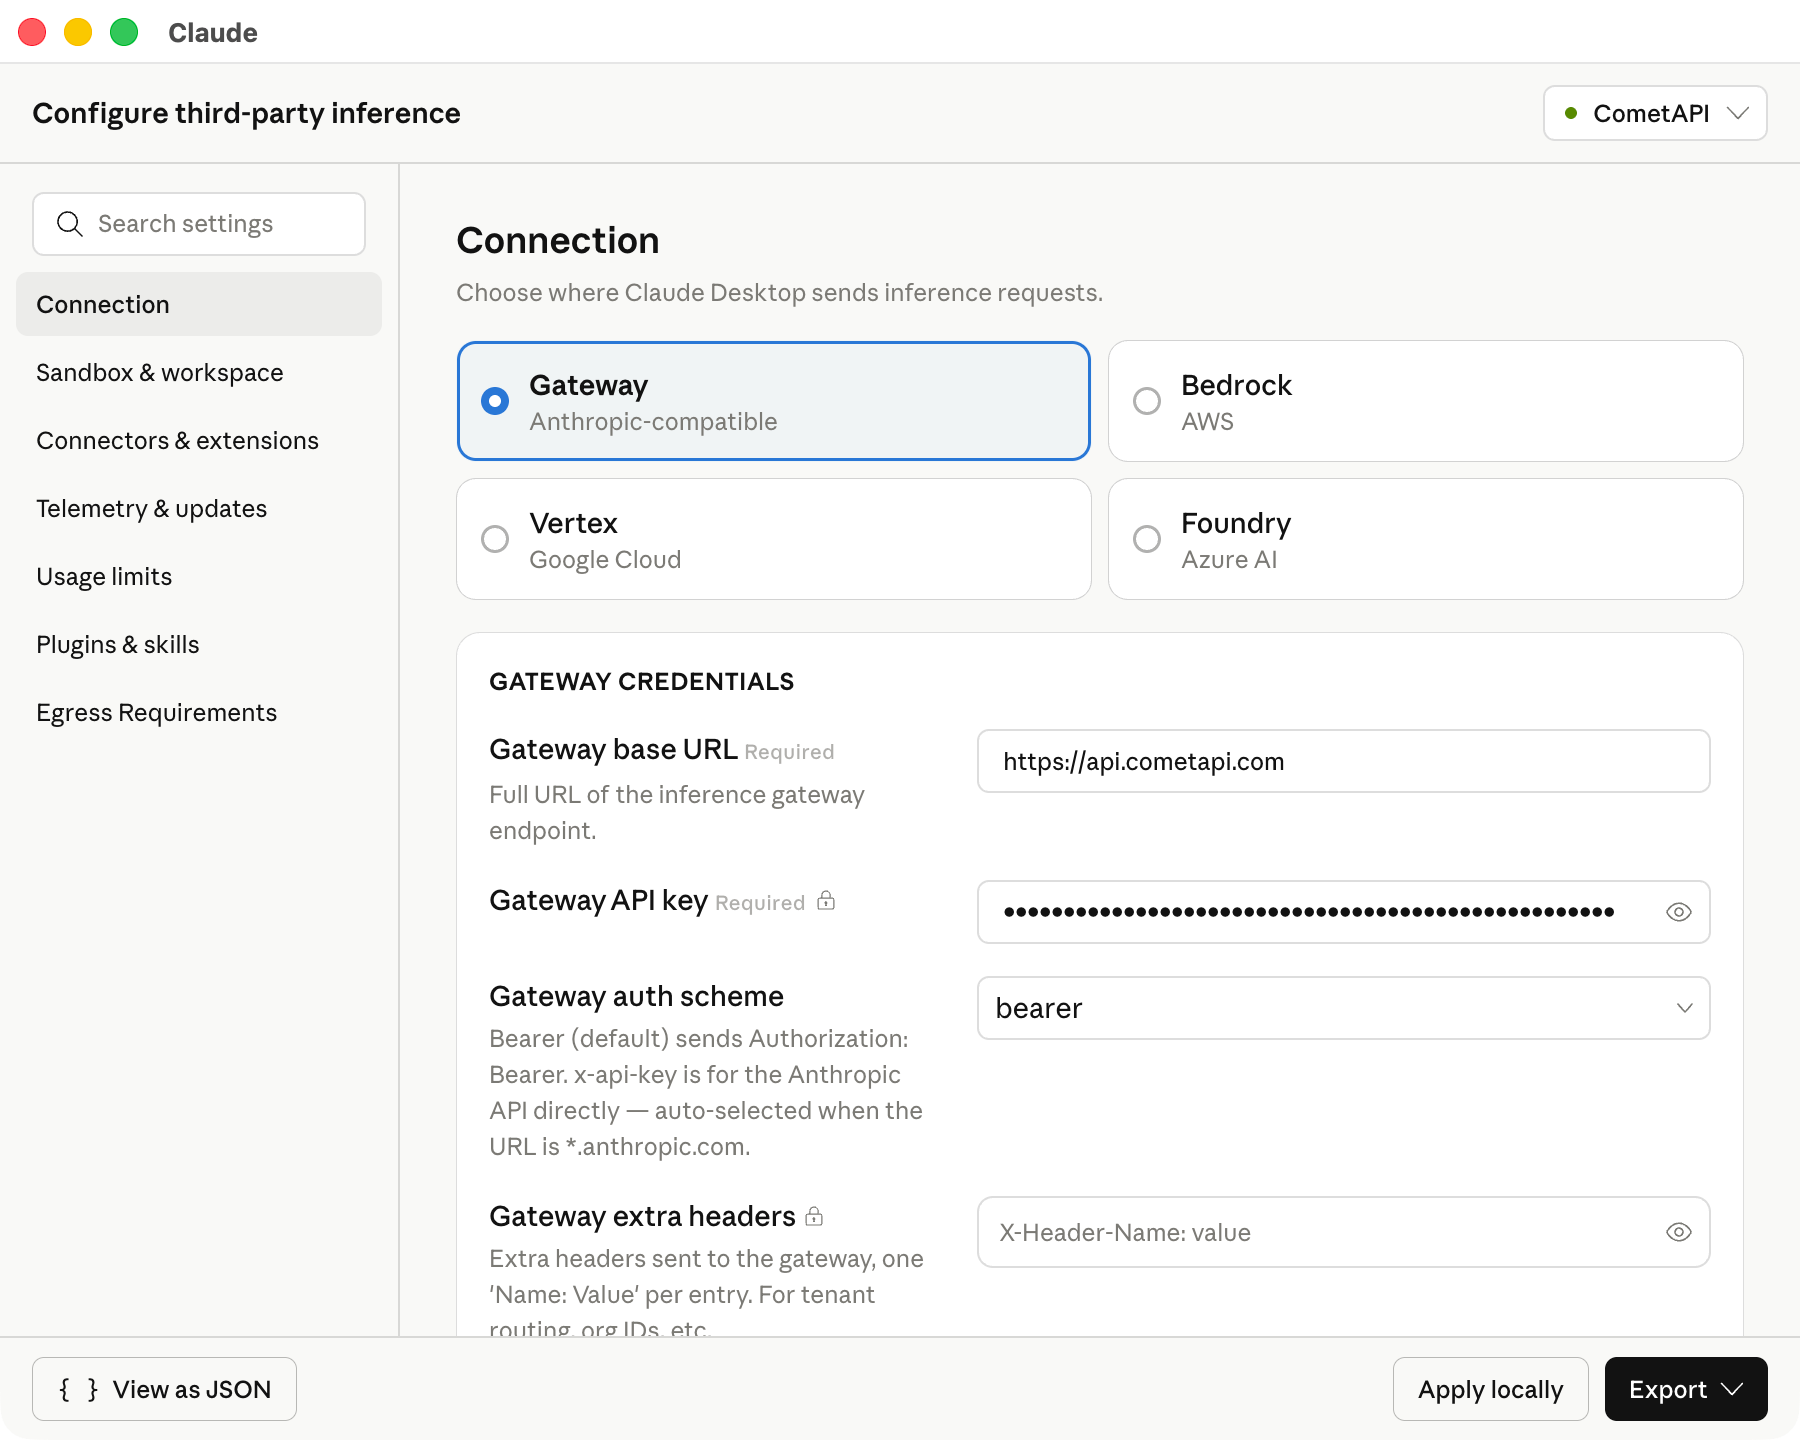
設定視窗開啟後,左側邊欄會顯示多個區段。請使用 **Connection** 區段來設定 CometAPI。
在 **Connection** 區段中,輸入以下 CometAPI 值:
| 欄位 | 值 |
| -------------- | -------------------------------------- |
| 推論供應商 | Gateway |
| Gateway | Anthropic-compatible |
| Gateway 基底 URL | `https://api.cometapi.com` |
| Gateway API 金鑰 | 你的 CometAPI API key,例如 `$COMETAPI_KEY` |
| Gateway 驗證方案 | Bearer |
| Gateway 額外標頭 | 留空 |
請保持基底 URL 與上方完全一致。Claude Desktop 要求使用 HTTPS 基底 URL。
下方截圖顯示已填入 CometAPI 值的 Connection 區段。
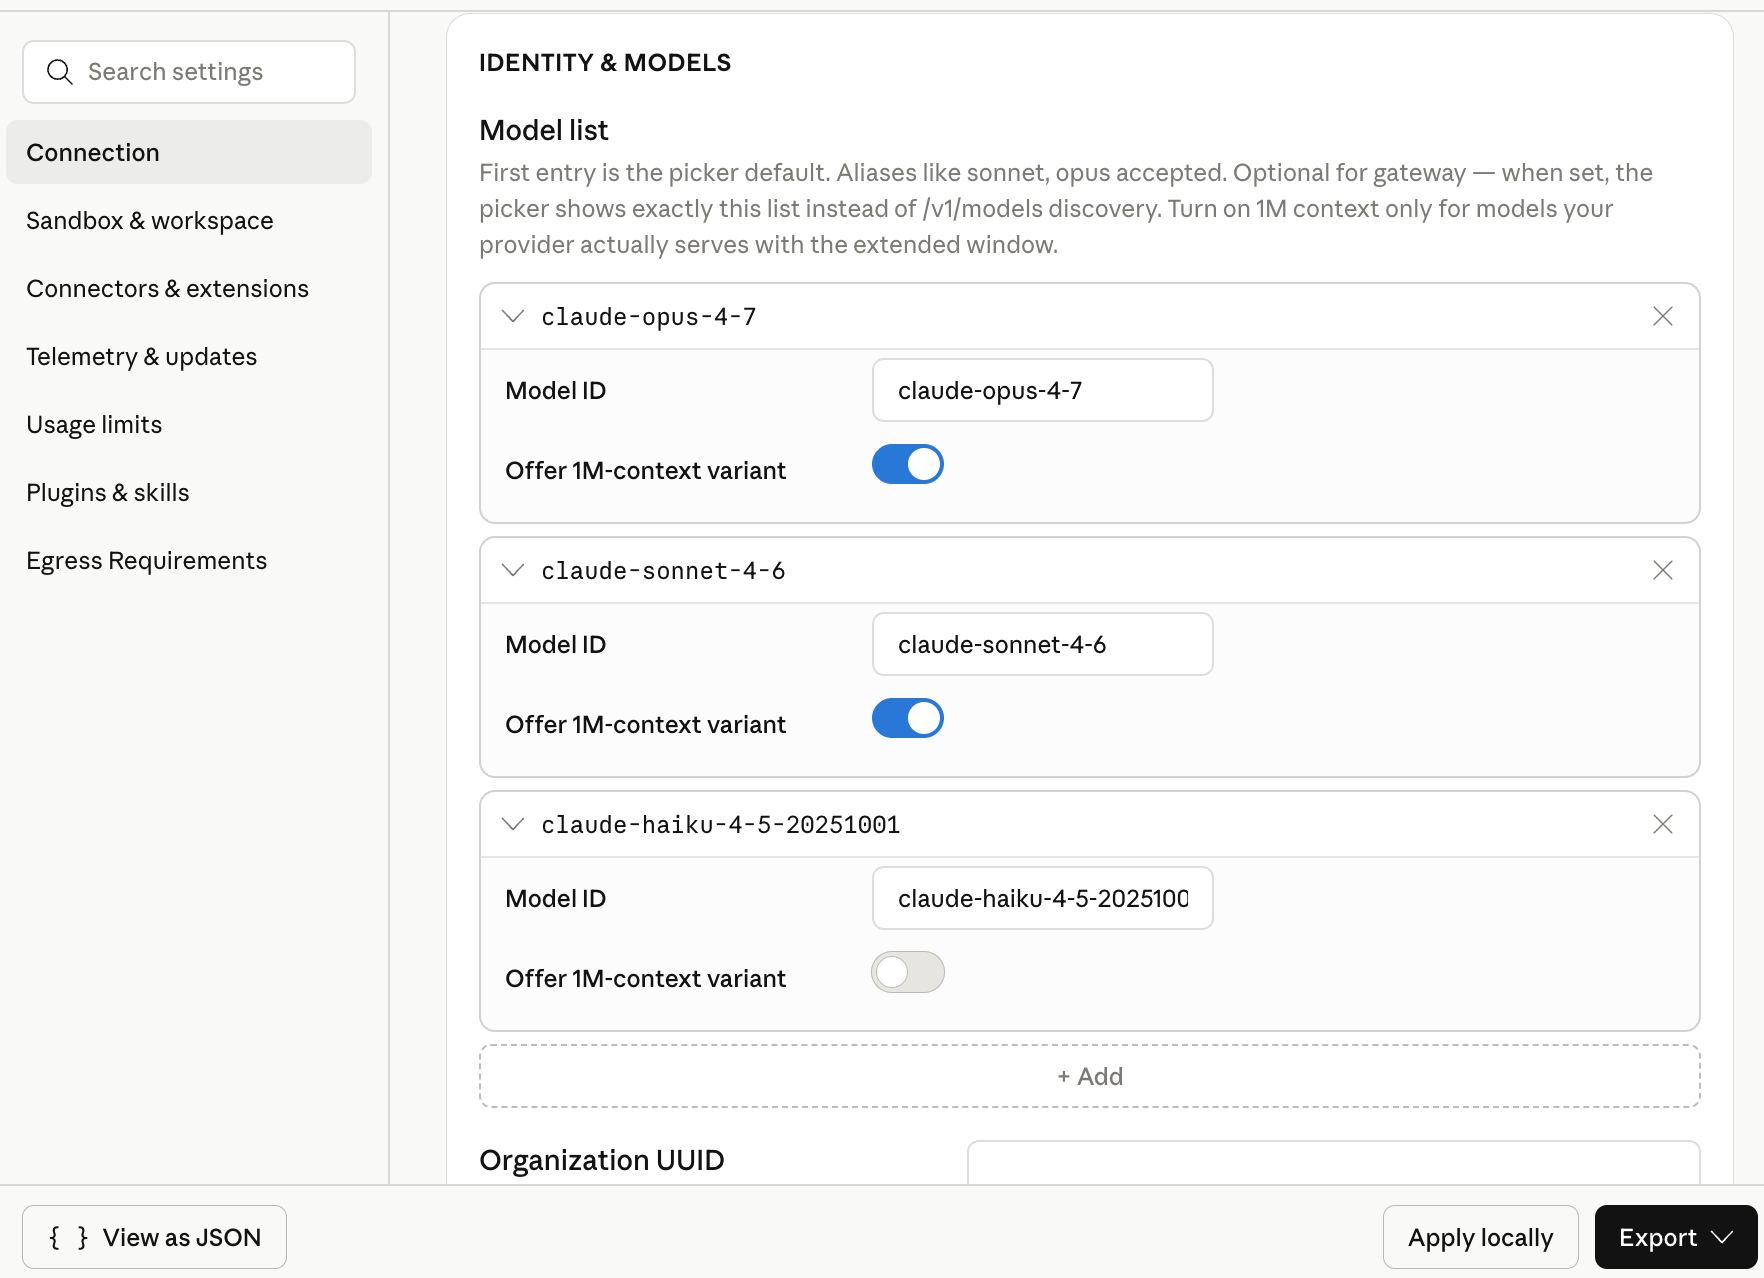
 在 **Model list** 中,手動新增這些 model ID:
| Model ID | 建議用途 |
| --------------------------- | --------------- |
| `claude-opus-4-7` | 複雜規劃與 agent 任務 |
| `claude-sonnet-4-6` | 一般桌面使用 |
| `claude-haiku-4-5-20251001` | 輕量 Prompt 與快速草稿 |
清單中的第一個模型會成為預設模型。如果你想要通用型預設模型,請將 `claude-sonnet-4-6` 放在第一個。
模型可用性可能會變動。如果完成設定後模型沒有出現在 Claude Desktop 中,請到 [CometAPI Models page](/zh-Hant/overview/models) 確認你是否具備存取權限。
下方截圖顯示已為 CometAPI 設定這三個 Claude model ID 的模型清單。
在 **Model list** 中,手動新增這些 model ID:
| Model ID | 建議用途 |
| --------------------------- | --------------- |
| `claude-opus-4-7` | 複雜規劃與 agent 任務 |
| `claude-sonnet-4-6` | 一般桌面使用 |
| `claude-haiku-4-5-20251001` | 輕量 Prompt 與快速草稿 |
清單中的第一個模型會成為預設模型。如果你想要通用型預設模型,請將 `claude-sonnet-4-6` 放在第一個。
模型可用性可能會變動。如果完成設定後模型沒有出現在 Claude Desktop 中,請到 [CometAPI Models page](/zh-Hant/overview/models) 確認你是否具備存取權限。
下方截圖顯示已為 CometAPI 設定這三個 Claude model ID 的模型清單。
 點擊 **Apply locally**。Claude Desktop 會將所選設定寫入本機使用者設定檔,並重新啟動應用程式。
如果應用程式沒有重新啟動,請完整結束 Claude Desktop 後再重新開啟。
在登入畫面上,選擇使用第三方推論的 Cowork 選項。開啟 Cowork 或 Projects,選取其中一個已設定的 Claude 模型,並送出一個簡短的測試 Prompt。
成功收到回應就表示 Claude Desktop 正在使用 CometAPI 進行模型呼叫。
## 驗證設定
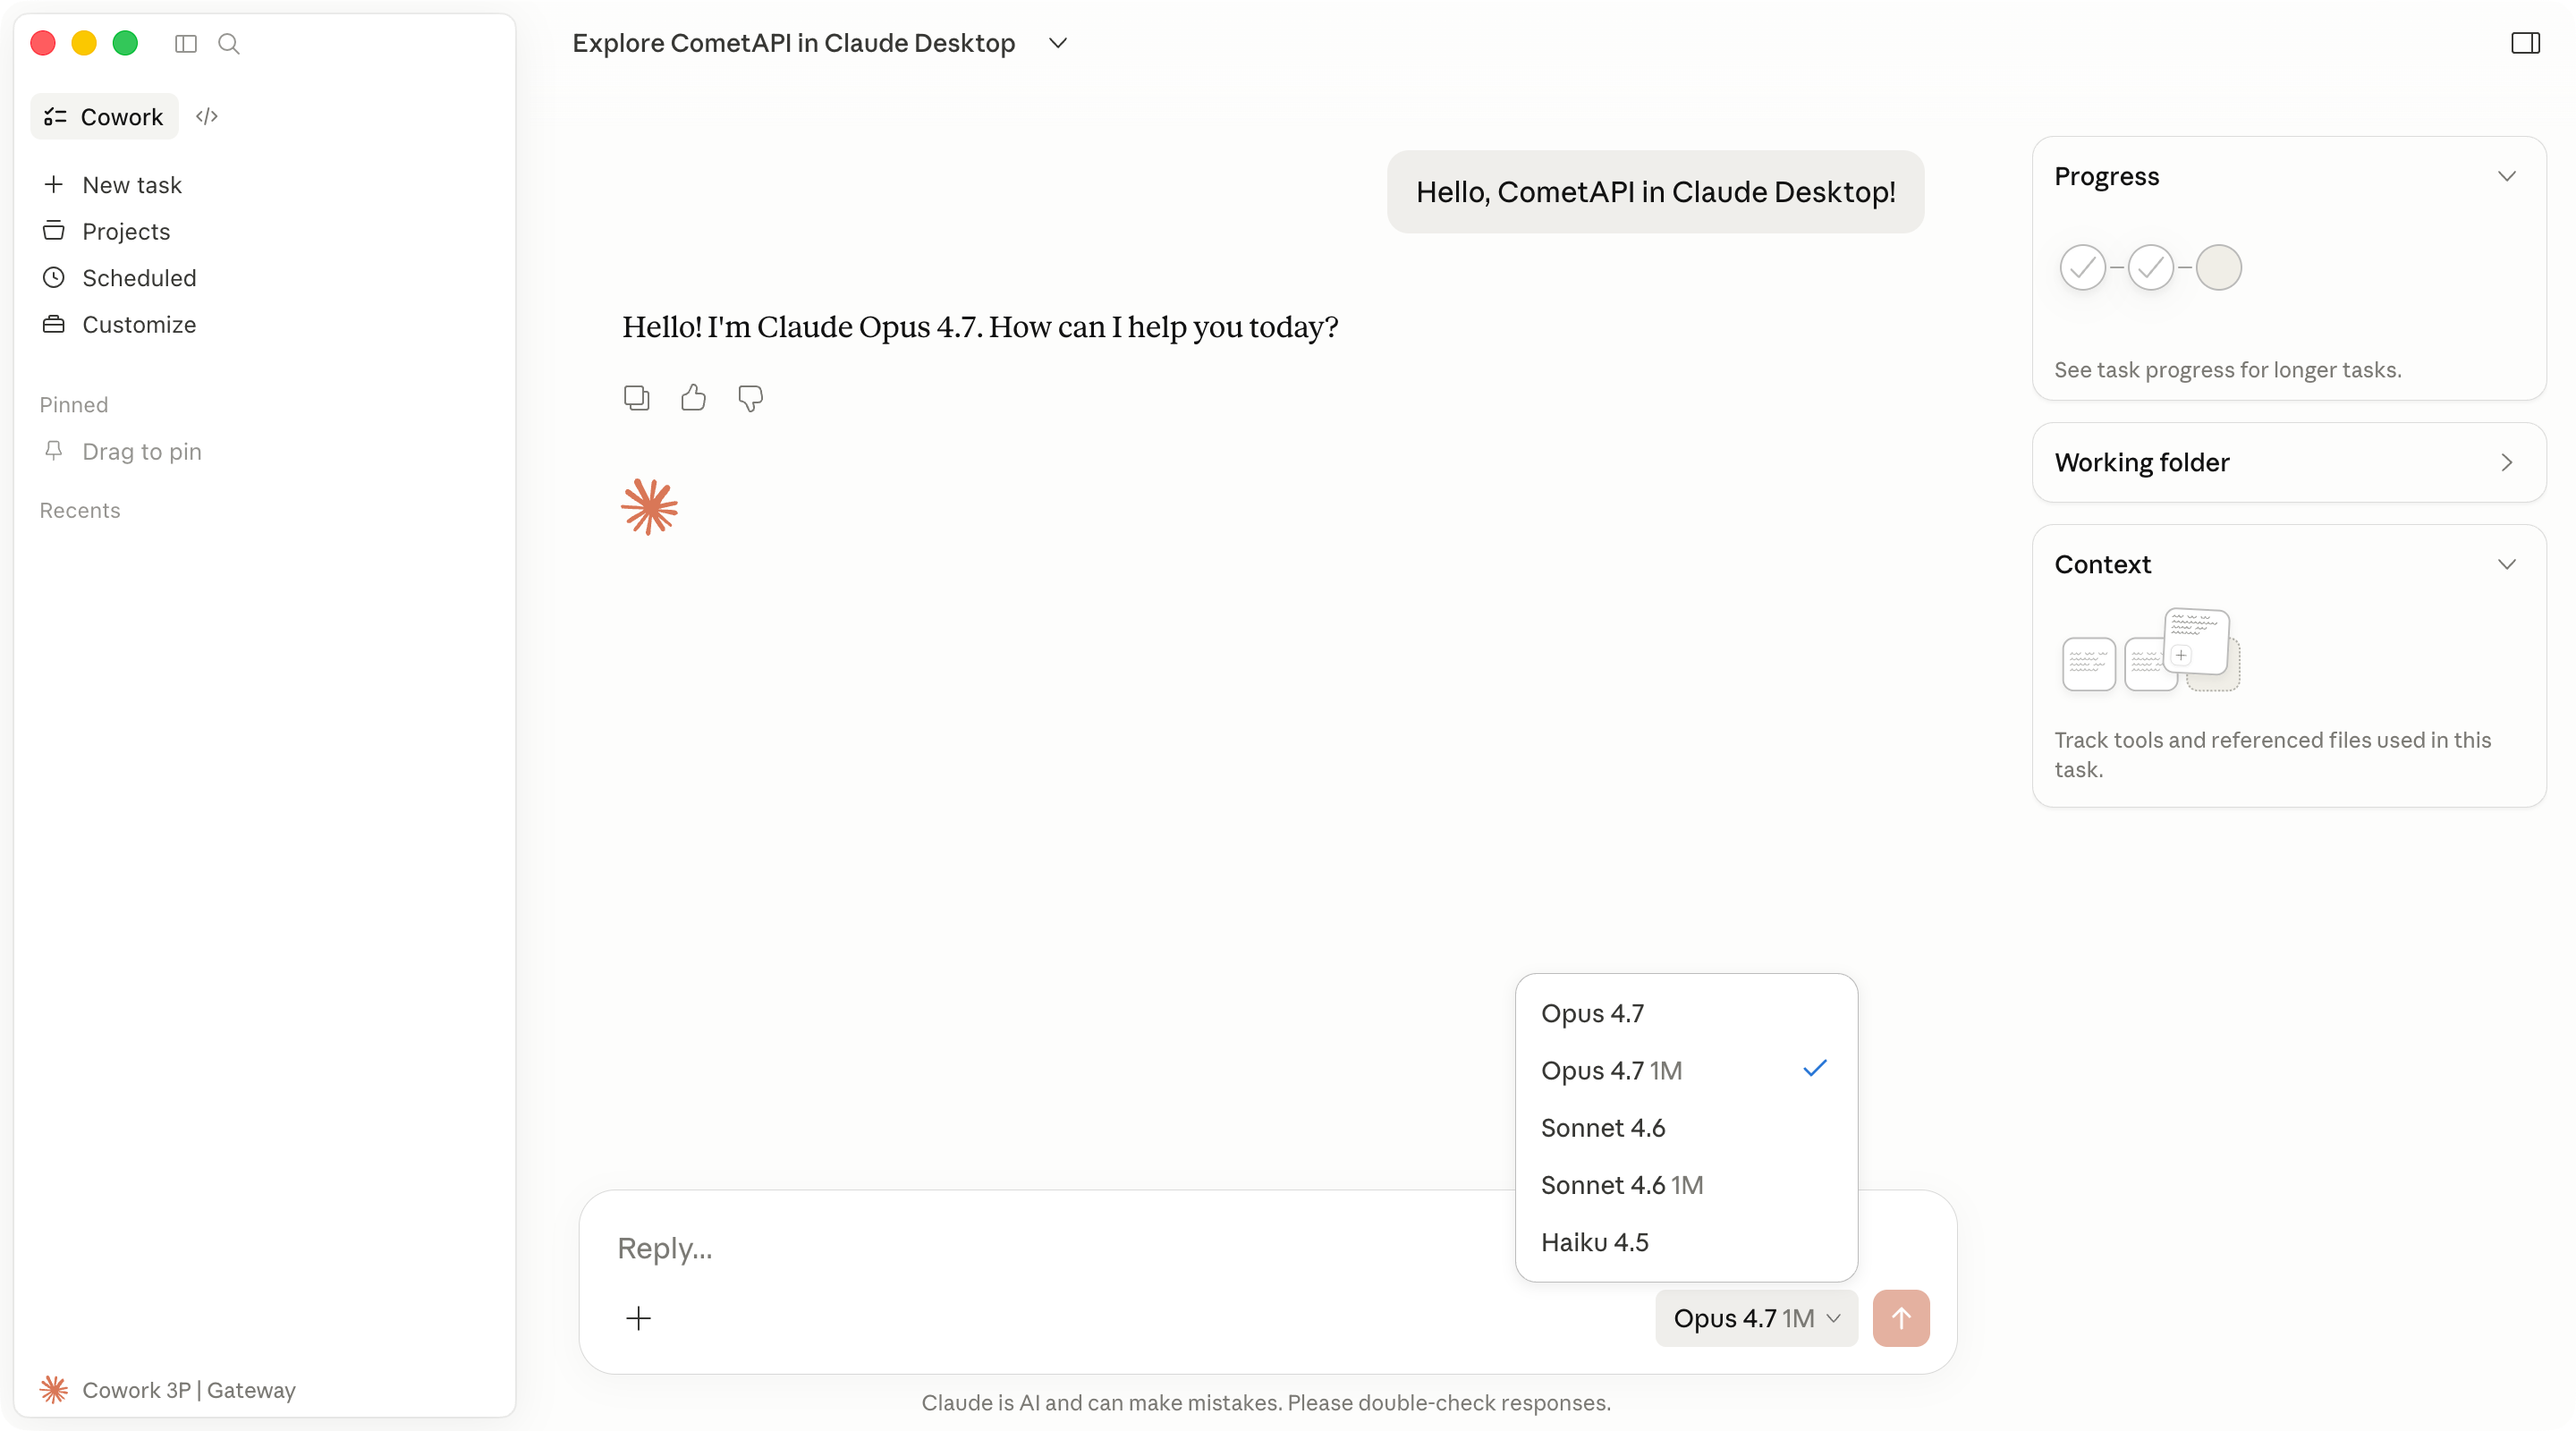
使用一個不需要外部工具的簡短 Prompt:
```text theme={null}
Reply with one sentence: Claude Desktop is connected through CometAPI.
```
如果 Claude Desktop 有回傳回應,就表示 base URL、API key 與模型清單都已正確設定。
下方截圖顯示透過 CometAPI 成功完成的 Cowork 回覆。
點擊 **Apply locally**。Claude Desktop 會將所選設定寫入本機使用者設定檔,並重新啟動應用程式。
如果應用程式沒有重新啟動,請完整結束 Claude Desktop 後再重新開啟。
在登入畫面上,選擇使用第三方推論的 Cowork 選項。開啟 Cowork 或 Projects,選取其中一個已設定的 Claude 模型,並送出一個簡短的測試 Prompt。
成功收到回應就表示 Claude Desktop 正在使用 CometAPI 進行模型呼叫。
## 驗證設定
使用一個不需要外部工具的簡短 Prompt:
```text theme={null}
Reply with one sentence: Claude Desktop is connected through CometAPI.
```
如果 Claude Desktop 有回傳回應,就表示 base URL、API key 與模型清單都已正確設定。
下方截圖顯示透過 CometAPI 成功完成的 Cowork 回覆。
 若要檢查偵測到的設定,請開啟 **Help** → **Troubleshooting** → **Copy Managed Configuration Report**。複製出的報告會遮蔽秘密值。
## 疑難排解
請確認你已選取 **Help** → **Troubleshooting** → **Enable Developer Mode**。接著完全關閉 Claude Desktop,然後重新開啟。
如果找不到這個選項,請安裝包含第三方推論設定的 Claude Desktop 版本。
請檢查以下項目:
* **Inference provider** 已設為 **Gateway**。
* **Gateway base URL** 為 `https://api.cometapi.com`。
* **Gateway API key** 包含你的 CometAPI API key,且沒有多餘空格。
* 你已點擊 **Apply locally**,並且已完整重新啟動 Claude Desktop。
請確認 base URL 是以 `https://` 開頭。Claude Desktop 不接受純 HTTP 的 gateway URL。
也請確認你的 CometAPI 帳戶可存取 Claude 模型,且該 API key 未被刪除或停用。
重新開啟 **Developer** → **Configure third-party inference**,並檢查 **Model list** 項目。model ID 必須與 CometAPI 提供的 ID 完全一致。
請將每個 model ID 分別新增為獨立項目。不要在 UI 欄位中包含引號、逗號或多餘空格。
Claude Desktop 的第三方推論在此流程中需要 Anthropic 相容的 gateway。請使用 `https://api.cometapi.com` 以及上方列出的 Claude 模型 ID。
Code 分頁在 Claude Desktop 中使用 Claude Code 引擎。某些桌面設定套用到 Code 工作階段的方式,可能與套用到 Cowork 的方式不同。
若要用於獨立終端機,請參閱 [Claude Code 整合指南](/zh-Hant/integrations/claude-code)。
若要檢查偵測到的設定,請開啟 **Help** → **Troubleshooting** → **Copy Managed Configuration Report**。複製出的報告會遮蔽秘密值。
## 疑難排解
請確認你已選取 **Help** → **Troubleshooting** → **Enable Developer Mode**。接著完全關閉 Claude Desktop,然後重新開啟。
如果找不到這個選項,請安裝包含第三方推論設定的 Claude Desktop 版本。
請檢查以下項目:
* **Inference provider** 已設為 **Gateway**。
* **Gateway base URL** 為 `https://api.cometapi.com`。
* **Gateway API key** 包含你的 CometAPI API key,且沒有多餘空格。
* 你已點擊 **Apply locally**,並且已完整重新啟動 Claude Desktop。
請確認 base URL 是以 `https://` 開頭。Claude Desktop 不接受純 HTTP 的 gateway URL。
也請確認你的 CometAPI 帳戶可存取 Claude 模型,且該 API key 未被刪除或停用。
重新開啟 **Developer** → **Configure third-party inference**,並檢查 **Model list** 項目。model ID 必須與 CometAPI 提供的 ID 完全一致。
請將每個 model ID 分別新增為獨立項目。不要在 UI 欄位中包含引號、逗號或多餘空格。
Claude Desktop 的第三方推論在此流程中需要 Anthropic 相容的 gateway。請使用 `https://api.cometapi.com` 以及上方列出的 Claude 模型 ID。
Code 分頁在 Claude Desktop 中使用 Claude Code 引擎。某些桌面設定套用到 Code 工作階段的方式,可能與套用到 Cowork 的方式不同。
若要用於獨立終端機,請參閱 [Claude Code 整合指南](/zh-Hant/integrations/claude-code)。