> ## Documentation Index
> Fetch the complete documentation index at: https://apidoc.cometapi.com/llms.txt
> Use this file to discover all available pages before exploring further.

# 使用 Continue 搭配 CometAPI

> 使用本指南設定 Continue 與 CometAPI 的整合，方法是設定 API key，以及 model 或 provider 選項。

[Continue](https://continue.dev) 是一個開源的 VS Code 擴充套件，提供 AI 驅動的程式編碼輔助。它內建第一方 CometAPI provider，無需手動設定 URL。

## 先決條件

* 已在 VS Code 中安裝 [Continue](https://marketplace.visualstudio.com/items?itemName=Continue.continue)
* 擁有一個啟用中 API key 的 [CometAPI](https://www.cometapi.com) 帳戶

## 設定

<Steps>
  <Step title="在 VS Code 中安裝 Continue">
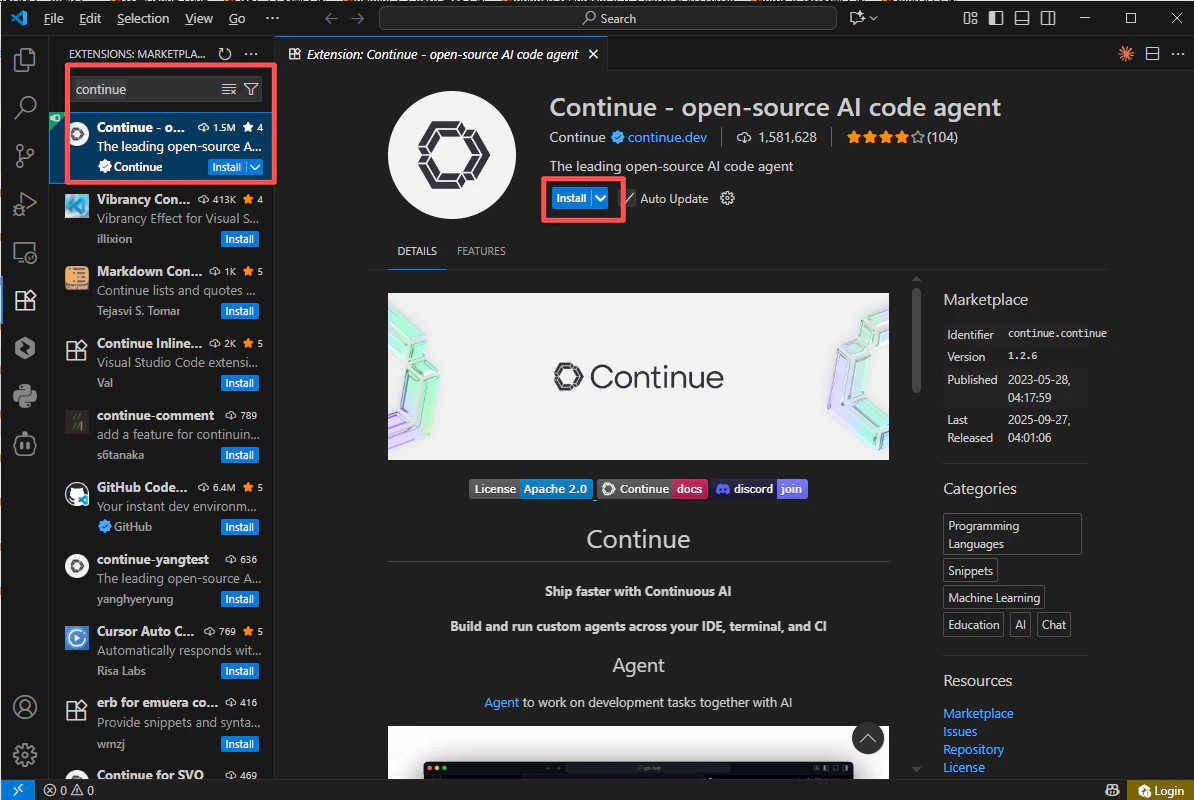
    在 VS Code 的 Extensions 面板中搜尋 **Continue** 並安裝。
    <Frame>
      <img src="https://mintcdn.com/cometapi/SZhlxZhCnMLn__BW/images/integrations/810968_362621.png?fit=max&auto=format&n=SZhlxZhCnMLn__BW&q=85&s=6e94ab329f18d8e02387dc6fe8c798e3" alt="顯示 Continue 擴充功能的 VS Code Extensions 面板" width="1194" height="800" data-path="images/integrations/810968_362621.png" />
    </Frame>
  </Step>

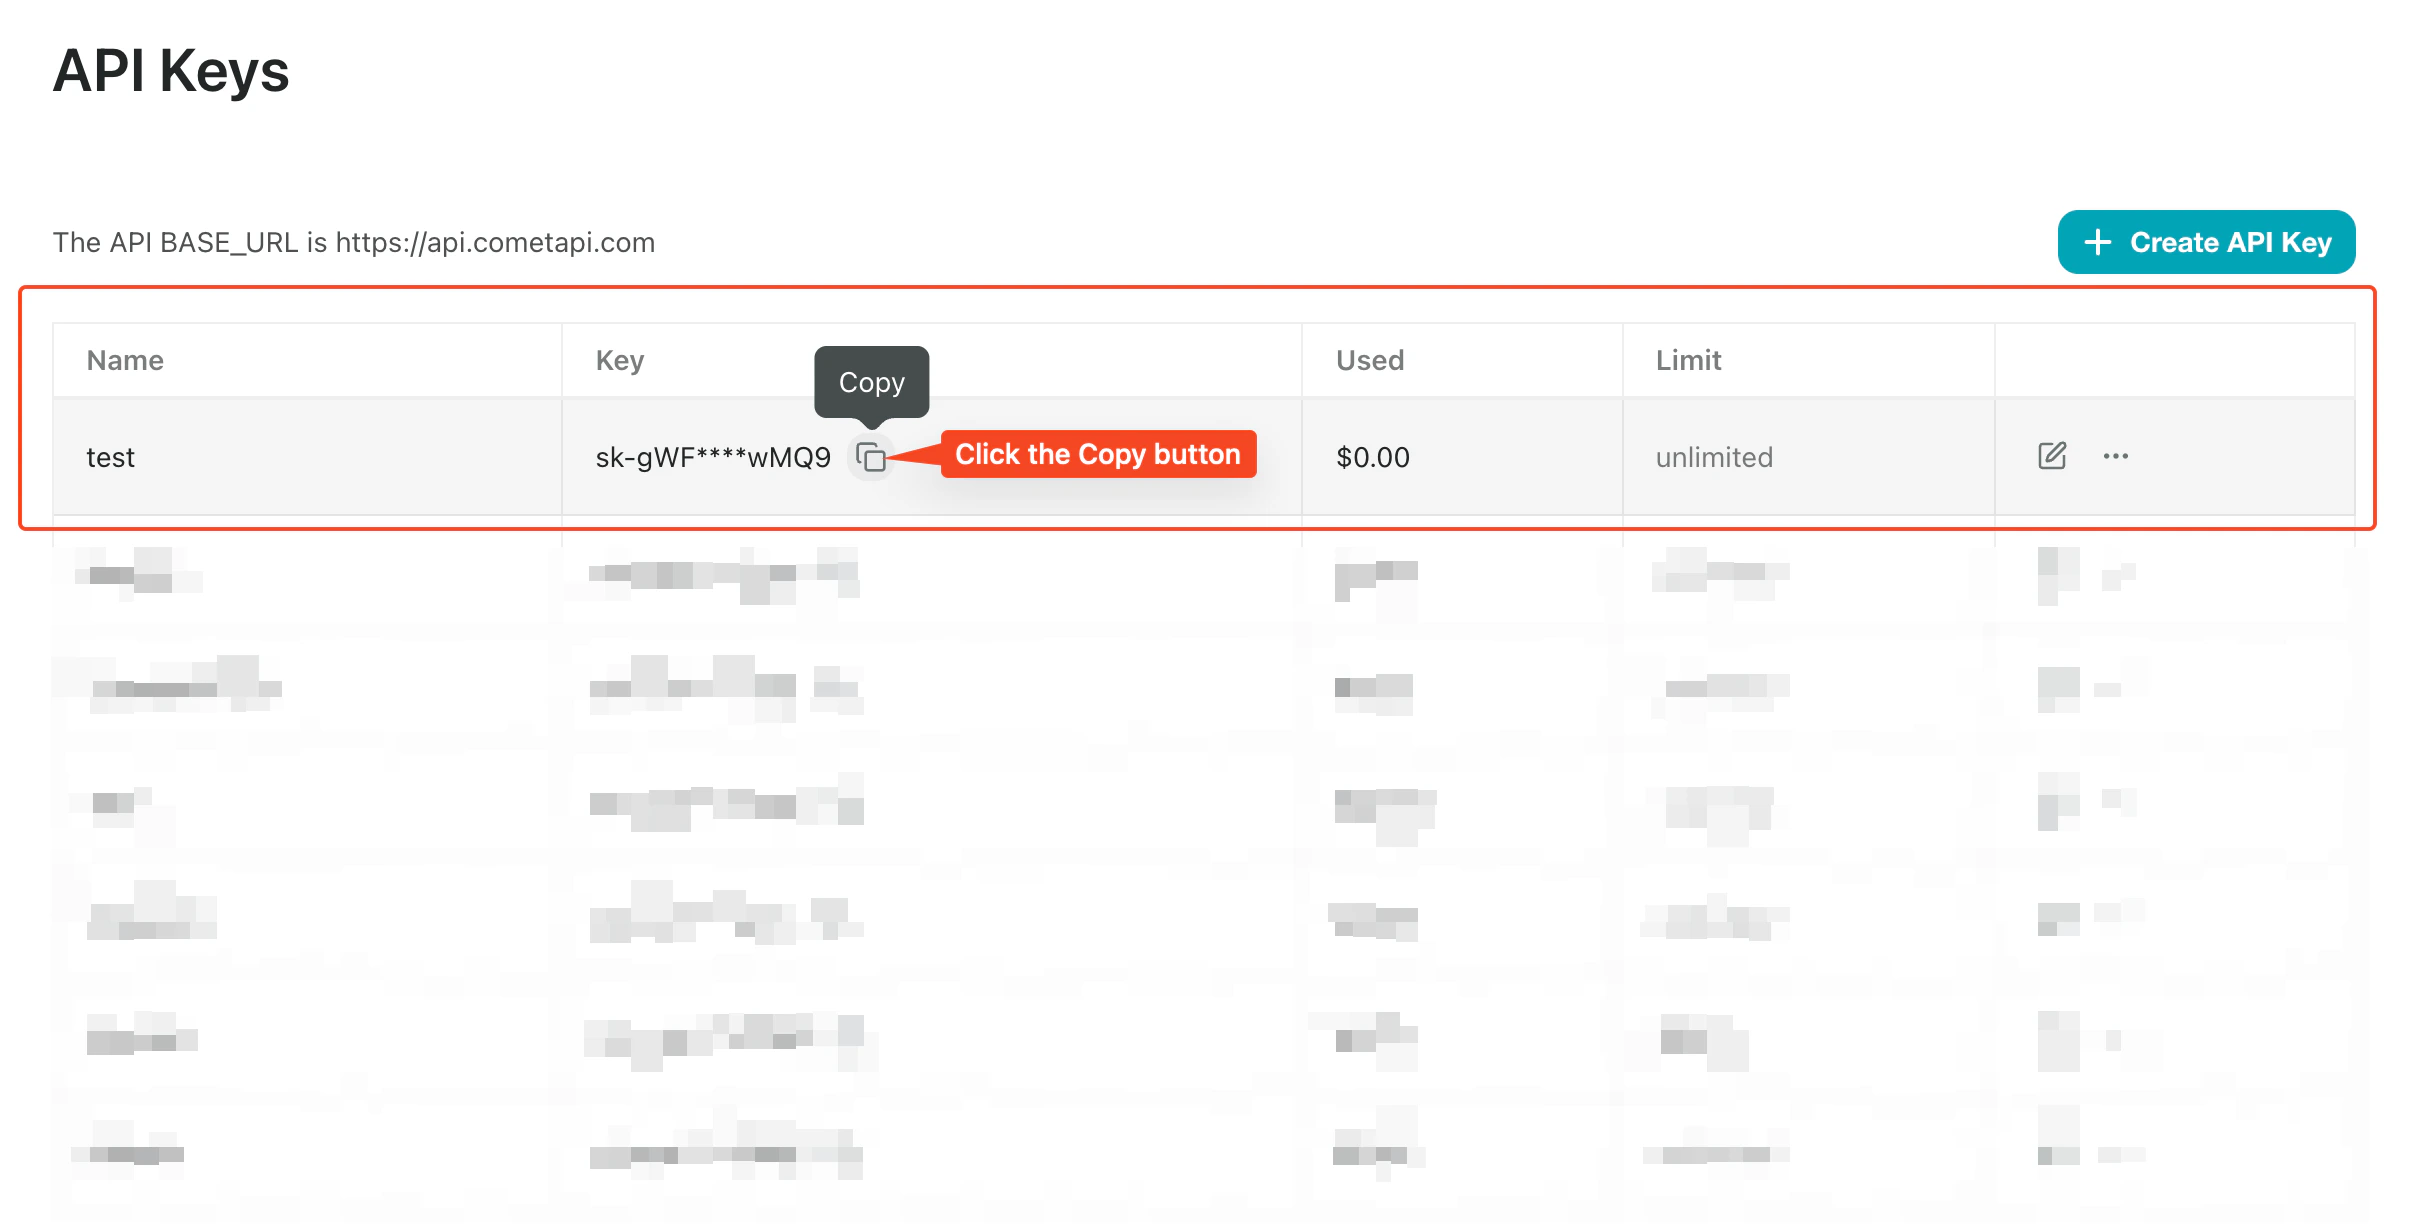
  <Step title="取得你的 CometAPI API key">
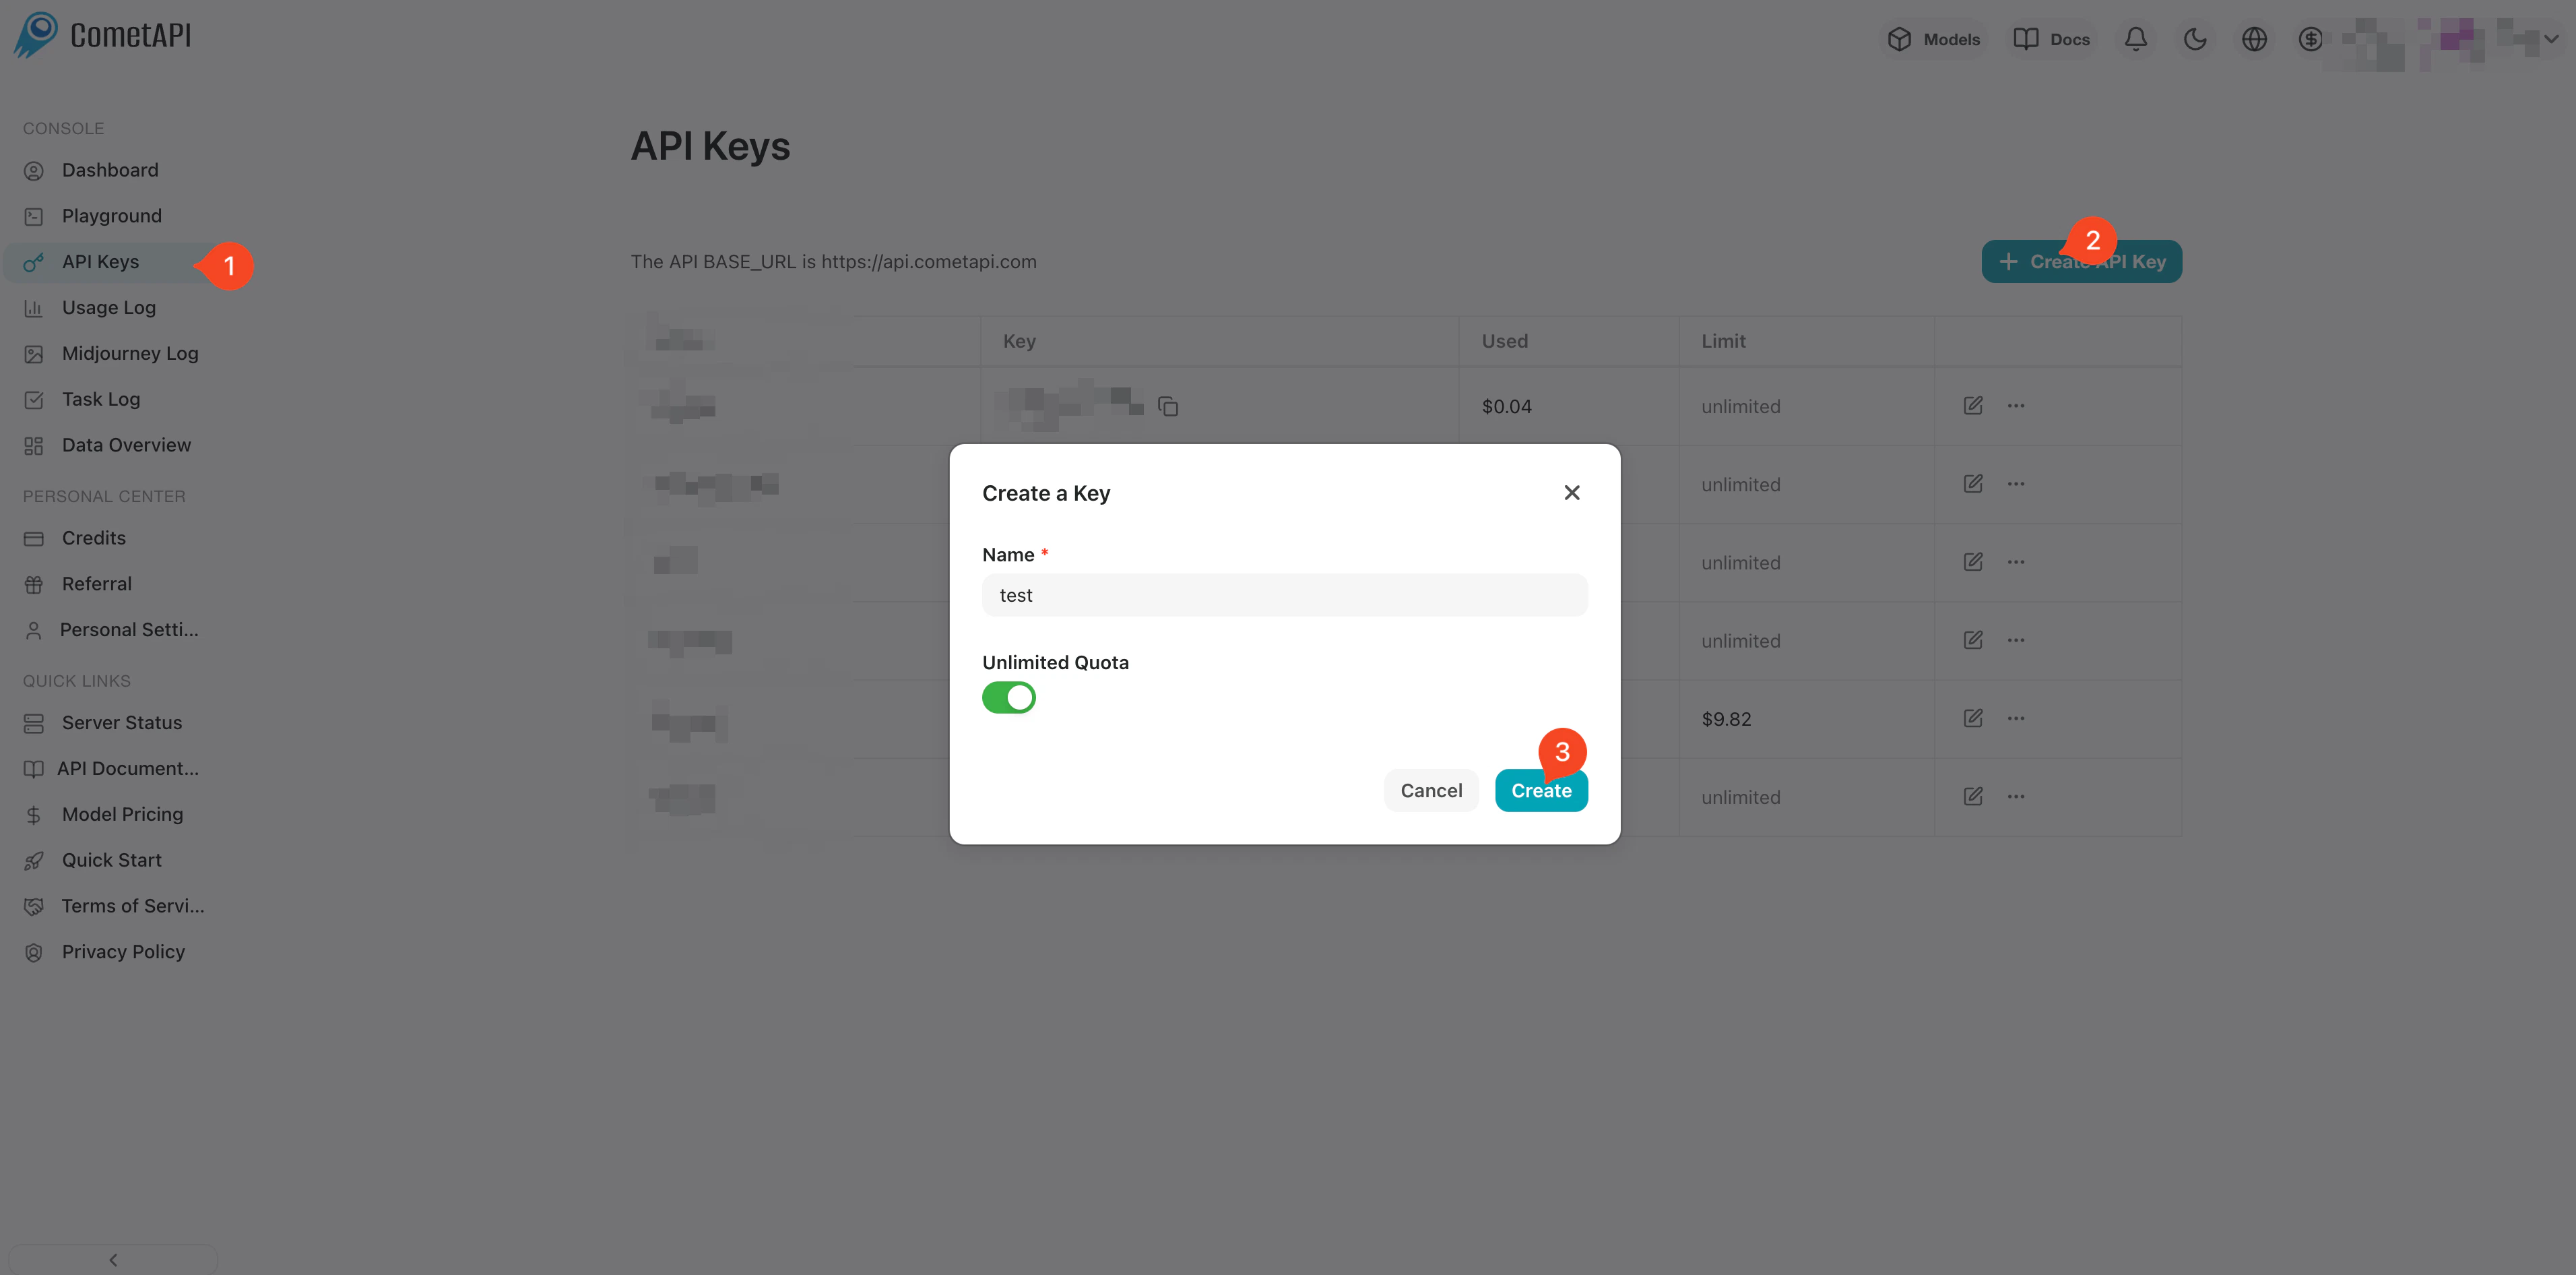
    登入 [CometAPI 控制台](https://www.cometapi.com/console)。點擊 **Add API Key** 並複製你的 key。
    <Frame>
      <img src="https://mintcdn.com/cometapi/SZhlxZhCnMLn__BW/images/overview/810968_364191.png?fit=max&auto=format&n=SZhlxZhCnMLn__BW&q=85&s=aef81a83f29f8eb16655ed4060425f50" alt="CometAPI 控制台 — Add API Key" width="3824" height="1892" data-path="images/overview/810968_364191.png" />
    </Frame>

    <Frame>
      <img src="https://mintcdn.com/cometapi/HhtmQffktazbxUvS/images/overview/810968_364193.png?fit=max&auto=format&n=HhtmQffktazbxUvS&q=85&s=d893f659267150d0faf45f99eb5dffc1" alt="CometAPI API key 與 base URL" width="2434" height="1232" data-path="images/overview/810968_364193.png" />
    </Frame>
  </Step>

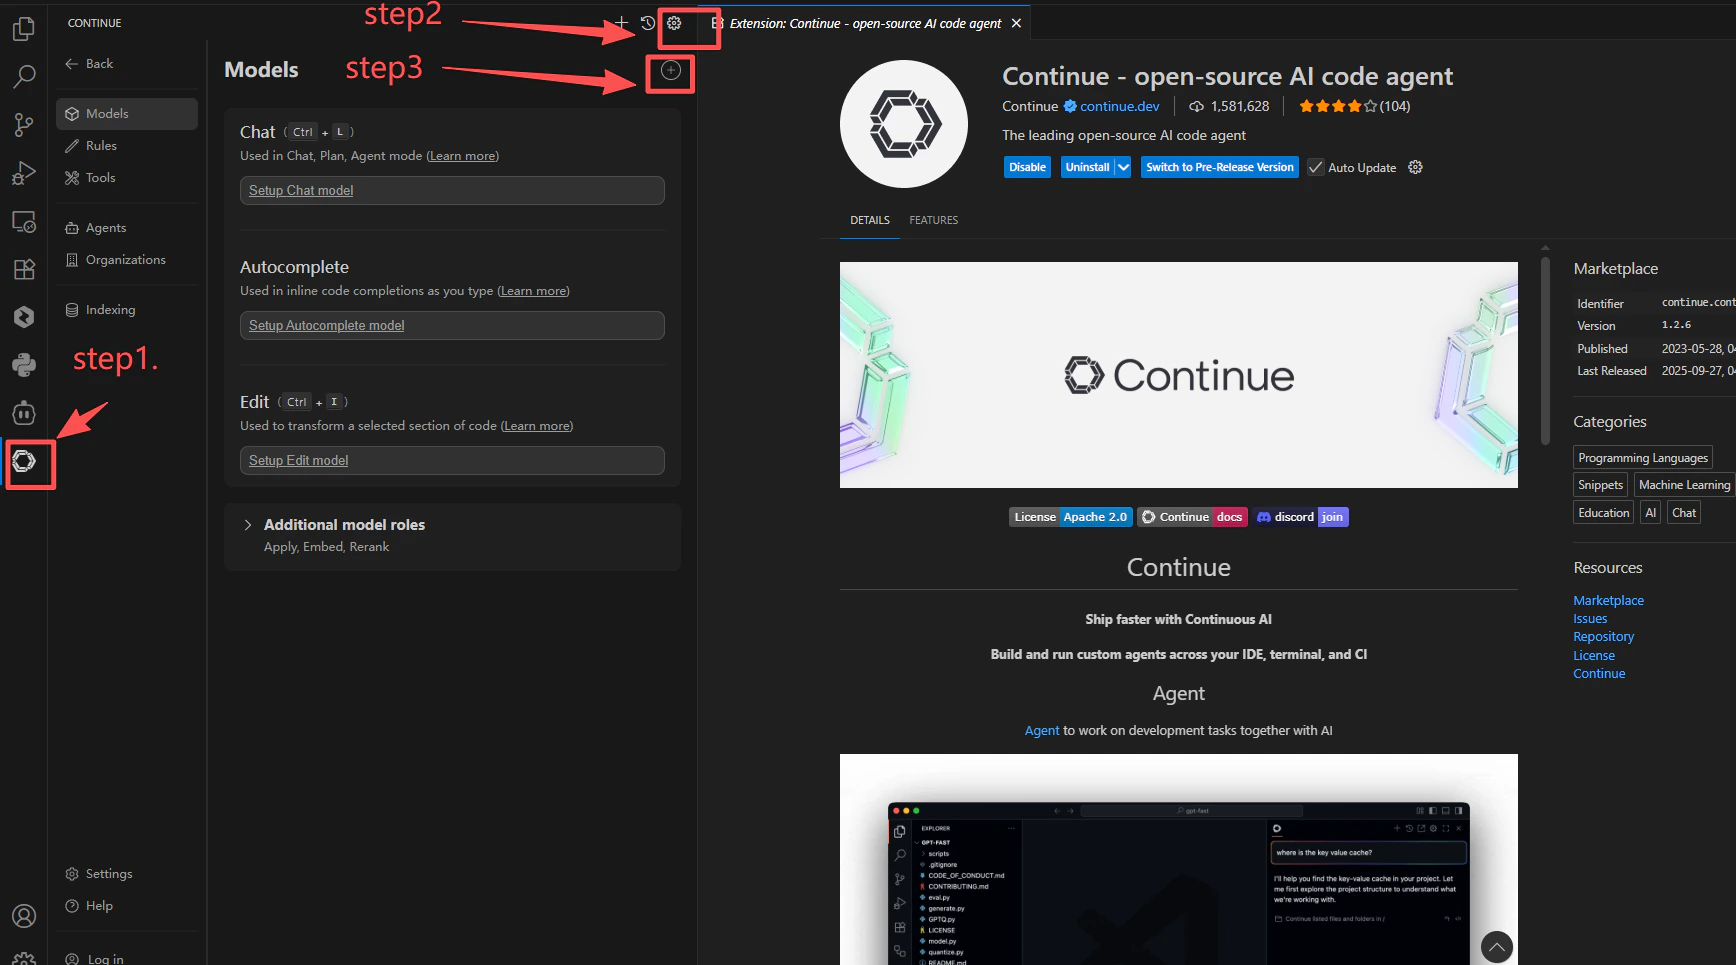
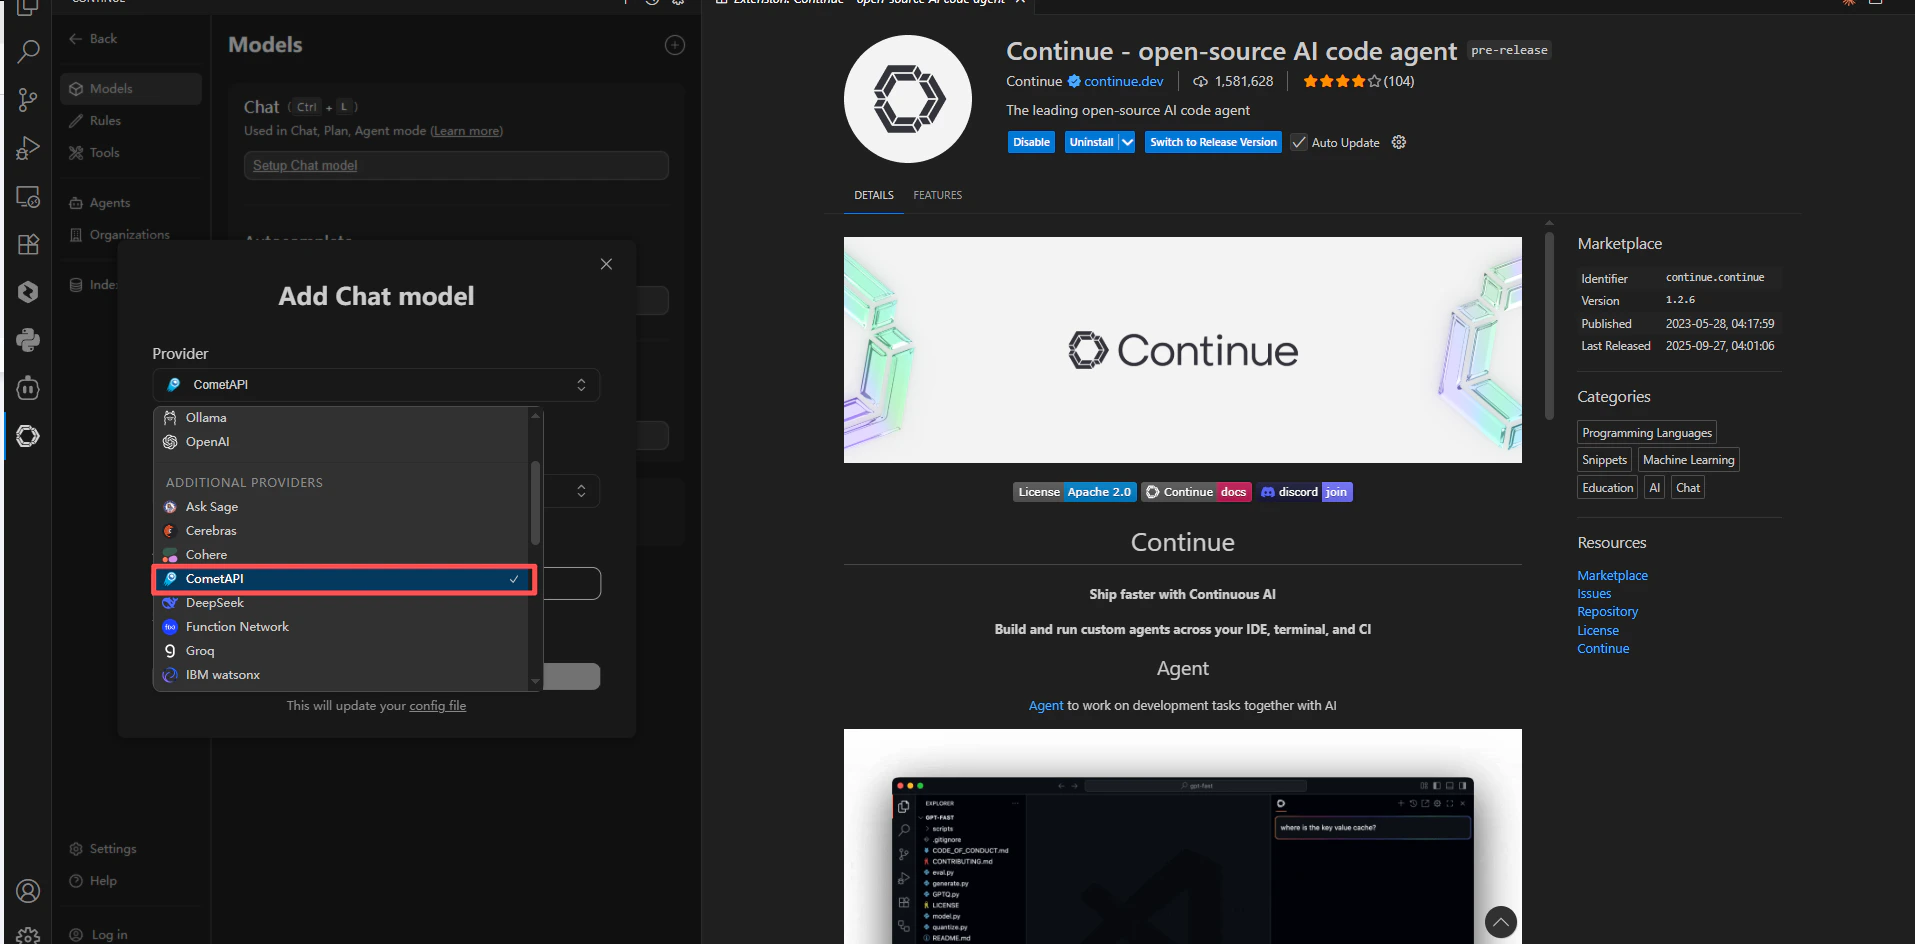
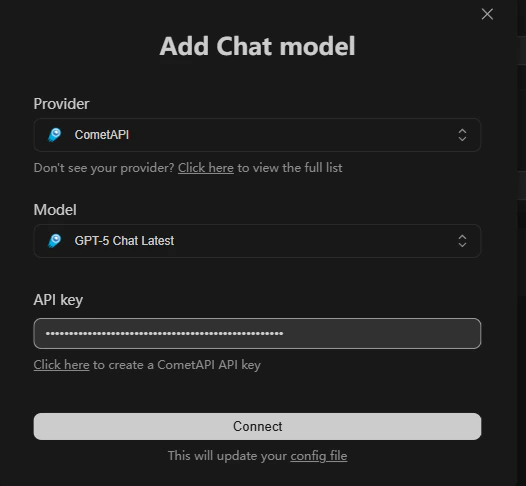
  <Step title="將 CometAPI 新增為 provider">
    開啟 Continue 的 **Settings** → **Models** → **+**。在 provider 清單中搜尋 `cometapi` 並選取它。貼上你的 API key，然後選擇你要使用的模型。

    <Frame>
      <img src="https://mintcdn.com/cometapi/SZhlxZhCnMLn__BW/images/integrations/810968_362622.png?fit=max&auto=format&n=SZhlxZhCnMLn__BW&q=85&s=7d9ad8d97240036f8eabad68ac872f7e" alt="Continue 設定畫面 — provider 搜尋並選取 cometapi" width="1736" height="965" data-path="images/integrations/810968_362622.png" />
    </Frame>

    <Frame>
      <img src="https://mintcdn.com/cometapi/SZhlxZhCnMLn__BW/images/integrations/810968_362623.png?fit=max&auto=format&n=SZhlxZhCnMLn__BW&q=85&s=53d3b5b690328196cbc0c7aeeb39ad9b" alt="Continue 中的 CometAPI provider 設定" width="1915" height="944" data-path="images/integrations/810968_362623.png" />
    </Frame>

    <Frame>
      <img src="https://mintcdn.com/cometapi/SZhlxZhCnMLn__BW/images/integrations/810968_362624.png?fit=max&auto=format&n=SZhlxZhCnMLn__BW&q=85&s=e9fee9dd542d42a4415f0a41827124e5" alt="Continue 中使用 CometAPI provider 的模型選擇" width="526" height="486" data-path="images/integrations/810968_362624.png" />
    </Frame>
  </Step>

  <Step title="測試連線">
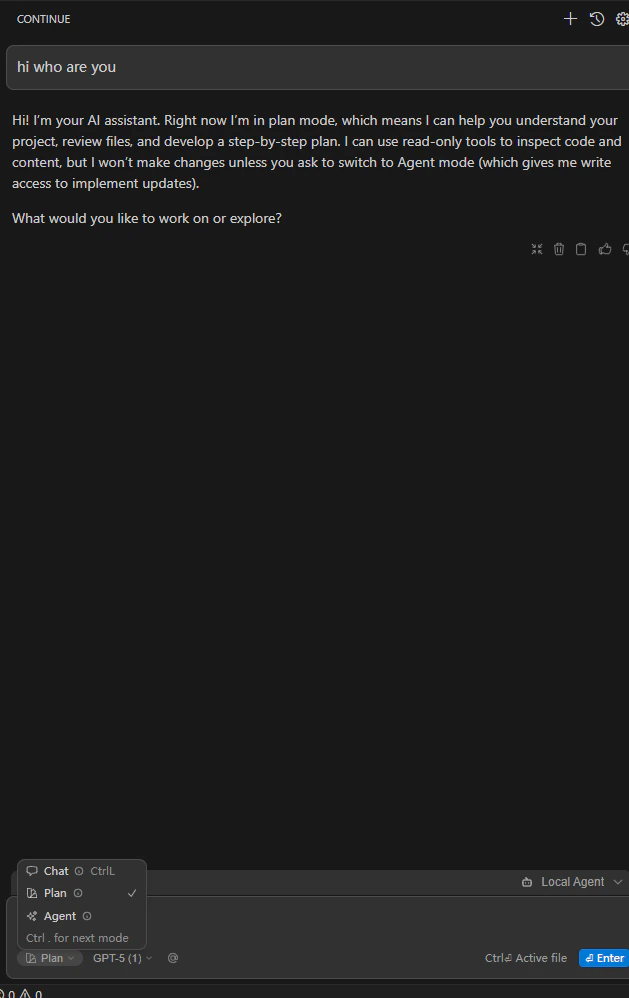
    開啟一個檔案，並透過 Continue 傳送測試 Prompt。若成功收到回應，即表示整合運作正常。

    <Frame>
      <img src="https://mintcdn.com/cometapi/SZhlxZhCnMLn__BW/images/integrations/810968_362626.png?fit=max&auto=format&n=SZhlxZhCnMLn__BW&q=85&s=765ce3c34f80b122bab7b763d970bd4f" alt="顯示來自 CometAPI 成功回應的 Continue 聊天畫面" width="629" height="998" data-path="images/integrations/810968_362626.png" />
    </Frame>
  </Step>
</Steps>

<Note>
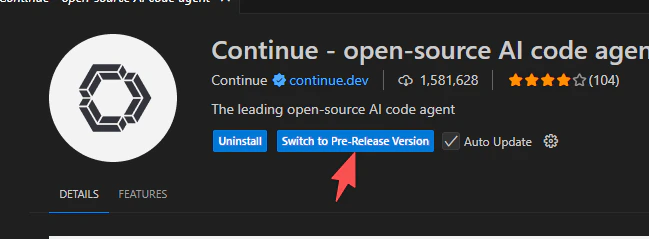
  如果 CometAPI 沒有出現在 provider 清單中，請將 Continue 切換到 **Preview** 版本，然後重新開啟擴充功能。

  <Frame>
    <img src="https://mintcdn.com/cometapi/SZhlxZhCnMLn__BW/images/integrations/810968_362627.png?fit=max&auto=format&n=SZhlxZhCnMLn__BW&q=85&s=54d4157b18c9134ec966daf66ec36e45" alt="顯示 Preview 版本切換開關的 Continue 擴充功能面板" width="649" height="239" data-path="images/integrations/810968_362627.png" />
  </Frame>
</Note>

<script type="application/ld+json">
  {`
    {
    "@context": "https://schema.org",
    "@graph": [
      {
        "@type": "HowTo",
        "@id": "https://apidoc.cometapi.com/integrations/continue#howto",
        "name": "搭配 CometAPI 使用 Continue",
        "description": "使用本指南，透過設定 base URL、API key，以及 model 或 provider 選項來設定 Continue 與 CometAPI。",
        "step": [
          {
            "@type": "HowToStep",
            "@id": "https://apidoc.cometapi.com/integrations/continue#step-1",
            "position": 1,
            "name": "在 VS Code 中安裝 Continue",
            "text": "完成「搭配 CometAPI 使用 Continue」指南中的「在 VS Code 中安裝 Continue」步驟。"
          },
          {
            "@type": "HowToStep",
            "@id": "https://apidoc.cometapi.com/integrations/continue#step-2",
            "position": 2,
            "name": "取得你的 CometAPI API key",
            "text": "建立或開啟你的 CometAPI 帳戶，然後從控制台複製一組有效的 API key。"
          },
          {
            "@type": "HowToStep",
            "@id": "https://apidoc.cometapi.com/integrations/continue#step-3",
            "position": 3,
            "name": "將 CometAPI 新增為 provider",
            "text": "完成「搭配 CometAPI 使用 Continue」指南中的「將 CometAPI 新增為 provider」步驟。"
          },
          {
            "@type": "HowToStep",
            "@id": "https://apidoc.cometapi.com/integrations/continue#step-4",
            "position": 4,
            "name": "測試連線",
            "text": "從 CometAPI Models 頁面選取目前的 model ID，然後從整合中傳送測試請求。"
          }
        ]
      },
      {
        "@type": "BreadcrumbList",
        "itemListElement": [
          {
            "@type": "ListItem",
            "position": 1,
            "name": "CometAPI 文件",
            "item": "https://apidoc.cometapi.com/"
          },
          {
            "@type": "ListItem",
            "position": 2,
            "name": "整合",
            "item": "https://apidoc.cometapi.com/integrations"
          },
          {
            "@type": "ListItem",
            "position": 3,
            "name": "搭配 CometAPI 使用 Continue",
            "item": "https://apidoc.cometapi.com/integrations/continue"
          }
        ]
      }
    ]
    }
    `}
</script>