This guide demonstrates how to use Gemini image models via CometAPI using the Google Gen AI SDK. It covers:
  • Text-to-image generation
  • Image-to-image editing
  • Multi-image composition
  • Saving generated images
  • Base URL: https://api.cometapi.com
  • Install the SDK: pip install google-genai (Python) or npm install @google/genai (Node.js)

Setup

Initialize the client with CometAPI’s base URL:
from google import genai
from google.genai import types
import os

COMETAPI_KEY = os.environ.get("COMETAPI_KEY") or "<YOUR_COMETAPI_KEY>"

client = genai.Client(
    http_options={"api_version": "v1beta", "base_url": "https://api.cometapi.com"},
    api_key=COMETAPI_KEY,
)

Text-to-Image Generation

Generate an image from a text prompt and save it to a file.
from google import genai
from google.genai import types
from PIL import Image
import os

client = genai.Client(
    http_options={"api_version": "v1beta", "base_url": "https://api.cometapi.com"},
    api_key=os.environ.get("COMETAPI_KEY"),
)

response = client.models.generate_content(
    model="gemini-3.1-flash-image-preview",
    contents="Create a picture of a nano banana dish in a fancy restaurant with a Gemini theme",
    config=types.GenerateContentConfig(
        response_modalities=["TEXT", "IMAGE"],
    ),
)

for part in response.parts:
    if part.text is not None:
        print(part.text)
    elif part.inline_data is not None:
        image = part.as_image()
        image.save("generated_image.png")
        print("Image saved to generated_image.png")
Response Structure: The image data is in candidates[0].content.parts, which can contain text and/or image parts:
{
  "candidates": [{
    "content": {
      "parts": [
        { "text": "Here is your image..." },
        {
          "inlineData": {
            "mimeType": "image/png",
            "data": "<base64-encoded-image>"
          }
        }
      ]
    }
  }]
}

Image-to-Image Generation

Upload an input image and transform it with a text prompt.
from google import genai
from google.genai import types
from PIL import Image
import os

client = genai.Client(
    http_options={"api_version": "v1beta", "base_url": "https://api.cometapi.com"},
    api_key=os.environ.get("COMETAPI_KEY"),
)

# Load the source image
source_image = Image.open("source.jpg")

response = client.models.generate_content(
    model="gemini-3.1-flash-image-preview",
    contents=["Transform this into a watercolor painting", source_image],
    config=types.GenerateContentConfig(
        response_modalities=["TEXT", "IMAGE"],
    ),
)

for part in response.parts:
    if part.text is not None:
        print(part.text)
    elif part.inline_data is not None:
        image = part.as_image()
        image.save("watercolor_output.png")
  • The Python SDK accepts PIL.Image objects directly — no manual Base64 encoding needed.
  • Do not include the data:image/jpeg;base64, prefix when passing raw Base64 strings.

Multi-Image Composition

Generate a new image from multiple input images. CometAPI supports two approaches:

Method 1: Single Collage Image

Combine multiple source images into one collage, then describe the desired output.
Input collage example
Generated output
from google import genai
from google.genai import types
from PIL import Image
import os

client = genai.Client(
    http_options={"api_version": "v1beta", "base_url": "https://api.cometapi.com"},
    api_key=os.environ.get("COMETAPI_KEY"),
)

collage = Image.open("collage.jpg")

response = client.models.generate_content(
    model="gemini-3.1-flash-image-preview",
    contents=[
        "A model is posing and leaning against a pink BMW with a green alien keychain attached to a pink handbag, a pink parrot on her shoulder, and a pug wearing a pink collar and gold headphones",
        collage,
    ],
    config=types.GenerateContentConfig(
        response_modalities=["TEXT", "IMAGE"],
    ),
)

for part in response.parts:
    if part.inline_data is not None:
        part.as_image().save("composition_output.png")

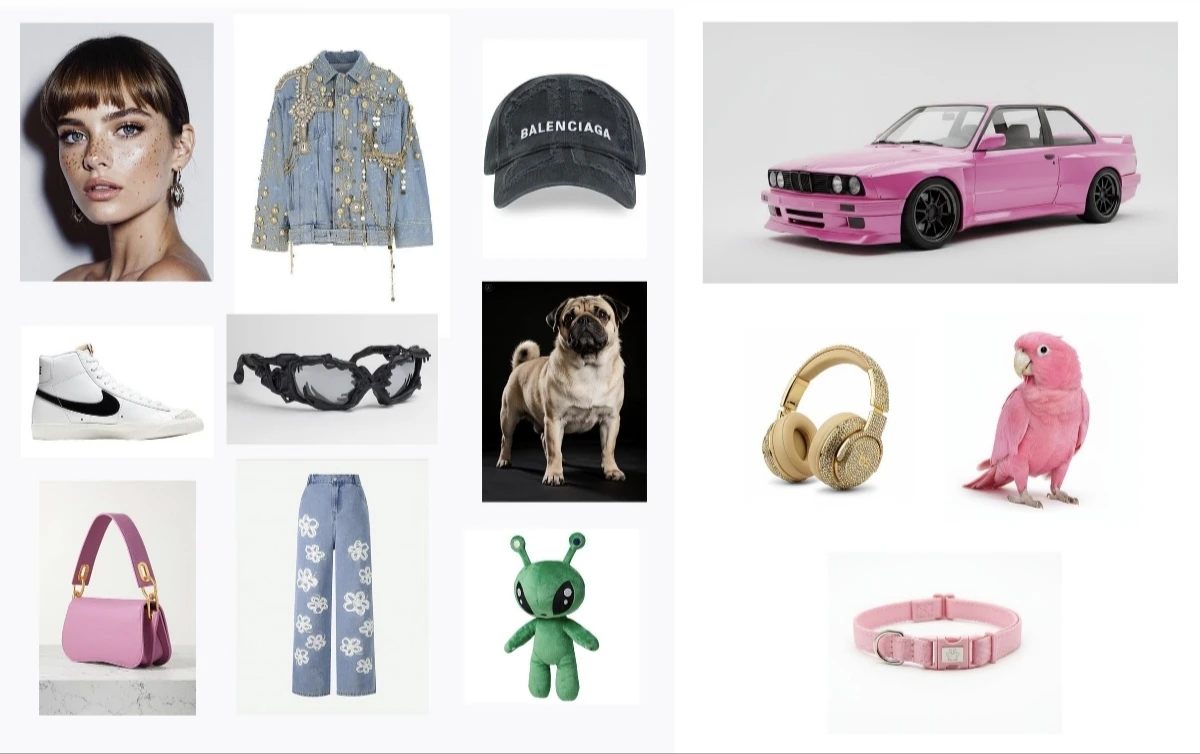
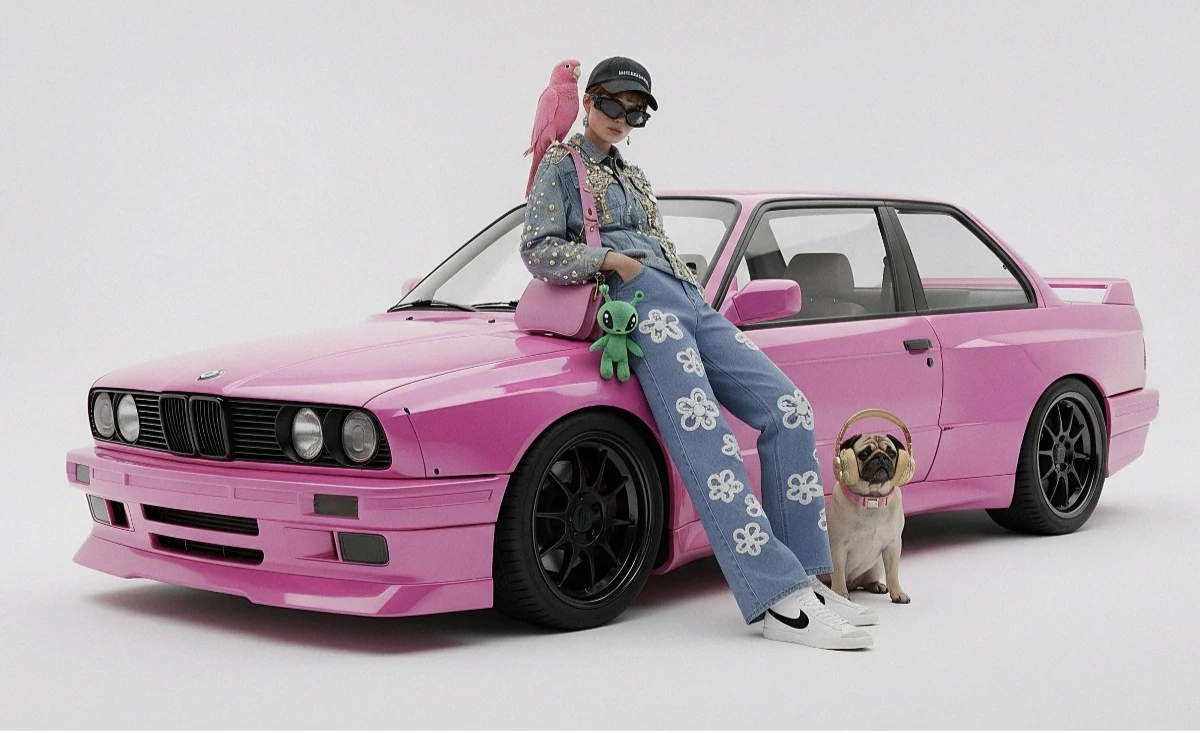
Method 2: Multiple Separate Images (Up to 14)

Pass multiple images directly. Gemini 3 models support up to 14 reference images (objects + characters):
from google import genai
from google.genai import types
from PIL import Image
import os

client = genai.Client(
    http_options={"api_version": "v1beta", "base_url": "https://api.cometapi.com"},
    api_key=os.environ.get("COMETAPI_KEY"),
)

image1 = Image.open("image1.jpg")
image2 = Image.open("image2.jpg")
image3 = Image.open("image3.jpg")

response = client.models.generate_content(
    model="gemini-3.1-flash-image-preview",
    contents=["Merge the three images", image1, image2, image3],
    config=types.GenerateContentConfig(
        response_modalities=["TEXT", "IMAGE"],
    ),
)

for part in response.parts:
    if part.inline_data is not None:
        part.as_image().save("merged_output.png")
Multi-image generation result

4K Image Generation

Specify image_config with aspect_ratio and image_size for high-resolution output:
from google import genai
from google.genai import types
import os

client = genai.Client(
    http_options={"api_version": "v1beta", "base_url": "https://api.cometapi.com"},
    api_key=os.environ.get("COMETAPI_KEY"),
)

response = client.models.generate_content(
    model="gemini-3.1-flash-image-preview",
    contents="Da Vinci style anatomical sketch of a Monarch butterfly on textured parchment",
    config=types.GenerateContentConfig(
        response_modalities=["TEXT", "IMAGE"],
        image_config=types.ImageConfig(
            aspect_ratio="1:1",
            image_size="4K",
        ),
    ),
)

for part in response.parts:
    if part.text is not None:
        print(part.text)
    elif image := part.as_image():
        image.save("butterfly_4k.png")

Multi-turn Image Editing (Chat)

Use the SDK’s chat feature to iteratively refine images:
from google import genai
from google.genai import types
import os

client = genai.Client(
    http_options={"api_version": "v1beta", "base_url": "https://api.cometapi.com"},
    api_key=os.environ.get("COMETAPI_KEY"),
)

chat = client.chats.create(
    model="gemini-3.1-flash-image-preview",
    config=types.GenerateContentConfig(
        response_modalities=["TEXT", "IMAGE"],
    ),
)

# First turn: generate
response = chat.send_message(
    "Create a vibrant infographic explaining photosynthesis as a recipe, styled like a colorful kids cookbook"
)

for part in response.parts:
    if part.text is not None:
        print(part.text)
    elif image := part.as_image():
        image.save("photosynthesis.png")

# Second turn: refine
response = chat.send_message("Update this infographic to be in Spanish. Do not change any other elements.")

for part in response.parts:
    if part.text is not None:
        print(part.text)
    elif image := part.as_image():
        image.save("photosynthesis_spanish.png")

Tips

Specify style keywords (e.g., “cyberpunk, film grain, low contrast”), aspect ratio, subject, background, lighting, and detail level.
When using raw HTTP, do not include data:image/png;base64, prefix — use only the raw Base64 string. The Python SDK handles this automatically with PIL.Image objects.
Set "responseModalities" to ["IMAGE"] only to guarantee image output without text.
For more details, see the API Reference. Official documentation: Gemini Image Generation