Chuyển đến nội dung chính
Hướng dẫn này minh họa cách sử dụng các model hình ảnh Gemini thông qua CometAPI bằng Google Gen AI SDK. Nội dung bao gồm:
  • Tạo ảnh từ văn bản
  • Chỉnh sửa ảnh từ ảnh đầu vào
  • Ghép nhiều hình ảnh
  • Lưu ảnh được tạo
  • Base URL: https://api.cometapi.com
  • Cài đặt SDK: pip install google-genai (Python) hoặc npm install @google/genai (Node.js)

Thiết lập

Khởi tạo client với base URL của CometAPI:
from google import genai
from google.genai import types
import os

COMETAPI_KEY = os.environ.get("COMETAPI_KEY") or "<YOUR_COMETAPI_KEY>"

client = genai.Client(
    http_options={"api_version": "v1beta", "base_url": "https://api.cometapi.com"},
    api_key=COMETAPI_KEY,
)

Tạo ảnh từ văn bản

Tạo một hình ảnh từ prompt văn bản và lưu vào tệp.
from google import genai
from google.genai import types
from PIL import Image
import os

client = genai.Client(
    http_options={"api_version": "v1beta", "base_url": "https://api.cometapi.com"},
    api_key=os.environ.get("COMETAPI_KEY"),
)

response = client.models.generate_content(
    model="gemini-3.1-flash-image-preview",
    contents="Create a picture of a nano banana dish in a fancy restaurant with a Gemini theme",
    config=types.GenerateContentConfig(
        response_modalities=["TEXT", "IMAGE"],
    ),
)

for part in response.parts:
    if part.text is not None:
        print(part.text)
    elif part.inline_data is not None:
        image = part.as_image()
        image.save("generated_image.png")
        print("Image saved to generated_image.png")
Cấu trúc phản hồi: Dữ liệu hình ảnh nằm trong candidates[0].content.parts, có thể chứa các phần văn bản và/hoặc hình ảnh:
{
  "candidates": [{
    "content": {
      "parts": [
        { "text": "Here is your image..." },
        {
          "inlineData": {
            "mimeType": "image/png",
            "data": "<base64-encoded-image>"
          }
        }
      ]
    }
  }]
}

Tạo ảnh từ ảnh

Tải lên một ảnh đầu vào và biến đổi nó bằng một Prompt văn bản.
from google import genai
from google.genai import types
from PIL import Image
import os

client = genai.Client(
    http_options={"api_version": "v1beta", "base_url": "https://api.cometapi.com"},
    api_key=os.environ.get("COMETAPI_KEY"),
)

# Load the source image
source_image = Image.open("source.jpg")

response = client.models.generate_content(
    model="gemini-3.1-flash-image-preview",
    contents=["Transform this into a watercolor painting", source_image],
    config=types.GenerateContentConfig(
        response_modalities=["TEXT", "IMAGE"],
    ),
)

for part in response.parts:
    if part.text is not None:
        print(part.text)
    elif part.inline_data is not None:
        image = part.as_image()
        image.save("watercolor_output.png")
  • SDK Python chấp nhận trực tiếp các đối tượng PIL.Image — không cần mã hóa Base64 thủ công.
  • Không thêm tiền tố data:image/jpeg;base64, khi truyền chuỗi Base64 thô.

Ghép nhiều ảnh

Tạo một hình ảnh mới từ nhiều hình ảnh đầu vào. CometAPI hỗ trợ hai cách tiếp cận:

Cách 1: Một ảnh ghép collage duy nhất

Kết hợp nhiều ảnh nguồn thành một ảnh collage, sau đó mô tả đầu ra mong muốn.
Ví dụ ảnh collage đầu vào
Đầu ra được tạo
from google import genai
from google.genai import types
from PIL import Image
import os

client = genai.Client(
    http_options={"api_version": "v1beta", "base_url": "https://api.cometapi.com"},
    api_key=os.environ.get("COMETAPI_KEY"),
)

collage = Image.open("collage.jpg")

response = client.models.generate_content(
    model="gemini-3.1-flash-image-preview",
    contents=[
        "A model is posing and leaning against a pink BMW with a green alien keychain attached to a pink handbag, a pink parrot on her shoulder, and a pug wearing a pink collar and gold headphones",
        collage,
    ],
    config=types.GenerateContentConfig(
        response_modalities=["TEXT", "IMAGE"],
    ),
)

for part in response.parts:
    if part.inline_data is not None:
        part.as_image().save("composition_output.png")

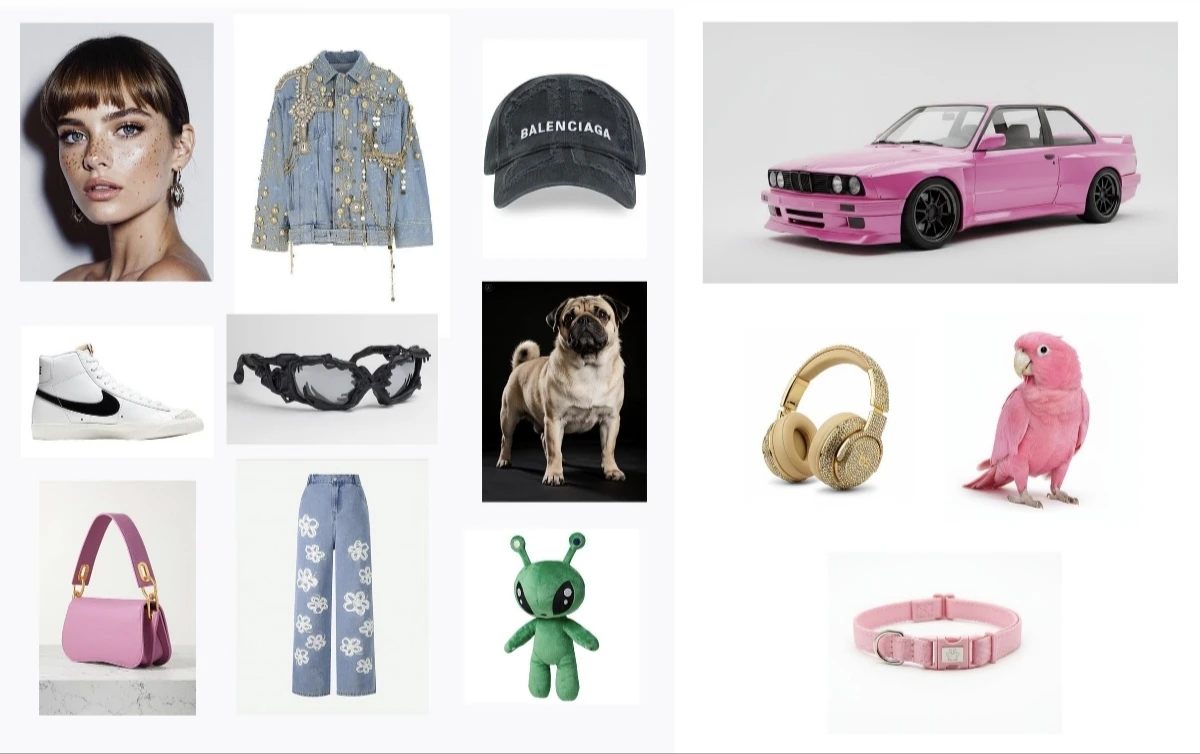
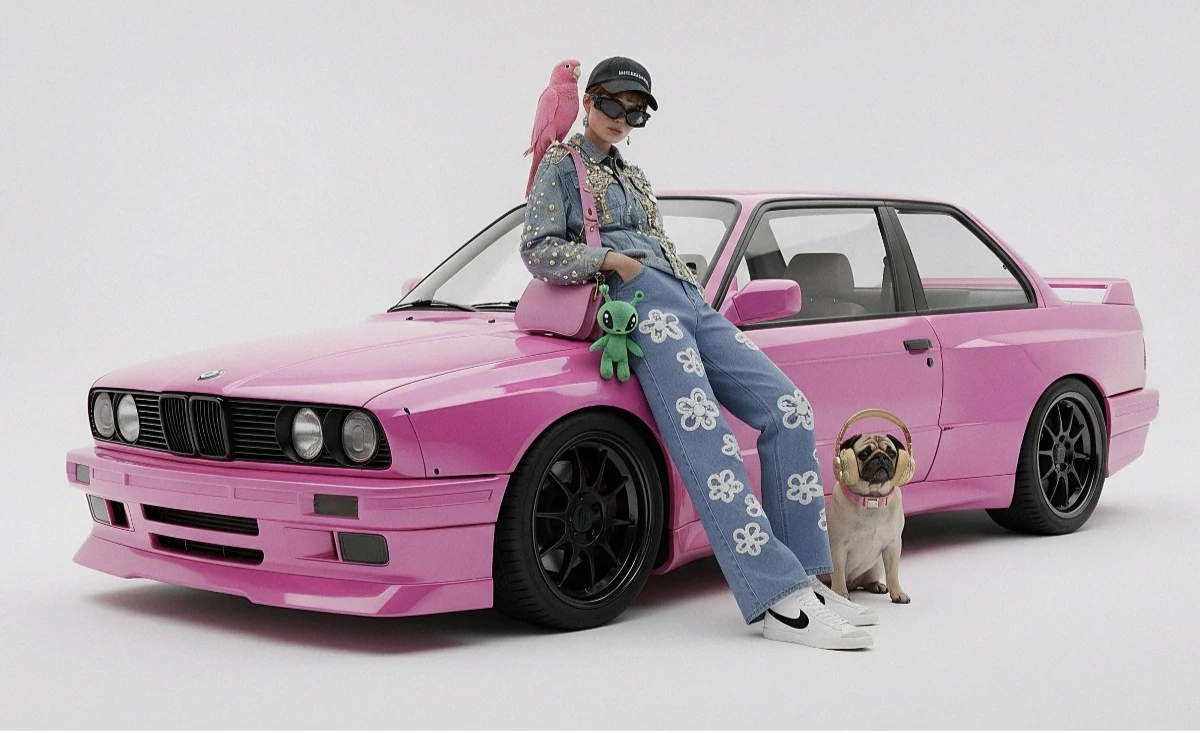
Cách 2: Nhiều ảnh riêng biệt (tối đa 14 ảnh)

Truyền trực tiếp nhiều ảnh. Các model Gemini 3 hỗ trợ tối đa 14 ảnh tham chiếu (đối tượng + nhân vật):
from google import genai
from google.genai import types
from PIL import Image
import os

client = genai.Client(
    http_options={"api_version": "v1beta", "base_url": "https://api.cometapi.com"},
    api_key=os.environ.get("COMETAPI_KEY"),
)

image1 = Image.open("image1.jpg")
image2 = Image.open("image2.jpg")
image3 = Image.open("image3.jpg")

response = client.models.generate_content(
    model="gemini-3.1-flash-image-preview",
    contents=["Merge the three images", image1, image2, image3],
    config=types.GenerateContentConfig(
        response_modalities=["TEXT", "IMAGE"],
    ),
)

for part in response.parts:
    if part.inline_data is not None:
        part.as_image().save("merged_output.png")
Kết quả tạo ảnh từ nhiều ảnh

Tạo ảnh 4K

Chỉ định image_config với aspect_ratioimage_size để xuất ra đầu ra độ phân giải cao:
from google import genai
from google.genai import types
import os

client = genai.Client(
    http_options={"api_version": "v1beta", "base_url": "https://api.cometapi.com"},
    api_key=os.environ.get("COMETAPI_KEY"),
)

response = client.models.generate_content(
    model="gemini-3.1-flash-image-preview",
    contents="Da Vinci style anatomical sketch of a Monarch butterfly on textured parchment",
    config=types.GenerateContentConfig(
        response_modalities=["TEXT", "IMAGE"],
        image_config=types.ImageConfig(
            aspect_ratio="1:1",
            image_size="4K",
        ),
    ),
)

for part in response.parts:
    if part.text is not None:
        print(part.text)
    elif image := part.as_image():
        image.save("butterfly_4k.png")

Chỉnh sửa ảnh nhiều lượt (Chat)

Sử dụng tính năng chat của SDK để tinh chỉnh ảnh theo từng bước lặp:
from google import genai
from google.genai import types
import os

client = genai.Client(
    http_options={"api_version": "v1beta", "base_url": "https://api.cometapi.com"},
    api_key=os.environ.get("COMETAPI_KEY"),
)

chat = client.chats.create(
    model="gemini-3.1-flash-image-preview",
    config=types.GenerateContentConfig(
        response_modalities=["TEXT", "IMAGE"],
    ),
)

# First turn: generate
response = chat.send_message(
    "Create a vibrant infographic explaining photosynthesis as a recipe, styled like a colorful kids cookbook"
)

for part in response.parts:
    if part.text is not None:
        print(part.text)
    elif image := part.as_image():
        image.save("photosynthesis.png")

# Second turn: refine
response = chat.send_message("Update this infographic to be in Spanish. Do not change any other elements.")

for part in response.parts:
    if part.text is not None:
        print(part.text)
    elif image := part.as_image():
        image.save("photosynthesis_spanish.png")

Mẹo

Chỉ định các từ khóa về phong cách (ví dụ: “cyberpunk, film grain, low contrast”), tỷ lệ khung hình, chủ thể, nền, ánh sáng và mức độ chi tiết.
Khi sử dụng HTTP thô, không bao gồm tiền tố data:image/png;base64, — chỉ dùng chuỗi Base64 thô. Python SDK tự động xử lý việc này với các đối tượng PIL.Image.
Đặt "responseModalities" thành chỉ ["IMAGE"] để đảm bảo đầu ra là ảnh mà không có văn bản.
Để biết thêm chi tiết, xem API Reference. Tài liệu chính thức: Gemini Image Generation